To avoid these ads, REGISTER NOW!

Ratchet handle repair

Speed-Racer

Well-known member
Joined
Aug 25, 2008
Messages
731
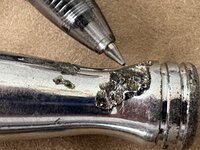
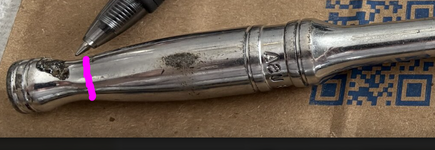
I want to fix the handle. It is sharp and needs to be filed down.

Has anyone filled a damaged ratchet? As found, but looks like someone contacted a battery terminal
Ideas I was considering before deciding to post a thread.
JB Weld, plastic dip, super glue with baking soda, silver solder, and convert to a hard handle. If hard handle convert, what is used to keep the handle in place. Other ideas?

Ratchet is from 1976 and other than the damage, the rest of the chrome is in great shape.
 

Attachments

  • ratchet pic damage.JPG
    ratchet pic damage.JPG
    465.4 KB · Views: 171
  • rathet zoom.jpg
    rathet zoom.jpg
    583.3 KB · Views: 164
To avoid these ads, REGISTER NOW!

seber

Well-known member
Joined
May 31, 2016
Messages
4,205
Location
Deep East Tx.
Hard handles are held with friction alone. Turning it down to the correct diameter would require a very good machinist. Unless you can do it yourself, it would cost more than a new ratchet. You can fill it with a steel filled epoxy like JB Weld and file it to the right contour if that is important to you, but it will be the wrong color. Silver solder runs like water when melted. Not to mention what the heat would do to the surrounding plating. So I think that would be an exercise in frustration. I don't know what tools you have available, but this is a perfect application for a bench grinder with soft wheel.
 

SwissMetric

Well-known member
Joined
Dec 28, 2024
Messages
186
Location
Switzerland
Hard handles are held with friction alone.
Do you mean it's not all a single forged part which includes the ratchet head?
If so I never saw or paid attention to such construction, the steel handles I'm used to are part of the body of the ractchet.
 

Nobody-named-Olli

Well-known member
Joined
Jan 9, 2025
Messages
1,639
Location
North Rhine-Westphalia; Germany
Do you mean it's not all a single forged part which includes the ratchet head?
If so I never saw or paid attention to such construction, the steel handles I'm used to are part of the body of the ractchet.


Hard handle examples: https://shop.snapon.com/search?q=Hard handle ratchet

It’s about putting one of these handles on that ratchet, to make up for the damaged all-steel handle. However, as it has been said, these can’t be fitted without machining the all-steel handle first.

Kind regards,
Olli
 
To avoid these ads, REGISTER NOW!

AEAdam

Well-known member
Joined
May 27, 2023
Messages
2,788
Location
SE PA
Its at the end of the handle so its not a structural problem. I think I'd fill it with JB Weld then abrasively shape it as close to the original shape as possible. Leave the jagged finish to help the epoxy bite into the steel. (don't smooth it first). If you play yoru cars right, you won't have to abrade the metal at all. Looks like that's all valleys, no mountains.

Then I agree with heat shrink. I think Hockey tape would peel and get sticky etc. You can do just that one little section or the whole handle area. You can also do multiple layers of heat shrink.
 

no704

Well-known member
Joined
Apr 27, 2016
Messages
5,229
Grind smooth, scuff handle up., plastic dip several coats. If you have anything else to dip have it ready too. Pre clean with acetone. Once you pop the plastic dip can you have about 48 hours to use it.
 

Paco Pena

Well-known member
Joined
Jul 20, 2010
Messages
2,444
Location
Vancouver Canada
Another vote for JB Weld. I used JB Weld to fill in a missing wooden insert in an old Ruko pocket knife. After sanding it down it turned out so nice that I did the same to the other side.

Paco
 
OP
S

Speed-Racer

Well-known member
Joined
Aug 25, 2008
Messages
731
Favoring a hard handle conversion using tight hole and not machining the metal ratchet down.
Snap-On used tough steel and I do not own a lathe. Want to make this easy with my drill press, to opening up the plastic handle and press the ratchet on the handle.
Easy path, but not sure what glue or expoxy to use.
 

seber

Well-known member
Joined
May 31, 2016
Messages
4,205
Location
Deep East Tx.
If you want to glue it, roughing the surface will be almost required. Any epoxy will do but epoxy strength is affected by cure time. The longer the cure, the stronger the bond. I try to use 24 hour epoxy for everything.
 

98ssuck

Well-known member
Joined
Oct 21, 2012
Messages
349
Location
British columbia
I had this Williams turned down on a lathe. Took the machinist all of 4 minutes. Epoxied on the handle from a broken screwdriver. Not the prettiest. But fancier than what you’ve got there. You could get creative and find a period correct cushion grip.IMG_8572.jpeg
 

Ohio Andy

Well-known member
Joined
Jul 31, 2024
Messages
2,343
Location
Columbus, Ohio
I had this Williams turned down on a lathe. Took the machinist all of 4 minutes. Epoxied on the handle from a broken screwdriver. Not the prettiest. But fancier than what you’ve got there. You could get creative and find a period correct cushion grip.IMG_8572.jpeg
How do you like your Williams ratchet?

I own two pearhead and two round heads (1/4 and 3/8). Very high backdrag, not easy to change direction.
 

mike93lx

ALLIANCE MEMBER
Joined
Dec 9, 2013
Messages
37,855
Location
Richmond, VA
I'd hit that with whatever grit is on my M12 right angle grinder and keep using it.

If you want to do a handle conversion, getting the surface roughed up with a grinder should give an epoxy plenty to bite on.
 

98ssuck

Well-known member
Joined
Oct 21, 2012
Messages
349
Location
British columbia
How do you like your Williams ratchet?

I own two pearhead and two round heads (1/4 and 3/8). Very high backdrag, not easy to change direction.
I have the luxury of being fussy. As work has supplied me with 1/4” and 3/8” ratchets of my choice on a whim. I have the standard version in 1/4” and 3/8” and the custom hard handle 1/4” flex. I haven’t noticed the selector being difficult. I have generally moved from the Williams ratchets to the proto premium pear head ratchets. Because of the smaller dimensions and higher tooth count. I carry a 1/4” socket set in a small pelican case in my tool bag at work. I moved from the proto premium pearl head to a Snap-On locking flex. I don’t see changing from that one.
 

SwissMetric

Well-known member
Joined
Dec 28, 2024
Messages
186
Location
Switzerland
It’s about putting one of these handles on that ratchet, to make up for the damaged all-steel handle. However, as it has been said, these can’t be fitted without machining the all-steel handle first.
I thought it was meant that the rear part of the handle was a separate metal part.

Pic below:
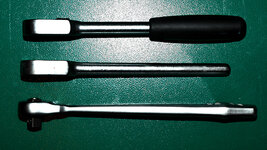
Below the customized Stahlwille 512 (1/2") where the rotating part (pinion) with 1/2" male square drive has been replaced by a female 1/2" square drive pinion is a forged body of the current 512 (1/2") where rotating part (pinion) and other pieces including the 2-component plastic handle have been removed.
The remainig round steel handle is more compact than the "SG" (Stahlgriff, Steel Grip) full metal handle and there is no sharp part, nice to use where space is limited.
Both the current and the two previous 2-component handles (always bi-color green and black) can be fitted and are fully interchangeable.
To remove the grip one can use a Dremel very carefully to not reach the metal and pry the slot open. The slightly warmed up handle is just pushed in place but its "rotational" position must be adjusted carefully before pushing the handle as it can no longer be rotated afterward and it's impossible to remove the handle without destroying it.
As the handle is slightly flattened it must be oriented very carefully, if not, the ratchet may no longer fit into the box. I once did that mistake and had to replace the new handle. :)

Those Stahlwille handles can be used with any cylindrical part of the right diameter (I'd have to measure it, it does not vary along the grip).
The inner part of the handle is made of hard plastic. Best is to carefully use a hydraulic press with two rubber pads to not damage the end of the handle nor the end of the ratchet head.
 

Attachments

  • Stahlwille0081.jpg
    Stahlwille0081.jpg
    294 KB · Views: 24
To avoid these ads, REGISTER NOW!
Top Bottom