To avoid these ads, REGISTER NOW!

What did you do "IN" your garage today?

Bob Heine

ALLIANCE MEMBER
Joined
Oct 24, 2009
Messages
10,709
Location
Boca Raton, Florida
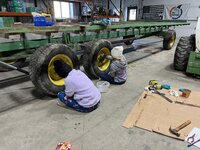
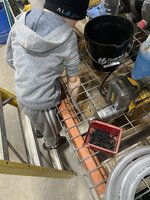
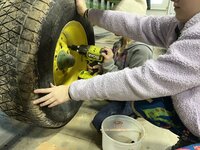
These girls are naturals. Pointed them at it and grabbed myself a beer. Gave a few pointers along the way but they each did 95% of their own work. Took nearly an hour to get these two wheel bearings checked and back together but they had a good time.
IMG_3093.jpeg

They struggled getting the tires off alone and worked together to keep Alyssa’s from falling on her. I failed as a picture taker for the rest of the process as I was busy trying to both keep my mouth shut and let them do things and try and to keep them from getting covered in grease. It can be washed off but girl hair with grease in it is apparently “so hard to wash out Dad” so I kept watch for them lol.
IMG_3091.jpeg
Mike, you are right to be proud of your little people. The mechanical abilities and teamwork they are learning are priceless. My son grew up with very little interest in learning to do maintenance and repair with me but it must have rubbed off somehow. Some of his seven children, including three of the boys and the youngest girl learned mechanical skills along the way and others did not.

Last week I witnessed my 32-year-old grandson do the best Laurel & Hardy routine I've seen in decades. If I didn't have security cameras, it would have been lost to the ether. My security system does not use a cloud so the video will be private. I did clip a few screenshots and will share those on my thread (he's a wonderful man but not a GJ kinda guy).
 
To avoid these ads, REGISTER NOW!

Dixie_Flatline

Well-known member
Joined
Oct 30, 2024
Messages
387
Location
Tennessee
Kay, there might be a flu going around. The Epson ink tank printer started spitting gobbledygook messages and one-liners. PC was playing a symphony of CBS and NBC ringtones coming from who knows where. The Brother PT-D600 refused to print labels so I suspected something other than the actual printers was FUBAR. Ran some diagnostics that did something with the print spooler software. I waved a boneless, skinless chicken breast over and blew some smoke in the PC and it all seems to be working again. I feel like John Snow from Game of Thrones: "You know nothing, John Snow Bob Heine!!!"

But you did not perform the rites of percussive maintenance. The machine spirit may not be appeased so easily in the future!
 

racecougar

Well-known member
Joined
Jan 26, 2021
Messages
5,189
Location
Missouri

LeonardY

Well-known member
Joined
Apr 16, 2011
Messages
5,107
Location
Southern California
Fixed the swivel on my Star Trek chair. It got really gummy and wouldn't turn. It's supposed to automatically return to center. Built this over ten years ago for fun. And because I'm a nerd.

When I got them from Craigslist, the seller asked if I was into Mid Century Modern. Then said her boyfriend wanted to turn them into Star Trek chairs. I gave her a look of you can't be serious. I sent her pictures of when we were done.

One thing about these chairs. The swivel mechanism wears through the casting and in some cases cracks the casting. We scanned the interior of the casting and the chair. Modeled a plug and printed it on SLS machine from nylon. The plug supports the casting to the bottom of the seat.
1739828036168.png The grease had turned gummy and had to be cleaned out.
1739828103083.png
1739828162548.png
1739828206961.png
Works like it was brand new.
 

David Paul

Well-known member
Joined
Jul 11, 2014
Messages
684
Location
Western New Jersey
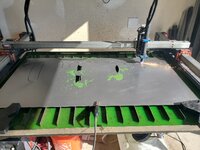
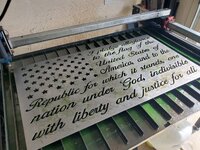
Hung up the new hand cleaner pump. Moved the paper towel rack. Finished some decorations. Stuffed boxes with orders for shipping. Faffed about with Lightburn. Burned rubber to make a stamp. Hung up my saturated plowing suit. Cleaned my hands with Cherry Bomb. Washed brushes.

Thanks Kay, I’ve been looking for a decent hand cleaner pump. Order placed.
 

ed_

Well-known member
Joined
Nov 5, 2019
Messages
187
Location
Maine
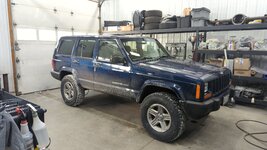
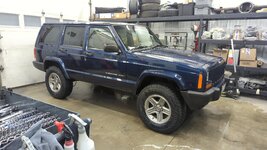
The XJ got some new tires and passed it's state inspection so it's fully road legal now. I went with 245/75/16s (~31s) to compliment the 2" lift.
IMG_20250217_160632_093.jpg

Don't worry I washed the salt off.
IMG_20250217_190003_776.jpg

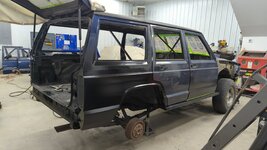
My other XJ is looking desperate for some attention though. It's in rough shape and I want to get back on it but the unibody shifted at some point due to not enough bracing while I was replacing the inner / outer rocker.

IMG_20250217_190042_015.jpg

Note how the top left of the driver door is touching the pillar, and the gap between the rear door and rear window pillar isn't parallel.
IMG_20240527_174713_207.jpg

I'm thinking my best bet is to buy a tram gauge and fully assess what went out of square before tweaking it any further.
 

Outlawmws

Well-known member
Joined
Aug 9, 2011
Messages
39,332
Location
The Badlands
Worked on sum pockets of clutter, and one was the Internet/Network shelves, and getting the UPS back on the wall as they again changed the "foot print" so I had to move a screw. I was too rushed last time to do more than just hook it up and stick it on the shelf...

Second pass at roundup on the weeds I missed or sprouted since I last sprayed. This is making a huge dent in easing the Yard recovery plan work! The weeds I sprayed last time are about ready for rake up and get gone...
 

jblnut

ALLIANCE MEMBER
Joined
Jan 17, 2015
Messages
7,141
Location
In the Middle of MN
First set of tanks are up. Second set are by Dad’s place and will stay there for the time being.
IMG_3118.jpeg

The lines cross. That’s all I can see. It’ll have to be changed or it won’t work correctly. Someone stuck the tanks up there all willy nilly and put the small one on the bottom. Oh well.
IMG_3119.jpeg

15w40 will come out of the brass valve and antifreeze will come out of the SS valve. All secured (for now) and at the proper height and everything.
IMG_3120.jpeg

I decided to drop a bunch of screws into the oil catch basin and enlisted the small arms of the little guy to retrieve them. I need to put a finer screen on here to prevent this in the future. I don’t want things in there and his arm are bound to get too large to fit sooner than later.
IMG_3121.jpeg
 

Dixie_Flatline

Well-known member
Joined
Oct 30, 2024
Messages
387
Location
Tennessee
The XJ got some new tires and passed it's state inspection so it's fully road legal now. I went with 245/75/16s (~31s) to compliment the 2" lift.
IMG_20250217_160632_093.jpg

Don't worry I washed the salt off.
IMG_20250217_190003_776.jpg

My other XJ is looking desperate for some attention though. It's in rough shape and I want to get back on it but the unibody shifted at some point due to not enough bracing while I was replacing the inner / outer rocker.

IMG_20250217_190042_015.jpg

Note how the top left of the driver door is touching the pillar, and the gap between the rear door and rear window pillar isn't parallel.
IMG_20240527_174713_207.jpg

I'm thinking my best bet is to buy a tram gauge and fully assess what went out of square before tweaking it any further.
Will it get armor or normal body panels? Seems like a good opportunity to get a cage going!
 

Old Man Roger

Well-known member
Joined
Apr 6, 2017
Messages
17,864
Location
Palm Coast Florida
First set of tanks are up. Second set are by Dad’s place and will stay there for the time being.
IMG_3118.jpeg

The lines cross. That’s all I can see. It’ll have to be changed or it won’t work correctly. Someone stuck the tanks up there all willy nilly and put the small one on the bottom. Oh well.
IMG_3119.jpeg

15w40 will come out of the brass valve and antifreeze will come out of the SS valve. All secured (for now) and at the proper height and everything.
IMG_3120.jpeg

I decided to drop a bunch of screws into the oil catch basin and enlisted the small arms of the little guy to retrieve them. I need to put a finer screen on here to prevent this in the future. I don’t want things in there and his arm are bound to get too large to fit sooner than later.
IMG_3121.jpeg
Magnet
 

XJSuperman

Well-known member
Joined
Jan 26, 2018
Messages
3,088
Location
Central Iowa
Normal, just because I'm not enough of an offroader to warrant a cage but I am beefing up the underside.
It's getting 2x6 rockers (pass side is done) and I'm likely going to replace the old "frame" rails with 2x4 tube.
IMG_20230402_211839_417.jpg
Remove the unibody and replace with 2x4 instead of a stiffener kit? Can I ask why you chose that route? -Guy who needs to install his stiffener kit and c-channel socket kit for 2x6 rockers
 

ed_

Well-known member
Joined
Nov 5, 2019
Messages
187
Location
Maine
Remove the unibody and replace with 2x4 instead of a stiffener kit? Can I ask why you chose that route? -Guy who needs to install his stiffener kit and c-channel socket kit for 2x6 rockers

Yeah, exactly that. Just to be clear there's nothing wrong with frame stiffeners but my center rails are rotting from the inside out so it seems silly to weld fresh metal to the rusting rails.

Also, I'll probably only be replacing the center section and leaving the rear as 5 years ago I replaced the rear frame rails with custom 16 gauge rails I bent up and welded off the shelf frame stiffeners onto them.

For ref this is how rotted my XJ was. The rear was by far the worst but the center section isn't much better.
20201011_140231.jpg20201010_163416.jpg

Bonus pic of the new rear:
20201215_083342.jpg
 
To avoid these ads, REGISTER NOW!

BlakeTheCarGuy

ALLIANCE MEMBER
Joined
Oct 10, 2018
Messages
9,387
Location
Roanoke Virginia
Super busy at work today. I turned 21.4 hours. Done a bunch of recalls. A couple tires and some flat repairs. Also a TPMS sensor as well for one that was dead. My parents came by for a state inspection on mom’s Camry since it’s free because she bought it there.

Today the debate in the shop was whether or not people use anti seize on spark plugs. I’m in camp yes because I’ve had very seized plugs before that have required the use of pipes and very large ratchets or breaker bars and I’ve pulled threads trying to get plugs out. Once you’ve done that you’ll definitely use it. I personally don’t care what the manufacturer says they aren’t the ones taking out the plugs and their coating doesn’t work most of the time. Found out only me and the 81 year old mechanic are the only ones who do. I use anti seize on everything except wheel studs lol. I hate seized up stuff and stuck wheels and brake rotors so I put it on there so it won’t be seized up next time. I usually have to buy my own anti seize though because I’m limited to one bottle every 3 months now and since I keep 3 kinds on hand I usually run out of at least one that I use the most lol. They got tired of me always asking for $30 bottles of nickel anti seize and $20 bottles of copper so I have to get them on my own. I usually have them get the silver for me. I don’t know why they make a big deal about it I guess because the shop snitch teachers pet told on me lol. But overall I’m in camp anti seize on everything except wheel studs. The only exception is Subaru wheel studs because they cross thread all the time so I do use anti seize on those and reduce torque and on the GR86 since it’s a Subaru with Toyota badges.
 

jblnut

ALLIANCE MEMBER
Joined
Jan 17, 2015
Messages
7,141
Location
In the Middle of MN
Super busy at work today. I turned 21.4 hours. Done a bunch of recalls. A couple tires and some flat repairs. Also a TPMS sensor as well for one that was dead. My parents came by for a state inspection on mom’s Camry since it’s free because she bought it there.

Today the debate in the shop was whether or not people use anti seize on spark plugs. I’m in camp yes because I’ve had very seized plugs before that have required the use of pipes and very large ratchets or breaker bars and I’ve pulled threads trying to get plugs out. Once you’ve done that you’ll definitely use it. I personally don’t care what the manufacturer says they aren’t the ones taking out the plugs and their coating doesn’t work most of the time. Found out only me and the 81 year old mechanic are the only ones who do. I use anti seize on everything except wheel studs lol. I hate seized up stuff and stuck wheels and brake rotors so I put it on there so it won’t be seized up next time. I usually have to buy my own anti seize though because I’m limited to one bottle every 3 months now and since I keep 3 kinds on hand I usually run out of at least one that I use the most lol. They got tired of me always asking for $30 bottles of nickel anti seize and $20 bottles of copper so I have to get them on my own. I usually have them get the silver for me. I don’t know why they make a big deal about it I guess because the shop snitch teachers pet told on me lol. But overall I’m in camp anti seize on everything except wheel studs. The only exception is Subaru wheel studs because they cross thread all the time so I do use anti seize on those and reduce torque and on the GR86 since it’s a Subaru with Toyota badges.
In regards to the anti sieze the world attitude …… I was called The Tin Man at my last job for good reason. That stuff didn’t sit in the cans long enough to get even a touch of water on top. Also, if you ever feel the need to buy the food grade stuff let it pass. It may be food grade but it tastes horrid on hotdogs.
 

rharman

Well-known member
Joined
Apr 22, 2012
Messages
8,911
Location
SoCal
Fixed the swivel on my Star Trek chair. It got really gummy and wouldn't turn. It's supposed to automatically return to center. Built this over ten years ago for fun. And because I'm a nerd.

When I got them from Craigslist, the seller asked if I was into Mid Century Modern. Then said her boyfriend wanted to turn them into Star Trek chairs. I gave her a look of you can't be serious. I sent her pictures of when we were done.

One thing about these chairs. The swivel mechanism wears through the casting and in some cases cracks the casting. We scanned the interior of the casting and the chair. Modeled a plug and printed it on SLS machine from nylon. The plug supports the casting to the bottom of the seat.
1739828036168.png The grease had turned gummy and had to be cleaned out.
1739828103083.png1739828162548.png1739828206961.png
Works like it was brand new.

We need to see the whole chair, please....
 

SMOKEYBEAR

Well-known member
Joined
Jan 3, 2016
Messages
466
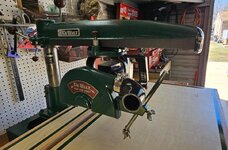
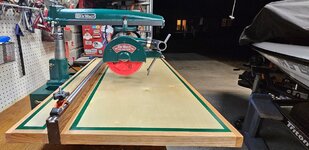
Wrapped up the fence on the RAS project, finished the wiring and what I think is the final assembly. Last is the final adjustments to the blade before use. I think its my last"winter project". Boat, trailer and fishing rod/ reel maintenance is next.
 

Attachments

  • Fence1.jpg
    Fence1.jpg
    89 KB · Views: 27
  • Fence2.jpg
    Fence2.jpg
    208.2 KB · Views: 23
  • FA4.jpg
    FA4.jpg
    149.3 KB · Views: 22
  • FA5.jpg
    FA5.jpg
    181.8 KB · Views: 21
  • FA6.jpg
    FA6.jpg
    203.8 KB · Views: 21
  • FA7.jpg
    FA7.jpg
    109.1 KB · Views: 25

cody1325

Well-known member
Joined
Apr 17, 2024
Messages
1,117
Location
Southwest Virginia
Learned the local Bobcat-Kubota dealer decided to retire and close up shop. Nearest other Kubota dealer is almost two hours away, and I'm not the biggest fan of Deere after Meade Tractor acquired the family-owned dealers around here--on top of that, they acquired the next-nearest (not even an hour's drive) Kubota dealer and converted them to Deere.

That means I'm now in charge of maintenance on our 2006 RTV-900. I took inventory and am ordering more consumables and maybe some wear and tear stuff. I also priced new tires (mud) and a windshield (the current scratched-up windshield is the remains of a soft cab minus its doors retrofitted to go under the hard roof). New cabs aren't cheap at all. Thus, I'm probably just going to make my own windshield out of Lexan. Buddy of mine has the stuff to mount ATV tires, so that will save quite a bit. My late Granddad was the last person to order tires about a decade ago, but paid extra for new rims resulting in about half a grand more. Thus, I'm not doing that again, and besides, Kubota OEM tires ****.

Considering replacements (new and used), but matching the steel bed (everyone likes plastic beds for some reason), hydraulic dump, and tough build quality of the old RTV is expensive, so I'm sticking with the old RTV. I did see a nice 2021 two-row Polaris Ranger XD on the United Rentals used site for 10K--looks like new and even has the full cab. Plus, the location it's sold from is only like an hour from here.
 

mikegt4

Well-known member
Joined
Sep 12, 2005
Messages
3,277
Location
sw ohio
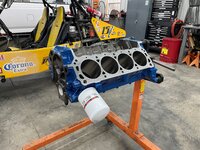
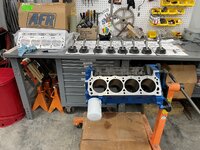
Picked up the engine block from machine shop jail on Friday for the '73 Mustang build. Painted it Saturday. This will be a 10:1 347 for the '73 Mustang that my parents dated in (Dad bought it new). Getting it back on the road for them to enjoy. This is the original numbers-matching block.

IMG_8249large.JPG


Whipped up this hose clamp storage unit Saturday night out of a few pushrods, exhaust valves, and intake valves. I should make another one, but as it is, this freed up two drawers.

IMG_8265large.JPG


Spent Sunday filing rings and assembling pistons/rods.

IMG_8270large.JPG

I see that you started off with the hardest part of the build, putting the oil filter on! ;)
Looking forward to seeing the finished product.
 
To avoid these ads, REGISTER NOW!
Top Bottom