
You are using an out of date browser. It may not display this or other websites correctly.
You should upgrade or use an alternative browser.
You should upgrade or use an alternative browser.
MP&C Shop Projects
- Thread starter MP&C
- Start date

bugnut
ALLIANCE MEMBER
Robert that wagon is a thing of beauty!
A bit of an update on the shop truck. A friend of mine had some AC parts in his attic (leftovers his father had saved) that included a condenser, compressor, and an under-dash AC unit. He donated them to the cause. I guess I'll need AC in the summer months if I expect the boss lady to ride with me. The only issue with the new goodies, the vents on the AC under-dash unit were rectangular as if the belonged on an early 70's Galaxie. And there is little on our dashboard that is rectangular.
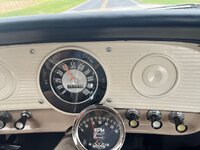
So I kept an eye out for one with round vents, and one soon appeared in Annapolis, a unit out of a Mustang.
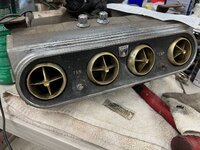
Everything seems to be intact and functional, but the chrome finish has seen better days. So we removed the vents and front housing bezel and sent them off for plating.

One of the few remaining maintenance bugs was that the self-cancelling feature of the turn signals was long gone, so an NOS turn signal switch was sourced from ebay. Here's removal of the old, with cancelling arms broken off. New one installed and cancelling feature working once again.

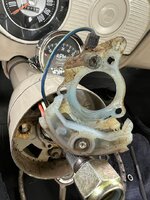
And I need to do something about the shop photographer, I forgot to get the completed picture..
So I kept an eye out for one with round vents, and one soon appeared in Annapolis, a unit out of a Mustang.
Everything seems to be intact and functional, but the chrome finish has seen better days. So we removed the vents and front housing bezel and sent them off for plating.
One of the few remaining maintenance bugs was that the self-cancelling feature of the turn signals was long gone, so an NOS turn signal switch was sourced from ebay. Here's removal of the old, with cancelling arms broken off. New one installed and cancelling feature working once again.
And I need to do something about the shop photographer, I forgot to get the completed picture..
zmotorsports
ALLIANCE MEMBER
Robert, that's a step back in time seeing the pictures of the turn signal cam. Changed many of those in my earlier years of wrenching as they had a high failure rate. In fact, when I was peddling parts at the several auto parts stores that I worked at in High School, we used to have a pretty decent assortment of them hanging on the "help" racks as we called them, out in front of the counters in the stores.
Ohmthis
Well-known member
Robert, nice tidy work on the wiring! I like how you installed the Fi Tech into the fuse block. That’s a custom touch. I’m glad you couldn’t add the ignition module to the firewall. I think it would have been something that drew your eye straight to it.
When you were talking about rectangular vents to where our trucks use round ones, I thought, “well here he goes making his own now!” The Mustang unit will look perfect and it even has the “Ford” emblem on it.
When you were talking about rectangular vents to where our trucks use round ones, I thought, “well here he goes making his own now!” The Mustang unit will look perfect and it even has the “Ford” emblem on it.
Bob Heine
ALLIANCE MEMBER
Robert, growing up after WWII our Chevies (1948 & 1950) had dealer installed directional signals so you didn't have to roll the window down to do the hand signal thing in the rain or snow. They weren't self-cancelling but here in Florida even the newest cars apparently don't self-cancel. I've followed some cars signaling for a left turn for 50-60 miles.

I remember being impressed that our '53 Olds had the directional signal built into the steering column and it turned itself off when you completed a turn.
I remember being impressed that our '53 Olds had the directional signal built into the steering column and it turned itself off when you completed a turn.
Shop truck update, I had some exhaust parts left under the tree. A 2-1/2" mandrel bend kit and a pair of Black Widow Venom 250's.

We had a spot going through a crossmember that was a bit snug, so we made a set of dies to flatten the pipe, as well as a plug for the end of the pipe to keep it round for welding to the next piece. Some quick geometry gave us the size and offset needed. Yeah, one of those classes from high school they say you'll never use again.
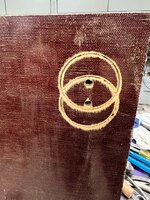


Plenty of clearance...
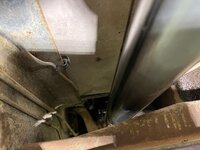
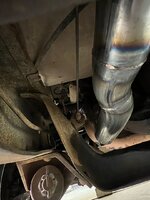

My favorite exhaust... heard and not seen.

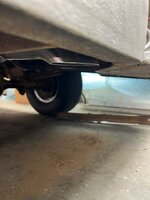
test fire (inside the paint booth)
And a couple drive bys..
I also "ran across" an engine suitable for rebuild to eventually replace the original 352 one day.


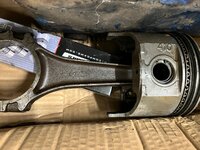
Yup, a 410 Mercury.
We had a spot going through a crossmember that was a bit snug, so we made a set of dies to flatten the pipe, as well as a plug for the end of the pipe to keep it round for welding to the next piece. Some quick geometry gave us the size and offset needed. Yeah, one of those classes from high school they say you'll never use again.
Plenty of clearance...
My favorite exhaust... heard and not seen.
test fire (inside the paint booth)
And a couple drive bys..
I also "ran across" an engine suitable for rebuild to eventually replace the original 352 one day.
Yup, a 410 Mercury.
Last edited:
BORING HOP YARD
Well-known member
Nice to see your post on the shop truck Robert.
Thank you for sharing!
Thank you for sharing!
zmotorsports
ALLIANCE MEMBER
Nice work on the exhaust Robert. I agree on the not being seen part as well.
When I built the exhausts for my couple of shop trucks, I bologna cut the turndowns flush with the body just as you did and loved the sound and especially, the lack of being seen.
When I built the exhausts for my couple of shop trucks, I bologna cut the turndowns flush with the body just as you did and loved the sound and especially, the lack of being seen.
stinkity stoink
Well-known member
It sounds perfect. A bit of a rumble, but not too loud.
I have to remember that exhaust flattening trick. Always impressed with the solutions you come up with.
I have to remember that exhaust flattening trick. Always impressed with the solutions you come up with.
Thanks guys..
We also did some tooling improvement, I have a tipping die that I've used in my Lennox for awhile now, but it needed some fine tuning... The basic setup, the adjustable "fence" has a flat side for your initial tip, to give the panel something to ride against...
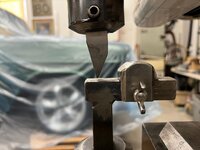
Once you get up to about a 45* angle, the panel would interfere with the top front of the machine.

So step two is to rotate the fence 180* and adjust to the upper die for panel clearance. This would now use the bend as a guide, rather than the edge of the flange. I've found the panel challenging at best to feed through and yet not distort the bend line further.

So I modified the lower portion of the tool from horizontal to a 45* ramp. This will allow us to keep the flat side of the fence forward to act as a guide from start to finish, and the interference is now gone. The initial pass is set to leave a slight mark in the panel, and all subsequent passes the panel is pushed against the fence and pulled upward a few degrees incrementally with each pass.


Much smoother operation, and we can do a full 90* tip...
We also did some tooling improvement, I have a tipping die that I've used in my Lennox for awhile now, but it needed some fine tuning... The basic setup, the adjustable "fence" has a flat side for your initial tip, to give the panel something to ride against...
Once you get up to about a 45* angle, the panel would interfere with the top front of the machine.
So step two is to rotate the fence 180* and adjust to the upper die for panel clearance. This would now use the bend as a guide, rather than the edge of the flange. I've found the panel challenging at best to feed through and yet not distort the bend line further.
So I modified the lower portion of the tool from horizontal to a 45* ramp. This will allow us to keep the flat side of the fence forward to act as a guide from start to finish, and the interference is now gone. The initial pass is set to leave a slight mark in the panel, and all subsequent passes the panel is pushed against the fence and pulled upward a few degrees incrementally with each pass.
Much smoother operation, and we can do a full 90* tip...
We had repair job in the shop to fabricate some replacements for fender mounts on a 4 wheeler. The originals were made of 19 gauge steel, and we opted for 16 gauge on the replacements, given the vibration environment. Owner attempt at repairs:
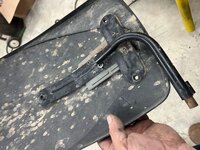
We started by making an MDF sandwich, the top uses a 3/4" slot as a guide for the punch we had turned on the lathe. The bottom uses a 1/2" slot as the female die for the punch's rounded tip.


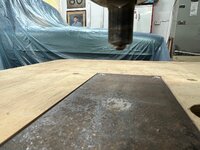
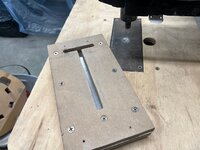

Trimmed to size and rolled to fit fender contour..

existing frame mounts cleaned up and TIG welded to our new replacements

Now for some owner added Krylon and they're ready to bolt on for more abuse

We started by making an MDF sandwich, the top uses a 3/4" slot as a guide for the punch we had turned on the lathe. The bottom uses a 1/2" slot as the female die for the punch's rounded tip.
Trimmed to size and rolled to fit fender contour..
existing frame mounts cleaned up and TIG welded to our new replacements
Now for some owner added Krylon and they're ready to bolt on for more abuse
steves_001
Well-known member
Truck sounds great! Loving the old green gal in the background too, completion date on that one yet? I'm guessing it's bound for a feature spread in a magazine at some point it's so beautiful.
Ohmthis
Well-known member
Robert, awesome job on the exhaust. I particularly loved that you guys ovaled the pipe. I’m wondering if a bench vise has enough *** to do that. You never know when it might be handy.
bulletpruf
Well-known member
Nice work on the shop truck and congrats on scoring a 410 for it! Don't see many of those around!
Bowtie4life
Well-known member
Yes....nice work on the truck Robert and I see your slowing tweaking it to your taste.
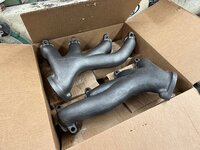
Collecting more parts for the shop truck... These are reproduction cast shorty headers by Kugel Komponents, based off the OEM Ford 406 headers. They were media blasted and have been dropped off for a Cerakote finish. Still looking for some C6AE-R cylinder heads, rockers, and an intake for the 410 block.
We also got the underdash AC bezel back from Chrome plating, still waiting on the round vents


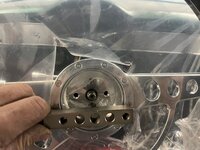
Still plugging along with the wiring on the 55. Fuse box is installed, still have some fine tuning (shortening) on some of the wire bundles.. but someone installed a steering wheel in the way. And since our Snap On puller doesn't fit the Billet Specialties hole pattern, it's time to make a new one..
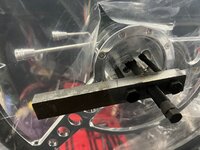
Strike two, we didn't have a 1/2-20 tap to fabricate the new part, so we opted for a 1/2-20 hex nut. A shoulder was machined to center it up in the clearance hole, and welded onto our bar stock

All removed, ready for some wiring...

Shortening up another bundle and crimping on new Pak-Con pins


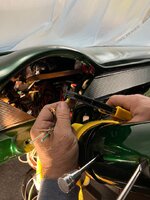
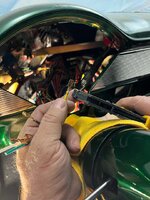
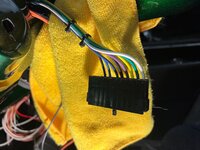
We went to install the reproduction ignition switch, which came with a grooved retaining nut. We didn't have the needed "socket", and the one found online had fingers that were too short, for a guaranteed slip and scratch of the chrome finish. So yeah, let's raid the scrap pile of some 1-1/4" tubing..

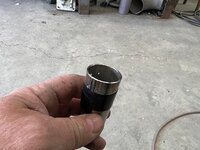


Works like a charm...
We also got the underdash AC bezel back from Chrome plating, still waiting on the round vents
Still plugging along with the wiring on the 55. Fuse box is installed, still have some fine tuning (shortening) on some of the wire bundles.. but someone installed a steering wheel in the way. And since our Snap On puller doesn't fit the Billet Specialties hole pattern, it's time to make a new one..
Strike two, we didn't have a 1/2-20 tap to fabricate the new part, so we opted for a 1/2-20 hex nut. A shoulder was machined to center it up in the clearance hole, and welded onto our bar stock
All removed, ready for some wiring...
Shortening up another bundle and crimping on new Pak-Con pins
We went to install the reproduction ignition switch, which came with a grooved retaining nut. We didn't have the needed "socket", and the one found online had fingers that were too short, for a guaranteed slip and scratch of the chrome finish. So yeah, let's raid the scrap pile of some 1-1/4" tubing..
Works like a charm...
WoodsTruck
Well-known member
- Joined
- Jan 12, 2013
- Messages
- 1,038
I'm always drawn to the tools you make to do the job.
I try doing that now on projects instead of just making due with what I have. Adds to the fun of the project.
Carry on.
I try doing that now on projects instead of just making due with what I have. Adds to the fun of the project.
Carry on.
Bowtie4life
Well-known member
Awesome fabrication for tools and restoration work as usual!!!
stinkity stoink
Well-known member
do you keep a log of the hours on the car ? Between building tools and adjusting small details it has to be a staggering amount of time. I am sure you enjoy it though because it shows in the amazing detail of the work !!
jimkinney
Well-known member
Nice job on the tooling, I have a whole drawer of homemade tools that probably have only been used once. Most recent is a BMW fuel pump ring spanner made from a scrap 2x2 and some 5/16 bolts. It got the job done.
Those connector and terminals bring back memories. In college, and before, I worked for a wire harness company. I must have crimped thousands of those.
Those connector and terminals bring back memories. In college, and before, I worked for a wire harness company. I must have crimped thousands of those.
BORING HOP YARD
Well-known member
Howdy Robert, I see that Gene Windfield passed yesterday and I was curious if your paths ever crossed.

BORING HOP YARD
Well-known member
I got to say hello to Gene at the Scottsdale Barret Jackson auction a few years back, he was using one of those scooters that you kneel on after I think he broke his hip. We were both in sperate lines next to each other going opposite directions slowly and we came face to face. He had just got back from Europe, and I got to tell him Hello and welcome home, he let out a big smile and said thank you.
This behavior is not the norm for me but I'm glad I spoke up.
This behavior is not the norm for me but I'm glad I spoke up.
56vette461
Well-known member
I was fortunate enough to have attended a metal bashing event in Northern California 3 years ago. Gene Winfield, Ron Covell, Jere Kirkpatrick and two other metal workers presented a wide range of techniques for making specialty metal parts for hotrods and motorcycles. Fascinating experience.
BORING HOP YARD
Well-known member
Hey Robert, I see that you haven't posted since March, and I was kind of Jonesing for an update.
I know this is selfish of me, but I wanted to make sure everything ok with you and your team.
I hope you're having great success and having fun; I have learned a great deal from your posts and wanted to reach out and make sure everything is golden with you.
I hope you're so busy living the dream that you don't have time for an update.
I also just wanted to say thank you for sharing your knowledge and letting us tag along.
Thank you!
I know this is selfish of me, but I wanted to make sure everything ok with you and your team.
I hope you're having great success and having fun; I have learned a great deal from your posts and wanted to reach out and make sure everything is golden with you.
I hope you're so busy living the dream that you don't have time for an update.
I also just wanted to say thank you for sharing your knowledge and letting us tag along.
Thank you!
xtremek
Well-known member
What he said^
Still plugging along. My wife has been dealing with her father having dementia, which is getting progressively worse. He lives in Oregon, so that makes it more challenging. Still working on the projects when we find time between the life stuff. I'll try and get some pictures posted in the next week.. Thanks for checking on me!
Some wagon updates!!!
Still working on the wiring, and to this stage we've done our best to eliminate all the ****-splice pigtails that come with the American Autowire kit. On the front end, the pigtail for the OEM parking light fixtures seemed to have an unobtainium style contact. Shout out to Sean Matthews at American Autowire. After explaining my OCD condition and the need for original pins to eliminate the **** splicing, a few messages and pictures back and forth, and he came up with the correct contact for us. Part numbers shown for those with similar OCD twitch.
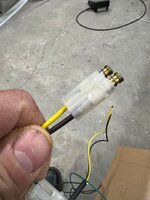
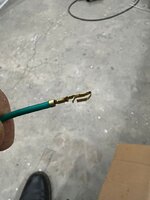
It takes a bit of force, but here's the slightly mis-shapen contact after strong arming its removal


It's not often I do spring cleaning, call it hoarding if you will. But here's a case where I got rid of the old grill from the wagon because I got tired of tripping over it. Then at a local show and I see this brace behind the stainless grill of a 55, and it hit me... The old grille still had that part attached.
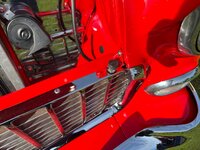
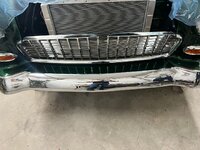
So I reached out to a local buddy who just finished his 55 to see if he had one. Sure enough, he saved the day..

a bit of media blasting before it gets the SPI epoxy primer.
The front end of the 55 also has separate harnesses for the headlight and parking lights, both visible when you open the hood. In order to clean this up a bit, we ran both into the headlight bucket and then down to the parking light fixture. This also helps in that we ran a separate ground to each light fixture to help eliminate those electrical gremlins, so it makes for a cleaner bridge between the two, out of sight under the fender.

fun fun.....

Still working on the wiring, and to this stage we've done our best to eliminate all the ****-splice pigtails that come with the American Autowire kit. On the front end, the pigtail for the OEM parking light fixtures seemed to have an unobtainium style contact. Shout out to Sean Matthews at American Autowire. After explaining my OCD condition and the need for original pins to eliminate the **** splicing, a few messages and pictures back and forth, and he came up with the correct contact for us. Part numbers shown for those with similar OCD twitch.
It takes a bit of force, but here's the slightly mis-shapen contact after strong arming its removal
It's not often I do spring cleaning, call it hoarding if you will. But here's a case where I got rid of the old grill from the wagon because I got tired of tripping over it. Then at a local show and I see this brace behind the stainless grill of a 55, and it hit me... The old grille still had that part attached.
So I reached out to a local buddy who just finished his 55 to see if he had one. Sure enough, he saved the day..
a bit of media blasting before it gets the SPI epoxy primer.
The front end of the 55 also has separate harnesses for the headlight and parking lights, both visible when you open the hood. In order to clean this up a bit, we ran both into the headlight bucket and then down to the parking light fixture. This also helps in that we ran a separate ground to each light fixture to help eliminate those electrical gremlins, so it makes for a cleaner bridge between the two, out of sight under the fender.
fun fun.....
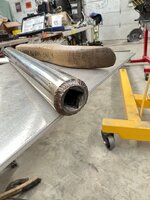


And then there's the shop truck..
I wanted to add some oil capacity to the new engine, and since the original drain plug dumps on top of the crossmember, let's move that enough to clear.
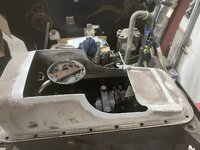
and yes, that's remnants of Ford's better idea for a quiet timing chain on the oil sump.
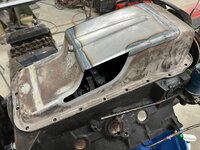
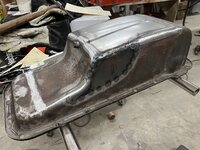
Missed getting a final shot, and we did add a baffle inside.
Another piece to the puzzle, I always liked the Mopar pistol grip shifters. In today's world, I don't like the price.. I found an aftermarket version in Sweden (eBay) and it actually already has the 5 speed bezel on top. Like it was meant to be. Also note the proximity of the original shifter to the dash. The under dash AC will never fit with that in there, so the T5 will be a welcome addition for the missus in being able to add AC to the equation..

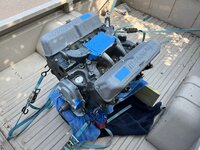
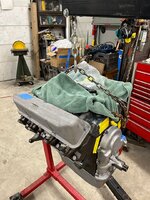
and 410 pickup day..
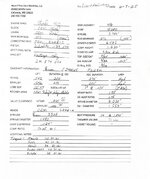
On the way to pick up a used bell housing from a local salvage yard, the old 352 left me stranded. Some roadside diagnostics, a changeout of the 59 year old OEM ignition coil, and we were back in business.
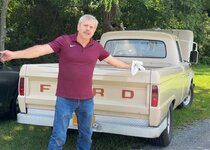
It made an uneventful trip back and forth to Downingtown PA yesterday to pick up some 19 ga AKDQ sheet. 3-1/2 hour drive each way.

I wanted to add some oil capacity to the new engine, and since the original drain plug dumps on top of the crossmember, let's move that enough to clear.
and yes, that's remnants of Ford's better idea for a quiet timing chain on the oil sump.
Missed getting a final shot, and we did add a baffle inside.
Another piece to the puzzle, I always liked the Mopar pistol grip shifters. In today's world, I don't like the price.. I found an aftermarket version in Sweden (eBay) and it actually already has the 5 speed bezel on top. Like it was meant to be. Also note the proximity of the original shifter to the dash. The under dash AC will never fit with that in there, so the T5 will be a welcome addition for the missus in being able to add AC to the equation..
and 410 pickup day..
On the way to pick up a used bell housing from a local salvage yard, the old 352 left me stranded. Some roadside diagnostics, a changeout of the 59 year old OEM ignition coil, and we were back in business.
It made an uneventful trip back and forth to Downingtown PA yesterday to pick up some 19 ga AKDQ sheet. 3-1/2 hour drive each way.
Last edited:
BORING HOP YARD
Well-known member
Thank you for the update, Robert!
Bowtie4life
Well-known member
Robert what do you have those front tie downs attached to?
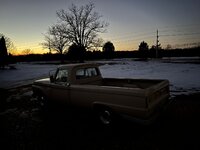
These are motorcycle shipment straps that have a loop and hook on the one end where if the hook doesn’t work you can wrap the loop around and hook into the loop. The straps in front of the truck use the loop through the stake holes, the ones in the back have the loops going through the tailgate gap (hooks wouldn’t fit) to eyebolts on the step bumper.