To avoid these ads, REGISTER NOW!

What did you do "IN" your garage today?

Bessy

Well-known member
Joined
Dec 18, 2012
Messages
995
Location
Ontario, Canada
Welding requires practice, but it also takes some consideration for being able to wield the fire with steady hand. Gas, arc, MIG, TIG, A steady hand and motion control is crucial

One tip I was given a long time ago, and works particularly well for gas and arc - take a wrap around your arm with the cables/hoses. this makes it so you hand is not being jerked around. -same principal for MIG/TIG - make sure you are not fighting those cables.
100% agree, Outlawmws! I'll totally try the arm-wrap technique next time I'm out there.

Being my first foray into MiG, I need to just get out there and consistently work on handling the gun (and similarly I should make a point of continuing building my skills in stick welding) and practicing the movements. The big hump, I think, will be when I can get over the "startle factor" when I actually do strike an arc. It's not fear but rather just unfamiliar assault on the senses (the sound mostly) when actually striking an arc that I just need to get used to with time.

I've got very few hours of actual practice under my belt accumulated sporadically over years. I wouldn't even put myself into the novice category yet, being that I have a few hours of formalized high school training (aka a single unit of maybe three weeks if I am lucky, dating back to 2010) and Youtube-iversity to lean on. I bought my first welder (Lincoln AC-225) at a garage sale maybe 4-5 years ago and I have successfully got metal to stick together, at least in some low-stress applications. With the new unit, the AC-225 will go back to my parents place so I have something there for various tasks around the shop.
 
To avoid these ads, REGISTER NOW!

PowerWagonBuilder

Well-known member
Joined
Jan 21, 2025
Messages
82
Location
NW of Richmond, Va
100% agree, Outlawmws! I'll totally try the arm-wrap technique next time I'm out there.

Being my first foray into MiG, I need to just get out there and consistently work on handling the gun (and similarly I should make a point of continuing building my skills in stick welding) and practicing the movements. The big hump, I think, will be when I can get over the "startle factor" when I actually do strike an arc. It's not fear but rather just unfamiliar assault on the senses (the sound mostly) when actually striking an arc that I just need to get used to with time.

I've got very few hours of actual practice under my belt accumulated sporadically over years. I wouldn't even put myself into the novice category yet, being that I have a few hours of formalized high school training (aka a single unit of maybe three weeks if I am lucky, dating back to 2010) and Youtube-iversity to lean on. I bought my first welder (Lincoln AC-225) at a garage sale maybe 4-5 years ago and I have successfully got metal to stick together, at least in some low-stress applications. With the new unit, the AC-225 will go back to my parents place so I have something there for various tasks around the shop.

One thing I have found when teaching MIG to new learners, is the student should have lots of protective gear on so that they can properly steady themselves without fear of burns, either from spatter or the weldaments getting too warm. Positioning and as mentioned, a few practice sweeps to feel out where your limits of position will be goes miles in the realm of MIG work. Nozzle angle relative to the joint, wire stickout, and travel speeds are important. The Sound of the wire burning back will also help you refine your travel speeds. I imagine you are just running a short circuit setup and is it fully shielded or Flux? Those are both different animals regarding the parameters above. Whats real fun is Dual Shield. I ran some of that in 0.045 flavor hard facing recently. The process went against the grain of the past 15 years of solid wire welding based on sound and burn-back but the welds turned out great.
 

DGersic

Well-known member
Joined
Mar 12, 2017
Messages
6,382
Location
DeKalb, IL
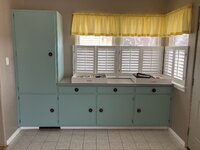
Looks great. Uhh.... Did you know you have a couple of leftover drawers?? :cool: :bounce:

Yeah. Those are two of the three old drawers. SWMBO needs to go through them and decide what goes in the new drawers and what gets flung. Then there are the bins and boxes of stuff In the basement that either go back in the cabinets or get flung.

None of this is my stuff. I’m not in charge of this part of the project.
 

jimkinney

Well-known member
Joined
Jan 3, 2009
Messages
303
Location
Florida's Space Coast
Replaced number 7 coil pack on wife's Sequoia yesterday. Got the thumbs up report after she drove it this morning. Smooth running again.
Replaced #5 (#6 was a few weeks ago) on the BMW. Third pack in 175k miles. Also changed the valve cover gasket while I was in there. Coil was easy, gasket not so much.
 

jimkinney

Well-known member
Joined
Jan 3, 2009
Messages
303
Location
Florida's Space Coast
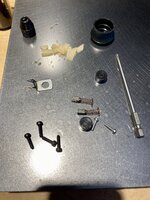
Tried to use the Dremel yesterday... Motor runs... But the chuck isn't connected...
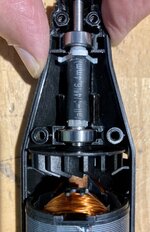
Took it apart and sure enough the plastic sacrificial shaft coupling had disintegrated...
IMG_4659.jpg
Ordered a new replacement part from Dremel, but needed it to work to finish a project... So I MacGyvered it...
Used a section of adhesive type heat shrink tubing but didn't apply heat to shrink it,
Good enough to finish the project... New part should arrive today...
IMG_4660 4.jpg
You can also use plastic tubing.
 

GrayFlattop

Well-known member
Joined
Jan 18, 2018
Messages
1,051
Location
Chicago
Welding requires practice, but it also takes some consideration for being able to wield the fire with steady hand. Gas, arc, MIG, TIG, A steady hand and motion control is crucial

One tip I was given a long time ago, and works particularly well for gas and arc - take a wrap around your arm with the cables/hoses. this makes it so you hand is not being jerked around. -same principal for MIG/TIG - make sure you are not fighting those cables.
I’ll have to try that. I’ve always wrapped the cable - or hoses - around my shoulders- kinda like a scarf, so most of the weight of the cable is carried on my shoulder. YMMV as I’ve done it that way for over 50 years. Your shirt (or welding jacket) will get dirty…

FWIW, I really thinks it helps new welders if they get the opportunity to practice gas welding first. Get good at that, and the basics of managing the puddle transfers readily to other types of welding. Of course, a good set of torches and tanks ain’t cheap - and probably not the best first choice for welding equipment. If you have a local community college that offers a welding class, that’s a great place to start.

Agree 100% a steady hand and motion control is foundational. And practice, practice, practice. If practicing with scrap pieces, make sure that you cut apart or otherwise destroy your work in a vise or press to get a feel for the penetration needed for a robust weld. Without penetration, you’ve got nothing.
 

cody1325

Well-known member
Joined
Apr 17, 2024
Messages
1,113
Location
Southwest Virginia
Returned the stuff to HFT.


Got started on rebuilding a Coleman 502 Sportster stove I probably should've paid more attention as to condition on--quite a few pieces had rather heavy rust (but not enough to compromise the strength--still had pressure when I opened up the gas cap). Probably needs seals and who knows what else. I've got some smaller parts off and soaking in Evaporust. I'll need to read up a bit more before I go any further, and it looks like getting the entire burner off is going to be a pain. But at least $20 is not a ton, and lesson learned if it's a POS, and am sure that I can sell it for parts for what I've got in it.
 
Last edited:

fillister

Well-known member
Joined
Sep 10, 2013
Messages
45
Location
Phoenix AZ
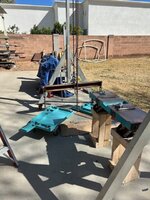
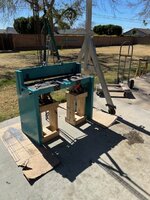
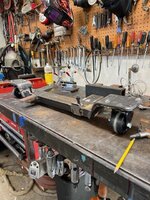
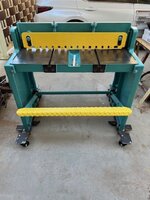
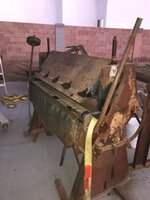
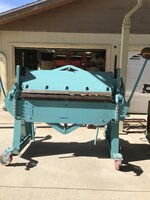
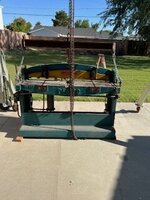
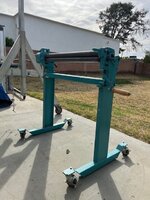
Completed the rebuild of Tennsmith 36 inch shear, formally owned by Bechtel and used during the construction of the Palo Verde Nuclear Generating station, it's been sitting outside for decades.

Disassembled, and had it grit blasted, epoxy primed and color coated with polyurethane.
Fabricated a rolling caster base, this will be painted the same color at a later date.
 

Attachments

  • 68892421060__1C74D5EC-7044-4D92-9830-FC20E147225A.JPEG
    68892421060__1C74D5EC-7044-4D92-9830-FC20E147225A.JPEG
    1.1 MB · Views: 79
  • IMG_0195.jpg
    IMG_0195.jpg
    143.7 KB · Views: 58
  • IMG_0198.jpg
    IMG_0198.jpg
    77.4 KB · Views: 49
  • IMG_0200.jpg
    IMG_0200.jpg
    152.2 KB · Views: 48
  • IMG_0205.jpg
    IMG_0205.jpg
    149.3 KB · Views: 49
  • IMG_0206.jpg
    IMG_0206.jpg
    84.1 KB · Views: 50
  • IMG_0207.jpg
    IMG_0207.jpg
    160.7 KB · Views: 53
  • IMG_0208.jpg
    IMG_0208.jpg
    126.6 KB · Views: 56

Fixr

Well-known member
Joined
Dec 23, 2012
Messages
9,709
Location
SW VA
I’ll have to try that. I’ve always wrapped the cable - or hoses - around my shoulders- kinda like a scarf, so most of the weight of the cable is carried on my shoulder. YMMV as I’ve done it that way for over 50 years. Your shirt (or welding jacket) will get dirty…

FWIW, I really thinks it helps new welders if they get the opportunity to practice gas welding first. Get good at that, and the basics of managing the puddle transfers readily to other types of welding. Of course, a good set of torches and tanks ain’t cheap - and probably not the best first choice for welding equipment. If you have a local community college that offers a welding class, that’s a great place to start.

Agree 100% a steady hand and motion control is foundational. And practice, practice, practice. If practicing with scrap pieces, make sure that you cut apart or otherwise destroy your work in a vise or press to get a feel for the penetration needed for a robust weld. Without penetration, you’ve got nothing.
I learned a bit early on with OA. By the time I got a TIG welder 40 years later, my hands weren't steady any more and my eyesight wasn't sharp close up either. So I cheat as much as I can with magnification, meds for the genetic tremor, and fixtures and braces. I'll never be a truly good welder, but I learn a little bit more now and then.
 

nadogail

Well-known member
Joined
Jan 23, 2009
Messages
32,049
Location
Coronado, CA
Stapled the Landscape Cloth Lining into a couple of the Raised Bed Planter Boxes I am building.
My Fitness Trainer came to my workshop and ran me through a workout.
Called the bank holding one of my CD’s and decided to move the funds to another bank offering 4.5% rather than the 3.8% APR, in todays market seven tenths of a percent difference in APR seems worth moving the funds.
 

jshillin

Well-known member
Joined
Nov 9, 2008
Messages
5,620
Location
PA
I picked up a John Deere X520 for the ballfield the other day. I bought everything to change the oil, filter, air filter, spark plugs, fuel filter and transaxle fluid. I changed the plugs today, drained the oil and polished on it a little bit. I didn't refill the oil or put the oil filter on yet, I want to change the fuel filter before I do, it leaves me some extra room. I hope to have time to finish it up later this week or weekend. Then I have to get the X360 that it's going to replace out to prep it for sale.
 

bugnut

ALLIANCE MEMBER
Joined
Jul 14, 2012
Messages
3,998
Location
Central Ohio
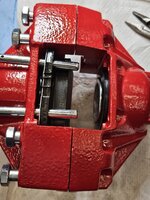
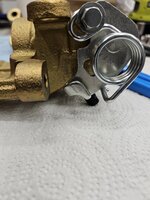
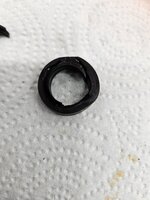
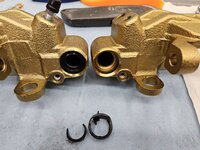
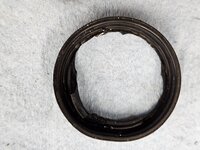
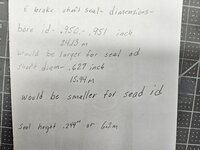
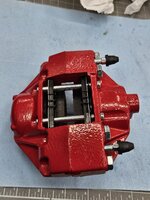
Continuing on disk brakes for the moneypit baja. The disk kit for the front is back from powdercoat and I reassembled today. Started a couple days back but could not find my brake lube so delayed till after a trip to the laps. Finished the front and then started disassembly of the rear in preparation for PC. This is where I ran into an issue. There is a seal on the ebrake actuating lever. I was struggling to remove. Second caliper the seal was part way out. Well in trying to pull it out I tore it apart. The bad news is I cannot find a replacement and the vendors claim these are disposable calipers and you just replace the entire assembly. I’m trying to figure out a solution, any direction/help appreciated! Thanks
 

Attachments

  • 20250227_123317.jpg
    20250227_123317.jpg
    797 KB · Views: 35
  • 20250228_114356.jpg
    20250228_114356.jpg
    770.3 KB · Views: 27
  • 20250303_105742.jpg
    20250303_105742.jpg
    694 KB · Views: 25
  • 20250303_115406.jpg
    20250303_115406.jpg
    602.4 KB · Views: 21
  • 20250303_124215.jpg
    20250303_124215.jpg
    1 MB · Views: 18
  • 20250303_124218.jpg
    20250303_124218.jpg
    894.1 KB · Views: 19
  • 20250303_124234.jpg
    20250303_124234.jpg
    692.2 KB · Views: 16
  • 20250303_124242.jpg
    20250303_124242.jpg
    786.3 KB · Views: 17
  • 20250301_142159.jpg
    20250301_142159.jpg
    624.7 KB · Views: 18
  • 20250228_120250.jpg
    20250228_120250.jpg
    674.8 KB · Views: 34
To avoid these ads, REGISTER NOW!

kaymccampbell

Well-known member
Joined
Feb 27, 2015
Messages
29,622
Location
Upstate New York
Continuing on disk brakes for the moneypit baja. The disk kit for the front is back from powdercoat and I reassembled today. Started a couple days back but could not find my brake lube so delayed till after a trip to the laps. Finished the front and then started disassembly of the rear in preparation for PC. This is where I ran into an issue. There is a seal on the ebrake actuating lever. I was struggling to remove. Second caliper the seal was part way out. Well in trying to pull it out I tore it apart. The bad news is I cannot find a replacement and the vendors claim these are disposable calipers and you just replace the entire assembly. I’m trying to figure out a solution, any direction/help appreciated! Thanks
It's a press fit radial seal. SKF is one of many brands. They are available by size. I'd try NAPA, or one of the many big truck parts places. Barring those, I'd try Granger or Kaman or any local bearing or industrial supply house.
 

cannuck

Well-known member
Joined
Nov 30, 2021
Messages
4,660
Location
Rural SK
It's a press fit radial seal. SKF is one of many brands. They are available by size. I'd try NAPA, or one of the many big truck parts places. Barring those, I'd try Granger or Kaman or any local bearing or industrial supply house.
The piston seals on a brake caliper don't slide along a surface, they are a bellows type so as the pads wear and the piston protrudes the machined outer diameter surface will not get dirty or corrode. If it wasn't done this way you couldn't risk retracting the pads/piston(s).
 

cannuck

Well-known member
Joined
Nov 30, 2021
Messages
4,660
Location
Rural SK
Continuing on disk brakes for the moneypit baja. The disk kit for the front is back from powdercoat and I reassembled today. Started a couple days back but could not find my brake lube so delayed till after a trip to the laps. Finished the front and then started disassembly of the rear in preparation for PC. This is where I ran into an issue. There is a seal on the ebrake actuating lever. I was struggling to remove. Second caliper the seal was part way out. Well in trying to pull it out I tore it apart. The bad news is I cannot find a replacement and the vendors claim these are disposable calipers and you just replace the entire assembly. I’m trying to figure out a solution, any direction/help appreciated! Thanks
you need to go around the vendor and find out who the manufacturer is. They buy the parts to make theirs, so MIGHT sell you a set when you tell them your problem. Sad that your vendor didn't offer to try this. assume you are asking over at Samba?
 

Jay__Dub

Well-known member
Joined
Nov 19, 2024
Messages
1,256
Location
Cold Country, Canada
Completed the rebuild of Tennsmith 36 inch shear, formally owned by Bechtel and used during the construction of the Palo Verde Nuclear Generating station, it's been sitting outside for decades.

Disassembled, and had it grit blasted, epoxy primed and color coated with polyurethane.
Fabricated a rolling caster base, this will be painted the same color at a later date.
Worked with Brown Boggs, and many antique ones, for years and years. Incredibly handy tool. Wish I'd have bought one of them when I retired. I'm sure they tossed the antique ones in the dump. Could be a challenge to shim for very thin substrates by times.
 

DGersic

Well-known member
Joined
Mar 12, 2017
Messages
6,382
Location
DeKalb, IL
The piston seals on a brake caliper don't slide along a surface, they are a bellows type so as the pads wear and the piston protrudes the machined outer diameter surface will not get dirty or corrode. If it wasn't done this way you couldn't risk retracting the pads/piston(s).

He needs the seal for the parking brake mechanism, not the seal for the caliper piston.
 

fillister

Well-known member
Joined
Sep 10, 2013
Messages
45
Location
Phoenix AZ
A buddy had a jump shear, finger brake, regular 8 and 12 ft brakes, etc. in his home shop years back/ we used to go there to fab most anything at times. RIP Carl. His widow sold everything, probably pennies on the dollar, as she wanted the $$ so she could gamble.
Yes, cutting sheet metal square and burr free is very very nice, I recently acquired a 48" pexto shear that was sloppily converted to Pneumatic and needs to be redone. Also rebuilt a 14 ga Dries Krump 4' universal sheet metal break "formally owned by the US navy" and a 48" Pexto slip roll along with a Doall 1612 . I'll post a few before and after photos. If there's interest I can post more detail in a separate thread.
 

Attachments

  • IMG_1485.JPG
    IMG_1485.JPG
    59.3 KB · Views: 29
  • IMG_3263.JPG
    IMG_3263.JPG
    687.9 KB · Views: 25
  • IMG_0013.jpg
    IMG_0013.jpg
    80.7 KB · Views: 28
  • IMG_2767.JPG
    IMG_2767.JPG
    659.2 KB · Views: 26
  • IMG_0213.jpg
    IMG_0213.jpg
    76.3 KB · Views: 29
  • IMG_3656.jpg
    IMG_3656.jpg
    21.3 KB · Views: 29
  • IMG_4081.jpg
    IMG_4081.jpg
    130.6 KB · Views: 54

kaymccampbell

Well-known member
Joined
Feb 27, 2015
Messages
29,622
Location
Upstate New York
The piston seals on a brake caliper don't slide along a surface, they are a bellows type so as the pads wear and the piston protrudes the machined outer diameter surface will not get dirty or corrode. If it wasn't done this way you couldn't risk retracting the pads/piston(s).
It's rotary not sliding. It's the e-brake pivot.
 

cannuck

Well-known member
Joined
Nov 30, 2021
Messages
4,660
Location
Rural SK
Worked with Brown Boggs, and many antique ones, for years and years. Incredibly handy tool. Wish I'd have bought one of them when I retired. I'm sure they tossed the antique ones in the dump. Could be a challenge to shim for very thin substrates by times.
I was lucky enough last year to find a matched set of BB 48", 18ga box and pan, shear and slip roll. Incredibly nice tools (I had some much newer brand name stuff on loan years ago, but the BB stuff is at top of heap).
 

Swanny1953

ALLIANCE MEMBER
Joined
Jul 28, 2010
Messages
1,082
Location
Lucas, TX
Bi-monthly draining of air compressor and perimeter bug treatment.
Also, had a few stains in the Alcantara seating fabric in the CTS-V. Used some Griot's interior cleaner and a brush to lift the stains, then used my Mytee Lite detail extractor to remove the cleaner. Once that all dries, I'll apply some Chemical Guys HydroThread ceramic thread protector to the Alcantara and then condition all the leather surfaces.
 

SMOKEYBEAR

Well-known member
Joined
Jan 3, 2016
Messages
466
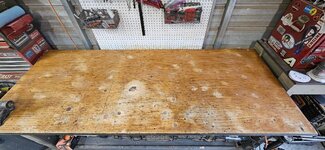
Been working on a quick refinishing of my work bench while I have boat parts out for powder coat and new windshields in the works, A few of my recent router sled projects had me screwing stop blocks directly to the table. The top is designed to be replaced, but its been there 20 years now and I've redone the polyurethane a few times, I like the character so I can't bring myself to replace it. Used some plugs and dowels to fill/ repair the wear and use its taken since the last go-round. I've used bondo previously, I like this process better. Plus I got to test my new Milwaukee cut off tool, Easy work for it. Pictures, no order
 

Attachments

  • TRD.jpg
    TRD.jpg
    81.9 KB · Views: 47
  • TRD1.jpg
    TRD1.jpg
    135.7 KB · Views: 42
  • TRD2.jpg
    TRD2.jpg
    90.1 KB · Views: 40
  • TRD3.jpg
    TRD3.jpg
    154.6 KB · Views: 36
  • TRD4.jpg
    TRD4.jpg
    144.9 KB · Views: 40
  • TRD5.jpg
    TRD5.jpg
    154.5 KB · Views: 41
Last edited:

SMOKEYBEAR

Well-known member
Joined
Jan 3, 2016
Messages
466
Continuing on disk brakes for the moneypit baja. The disk kit for the front is back from powdercoat and I reassembled today. Started a couple days back but could not find my brake lube so delayed till after a trip to the laps. Finished the front and then started disassembly of the rear in preparation for PC. This is where I ran into an issue. There is a seal on the ebrake actuating lever. I was struggling to remove. Second caliper the seal was part way out. Well in trying to pull it out I tore it apart. The bad news is I cannot find a replacement and the vendors claim these are disposable calipers and you just replace the entire assembly. I’m trying to figure out a solution, any direction/help appreciated! Thanks
Time is money, may take some research and time to find the proper seal. Could you find a new/ rebuilt caliper faster and steal the seals off of it for the ones you have since they are already coated? I know its the more expensive path..
 

rcktpwrd

Well-known member
Joined
Mar 5, 2008
Messages
1,102
Location
Raleigh, NC
Been working on a quick refinishing of my work bench while I have boat parts out for powder coat and new windshields in the works, A few of my recent router sled projects had me screwing stop blocks directly to the table. The top is designed to be replaced, but its been there 20 years now and I've redone the polyurethane a few times, I like the character so I can't bring myself to replace it. Used some plugs and dowels to fill/ repair the wear and use its taken since the last go-round. I've used bondo previously, I like this process better. Plus I got to test my new Milwaukee cut off tool, Easy work for it. Pictures, no order
Bench top look great! Well used but not too abused.
 
To avoid these ads, REGISTER NOW!
Top Bottom