To avoid these ads, REGISTER NOW!

VISE REPAIR 101 all vise repairs, lubricants, sources for parts and the tricks to fix

Midwest Shop Supply

Well-known member
Joined
Jan 22, 2025
Messages
74
Location
Northern Illinois
Sorry to hear that because we need more machinists that like to make parts for our great old tools. I think in some of the first few posts of this thread I created an idea of which members to contact if you need parts and if I did I’ll add your name to it.

Glad to see outlaw had a catalog page for your vise. I had 3 computers crash the last couple decades that had a lot of information and catalogs on vises so instead of gathering them all now I just do my best to recall what I read and learn.

here's the link to the big vise thread that might be a good read for a year or so cause it's got more than a million posts give or take. https://www.garagejournal.com/forum/threads/the-vises-of-garage-journal.44782/

I just added your name to post #6 of this thread mentioning that you make old vise parts. hope that is ok? in case you have time to read there are a few pages of all the vise companies we knew of at the time on a few of the early posts too along with lubricants and other things, but it hasn't been updated in a few years.

glad to have you posting on this thread and GJ!!
Thank you drivesitfar! I will check out this thread, and thank you for adding my name, I appreciate it very much!
 
To avoid these ads, REGISTER NOW!

akasrick

Well-known member
Joined
Apr 10, 2017
Messages
795
Location
south jersey
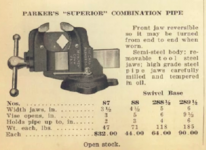
1932 catalog:
Midwest Shop Supply said:
when this Charles Parker No.87 vise might have been manufactured? I

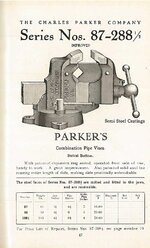
The 1912 catalog shows a pic of the "new style" swivel hold down and an explanation of it for a 1910 patent, not the wrench style of the 1932 catalog. How that happens I have no clue. It looks like the 1912 cat. also alludes too a set screw(?). Possibly the larger vise thread or the vise spreadsheet will shed a little more light on your tool.
87t 2025-04-12 064645.jpgBase 2025-04-12 065139.jpg

akasrick
 

Outlawmws

Well-known member
Joined
Aug 9, 2011
Messages
39,327
Location
The Badlands
The 1912 catalog shows a pic of the "new style" swivel hold down and an explanation of it for a 1910 patent, not the wrench style of the 1932 catalog.

Didn't notice the more conventional lock down type of "wrench"; but the 1912 doc still indicates the brake shoe type lock.

Interesting that the catalog shows the lock on one side, but Midwest's example has it on the opposite side... :dunno:
 

akasrick

Well-known member
Joined
Apr 10, 2017
Messages
795
Location
south jersey
Didn't notice the more conventional lock down type of "wrench"; but the 1912 doc still indicates the brake shoe type lock.

Interesting that the catalog shows the lock on one side, but Midwest's example has it on the opposite side... :dunno:
The last paragraph of Parker's document explains that it could be moved righty lefty. I didn't look into the parts list for that set screw, maybe in retrospect it was digging into the studs' thread and they moved into the wrench type hold down. (??)

akasrick
 

E. H.

Member
Joined
Apr 4, 2025
Messages
5
EH: yes you’ve got one of the cool old rock island made Craftsman 519x’s and I think the guys mentioned which number correctly. If you look on the end of the big hub on main screw there should be 519 and the last number to confirm.

I’m pretty sure your vise should work ok with that piece broken off or I’m guessing it might cost you a bit to have a machinist make you one if you’re not a machinist that can do it yourself.

Maui: I’m ok with you posting old vintage vise parts on this thread cause I’m not sure more than a few of us even know about the vise parts thread. Since this thread is about repairs and it’s where new members and old check to see how it might as well be parts too cause we all need some unobtainable one. if regular posting members want to post their spare parts on this thread to give it a little more reason for others to stop here and participate that's ok by me.
It isn't just that ring that is broken. The base of the nut has a pretty good tear which means the nut doesn't line up well with the spindle so it binds a little when opening or closing. Sorry the photos don't show that tear very well. I am using it that way for now but I guess at some point I'll have to have the nut repaired by closing up that tear and then welding or brazing it
 
OP
D

drivesitfar

Well-known member
Joined
Oct 23, 2013
Messages
36,071
Location
Pacific Northwest
EH: if you know a machinist that might be near you to help or maybe a great welder that might make your repair. Finding a good donor on that model might be impossible but check eBay for both the swivel or stationary version for either a parts vise or maybe just the nut.

Putting your location in your profile could help you find a member or maybe one of us could help you too. A few posts prior Midwest is a great machinist if your near him.
 

Oregon rock crusher

Well-known member
Joined
Jun 28, 2016
Messages
1,913
Location
West of Salem
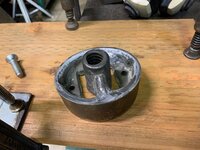
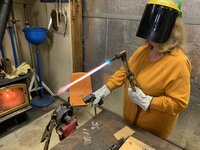
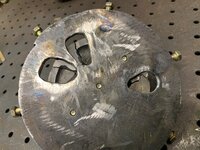
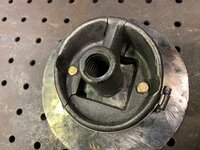
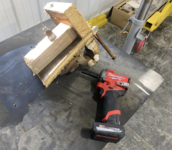
Here is a nut repair job I recently completed for an Oliver pattern makers vise. One of the previous owners had glued the nut together and I didn't spot the very temporary repair until taking the vise apart to clean it up. Nut was broken into three pieces so I made a jig to hold it solidly in position while allowing access to every crack. After securing the nut in the jig I V'd out all the cracks on both sides with a carbide burr leaving only a thin web of original casting touching.

To keep the nut consistently around 350* for welding I had the wife help me by running the torch and temp gun. As the jig required frequent repositioning, I clamped it in a vise for some welds making welding over an open forge impractical. Using nickel 99 I started with the inside cracks first to help pull the nut together. Every weld deposit was peened with a needle scaler after each bead was laid. Outside of the cracks came next and finally the bottom cracks.

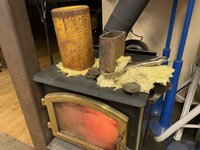
After welding the still hot nut went on the wood stove packed in rock wool insulation overnight. It was still very warm the next morning. After making sure the welds were sound I ground the outer radius down just enough to be an interference fit of around .015 in a 4" steel sleeve. Sleeve was heated up to receive the nut and it was still a very tight press fit. After the nut was encased in the sleeve I finish shaped the sleeve to match the angle cut of the nut. I believe this repaired nut will hold up in use. Ed.
 

Attachments

  • IMG_6351.jpg
    IMG_6351.jpg
    549.9 KB · Views: 40
  • IMG_6340.jpg
    IMG_6340.jpg
    488 KB · Views: 36
  • IMG_6338.jpg
    IMG_6338.jpg
    845.9 KB · Views: 31
  • IMG_6334.jpg
    IMG_6334.jpg
    863.6 KB · Views: 33
  • IMG_6332.jpg
    IMG_6332.jpg
    759.8 KB · Views: 31
  • IMG_6327.jpg
    IMG_6327.jpg
    624.3 KB · Views: 34
  • IMG_6325.jpg
    IMG_6325.jpg
    623.7 KB · Views: 33
  • IMG_6309.jpg
    IMG_6309.jpg
    929.1 KB · Views: 30
  • IMG_6308.jpg
    IMG_6308.jpg
    819.2 KB · Views: 31
  • IMG_6304.jpg
    IMG_6304.jpg
    716.8 KB · Views: 31

12vx2

Well-known member
Joined
Feb 6, 2017
Messages
75
Location
Duck Creek New Mexico
Here is a nut repair job I recently completed for an Oliver pattern makers vise. One of the previous owners had glued the nut together and I didn't spot the very temporary repair until taking the vise apart to clean it up. Nut was broken into three pieces so I made a jig to hold it solidly in position while allowing access to every crack. After securing the nut in the jig I V'd out all the cracks on both sides with a carbide burr leaving only a thin web of original casting touching.

To keep the nut consistently around 350* for welding I had the wife help me by running the torch and temp gun. As the jig required frequent repositioning, I clamped it in a vise for some welds making welding over an open forge impractical. Using nickel 99 I started with the inside cracks first to help pull the nut together. Every weld deposit was peened with a needle scaler after each bead was laid. Outside of the cracks came next and finally the bottom cracks.

After welding the still hot nut went on the wood stove packed in rock wool insulation overnight. It was still very warm the next morning. After making sure the welds were sound I ground the outer radius down just enough to be an interference fit of around .015 in a 4" steel sleeve. Sleeve was heated up to receive the nut and it was still a very tight press fit. After the nut was encased in the sleeve I finish shaped the sleeve to match the angle cut of the nut. I believe this repaired nut will hold up in use. Ed.
Excellent repair. I think the sleeve concept is outstanding. Heat retention and peening make good nickel rod repairs. May be better than new.
 

Outlawmws

Well-known member
Joined
Aug 9, 2011
Messages
39,327
Location
The Badlands
To keep the nut consistently around 350* for welding I had the wife help me by running the torch and temp gun. As the jig required frequent repositioning, I clamped it in a vise for some welds making welding over an open forge impractical.


I just went through the pic sequence (well documented!) after reading through and the thought occurred to me that an old Coleman Stove could be used as a "heated platform" for this type of work, and old ones from the 50's and 60's are plentiful and cheap enough to sacrifice for something like this. Clamps like you setup could be attached to the grate easily. Heck, even the propane stoves from 70's on could be used bur you would want to protect the rubber hose if any (some had metal lines...)
 
Last edited:

Oregon rock crusher

Well-known member
Joined
Jun 28, 2016
Messages
1,913
Location
West of Salem
I agree with you Outlaw and even considered doing just that on my single burner 52. In the end I decided to go with the heat assistant method on this repair as it allowed focused heating rather than general heating and most of the welds were done in the vise to minimize vertical welds. Other methods of holding the nut would have been fiddly and couldn't withstand the heavy peening action.

Keeping the entire nut the same temp seemed more important than any absolute target temp so when I would weld heat would be focused at the bead and she was able to add heat to the other parts of the nut to try and match the lower heat areas to the higher. After the first few beads temps got fairly stable throughout. Preparation took several hours but the actual welding was less than an hour start to finish. Cleaning up the welds, sizing, and pressing on the sleeve added a few more hours. Ed.
 

SouthernIllinois

Well-known member
Joined
Jan 14, 2024
Messages
1,692
Restoring Dad’s vise I found when we moved back.

It's a Dunlap 5244.

Not certain but I believe this was one of my Grandfather's vise before Dad got it. Not sure which Grandfather - they both grew up and lived here their whole lives.

Got the moving parts broke free. Let is soak in Corrosion-X overnight, pressure wash it, sandblast it, paint it and put it back to work.

Screenshot 2025-04-15 at 6.06.54 PM.pngScreenshot 2025-04-15 at 6.07.07 PM.pngScreenshot 2025-04-15 at 6.07.17 PM.png
 
Last edited:

Midwest Shop Supply

Well-known member
Joined
Jan 22, 2025
Messages
74
Location
Northern Illinois
Midwest Shop Supply said:
when this Charles Parker No.87 vise might have been manufactured? I


The 1912 catalog shows a pic of the "new style" swivel hold down and an explanation of it for a 1910 patent, not the wrench style of the 1932 catalog. How that happens I have no clue. It looks like the 1912 cat. also alludes too a set screw(?). Possibly the larger vise thread or the vise spreadsheet will shed a little more light on your tool.
87t 2025-04-12 064645.jpgBase 2025-04-12 065139.jpg

akasrick
Thank you for sharing this! This is helpful, and very interesting. I really love this old Parker and have been on the hunt for more info, so thanks for sharing!
 

wbarnes1001

Member
Joined
Jan 3, 2020
Messages
17
Location
Maryland
WB, I'd go kinda gingerly with the u-joint pressing or any kind of pressing for that matter.---You have a beauty of vise there and it sure would be a tragedy to damage it with too much cranking.---Many a vise has gone to the scrapyard for that very reason.---One really needs an actual press for pressing and a vise for clamping/holding.---But not really any of my business, your vise, carry on.
Yes it has been this long since I logged into GJ...LOL. Thanks for the advice Grouseman. I sold the 65 and have a 67 Shelby now. I will not use the vise to press u-joints.
 
To avoid these ads, REGISTER NOW!

Midwest Shop Supply

Well-known member
Joined
Jan 22, 2025
Messages
74
Location
Northern Illinois
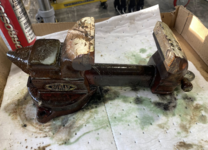
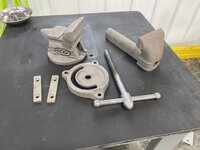
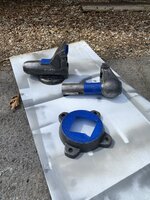
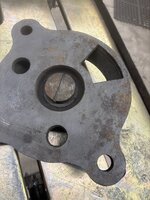
Hey all, i'm looking for a little help here. I've got a Reed 405 with a swivel base center pin that is stuck. I've tried hitting it with Kroil, i've soaked it in evaporust, i've soaked it in PB blaster, all to no avail. Anyone have a suggestion?
 

Attachments

  • IMG_0371.JPG
    IMG_0371.JPG
    1 MB · Views: 21
  • IMG_0372.JPG
    IMG_0372.JPG
    825.6 KB · Views: 20

Midwest Shop Supply

Well-known member
Joined
Jan 22, 2025
Messages
74
Location
Northern Illinois
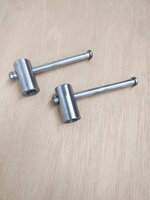
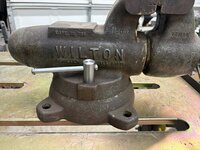
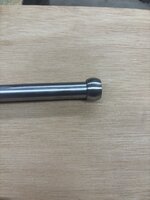
Here is a spindle handle I make for a Wilton #400, it will work on a Wilton C1 and #450 I believe as well. It is 11/16" in diameter x 10.5" long, so it will fit any vise with that size diameter handle. www.midwestshopsupply.com
 

Attachments

  • IMG_0361.JPG
    IMG_0361.JPG
    919.1 KB · Views: 17
  • IMG_0363.JPG
    IMG_0363.JPG
    957.9 KB · Views: 9
  • IMG_0364.JPG
    IMG_0364.JPG
    690.1 KB · Views: 7
  • IMG_0365.JPG
    IMG_0365.JPG
    696.8 KB · Views: 5
OP
D

drivesitfar

Well-known member
Joined
Oct 23, 2013
Messages
36,071
Location
Pacific Northwest
Midwest: it might be time to soak in in a vinegar bath (make sure to rinse vinegar off and dry after it soaks for a day or two). Or electrolysis? Years ago I was able to clamp a vise grip on one and get it loose without dinging up the screw much.

A drag link socket to or make one that is length of the slot?
 

Midwest Shop Supply

Well-known member
Joined
Jan 22, 2025
Messages
74
Location
Northern Illinois
Midwest: it might be time to soak in in a vinegar bath (make sure to rinse vinegar off and dry after it soaks for a day or two). Or electrolysis? Years ago I was able to clamp a vise grip on one and get it loose without dinging up the screw much.

A drag link socket to or make one that is length of the slot?
Yes, i forgot to mention that I did clamp a hand vise grip on to it and knock it with a hammer but that didn't work either. That is a great idea about soaking it in a vinegar bath. I'll give that a try!
 

Outlawmws

Well-known member
Joined
Aug 9, 2011
Messages
39,327
Location
The Badlands
Hey all, i'm looking for a little help here. I've got a Reed 405 with a swivel base center pin that is stuck. I've tried hitting it with Kroil, i've soaked it in evaporust, i've soaked it in PB blaster, all to no avail. Anyone have a suggestion?

If you don't have a very good fitting drag link socket, you (of all people here) can make one - but I'd make the "blade" fairly short in depth and maybe tool steel so you can harden it?

Then, use that with a hammer impact. I've had much better luck with this class of stuck with a hammer impact then the usual mechanic's rattle gun. The hammer imparts vertical and rotational shock you don't get with a gun
 

Midwest Shop Supply

Well-known member
Joined
Jan 22, 2025
Messages
74
Location
Northern Illinois
If you don't have a very good fitting drag link socket, you (of all people here) can make one - but I'd make the "blade" fairly short in depth and maybe tool steel so you can harden it?

Then, use that with a hammer impact. I've had much better luck with this class of stuck with a hammer impact then the usual mechanic's rattle gun. The hammer imparts vertical and rotational shock you don't get with a gun
Yes thats a great idea, I was trying a air hammer chisel in a hammer drill, but that didn't work. I'll definitely try the drag link socket.
 

Midwest Shop Supply

Well-known member
Joined
Jan 22, 2025
Messages
74
Location
Northern Illinois
Midwest: it might be time to soak in in a vinegar bath (make sure to rinse vinegar off and dry after it soaks for a day or two). Or electrolysis? Years ago I was able to clamp a vise grip on one and get it loose without dinging up the screw much.

A drag link socket to or make one that is length of the slot?
drivesitfar: do you use a particular type of vinegar or just any old one?
 

Fretters

Well-known member
Joined
Jan 25, 2014
Messages
4,217
Location
South Yorkshire, England
drivesitfar: do you use a particular type of vinegar or just any old one?

When I personally occasionally go the acid route, white vinegar/acetic acid is my preference. Citric second choice. Then I either dunk the piece(s) in, else pour over the piece(s), boiling water. That rinses it/them off & neutralises the acid. That also heats the pieces so they dry more quickly.
 
Last edited:
To avoid these ads, REGISTER NOW!
Top Bottom