To avoid these ads, REGISTER NOW!

The VINTAGE toolboxes of Garage Journal!

To avoid these ads, REGISTER NOW!

Smokeshow69

Well-known member
Joined
Dec 7, 2012
Messages
8,393
Location
Pacific Northwest
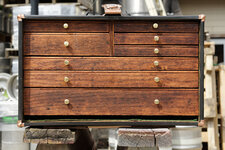
The drawers are as done as they're gonna be:

54462953034_e356163067_o.jpg

A goodly scrub with Murphy's and elbow grease--plus some scraping for nasty globs and the requisite white paint drips--a light coat of thinned BLO and a wiped finish of satin poly. I polished the pulls using a dowel in the DP, as someone suggested above.

The light in that part of the shop *****, but they sure don't look like Outlaw's above--they've had ca. 80 years of use by a by a mechanic with dirty, oily hands and I want to reflect that--just not solid black anymore.

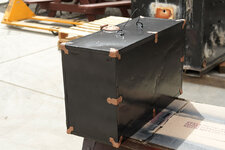
The case got its first coat of Hammered Copper on all the parts that had been brass-plated--but were now red oxide finish. I spent about an hour getting the rust and old paint prepped. Tomorrow, I'll mask the trim pieces and start in on the Hammered Black finish.

54463027088_fedaf37e7f_o.jpg

I just shot a second coat of the HC on the trim--I think it's good. With the Hammered finish paints, I'm finding that a lot of very thin coats doesn't give the desired effect--instead, a few coats as heavy as possible without running is the way to go. It's kind of walking a razor's edge....

I'm leaving the inner edge of the front and the entire bottom original.

You know all the cool stuff you find in and under the drawers in an old cabinet like this?

54462953039_8341738b39_o.jpg

Not this one--it's been pretty well cleaned out. A small Woodruff key, some sort of adjusting tool or shim, a carbide chip for a tool, and a small socket-head screw.
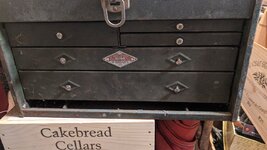
IMG_3096.jpeg
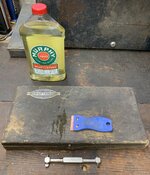
Ok I picked up some Murphy wood soap. What’s your process? Do you dilute it or do you just put it on? As you can see I just ran this plastic razor blade across the lid and it already has scraped up a bunch of junk on the surface
 

Beerhippie

Well-known member
Joined
Oct 13, 2023
Messages
9,985
Location
Far NE Oregon
1/4 cup per gallon, as per the instructions. But then they tell you to use a mop--not real practical on a small object. It also seems like a regular cleaning thing, not removing 80-odd years of machinist's greasy fingerprints. I doubled the dose.

I wetted the wood with it and let set for a few--one ahead of the one I was working on. Then elbow grease with a non-abrasive scrubbie and some scraping.

As per the instructions, it's a no-rinse process. Seems to have taken a finish just fine after a couple of hours of drying in the sun.
 

Smokeshow69

Well-known member
Joined
Dec 7, 2012
Messages
8,393
Location
Pacific Northwest
Smoke, dilute it in hot water so it mixes easier then use it. We have a sprayer we refill that way. I think dilution is in the instructions.

1/4 cup per gallon, as per the instructions. But then they tell you to use a mop--not real practical on a small object. It also seems like a regular cleaning thing, not removing 80-odd years of machinist's greasy fingerprints. I doubled the dose.

I wetted the wood with it and let set for a few--one ahead of the one I was working on. Then elbow grease with a non-abrasive scrubbie and some scraping.

As per the instructions, it's a no-rinse process. Seems to have taken a finish just fine after a couple of hours of drying in the sun.
Good tips guys! I will mix it up in a hot water solution and probably use a towel to dab it on while I scrape it and give it some love. Poor old tap and die set. It has the short lived early heritage logo and deserves to live a better life!
 

Outlawmws

Well-known member
Joined
Aug 9, 2011
Messages
39,315
Location
The Badlands
I'll usually spray it on, and scrub with a Murphy's dampened paper towel. I save scraping for if it won't cut it on its own.

The hardest to cut is generally nicotine layers.
 

four.cycle

Well-known member
Joined
Oct 19, 2015
Messages
29,189
Location
Tacoma, Washington
With the Hammered finish paints, I'm finding that a lot of very thin coats doesn't give the desired effect--instead, a few coats as heavy as possible without running is the way to go.
^ Yes. I use "Rustoleum" hammertone stuff on lawnmower parts - looks great, but you really have to lay it on thick and hope it doesn't run.
 
  • Like
Reactions: 555

Beerhippie

Well-known member
Joined
Oct 13, 2023
Messages
9,985
Location
Far NE Oregon
Since I now have the box identified to maker and model #,

54463785302_07a83c0051_o.jpg

may as well record it for the future. Graphite pencil in a protected area lasts for hundreds of years.

Done painting--still needs a few weeks of cure:

54464620116_a3ceb988f3_o.jpg

54463785292_2fd7fd5b81_o.jpg

Over an hour and a half of masking and I miss that one corner.

54463785287_a2805fa6c4_o.jpg

It came out OK.

I gave the wooden drawer slides a dose of this:

54464893978_a4f0aeee61_o.jpg

They now run as smooth as... wooden drawer slides can.

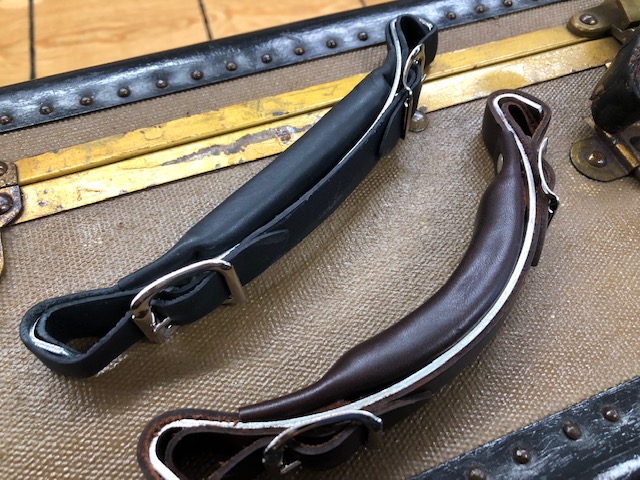
Now to measure and order some green felt to replace the dirty stuff--and order a handle to replace the rotten one. The wire was just for convenience when painting.
 
Last edited:

alinc100

Well-known member
Joined
May 26, 2013
Messages
3,039
Location
Dearborn,MI
Since I now have the box identified to maker and model #,

54463785302_07a83c0051_o.jpg

may as well record it for the future. Graphite pencil in a protected area lasts for hundreds of years.

Done painting--still needs a few weeks of cure:

54464620116_a3ceb988f3_o.jpg

54463785292_2fd7fd5b81_o.jpg

Over an hour and a half of masking and I miss that one corner.

54463785287_a2805fa6c4_o.jpg

It came out OK.

I gave the wooden drawer slides a dose of this:

54464893978_a4f0aeee61_o.jpg

They now run as smooth as... wooden drawer slides can.

Now to measure and order some green felt to replace the dirty stuff--and order a handle to replace the rotten one. The wire was just for convenience when painting.
Considering what it looked like on Friday it's come a long way ,baby!! I like the added script it may come in handy somewhere down the line. Maybe it's enough inspiration to write up an index card with the info I know and tuck it in these cases.
When I cleaned up the 1914 41B , I used Howard's Feed and Wax on the drawer faces, the leatherette, and then with the wax/polish left in the rag I wiped the sides/back of the drawers and all the wooden internals of the case, the wood was pretty thirsty and I could likely wipe a bit more Howard's on in a few days/weeks. Drawers are smooth gliding now , felt removal/replacement is next on the checklist.
 

Beerhippie

Well-known member
Joined
Oct 13, 2023
Messages
9,985
Location
Far NE Oregon
I've ordered new felt.

What's the best way to remove the old? Get it good and wet? Seems the glue is likely hide or hoof glue, given the age.

I also added the date of restoration and my name to the bottom of the drawer. It's little Easter egg for whoever owns it next--written on Easter. ;)
 

alinc100

Well-known member
Joined
May 26, 2013
Messages
3,039
Location
Dearborn,MI
I've ordered new felt.

What's the best way to remove the old? Get it good and wet? Seems the glue is likely hide or hoof glue, given the age.

I also added the date of restoration and my name to the bottom of the drawer. It's little Easter egg for whoever owns it next--written on Easter. ;)
It sound diabolical but some very hot water poured in the drawer for about 30 seconds and the felt will peel right out. Quick wipe of any excess moisture and ready for new felt. Franklin's liquid hide glue ,warmed in a water bath flows great. If you mess up an iron fixes it. I have a roll of Gerstner felt here , I just haven't used it yet. Many say it is the best to work with. It wasn't cheap.
 

Beerhippie

Well-known member
Joined
Oct 13, 2023
Messages
9,985
Location
Far NE Oregon
Considering what it looked like on Friday it's come a long way ,baby!! I like the added script it may come in handy somewhere down the line. Maybe it's enough inspiration to write up an index card with the info I know and tuck it in these cases.
When I cleaned up the 1914 41B , I used Howard's Feed and Wax on the drawer faces, the leatherette, and then with the wax/polish left in the rag I wiped the sides/back of the drawers and all the wooden internals of the case, the wood was pretty thirsty and I could likely wipe a bit more Howard's on in a few days/weeks. Drawers are smooth gliding now , felt removal/replacement is next on the checklist.
I wouldn't trust an index card to keep traveling with the cabinet. Writing it in graphite pencil in a protected location is as archival as it gets--the pencil script will last as long as the wood it's written on. I've found carpenter and roofer's inscriptions in buildings that were over a hundred years old--and I've heard that some much, much older were found in the restoration of the Notre-Dame during the reconstruction.

One owner had a cedar shake with a 1907 roofer's inscription on the bottom framed and hung in the old house we remodeled.

BTW: I left the bottom with what remains of the original paint, should anyone ever care.
 
Last edited:

Private Lugnutz

Well-known member
Joined
Mar 30, 2012
Messages
30,675
Location
The Authentic Jersey Shore
Looks great, @Beerhippie . On one of the threads you have been posting this SIPCO chest I said that I thought black would be a good choice as the big ol' trunk hasp would really pop, and at the time I didn't realize you were going to touch up the hasp and the corner supports, which makes it pop even more. Are you going to replace the handle? If you've gone this far, you might as well. Any salvaged handle would do, but I think brown leather would match the hardware well, and, like the hardware, standout against the black.
 

Beerhippie

Well-known member
Joined
Oct 13, 2023
Messages
9,985
Location
Far NE Oregon
Looks great, @Beerhippie . On one of the threads you have been posting this SIPCO chest I said that I thought black would be a good choice as the big ol' trunk hasp would really pop, and at the time I didn't realize you were going to touch up the hasp and the corner supports, which makes it pop even more. Are you going to replace the handle? If you've gone this far, you might as well. Any salvaged handle would do, but I think brown leather would match the hardware well, and, like the hardware, standout against the black.
I need to go back through the threads and find the link that someone--you?--posted for a replacement handle. I also need to let the bank account recover from too many recent projects.

Hopefully the key shows up soon. Same for the felt. I may be doing some brush painting on things like the inside edge of the case and that one spot where I screwed up the masking.
 

alinc100

Well-known member
Joined
May 26, 2013
Messages
3,039
Location
Dearborn,MI
I need to go back through the threads and find the link that someone--you?--posted for a replacement handle. I also need to let the bank account recover from too many recent projects.

Hopefully the key shows up soon. Same for the felt. I may be doing some brush painting on things like the inside edge of the case and that one spot where I screwed up the masking.
 
To avoid these ads, REGISTER NOW!

Beerhippie

Well-known member
Joined
Oct 13, 2023
Messages
9,985
Location
Far NE Oregon
Preaching to the choir here. I've ordered a couple different iterations of half-mortise locks to see what I can incorporate into the door panel of the 41B.
I was tempted to trying my hand at making one using the old steel core. It's just a strap of steel, wrapped in cotton cloth and finished with the stitched leather. Problem is, my leatherwork always comes out looking like something a third-grader made--not a talented third-grader.
 

Private Lugnutz

Well-known member
Joined
Mar 30, 2012
Messages
30,675
Location
The Authentic Jersey Shore
My first choice is always original and salvage. I have a few surplus right now that I cannibalized off of **** boxes. But I've also re-clad leather handles for several boxes from leather remnants, including a New Britain Precision-Bilt (red boxing glove!), a Snap-on Handikit (old brown sofa!), and a few others, doing my own sewing. Those have all been posted before. But props where props are called for, @Davefr has also done a few for machinists' chests, explicitly, Union, as I recall, and he is a steely-eyed craftsman! :bowdown:
 

MShaw

Well-known member
Joined
Mar 2, 2015
Messages
1,014
Location
York, Pa.
I was looking for a candidate to make a steel user machinist's toolbox when I noticed one at the top of Twertsy's "excess" pile. I contacted him and became the owner of a very solid older S & K box. It was uniformly rusty with very little paint remaining as per the first photo, I removed all the drawer handles, wire brushed the crud off and buffed them. All of the old crusty felt was removed and everything inside and out was washed with simple green, wiped down with mineral spirits, sanded, dusted off and wiped down again with mineral spirits. The decal was stabilized with two coats of archival varnish. I searched the entire domain of rattle can paint and could find nothing that came close to the original wrinkle finish so I settled for gloss paint. Everything was primed and painted. Rust pitting showed thru but my aim was for a user not a museum piece so I accepted that. All the drawers and the top till were felt lined. A handle from McMaster Carr was added. My local locksmith re-keyed the lock.
 

Attachments

  • toolbox.jpg
    toolbox.jpg
    398.1 KB · Views: 33
  • toolbox2.jpg
    toolbox2.jpg
    922.5 KB · Views: 34
  • toolbox3.jpg
    toolbox3.jpg
    263.3 KB · Views: 34
  • toolbox4.jpg
    toolbox4.jpg
    307.3 KB · Views: 37
  • toolbox5.jpg
    toolbox5.jpg
    1 MB · Views: 35

Buckeye93

Active member
Joined
May 28, 2024
Messages
33
What do you guys use to remove iron deposits from a wrinkle finish tool box exterior without damaging the paint? The box looks like hell but is very solid, just a bit stained and I want to find something to remove the rust without hurting the paint IMG_2935.jpeg
Perhaps try some barkeepers friend. But if you have solved it. Let us all know.
 

Beerhippie

Well-known member
Joined
Oct 13, 2023
Messages
9,985
Location
Far NE Oregon
Perhaps try some barkeepers friend. But if you have solved it. Let us all know.
The active ingredient on BKF is oxalic acid. [URL]https://www.barkeepersfriend.com/wp-content/uploads/2014/12/SDS_BKF_Cleanser_Polish_6-12-15.pdf[/URL]

Note that the SDS says not to use it on painted surfaces. It also contains feldspar, which act as a mild abrasive, possibly clouding the paint.

Oxalic acid plays nice with some paint, but not all. I've used it to soak rusty painted pieces in hopes of preserving the paint. Some, like Coleman Green, work well--they come out a little hazy, but it cleans off. Others, like USFS green, come out blue--the oxalic acid dissolves whatever the yellow pigment is.

Experiment on the bottom of the box first.
 

Smokeshow69

Well-known member
Joined
Dec 7, 2012
Messages
8,393
Location
Pacific Northwest
Perhaps try some barkeepers friend. But if you have solved it. Let us all know.
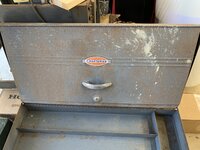
Funny you should mention this… I have been using some Adam’s iron remover for detailing cars on this box this weekend. I have sprayed it on 4 times. Let sit for 5 minutes and then rinse off and repeat. I did agitate it with some stuff bristle brushes. After the final coat I hit it with a meguires heavy duty wheel cleaner gel. The paint is better but not perfect but I think this is as good as it gets. It’s better but not perfect but that’s ok. It’s a solid box. Picture of the most recent view of the front cover post cleaning
IMG_3109.jpeg
 

MShaw

Well-known member
Joined
Mar 2, 2015
Messages
1,014
Location
York, Pa.
Just for the record I did some catalog research and the boxes without the diamond emboss around the pulls like mine are shown in the 1938 and the 1943 wartime catalogs, The 1947 and newer catalogs show the embossed diamonds. It looks like my box could be no newer than 1947.
 

RTM

Well-known member
Joined
May 13, 2019
Messages
13,238
Location
SF Bay Area
Just for the record I did some catalog research and the boxes without the diamond emboss around the pulls like mine are shown in the 1938 and the 1943 wartime catalogs, The 1947 and newer catalogs show the embossed diamonds. It looks like my box could be no newer than 1947.
Dang, thought I saw it the other way. Memory is a fleeting thing.
 

d42jeep

Well-known member
Joined
Oct 22, 2014
Messages
16,585
Location
Northern California
I was looking for a candidate to make a steel user machinist's toolbox when I noticed one at the top of Twertsy's "excess" pile. I contacted him and became the owner of a very solid older S & K box. It was uniformly rusty with very little paint remaining as per the first photo, I removed all the drawer handles, wire brushed the crud off and buffed them. All of the old crusty felt was removed and everything inside and out was washed with simple green, wiped down with mineral spirits, sanded, dusted off and wiped down again with mineral spirits. The decal was stabilized with two coats of archival varnish. I searched the entire domain of rattle can paint and could find nothing that came close to the original wrinkle finish so I settled for gloss paint. Everything was primed and painted. Rust pitting showed thru but my aim was for a user not a museum piece so I accepted that. All the drawers and the top till were felt lined. A handle from McMaster Carr was added. My local locksmith re-keyed the lock.
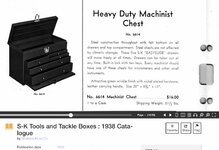
Based on the decal and other details, I believe that yours is prewar. I think this is it in the 1938 catalog. IMG_7807.jpeg
-Don
 
To avoid these ads, REGISTER NOW!
Top Bottom