You are using an out of date browser. It may not display this or other websites correctly.
You should upgrade or use an alternative browser.
You should upgrade or use an alternative browser.
What did you do "IN" your garage today?
- Thread starter mayhemman
- Start date

Prospecter
Well-known member
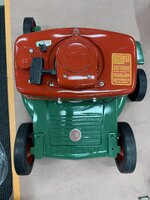
That's before my time. I only remember the lime green ones.Worked on putting this old turd back together. Not too bad for 70 years old!
harley jim
Well-known member

Put new cab mount bushings in my truck today.
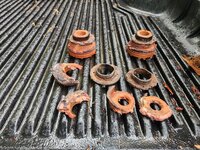
I think they were a bit shot.

Got some urethane pieces.
Now the body lines between the cabin and box are even!
Burt Shaver
Well-known member

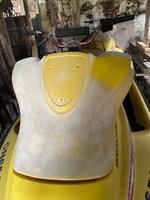

 Tested out a new procedure to restore old faded hoods on an old badly faded wrecked Seadoo hood (top 2 pics) seemed to work pretty good so I used that process on my 95Xp, have to zoom in on the bottom picture to see the difference. I did the left half of the hood quickly just to get an idea of the results. Going to work good. Later this summer I will take that decal off, take the gauges out of the hood and get her cleaned up.
niget2002
Well-known member
Finished wiring up the light on the zero turn and tested it out after dark.
Light off

Light on

Light off
Light on
Long before my time too. It’s a 1955, I’m a 1979!That's before my time. I only remember the lime green ones.
Burt Shaver
Well-known member
BeautifulWorked on putting this old turd back together. Not too bad for 70 years old!

bugnut
ALLIANCE MEMBER
At a minimum, don't know what else it's going to need. Probably for the sake of time go with a new 2000cc or bigger and then disassemble this one, do a full review and figure it out.
Seems like you will need a align bore and new main bearings.
bugnut
ALLIANCE MEMBER
Opened a couple packages from amz. Fog lights are here and electrical connector for ignition switch. Eyeballed the possible mounting of the lights on the tube bumper.
The rear main should not be able to move at all, and crank-to-main flange end play is 4 - 5 thou (I am using inches for y'all down there). 0.028 - 0.040" is repairable with first oversize thrust flange and there is (or at least was??) a 2mm oversize thrust flange (i.e. 0.080") - so case can be salvaged - IF you have access to a shop that can line bore PROPERLY. The original VW tooling was a set of manual reamers, so "back in the day" it was a quick facing of the case (some used a heavy glass plate and grinding paste, studs and dowels out to allow and scuff it a few minutes by hand. There were reamers for bore and end thrust faces. I am mentioning this because very few people alive seem to have the original (and extremely accurate and repeatable) tooling. If you use someone with boring bars, tool setup becomes a critical variable. I have seen all kinds of online videos with DIY boring setups being hand fed and turned with drills. While this sort-of-might work, just not what I could recommend. The surface finish from a reamer is far, far better than a single point boring bar can produce. At the price of machine shop time these days a new case could be more cost effective.Spent more time measuring on the crank and the rear main bearing, put an indicator on both surfaces and then gently moved, bearing moved more than the indicator could measure, so greater than .028", crank moved more than .040" so this is not good. Left it set up so I can digest the numbers and figure out if I have more questions.
Put two new tires and rims, that I picked up from my tire savant, in the stack of parts ready for installation on the baja. Thinking it would be nice to replace the lug bolts, with studs. Gotta find out who sells them and if they are short enough for the aluminum wheels.
Just thought I should also explain: the facing of a good case would allow a return to standard bearing sizes and correct bearing crush. In a not so good one, it would allow one to easily find center main or center cam bearing alignment problems. Cases start out true, but stress relief after casting and machining move them a bit and temperature and fastener torque variations over long time can move them a fair bit.
Last edited:
Hooked
Well-known member
Put the second new air filter in my '94 7.3 diesel and fell back to the old one again. Seems the manufacturers (Wix and Motorcraft) are making the filter material much thinner now so I get engine/air noise in the cab with these new filters. Anyone have a recommendation for a good (heavy duty) replacement?
While doing this I also thought it was probably time to clean, or replace, the CDR valve. I elected to clean it.
While doing this I also thought it was probably time to clean, or replace, the CDR valve. I elected to clean it.
Not sure if it will fit, but IIRC if you can get air to it the factory retrofit severe duty (Donaldspn) made with filtration medium developed for Desert Storm flows far better than any aftermarket or original element and filtration is far, far better. These were developed for later 7.3 that use front air inlet behind grill but I use the side (inner fender) entrance as well. IIRC your truck only has side entrance?Put the second new air filter in my '94 7.3 diesel and fell back to the old one again. Seems the manufacturers (Wix and Motorcraft) are making the filter material much thinner now so I get engine/air noise in the cab with these new filters. Anyone have a recommendation for a good (heavy duty) replacement?
While doing this I also thought it was probably time to clean, or replace, the CDR valve. I elected to clean it.
Fav Onefour
Well-known member
Bummer. Now you have run out of excuses to mow the lawn.Finished wiring up the light on the zero turn and tested it out after dark.
Light off
Light on
The output is pretty impressive.
69charged
Well-known member
Some small stuff on the boat.
Polished up the docking lights.

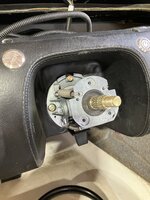
Then tightened up my steering wheel. The tilt mechanism would flop around and I thought it was bushings that were shot. Turns out it was as easy as tightening the Phillips screws that hold it to the helm. Plus added blue loctite.
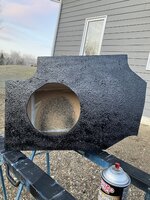
Then a final coat on the sub box. I’ll test it out tonight and see how it sounds. Should be better than the crappy box that was in there.
Polished up the docking lights.
Then tightened up my steering wheel. The tilt mechanism would flop around and I thought it was bushings that were shot. Turns out it was as easy as tightening the Phillips screws that hold it to the helm. Plus added blue loctite.
Then a final coat on the sub box. I’ll test it out tonight and see how it sounds. Should be better than the crappy box that was in there.
Old Man Roger
Well-known member
Fixed a free breaker bar. It’s one of those extendable bars. The release lever was stuck, so of course I hit it with a BFH.LOL
That did the trick, it shot springs, clips, and ball bearings out at a high rate of speed. Luckily they were easy to find, so I put it all back together and dosed it with some oil.
I already have all different length and drive size breaker bars, so I’m not sure what purpose this one will serve, but I don’t have to explain to you guys why I’m happy to have it.lol
An added plus, it makes a great sound when you let the head hang down and pull the release, kinda like when you chamber a shot gun shell.
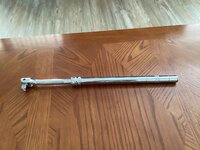

That did the trick, it shot springs, clips, and ball bearings out at a high rate of speed. Luckily they were easy to find, so I put it all back together and dosed it with some oil.
I already have all different length and drive size breaker bars, so I’m not sure what purpose this one will serve, but I don’t have to explain to you guys why I’m happy to have it.lol
An added plus, it makes a great sound when you let the head hang down and pull the release, kinda like when you chamber a shot gun shell.
Hooked
Well-known member
Thanks for this info. I'll check on the Donaldson filter availability/fit(round 12"diameter x 6" height). My air intake is front entrance mounted next to the top of the radiator.Not sure if it will fit, but IIRC if you can get air to it the factory retrofit severe duty (Donaldspn) made with filtration medium developed for Desert Storm flows far better than any aftermarket or original element and filtration is far, far better. These were developed for later 7.3 that use front air inlet behind grill but I use the side (inner fender) entrance as well. IIRC your truck only has side entrance?
I thought you had a 7.3 diesel??? The Donaldson for that engine is a complete system with a cube like box. They were offered as a factory retrofit and option because Ford was losing literally hundreds of engines a year in the Athabasca oil sands around Ft. McMurray AB. The original recangular elements would plug up and collapse, dusting the engine terminally. The first fix was a deeper filter pleat and an airbox with a support for middle of filter - but did not work worth a damn. The Robertson box and element are in my experience the best air filter ever fitted to any car or truck.Thanks for this info. I'll check on the Donaldson filter availability/fit(round 12"diameter x 6" height). My air intake is front entrance mounted next to the top of the radiator.
69charged
Well-known member
Wow! Yeah, those needed changing. Besides the body lines, could you hear/feel the cab hitting something on bumps? I would guess you co feel something with how they looked!!!
Put new cab mount bushings in my truck today.
I think they were a bit shot.
Got some urethane pieces.
Now the body lines between the cabin and box are even!
Slednut
Well-known member
Got the 1966 headlight bezels and grille sorted on my 1967 Fairlane bodied 2016 Mustange GT (Fairstang). This picture shows how well the Mustang's stretched chassis fits under the Fairlane body.

Old Man Roger
Well-known member
That pic reminds of changing the engine on my old 02 Firebird. It was easier to drop the whole subframe than try to maneuver it out the top.
Slednut
Well-known member
This will be the same way, the engine transmission and suspensions are all on a K member, has eighteen bolts that hold it in.That pic reminds of changing the engine on my old 02 Firebird. It was easier to drop the whole subframe than try to maneuver it out the top.
Old Man Roger
Well-known member
I know I’ve probably said this before, and I’m a GM guy, but your project is way cool.This will be the same way, the engine transmission and suspensions are all on a K member, has eighteen bolts that hold it in.
larry4406
Well-known member
Still waiting on the build thread….Got the 1966 headlight bezels and grille sorted on my 1967 Fairlane bodied 2016 Mustange GT (Fairstang). This picture shows how well the Mustang's stretched chassis fits under the Fairlane body.
Nice work!
Slednut
Well-known member
I know it will happen one of these days. Trying to get it done and under two years.Still waiting on the build thread….
Nice work!
Magnum440d100
Well-known member
Watched it flood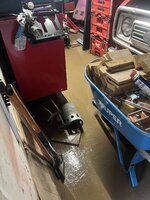
Waters receded.
Got some cleanup to do.
Not sure anything’s worth getting H.O. involved. I’ll know tomorrow after the rest has receded.
Oof.
Wish me luck!
Waters receded.
Got some cleanup to do.
Not sure anything’s worth getting H.O. involved. I’ll know tomorrow after the rest has receded.
Oof.
Wish me luck!
Snapped-off
Well-known member
Serviced the mower today so I could get the first mow in before the rain came.
Only thing that's left is the hydro fluid/filter. Also been getting the shop ready to paint.
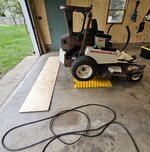

Only thing that's left is the hydro fluid/filter. Also been getting the shop ready to paint.
Old Man Roger
Well-known member
Oh faaaack! From the looks of it, I’d might try just hosing the the mud out. I mean everything that’s gonna get wet is already wet.Watched it flood
Waters receded.
Got some cleanup to do.
Not sure anything’s worth getting H.O. involved. I’ll know tomorrow after the rest has receded.
Oof.
Wish me luck!
Magnum440d100
Well-known member
I like the way you think lolOh faaaack! From the looks of it, I’d might try just hosing the the mud out. I mean everything that’s gonna get wet is already wet.
Tomorrow I’ll start doing some clean up. Just gotta wait for everything to recede
There’s really nothing that I’d cry over if it were toast. Even that plasma monitor isn’t the greatest.
The headers to the truck are under the truck. Those might’ve gotten flooded.
It looks messy in there, but I really was JUST reorganizing everything. But fortunately nothing valuable was on the ground.
Old Man Roger
Well-known member
And now that you know it can flood, don’t ever leave anything valuable on the floor. Maybe get some of those plastic pallets?I like the way you think lol
Tomorrow I’ll start doing some clean up. Just gotta wait for everything to recede
There’s really nothing that I’d cry over if it were toast. Even that plasma monitor isn’t the greatest.
The headers to the truck are under the truck. Those might’ve gotten flooded.
It looks messy in there, but I really was JUST reorganizing everything. But fortunately nothing valuable was on the ground.
JEFFREYWisconsin
Well-known member
- Joined
- Oct 9, 2021
- Messages
- 380
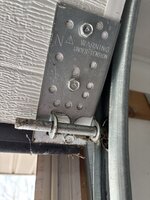
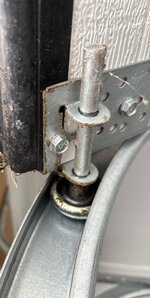
Today I accessed the ability to put one of those thicker seals at the bottom of the main garage door on the house. I get a little water coming in when it rains hard. So, I am not a garage door guy...kinda clueless. Everything would be self explanatory on the install, except the ends.
Anyone have advice? The end bracket needs to be removed... The under tension aspect concerns me, this feel like I could lose a body part? See what I mean?
I could maybe cut around and leave the black piece in under the bracket? I wanna do it correctly but also keep my eyes.
Anyone have advice? The end bracket needs to be removed... The under tension aspect concerns me, this feel like I could lose a body part? See what I mean?
I could maybe cut around and leave the black piece in under the bracket? I wanna do it correctly but also keep my eyes.
Attachments
Old Man Roger
Well-known member
If the cable isn’t connected to it, I would think just put the door halfway down and there shouldn’t be any tension on it. But I don’t know **** about garage doors.lolToday I accessed the ability to put one of those thicker seals at the bottom of the main garage door on the house. I get a little water coming in when it rains hard. So, I am not a garage door guy...kinda clueless. Everything would be self explanatory on the install, except the ends.
Anyone have advice? The end bracket needs to be removed... The under tension aspect concerns me, this feel like I could lose a body part? See what I mean?
I could maybe cut around and leave the black piece in under the bracket? I wanna do it correctly but also keep my eyes.
JEFFREYWisconsin
Well-known member
- Joined
- Oct 9, 2021
- Messages
- 380
the cable is connected!If the cable isn’t connected to it, I would think just put the door halfway down and there shouldn’t be any tension on it. But I don’t know **** about garage doors.lol
niget2002
Well-known member
I really don't mind mowing. This will just let me finish if I get a late start. Plus the paint on the light matches the mower so it looks cool.Bummer. Now you have run out of excuses to mow the lawn.
The output is pretty impressive.
Old Man Roger
Well-known member
Oh, ignore me.lolthe cable is connected!
kaymccampbell
Well-known member
Dragged **** in from the "drywall the cellar entry" debacle. Fetched a lot of tools to install a dashcam in a customer car. Left em on the bench.
SouthernIllinois
Well-known member
- Joined
- Jan 14, 2024
- Messages
- 1,695
First of many exterior lights up using Everette Manufacturing bases

Put up a motion light INSIDE the building.

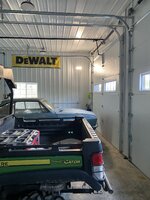
Put up a motion light INSIDE the building.
rsparks64
Well-known member
First of many exterior lights up using Everette Manufacturing bases
Put up a motion light INSIDE the building.
What is the car?
kaymccampbell
Well-known member
Looks like a blue one.What is the car?
kaymccampbell
Well-known member
Maybe a Corvair.
Well it's ready to go!Trying to split this idler pulley to replace the bearing.