To avoid these ads, REGISTER NOW!

What did you do "IN" your garage today?

To avoid these ads, REGISTER NOW!

micromind

Well-known member
Joined
Sep 24, 2023
Messages
3,101
Location
Fernley, Nevada, about 30 miles east of Reno.
Cleaning up then some bronco time. Sore as hell today so probably see if I squeak out some time om the couch with NASCAR.

One of the worst possible things that can befall any human is to know that stuff needs to be done, be motivated to get it done but be too sore to do it.......
 

cannuck

Well-known member
Joined
Nov 30, 2021
Messages
4,658
Location
Rural SK
Put my 8x12 horizontal bandsaw on wheels. Completes my slow campaign to get as many things as possible on wheels. The saw was of course the first thing any fab project sees coming into the shop, so it has had a place beside welders where it lined up with the opening side of the main door. When I need to cut a 45, that's when the problems start. Thing is ****** heavy and space is tight so giant PITA to swing it. Now that it is on 3 x 3" crowned aluminum wheels even my grandkids can easily move it to align or re-position. Inspiration was my 16x12 vertical came on casters. Feels good.
 

kaymccampbell

Well-known member
Joined
Feb 27, 2015
Messages
29,619
Location
Upstate New York
Cut off the experimental rock roll from the dogeater. Chopped off the old skids, too. Welded up and installed new longer, higher skids. Performed a durability test on the new skids. Used my formidable CAD skills to design templates for the chute boards. Parked the Dingo. Recycled the scrap. Left the mess til tomorrow.

IMG_20250504_163825.jpgIMG_20250504_165721.jpg
 

nadogail

Well-known member
Joined
Jan 23, 2009
Messages
32,049
Location
Coronado, CA
Replaced the three knives in my Jointer. The post mark on the envelope they were stored in was 1978, I last changed the knives in 78 or 79 after I bought the machine at a Garage Sale. The Sears instructions were in the envelope with the set of spare knives. I had all the correct size Allen Wrenches and only dropped two of the 12 screws, they fell into the chip collection box.
All in all I count the Job as being successful.
 

alinc100

Well-known member
Joined
May 26, 2013
Messages
3,043
Location
Dearborn,MI
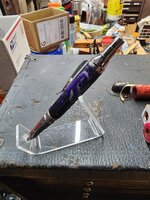
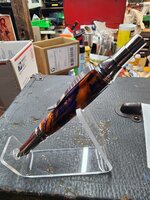
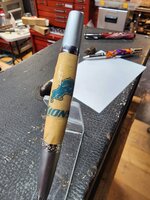
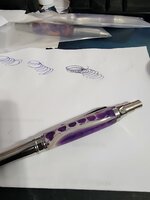
Well other than my garage being storage for the 'too many' tools I buy I'm finally getting around to turning pens again after about 10 years of not turning. I found a supplier that is making stainless steel pen kits in the USA and the quality/fit is great. 2 are acrylic resin the last one is alligator jaw filled with resin.
 

Attachments

  • 20250504_145649.jpg
    20250504_145649.jpg
    910.1 KB · Views: 75
  • 20250504_142747.jpg
    20250504_142747.jpg
    1,003 KB · Views: 57
  • 20250504_142815 - Copy.jpg
    20250504_142815 - Copy.jpg
    762.7 KB · Views: 48
  • 20250504_142926 - Copy.jpg
    20250504_142926 - Copy.jpg
    1.1 MB · Views: 52
  • 20250504_173312.jpg
    20250504_173312.jpg
    232.5 KB · Views: 51

Cheesy1

Active member
Joined
Mar 3, 2025
Messages
42
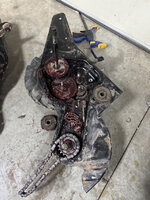
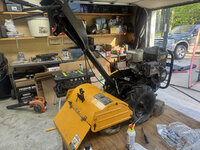
My 72 year old dad came over yesterday and we turned my disassembled tiller transmission (broken chain) back into a functional tiller.

IMG-8063.jpg

I put the tine shroud on today. Changed oil, plug, and air filter. Should be back in business.

IMG-8592.jpg

Starting to migrate tools into my new box.

IMG-8584.jpg
 

rd65

Well-known member
Joined
Sep 29, 2017
Messages
2,833
Location
Granite Falls, WA
My 72 year old dad came over yesterday and we turned my disassembled tiller transmission (broken chain) back into a functional tiller.

IMG-8063.jpg

I put the tine shroud on today. Changed oil, plug, and air filter. Should be back in business.

IMG-8592.jpg

Starting to migrate tools into my new box.

IMG-8584.jpg
sweet box, not my color, but sweet box.
 

larry4406

Well-known member
Joined
Jan 27, 2006
Messages
19,565
Location
Northern Virginia
My 72 year old dad came over yesterday and we turned my disassembled tiller transmission (broken chain) back into a functional tiller.

IMG-8063.jpg

I put the tine shroud on today. Changed oil, plug, and air filter. Should be back in business.

IMG-8592.jpg

Starting to migrate tools into my new box.

IMG-8584.jpg
I did the broken chain repair on our tiller a few years ago.

I used a master link to repair the broken link and put it all back together thinking I was so smart. Well it lasted about 20 minutes and broke in another location. I then installed a brand new continuous chain.

Apparently these chains experience such shock from use, that all of the links pretty much wear out at the same time.
 

SMOKEYBEAR

Well-known member
Joined
Jan 3, 2016
Messages
466
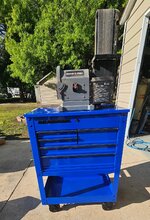
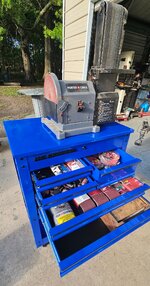
Garage projects have been on hold for a few weeks minus some low level boat maintenance , work schedule during the week and fishing the weekends.

Replaced the stand I had a smaller belt/ disc sander on. It was made out of scrap a while back, served the purpose fine but the storage of extra abrasives was an ongoing exercise of organization. Replaced it with a 30" General cart. I like the organization much better. Removed the locking mechanism so the drawers would open with the lid down, 4 holes in the top and some aluminum angle on the inside to increase the rigidity. Before and after..
 

Attachments

  • PC1.jpg
    PC1.jpg
    473.8 KB · Views: 849
  • PC2.jpg
    PC2.jpg
    374.6 KB · Views: 856
  • PC3.jpg
    PC3.jpg
    494.3 KB · Views: 852

Cheesy1

Active member
Joined
Mar 3, 2025
Messages
42
I did the broken chain repair on our tiller a few years ago.

I used a master link to repair the broken link and put it all back together thinking I was so smart. Well it lasted about 20 minutes and broke in another location. I then installed a brand new continuous chain.

Apparently these chains experience such shock from use, that all of the links pretty much wear out at the same time.
I bought a new one for the drive axle, endless. In hindsight I probably should have replaced the one for the tines while in there.
 

niget2002

Well-known member
Joined
Oct 2, 2012
Messages
11,240
Location
Josephine, TX
Installed the delay timer on the lights on the zero turn. This little device is crazy powerful for what it is. It has the ability to accept two different triggers or simply start when power is applied. All I'm using it for is to delay turning on the lights on the zero turn for 5 seconds after the switch is put into the AUX position. I went with this device because I have other ideas for what I want to do with one and this is a simple test case.

1000003771.jpg
 
To avoid these ads, REGISTER NOW!

PassnThru

Well-known member
Joined
Jan 5, 2010
Messages
6,512
Location
Bowling Green KY
Installed the delay timer on the lights on the zero turn. This little device is crazy powerful for what it is. It has the ability to accept two different triggers or simply start when power is applied. All I'm using it for is to delay turning on the lights on the zero turn for 5 seconds after the switch is put into the AUX position. I went with this device because I have other ideas for what I want to do with one and this is a simple test case.

1000003771.jpg
As I recall you mounted the light on the ROPS - from the shot I saw it looks like it would be right over your head.
I hope you don't have a lot of bugs out at night.......
 

KwikFab

Well-known member
Joined
Jul 27, 2024
Messages
1,224
Location
Central Valley, CA
Sold the CNC table.

20250427_141633.jpg

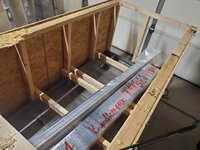
Just need to clean up, give away some steel, and reorganize a few things before my setup arrives.
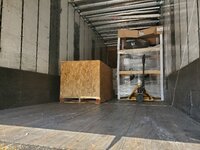
Well, I couldn't leave this space empty for long!

All that steel in the corner was given away - all clean from 2" square, 3" square, and more at lengths up to 6'. Figured someone can make use of it.

Anyway, the real reason for posting.

20250505_091828.jpg

20250505_093511.jpg

20250505_112406.jpg

20250505_112412.jpg

20250505_112719.jpg

20250505_112749.jpg

20250505_112809.jpg

20250505_113009.jpg

20250505_113036.jpg

20250505_124015.jpg

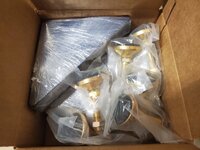
The new (and larger) CNC table just arrived :cool:
 

Motorman55

Well-known member
Joined
Apr 10, 2016
Messages
2,649
Location
South Jersey
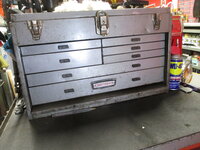
Rainy day lazy just hanging in the garage when for no reason at all I started to clean up the old Craftsman Crown box that used to be my FIL's.

The amount of dirt, grime, oil could only be compared to an old yellowed out coating of shellac. After about an hour of cleaning I managed to get the drawers and top front of the box to a state of nice patina.

I have no desire to, nor will I actually restore/repaint the box, but at some point I'll clean the remaining three sides. Another rainy day lazy time down the road.1746491090220.jpeg1746491041567.jpeg
 

rcktpwrd

Well-known member
Joined
Mar 5, 2008
Messages
1,102
Location
Raleigh, NC
Rainy day lazy just hanging in the garage when for no reason at all I started to clean up the old Craftsman Crown box that used to be my FIL's.

The amount of dirt, grime, oil could only be compared to an old yellowed out coating of shellac. After about an hour of cleaning I managed to get the drawers and top front of the box to a state of nice patina.

I have no desire to, nor will I actually restore/repaint the box, but at some point I'll clean the remaining three sides. Another rainy day lazy time down the road.1746491090220.jpeg1746491041567.jpeg

looks great!
 

Fix Until Broke

Well-known member
Joined
Feb 21, 2016
Messages
796
Location
SE Wisconsin
Installed the delay timer on the lights on the zero turn. This little device is crazy powerful for what it is. It has the ability to accept two different triggers or simply start when power is applied. All I'm using it for is to delay turning on the lights on the zero turn for 5 seconds after the switch is put into the AUX position. I went with this device because I have other ideas for what I want to do with one and this is a simple test case.

1000003771.jpg

I've used those from Timers.shop before - agreed it's amazing what you can do with one and they were relatively cheap, like $20 (but that was 10 years ago).

I setup cornering lights for turn signals on a vehicle that I did an engine swap on and the new engine controls didn't have that functionality but I wanted to keep the corner lights. You need corner lights to be on, only with the respective turn signal, not hazards, only when the headlights are on and they need to be on steady, not flashing.
 

niget2002

Well-known member
Joined
Oct 2, 2012
Messages
11,240
Location
Josephine, TX
I've used those from Timers.shop before - agreed it's amazing what you can do with one and they were relatively cheap, like $20 (but that was 10 years ago).

I setup cornering lights for turn signals on a vehicle that I did an engine swap on and the new engine controls didn't have that functionality but I wanted to keep the corner lights. You need corner lights to be on, only with the respective turn signal, not hazards, only when the headlights are on and they need to be on steady, not flashing.
The timer itself is still only $15. The controller is another $17 or so.

I'm thinking of using one for a water top off. I don't want the water to stay at the top of the bucket, I want it to drain down and then refill. One of these going to a sprinkler valve would work great for that.
 

CoogarXR

Well-known member
Joined
Jan 11, 2016
Messages
6,870
Location
Ohio
At the home garage - finally found the suspension noises in my wife's VW. The front end was a loose swaybar bolt, and the rear is a broken spring that must have just happened this week.

At the new place garage - cutting shims and trim for the kitchen cabinets. Made up some brackets for the under-cabinet lights.
 

Hooked

Well-known member
Joined
Sep 24, 2010
Messages
445
Location
League City, Texas
Spent most of the day doing the annual maintenance on the ZTR. ExMark didn't put zerks on the front wheels so you gotta remove and disassemble the wheels to grease the bearings, which also means replacing the seals. Long messy chore, made even moreso when I thought my grease gun was empty and unscrewed the tube. :lol_hitti
The rest goes quickly -- changing oil & filter, fuel filter, hitting all the grease points and lube points.

Today I need to replace a couple of the worn anti-scrape wheels on the deck.
 

JEFFREYWisconsin

Well-known member
Joined
Oct 9, 2021
Messages
380
Went out to garage, got chain saw, got timber jack, went into woods to clear dead fall and plan my next phases, watered the bare root sugar maples that are part of my reforestation plan.

This is a small area of my front yard, what you see is carefully planned native vegetation, some invasive plants (which will ultimately be removed) and native trees. If you look, there are two cages in the picture showing the landscape. Those are two sugar maples. You can see by using black cages they kind of disappear
and you can replant without looking like a garden center.

Look in the center of the cage in the last picture, the bare root saplings are starting to leaf out, a good sign.
 

Attachments

  • IMG_2179.jpeg
    IMG_2179.jpeg
    2.1 MB · Views: 40
  • IMG_2177.jpeg
    IMG_2177.jpeg
    1.8 MB · Views: 40
  • IMG_2181.png
    IMG_2181.png
    3.8 MB · Views: 41
Last edited:
To avoid these ads, REGISTER NOW!
Top Bottom