To avoid these ads, REGISTER NOW!

What did you do "IN" your garage today?

Beerhippie

Well-known member
Joined
Oct 13, 2023
Messages
10,007
Location
Far NE Oregon
Would love to see how the shots are set up and what it looks like. Those pics look great and I didn’t really notice the table thing tbh.

Timm is his own worst critic, and takes excellent photographs when he does the full setup.


I agree its a round table and the angle of the butcher block pattern looks great. The cans and glass's are vertical (my nemesis when I take pics) and that's all that you really see.
Look at the level of the liquid in the glasses--it ain't level. Sorry, I spent too many years as a carpenter with a "bubble in the ****".

If you've ever worked for a real photo editor... let's just say that "perfect" is only second-best.
 
Last edited:
To avoid these ads, REGISTER NOW!

nadogail

Well-known member
Joined
Jan 23, 2009
Messages
32,042
Location
Coronado, CA
Dodged a bullet...

A few weeks ago I was out of town (of course) and my daughter called me and asked why her Volvo C70 sounded so terrible, "like a jet engine."

My wife heard the noise and had told her to put the car in the garage and turn it off.

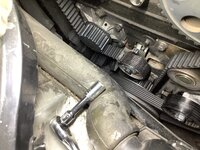
This didn't sound good to me. My first thought was a timing issue and when I arrived home I popped off the timing cover I saw this.

IMG_0226.jpg

The teeth on the timing belt had sheared off. I have no idea what happened. It is a Continental belt bought from Rock Auto so it should be a quality part. By some miracle, the engine stopped right at this point because if it had kept going for another revolution I think I'd of been doing a cylinder head replacement.

IMG_0120.jpg

IMG_0121.jpg
I think the belt slipped a tooth and that was what they heard. It was very fortunate that this happened in the garage and not on the freeway because then it would have been game over for the engine.

I installed a new belt and tensioner and got the engine timed. I then rotated the engine by hand several times to verify the timing and that there was no interference or metal clanking.

Sweating bullets, I held my breath, turned the key and it started up without any issues.

It lives!
Looks like you got Very Lucky.
 

Beerhippie

Well-known member
Joined
Oct 13, 2023
Messages
10,007
Location
Far NE Oregon
Would love to see how the shots are set up and what it looks like. Those pics look great and I didn’t really notice the table thing tbh.
Here's some of my gear set up for a food shoot:

54443638256_d91d2e6751_o.jpg

Working up in the "attic" of the pub allows me to keep the ambient lighting to "mostly don't matter" compared to the continuous lights I'm using.

For the beer photos, I used only the one big soft box left of the table with the grid removed. The grid made a very noticeable reflection in the glass, which wasn't at all natural.

Here's a secret weapon:

54548128709_5f42d771af_o.jpg

A piece of cardboard with aluminum glued to the front, cut out to the silhouette of the glass. Placed out of sight behind the glass, it gives it that "glow". Getting and keeping it out of sight... ay, there's the rub. Too close and the edges show, too far back and the edges of the glass are black.

Now, both glass and aluminum cans are very reflective, so I give them some help:

54548128714_8c3f51b188_o.jpg

(I see a fingerprint in the finish, so I'll have to strip and re-do that one.)

I'd be using a polarizing filter when shooting from the tripod, but these are hand-held snap-shots, so I need the shutter speed. The polarizer removes some of the glare, but not the hard reflections. A quick and light shot of satin Deft clear lacquer dulls the glass nicely and helps to make it look frosty. The lacquer doesn't stick well to glass, so after every use, I clean the glasses and re-apply. I set up with four glasses for this session and had to re-do two of them to finish.

Otherwise, the reflections look like this:

54547948261_07a33e1697_o.jpg

You can probably read the brand and wattage of the bulb in that reflection!

Finally there's a spray-bottle shot of glycerin/water solution to give that "sweaty" look to the glass and can--and then the pour. I spent more time perfecting the pour to get the head of foam just right than anything else. Once right, it's about a five-second window to get the shot, so I stood with a pitcher in one hand and a cable-release in the other and have twenty pictures for every one I showed y'all.

Did I mention it ain't easy?
 
Last edited:

rd65

Well-known member
Joined
Sep 29, 2017
Messages
2,827
Location
Granite Falls, WA
Sort of, maybe, fixed a chocolate fountain for my Mrs. They had one at work that wasnt spinning the lift for the fountain. Found a broken plastic drive gear. Used some super glue and a wrap of safety wire to hold it together. Two gear and a small toothed belt. Makes a lot of noise but was working for the few minutes she ran it.
Cut of a couple scrap pieces of plywood to make a back for a small bookshelf that is used in the exercise room. Stock backing was heavy cardboard. Got things cut to size, ran some sand paper over things real quick, and got the first coat of black paint on them.
Since the saw was out, I cut of a 2x3 and another scrap plywood piece for a shelf for the tv in the same room. The DVD player will go underneath. Wood looks decent enough that I will throw some stain on that I think. Needs some finish sanding first though.
Checked the balance on my recently sharpened mower blades, looked to be ok.
Pulled the mower in to check the blades, they will need sharpening after the next mow or two. Also checked blade height, was off a tiny bit, so fixed that.
Moved a couple of things around to make getting to scrap wood easier. I need to do some reorganizing now that one of the bikes is gone.
 

bugnut

ALLIANCE MEMBER
Joined
Jul 14, 2012
Messages
3,995
Location
Central Ohio
Backed out the mower to let the mud dry so I can clean it. Swept up all the debris from the mower, Moved the Kubota out to the yard. Threw up a couple of sawhorses and then added 2x4 and particle board to make a project table. Put a few pieces on the table and looked them over. Stewed over a print on the x1c then realized it was easier than I though, started a new design and got to printing.
 

zmotorsports

ALLIANCE MEMBER
Joined
Oct 20, 2009
Messages
21,454
Location
Northern Utah
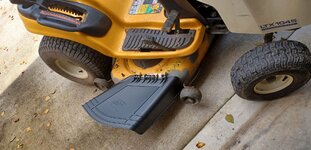
Replaced the discharge chute on the riding mower, then attached a cord so that I can raise it when mowing close to the landscape stones around the flower beds.

20250519_103224.jpg

20250519_110301.jpg

20250519_111954.jpg

After that I sorted 5 more boxes of books from my previous job and set them by the door so I can donate them to the local community college welding school.

20250519_140150.jpg


20250519_141208.jpg

20250519_140614.jpg

20250519_141203.jpg

20250519_141158.jpg

I have and have read some of those books back when I was learning to weld and before so much information was readily available via internet. Some great information in those.
 

zmotorsports

ALLIANCE MEMBER
Joined
Oct 20, 2009
Messages
21,454
Location
Northern Utah
Get yourself a forklift !! All kinds of handy !! This one needs the main lift cylinder resealed. I put the approved 2x4 safety stop in there though so it’s all good.
IMG_3700.jpeg

Sharpened and balanced all three blades.


Dang, I ***** about moving my 42" dual blade fabricated deck around. It's about as much as I can handle by myself using a small two-wheeled hand truck to move it outside to pressure wash. I can see where you need a forklift to do much to that deck. Looks like a beast.
 

jblnut

ALLIANCE MEMBER
Joined
Jan 17, 2015
Messages
7,133
Location
In the Middle of MN
Dang, I ***** about moving my 42" dual blade fabricated deck around. It's about as much as I can handle by myself using a small two-wheeled hand truck to move it outside to pressure wash. I can see where you need a forklift to do much to that deck. Looks like a beast.
72" John Deere drive over deck for the 2038r. I don't know what it weighs but I can barely drag it enough to spin it. I wanted a big deck to power through the acres around here. So far so good. Mama Bear hops on the Hustler and does the corners and trimming and I do the wide open spaces. I can't believe how well it handles thick grass. It'll mow off 12" tall grass in one pass and look nice. I'm actually thinking of selling my brush mower as all use it for is mowing taller grass :dunno:
 

zmotorsports

ALLIANCE MEMBER
Joined
Oct 20, 2009
Messages
21,454
Location
Northern Utah
Was planning out what is going on garage walls in the toy hauler. Found out you shouldn’t put E-Track over carpet. Made he rethink it and drop the carpet all together. What a shame, carpet and trim was donated by the neighbor. Back to him it goes. Looking at DC Cargo for all the E-Track.

A friend of mine put carpet down in his race trailer and I liked the looks of it but he fought keeping it clean for years until he pulled it out.

Then another friend ordered his new race trailer with the "rubber coined" flooring. Again, I liked the looks of it, but what he found was that on warm days when the sandcar and quads were strapped down driving to or from the dunes/races, the tires would grip the rubber flooring better than the flooring on the plywood underneath so the rubber flooring would wrinkle up slightly or bunch up in areas.

I took from their poor experiences and when I ordered my new 26' race trailer, I optioned it with the ATP (Aluminum Tread Plate) style of flooring with 6 recessed 6k pound swivel D-rings then added the E-track according to our needs. The aluminum floor was blinding when the ramp door was down until it got scuffed a little bit.

I liked the carpet option so much that I got a couple of dark gray remnant pieces and had them edged, then cut out where the E-track and D-rings were located so I could roll it out as needed. Then once home, I could pull it outside and vacuum it or shake it off. It actually worked out well and that way I only used it when I wanted it and didn't have to deal with it when I didn't. Just something to consider if you still want to use the carpet.
 

zmotorsports

ALLIANCE MEMBER
Joined
Oct 20, 2009
Messages
21,454
Location
Northern Utah
72" John Deere drive over deck for the 2038r. I don't know what it weighs but I can barely drag it enough to spin it. I wanted a big deck to power through the acres around here. So far so good. Mama Bear hops on the Hustler and does the corners and trimming and I do the wide open spaces. I can't believe how well it handles thick grass. It'll mow off 12" tall grass in one pass and look nice. I'm actually thinking of selling my brush mower as all use it for is mowing taller grass :dunno:

Awesome. That may be a bit much for my 3/4 acre property though. 😆
 

bulletpruf

Well-known member
Joined
Nov 28, 2013
Messages
11,130
Location
San Antonio
I will sometimes purposefully take on a project that is possibly too far gone or not financially worth taking on, because it challenges me and I can very intentionally practice skills on a low-stakes project where a screwup wouldn't ruin my week.

I like how you think. Kind of how I'm approaching my 24 Hours of Lemons '72 Javelin race car.

IMG_3282.jpg
 

Beerhippie

Well-known member
Joined
Oct 13, 2023
Messages
10,007
Location
Far NE Oregon
So do I. Have any been built in the last 40 years? I'd love to know of a source for reliable info about reliable info about specific engines.
My '93 Toyota Corolla 1.8L 7AFE is non-interference--which is fortunate, as it was about three teeth out of time when I bought it. New timing belt and it runs like a (thirty-year-old) top!

VW's flat fours (AC and Wasserboxer) have always been non-interference and gear-driven--but maybe not under 40 years of age.
 

Jay__Dub

Well-known member
Joined
Nov 19, 2024
Messages
1,256
Location
Cold Country, Canada
Spent too much time under my truck arguing with the top starter bolt. Next I'm going to try going through the wheel well.

There is no room on top, the ******* socket keeps slipping off.

I'm sure there is a group of Ford engineers somewhere who regularly get together to laugh their guts out about that bolt.

These are the times you wish you had a hoist.
 
To avoid these ads, REGISTER NOW!

rzims

Well-known member
Joined
Oct 25, 2006
Messages
461
Location
Grass Valley, CA
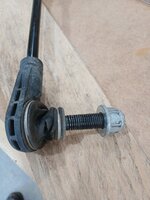
Spent the morning replacing sway bar end links on the wife's bronco sport.
The guys that did the lift, didn't do a very good job installing it and buggered up the seals. It started squeaking a year later and when I took it back, I guess they just threw some threadlocker on there and hit it with an impact wrench.
Started squeaking again last week so I took the wheels off and the seals were all twisted up.
Had a heck of a time getting them off. Ended up using a torch to heat them so the nut would loosen....
All better now...
20250527_080733.jpg20250527_113301.jpg1000011155.jpg
 
Last edited:

phred

Well-known member
Joined
Apr 23, 2009
Messages
527
Location
NC
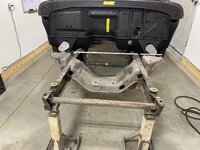
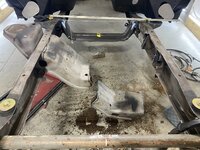
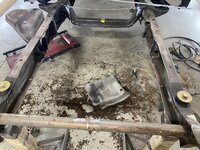
Chopped the front crossmember out of the ‘66. Prepping it for new goodness.
 

Attachments

  • IMG_3467.jpeg
    IMG_3467.jpeg
    802.7 KB · Views: 41
  • IMG_3469.jpeg
    IMG_3469.jpeg
    1,020.4 KB · Views: 31
  • IMG_3470.jpeg
    IMG_3470.jpeg
    1.1 MB · Views: 30
  • IMG_3471.jpeg
    IMG_3471.jpeg
    1.2 MB · Views: 31
  • IMG_3478.jpeg
    IMG_3478.jpeg
    572.4 KB · Views: 36

KwikFab

Well-known member
Joined
Jul 27, 2024
Messages
1,218
Location
Central Valley, CA
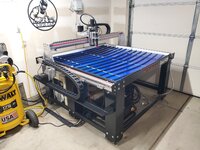
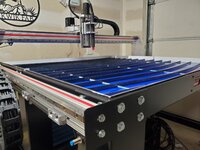
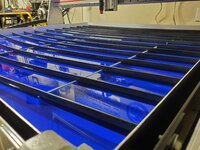
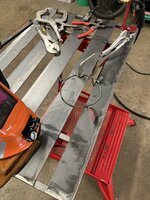
At 58" x 58" and almost 2.5" of water, this table is easily over 1,000lbs.

20250527_151719.jpg

Could've filled it a bit less since I personally like to have a nice gap between my steel and the water.

20250527_154211.jpg

20250527_154126.jpg

It's been over 3.5 hours since I filled it and not a single drop anywhere on the floor.

That 3M Marine 5200 adhesive is serious ****.

Can't wait to grab some steel in the next few days and get this fucker dialed in.
 

nadogail

Well-known member
Joined
Jan 23, 2009
Messages
32,042
Location
Coronado, CA
Started assembly of a different style of raised bed planter. This style uses 5 gallon buckets and 2X4 lumber.
I am building the prototype from materials that have been in my storage for in some cases years.
After I get the design and process smoothed up I be able to determine what my current cost basis is.
After determining my cost and labor, I’ll be able to decide on a price.
 

KwikFab

Well-known member
Joined
Jul 27, 2024
Messages
1,218
Location
Central Valley, CA
Yes it is, I glued part of a jet ski together with it, the Jet part.lol I had zero confidence it would hold. I was wrong.

Damn

I mean, there's a ton of videos specifically detailing what parts of a boat to use it on and where 4200 is the more acceptable solution

If you don't want it to come apart, use 5200 for sure

Just wish I knew about the Fast Cure stuff, I let the 3M I used (only where the two pans meet) sit and cure for about 7 days
 

DGersic

Well-known member
Joined
Mar 12, 2017
Messages
6,374
Location
DeKalb, IL
Finished making a charcoal support ring, that I started on yesterday while waiting for the ribs in the smoker to cook.

IMG_7152.jpeg

I use a Weber charcoal chimney, works great when starting a load of charcoal for the grill. But when starting the smoker, I only need ten coals (Minion method) to put in the basket of charcoal and wood. That’s too few to stack in the chimney.

What I normally do is make a rope out of aluminum foil,to go around the outside edge, then pile my 10 coals in the middle. This ring replaces the aluminum foil rope. The legs go out against the body of the chimney.

We‘ll see how it works the next time I smoke something. Got two more racks of ribs and most of a brisket in the freezer that need cooking.

Puttered with the fast idle adjustment screw (Holley) to raise it a bit. Cold starts, it wants to stall unless I keep my foot on it for ~20 seconds. I think it’s better, need a cold start to test it to be sure.

Swept, cleaned, put away, and prepared to fling. The old mower and Camry parts need to go away, garbage day is Friday.
 

Beerhippie

Well-known member
Joined
Oct 13, 2023
Messages
10,007
Location
Far NE Oregon
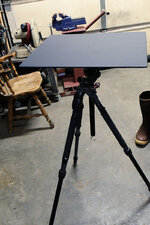
I said I'd make one and I did:

54550588551_95c77721a1_o.jpg

A tripod-mounted table for my beer photography, which will allow me to easily level the table so the beer is level in the glass. Just a 17" X 20" piece of 6061, painted flat black and drilled and tapped to 1/4"-20 to accept the mounting screw of a tripod head QR plate. Now I need to order a QR plate for the the only pan-tilt tripod I own, as it's a Bogen head, which uses a different plate than my other tripods (Arca-Swiss ballheads, which are less suited for this use)--and I've lost the only plate I had for it. Sure to find it sometime right after the new one arrives.

The tripod-mount table will also allow me to shoot from a more comfortable level that a table top, which has me either crouching or sitting in a chair to see through the lens.
 
Last edited:

nadogail

Well-known member
Joined
Jan 23, 2009
Messages
32,042
Location
Coronado, CA
My 12" Sears Craftsman Commercial Floor Saw (I bought it used about 50 years ago) would not start, i found that both of the 240 Volt supply legs had become disconnected from the power switch. I slid the terminal lugs back onto the switch and reminded myself t check it again someday.
 

Jazz1

Well-known member
Joined
Jan 3, 2016
Messages
4,188
Location
Thunder Bay On.
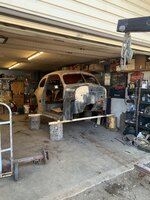
I had to lift body off the junk frame..looped sling through windshield and lifted rear with jack..easy enough. Parts run tomorrow for the car in the bush …
 

Attachments

  • att.UBu-RXtdaajS2hAIzm9PVZR3jYGhxGW_7QGq6ttuXWw.jpeg
    att.UBu-RXtdaajS2hAIzm9PVZR3jYGhxGW_7QGq6ttuXWw.jpeg
    302.1 KB · Views: 46

  • att.UKR9c_nVbnxpC-OS-1D4ez2ae-_oh8Qgbgrhqq60kqs.jpeg
    att.UKR9c_nVbnxpC-OS-1D4ez2ae-_oh8Qgbgrhqq60kqs.jpeg
    428.8 KB · Views: 47
  • IMG_3562.jpeg
    IMG_3562.jpeg
    924.6 KB · Views: 48
  • IMG_3561.jpeg
    IMG_3561.jpeg
    1,006.9 KB · Views: 47

Prospecter

Well-known member
Joined
May 16, 2015
Messages
2,443
Location
Maine
Started assembly of a different style of raised bed planter. This style uses 5 gallon buckets and 2X4 lumber.
I am building the prototype from materials that have been in my storage for in some cases years.
After I get the design and process smoothed up I be able to determine what my current cost basis is.
After determining my cost and labor, I’ll be able to decide on a price.
And using up stored materials, too! Win-Win! :rocker:
 
To avoid these ads, REGISTER NOW!
Top Bottom