To avoid these ads, REGISTER NOW!

Between 705 & 1200 SQ/FT Humble Shop in the North

Workspaces between 705 and 1200 squarefeet.

Aladinsane07

Well-known member
Joined
Aug 13, 2020
Messages
69
Location
MN
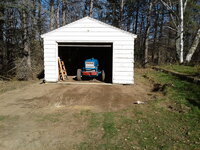
Well the time has finally come to start a thread for my new shop. My wife and I have been in our house for 5 years come June. When we were shopping she had a long list of musts for our new house; I had one - at least a useable shop space. Shocker: she got all her wants and I got this 16 ft. x 15 ft. tiny garage. That's not to say I didn't try and make the most of it. I've finished tons of projects and maintained all of our vehicles (as well as many close acquaintances) out of this sub-optimal space. But to say we've outgrown it is the understatement of the year. I snapped this during one of my frequent re-arranging / cleanup sessions.

PXL_20231022_224803454.jpg

The last few years I've had it in my head that THIS would be the summer I was building a new shop. I just finally came to the realization that there's not going to be an extended period of time where life doesn't get in the way and all the stars will align. So it's finally happening. Unfortunately, I live in Minneapolis proper and they really like to discourage building at any chance possible. The permitting has been a challenge to say the least. I'll spare you all the details.

One positive I have going for me is that I live on a very old block without an alley and it was zoned before the city "standardized" on 5,200 sq.ft lots. That means I can take advantage of the 10% of total lot size (vs. the 660 sq.ft max that is usual), for a hefty fee of course. 10% of the total lot, 8,720 sq.ft, puts me at 872 sq.ft of buildable space. I'm also opting for as high a wall as allowable - 10 ft. at top plate. Oh, and another fee. Here's an aerial of where the new shop will live. The final dimensions will be 33.5 ft x 26 ft., or 871 sq.ft.

Garage - West outline.PNG

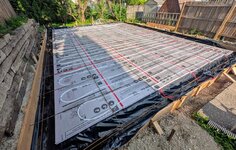
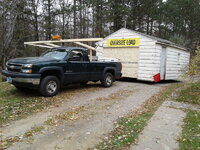
I've tried to absorb as much as I could from this community over the last few years. All that reading has essentially boiled down to me deciding on a few crucial elements to this build: as much square footage as legally allowable, radiant floor heating in-slab, half attic trusses and half vaulted trusses to allow for a lift in the future. I have concrete scheduled for the end of the month so it's starting to feel slightly real. I have a few work trips before that time (life getting in the way), so it'll be tight to get the current building unloaded (ugh), things moved into storage, and then torn down.

Thanks to anyone who reads and participates along the way. I'm handling everything except for concrete and roofing, so I'll take all the advice I can get.

- Evan
 

Attachments

  • Garage - West.PNG
    Garage - West.PNG
    536.9 KB · Views: 84
To avoid these ads, REGISTER NOW!

Mark I

Well-known member
Joined
Sep 8, 2008
Messages
68
Location
Mendota Heights, MN
You have my sympathies for forging ahead on this in MPLS. We lived in northern Dakota County for 27 years and decided we’d had enough of MN. And I’m a MN native.

Looking forward to seeing what you come up with. I’m about 4 weeks into building a shop very close to your dimensions. 24x34. Took me about 12-13 months to find a builder, get plans made, permits, HOA approval etc. Pic attached of what it looks like today. Builder will finish the outside, and I’m on my own for everything inside. BTW, we are now living in update SC.
 

Attachments

  • IMG_6618.jpeg
    IMG_6618.jpeg
    1.1 MB · Views: 117
Last edited:
OP
A

Aladinsane07

Well-known member
Joined
Aug 13, 2020
Messages
69
Location
MN
You have my sympathies for forging ahead on this in MPLS. We lived in northern Dakota County for 27 years and decided we’d had enough of MN. And I’m a MN native.

Looking forward to seeing what you come up with. I’m about 4 weeks into building a shop very close to your dimensions. 24x34. Took me about 12-13 months to find a builder, get plans made, permits, HOA approval etc. Pic attached of what it looks like today. Builder will finish the outside, and I’m on my own for everything inside. BTW, we are now living in update SC.
I was on the fence about moving back to MN before we bought here. We were living in Rapid City, SD for a while but are both MN natives. She has aging parents that will need care soon so that made the decision for us.

Looks like a really great building! Mr. Roboto has a great thread that helped me visualize the space built out. If I recall correctly, he has the exact dimensions you do.

Thanks for following along and good luck finishing off your garage!
 

Ultradog MN

Well-known member
Joined
Jan 20, 2024
Messages
752
Location
Twin Cities
What will you do with the old garage?
Is there room to sneak it out between the houses?
I'm just 1-1/2 blocks north of Mpls in Anoka county.
7 Years ago it was my time to build a new garage. The old one - 14x22' was still structurally sound and I hated to tear it down to make room for the new one.
So I lifted it up, set it on my trailer and hauled it up to my property in Aitkin, MN.
Ìt was a fun project.
Here are a couple of photos.
Edit:
Never mind. 14' is the max width they will allow you to pull down the hjghway.
 

Attachments

  • IMG_20161023_094529487.jpg
    IMG_20161023_094529487.jpg
    35.9 KB · Views: 121
  • 20161023_105524_1.jpg
    20161023_105524_1.jpg
    356.7 KB · Views: 102
  • 20161024_135402.jpg
    20161024_135402.jpg
    351.7 KB · Views: 101
Last edited:
OP
A

Aladinsane07

Well-known member
Joined
Aug 13, 2020
Messages
69
Location
MN
What will you do with the old garage?
Is there room to sneak it out between the houses?
I'm just 1-1/2 blocks north of Mpls in Anoka county.
7 Years ago it was my time to build a new garage. The old one - 14x22' was still structurally sound and I hated to tear it down to make room for the new one.
So I lifted it up, set it on my trailer and hauled it up to my property in Aitkin, MN.
Ìt was a fun project.
Here are a couple of photos.
Edit:
Never mind. 14' is the max width they will allow you to pull down the hjghway.
Hey, neighbor!

Funny story...

IMG-20250512-WA0005.jpg

The dumpster got delivered yesterday so a couple family members helped me get a start on the tear down. We filled the 30 yd. dumpster so I have to wait a few days for the company to swap it out with an empty one. As far as salvaging the building, unfortunately it was beyond saving. When we first moved in I had to replace a dozen or so of the wall studs and sister several ceiling joists. Not to mention every wall was ****-eyed, there were 3 layers of roofing stacked one on top of the other, etc. As far as I can tell the garage was put up around the time the house was - 1922.
 
OP
A

Aladinsane07

Well-known member
Joined
Aug 13, 2020
Messages
69
Location
MN
The second dumpster was dropped off last night so I was able to finish up the teardown. It's funny how perspective can change on size so often. This previous garage was objectively tiny, but when I had it all cleared out it seemed nearly livable. But now that I'm looking at just the concrete pad it looks miniscule again. It is pretty nice to see an unobstructed view of the area the new garage will be. I'm going to do a quick layout this weekend to help visualize better.PXL_20250515_122553473.jpg
 
OP
A

Aladinsane07

Well-known member
Joined
Aug 13, 2020
Messages
69
Location
MN
Will you be able to save any of that concrete or is that going away too?

Hope you have a dry and safe location for your tools in the pic?
All of the concrete is going away. Hard to tell from this picture, but it's extremely cracked and tired. It will be replaced by 4.5" thick 4500 psi pad.

Don't worry, the tools are all safe. It's just a constant game is Tetris getting everything put away at the end of every night 😂
That's a nice looking 350F...and 400 behind?

I've been looking for a clean 350, its tough!

Great build. keep it coming!
Thanks! The downside of having a cool wife is that she doesn't want to ride on back, she wants her own. I've had the orange 550F for years and she got sick of not having one, hence the 350F. Same goes with Land Cruisers; we now own two because she didn't want to just borrow mine 🫠
 

andyvh1959

Well-known member
Joined
Feb 15, 2020
Messages
2,590
Location
Green Bay WI
I noticed the bikes 1st. My first brand new bike was a 74 CB350F back when I was 16. I traded it in for a 78 CB750K after 13000 miles. Back in 2014 I bought a running 72 CB350F with a title for $300. It's on the project schedule in my shop.
 
To avoid these ads, REGISTER NOW!
OP
A

Aladinsane07

Well-known member
Joined
Aug 13, 2020
Messages
69
Location
MN
Looking forward to the build! Nice start so far. :)
Thanks for the support!
I noticed the bikes 1st. My first brand new bike was a 74 CB350F back when I was 16. I traded it in for a 78 CB750K after 13000 miles. Back in 2014 I bought a running 72 CB350F with a title for $300. It's on the project schedule in my shop.
That must have been such a riot to ride off the lot in '74. And at 16 years old no less. Same year as mine. I love all the SOHC Hondas of that era, but the 350/400s are just so fun.
 

andyvh1959

Well-known member
Joined
Feb 15, 2020
Messages
2,590
Location
Green Bay WI
Yeah, I felt like the big man on campus in high school, all 5'-6" of me, 130lbs, riding my new shiny Honda four. Walking into school in my leather jacket carrying my Bell Star helmet. That is, until a classmate shorter than me shows up on a Ducati 750SS. My Honda was my 1st loan, $1300. My dad cosigned for me at tge credit union. He said, "miss one payment and that bile is mine." All the incentive I needed. I think I paid like $50 every Friday. Less than a year later it was totally mine.
 
OP
A

Aladinsane07

Well-known member
Joined
Aug 13, 2020
Messages
69
Location
MN
No updates for this week, unfortunately. Had to travel for work, but the silver lining is that it came after teardown and while I'm waiting for concrete. Spent the week visiting and checking on project progress at our Costa Rican plant.

I was supposed to have most of Sunday free to actually do some exploring, but I got stuck on the runway of my Atlanta connection flight for 3.5 hrs due to weather. The other bummer was my coworkers were more than happy to eat dinner every night in our little tourist shelter zone and wouldn't venture into the city. The whole week felt like trying to evaluate a nice wine by staring at the bottle; all this beauty and culture around us but we were so isolated from it.

PXL_20250520_230439856~2.jpg

Our plant is in this serene valley surrounded by mountains.

I was able to convince one of my Costa Rican coworkers to smuggle me out for lunch one day. Off roading is huge here and you see tons of modified 4WDs. Pretty cool car culture. This really nice FJ40 was outside the restaurant we went to.


1000002177.jpg

Sent a few emails back and forth regarding permitting while I was traveling. I think I *finally* have all the nonsense they're requesting in order. Fingers crossed 🤞.
 
OP
A

Aladinsane07

Well-known member
Joined
Aug 13, 2020
Messages
69
Location
MN
The site cleaned up very nice, looking forward to seeing the build.
Thank you for sharing!
Thanks! Happy to have you along.

I spent the day taking down a small tree, clearing some brush, and just generally tidying while I wait for concrete. Speaking of, concrete contractor called and said they're a few days behind because of all the rain. Hopefully it stays just a few days 🙃

I've been trying to visualize what the dimensions of the new shop will look like. Hopefully this helps others as well. Starting from survey mark in the corner (back right of the picture) I put stakes (shown by red dots) in what should be the final dimensions. I'm standing in the what will be the front right of the shop.

1000002198.jpg
 
OP
A

Aladinsane07

Well-known member
Joined
Aug 13, 2020
Messages
69
Location
MN
It's been unseasonably rainy here the last month and a half. There was a 3 week stretch where it at least sprinkled every single day. Needless to say, there's been delays.

But good news! The concrete guys have been working this week. First to remove the old slab. I had to work that day so I had my wife continually update me on progress. I think the crew got sick of the oversight. Or at least this one guy.

1000002293.jpg

1000002294.jpg

1000002295.jpg

The next few days were removing dirt to get to final depth and do rough layout. I got slightly concerned that I had to correct the layout twice. First time was because they set it up directly on the property marker. Then they laid out 26' square instead of 33.5' x 26'. Oh well, people make mistakes; just glad I caught it.

They ran out of fill on Friday so work will continue on Monday.

1000002310.jpg
 

nicholam77

Well-known member
Joined
Dec 18, 2016
Messages
2,655
Location
Minneapolis, MN
Checking in from Saint Louis Park! 😂

That's a nice sized shop for a city lot! I'm at least able to park both cars (barely) in my detached 18'x20' alley garage, but it's a squeeze. Not much room for storage and tools.

It's been unseasonably rainy here the last month and a half. There was a 3 week stretch where it at least sprinkled every single day. Needless to say, there's been delays.

OMG the rain! Where is summer?

I had to work that day so I had my wife continually update me on progress. I think the crew got sick of the oversight.

I would do the same. Unfortunately I have little trust in contractors. Good catch on the layout. I'm sure you're paying good money for it so gotta make sure it's done to your standards (and correctly)!

What are the wheels on the Audi? Holeshot RSR? In any case I like that style, looks good.

Subscribed and looking forward to following a long with this one.

🍻
 
OP
A

Aladinsane07

Well-known member
Joined
Aug 13, 2020
Messages
69
Location
MN
Checking in from Saint Louis Park! 😂

That's a nice sized shop for a city lot! I'm at least able to park both cars (barely) in my detached 18'x20' alley garage, but it's a squeeze. Not much room for storage and tools.

Well hey there, neighbor! I've been following your thread for a while. I think it was about a year ago I was going to help you install some shocks and springs on the GTI.

You're right. No alley and living in an old part of NE Mpls is a blessing in terms of lot size. I'm trying to make the most of it; only sacrificing 1 sq.ft off the max allowable :)

What are the wheels on the Audi? Holeshot RSR? In any case I like that style, looks good.
Good eye! You're correct. They photograph much more silver, but they're technically a deep bronze color. I think it works well with Daytona Grey of the car.

Thanks for following along 🍻
 
OP
A

Aladinsane07

Well-known member
Joined
Aug 13, 2020
Messages
69
Location
MN
Took another big step this weekend by getting the slab insulation and PEX ran for radiant heat. It was honestly all pretty smooth and I had a hand later in the day to help wrangle the PEX, which made it go so much smoother.

Uponor has such a helpful piece of software on their website to help design your loops. You essentially fill in some key details about your building like wall construction, concrete details, window/door openings and it will spit out your loop layouts, all the components needed, as well as some nerdy data like expected heat loss, etc. VERY helpful for wrapping my head around what was completely unknown to me.

Here's the layout that was suggested.
1000002375.png

I started by laying 6 mil poly underlay then 2" foam insulation over that. I taped all the poly joints and the foam together.


1000002377.jpg

Next we just tried to match the layout as close as possible. The foam insulation has a built-in grid that saved us tons of measuring.

1000002378.jpg

Almost looks like we knew what we were doing!

1000002379.jpg

Next up is rebar, first inspection, then concrete 🤞
 
OP
A

Aladinsane07

Well-known member
Joined
Aug 13, 2020
Messages
69
Location
MN
Hey look - rebar! Calling for inspection tomorrow.

1000002407-jpg.2363367
1000002408.jpg
 

Attachments

  • 1000002407.jpg
    1000002407.jpg
    1.2 MB · Views: 680
OP
A

Aladinsane07

Well-known member
Joined
Aug 13, 2020
Messages
69
Location
MN
following!
Thanks for checking it out :) 🍻
Looks like a nice size garage. Looking forward to more updates. Would love to swing bye and see it sometime.
Good idea! Maybe I'll throw a garage-warming party once it's finished.

Concrete day! The guys showed up early this morning. They had to use an additional pump truck to ferry the concrete up my fairly long, narrow driveway. Had to do a fair amount of vibrating to ensure the radiant lines in the rear were fully encapsulated and not trapping air pockets.

PXL_20250712_1706521512.JPG

They added a nice radius to the leading edge.

PXL_20250712_17073025523.jpg

Today ended with them doing a last spray down and adding a sealant. Tomorrow he'll come back and cut the control joints and remove the forms. Oh, and I have to write a big check :oops:. I'm really excited that from this point on I can transition the updates from just "here's pictures of the work other people did" to updating on work I actually put into getting this building up and ready.
 
Last edited:
OP
A

Aladinsane07

Well-known member
Joined
Aug 13, 2020
Messages
69
Location
MN
Time for an update.

After the pad had cured for a week, I called a buddy who had some experience laying concrete block. I asked him to just help me verify the mortar looked right, lay a couple blocks, then I'd take it from there. WRONG! When I went to measure and snap lines I was astonished. Here's how the pad measures:

1000002614.png

That makes the corner-to-corner measurements off by nearly 10.5"! I'm still just so confused because I measured the corner-to-corner on the forms and it was within 1/16".

The only positive here is that at least they messed up by making the pad bigger in every dimension. I quickly went into salvage mode and needed to figure out how to "hide" the excess pad and establish square walls. Obviously I wanted it towards one of the back walls where it would be less visible. We used the ol' 3/4/5 method to find square and iterated several times until that rectangle we made equally hid the excess to where it made sense.

Here's just a quick picture of making the arc and finding the intersection:
1000002615.jpg

Once I had a perfectly placed rectangle, I could actually go about laying block. This was a steep learning curve to say the least. It didn't help that that day was 93° and insanely humid. As soon as I got a feel for the moisture level in the mortar, it had evaporated off. But I got in a groove and things were going well by starting in my corners and meeting in the middle.

A couple examples of where my inexperience showed when I got to the middle of the back wall.
1) When the city wanted me to add this CMU course to the plans, I never considered if my dimensions actually worked with available block sizes, i.e. - are my dimensions divisible by the block length.
2) I set the inlet for utilities and the radiant lines in line with my bottom plate. Well again, when the CMU was added I didn't account for the spacing needed to actually get block over them.


First, I had to fix another oopsie the concrete company made. They had a footer board break the plane of the pad and left a void.
1000002617.jpg

Quick fix:
1000002619.jpg

Then onto blocking around the radiant/utilities. Masons - avert your eyes! I tried to chisel out the center of several blocks, with them all collapsing when I'd nearly have them finished. I tried salvaging some with cleaner breaks and jumble together a configuration of broken pieces that would work.

1000002616.jpg

And how it turned out:1000002618.jpg

I've got some cleanup to do where the mortar got messy in a few spots, but all in all I'm pretty happy to be moving on from blocking.
 
Last edited:
OP
A

Aladinsane07

Well-known member
Joined
Aug 13, 2020
Messages
69
Location
MN
I took a few days off work ahead of Labor Day to start framing.

Day 1:

I started with the simplest wall. No windows or doors to deal with, just one straight section to knock out. The pressure treated bottom plates are warped enough that they're really fighting me. It was leaving a major gap on one side of the studs. I got more than half the first wall up before I decided now was the time to fix it; it would bug me forever.

I read a few things online that said to soak the wood overnight or wet it down and clamp it against something straight. Having taken the day off I was really hoping for a more immediate solution. Here's what I came up with.

1000002732.jpg

A couple clamps, some cut off 2x6, and a set of spring compressors. I'd essentially set up the clamps and cutoffs to get the baseplate mostly in position and then slowly sinch down the spring compressors until the stud was flush across it's entire contact length. It worked surprisingly well. Much slower obviously than just shooting a few nails into the stud, but I'm much happier with this outcome. I was starting to lose light when I got the first wall back up.

1000002733.jpg

More to come tomorrow.
 
To avoid these ads, REGISTER NOW!
Top Bottom