To avoid these ads, REGISTER NOW!

Machining pure Tungsten?

RoninB4

Well-known member
Joined
Jul 22, 2020
Messages
3,615
Location
Under My House
To get that deep I was peck cutting maybe 0.100” pecks and withdrawing the tool completely but the chips more of a dust would want to drip back down.
-Interesting that the material turned to crumbly dust.
More of a mixture of dust and cutting fluid.
-Could almost be considered lapping compound or abrasive mud.
I ended up using a light air blast on the tool to clean it as it came out of the hole.
-Probably a better strategy using air as an additional aid, don't know about cutting fluid for what you're doing. I use compressed air, mounted if possible for continuous use, when using carbide cutters in a hole to evacuate everything in the hole. Allowing ANYTHING to remain in the hole is subject to re-cutting and is certainly NOT helping you. I run carbide dry to avoid "mud".
 
To avoid these ads, REGISTER NOW!

RoninB4

Well-known member
Joined
Jul 22, 2020
Messages
3,615
Location
Under My House
Really do need to get some insert tools. Any recommendations?
-There's only two types of people that should offer recommendations and I'm not one of them:

1) Those that have actually machined pure tungsten like you're doing, varying results.
2) A rep from one of the insert makers. A good rep will know more about the application of his inserts than 95% of machinists because, if the rep is sharp, he'll have observed and worked with his clients to develop a solution that establishes trust and repeat sales. A good rep will also see the potential being associated with what your shop/company is doing. A good rep may also toss you some free stuff, holders and inserts, to try out just to establish the account. This is not uncommon.

-I was a longstanding member of Practical Machinist and a great number of recommendations for machining problems were to contact the rep for suggestions. The rep may even have other clients that are/have also found solutions for machining tungsten. See if the rep offers a CVD or PVD coating for the inserts. Both Kennametal and Sandvik used to be good companies to work with, don't know about now. A short read on speeds/feeds and assorted info on machining tungsten is below:

 
OP
N

no704

Well-known member
Joined
Apr 27, 2016
Messages
5,229
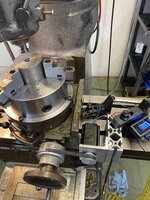
Began working on the lid today. Started with a 1/4” drill, 23/64 drill then 3/8 endmill to 0.335” deep. That went pretty well, could definitely tell the 1/4” was getting dull.
Then proceeded to start the 1/4” deep pocket that will be 2.510 diameter. Was pretty happy with a 0.030 doc. Lots of cranking! Came up with this from stuff I had laying around. Got to .2” radially before it was obvious this end mill is done. IMG_1970.jpeg
 
OP
N

no704

Well-known member
Joined
Apr 27, 2016
Messages
5,229
Did you ever get that quote back from Xometry? :lol: This looks as much fun as having Cap't Hook for a proctologist.
Didn’t get one. I’m determined now! And yes it’s lots of fun. I did find that McMaster has double ended coated end mills for less than single uncoated! Not sure if a larger diameter cutter might last longer?
 

mike93lx

ALLIANCE MEMBER
Joined
Dec 9, 2013
Messages
37,870
Location
Richmond, VA
Didn’t get one. I’m determined now! And yes it’s lots of fun. I did find that McMaster has double ended coated end mills for less than single uncoated! Not sure if a larger diameter cutter might last longer?
How much og the 5k have you spent? 😉
 
OP
N

no704

Well-known member
Joined
Apr 27, 2016
Messages
5,229
How much og the 5k have you spent? 😉
It was 6k and I’m about a week in plus maybe $500 in tooling. So like 2k and I have new tools also. And have learned things. Like don’t machine pure tungsten! Expect to spend another 3 days on this. And probably some more tools so should end up at about 3k. And a lesson.
 

mike93lx

ALLIANCE MEMBER
Joined
Dec 9, 2013
Messages
37,870
Location
Richmond, VA
It was 6k and I’m about a week in plus maybe $500 in tooling. So like 2k and I have new tools also. And have learned things. Like don’t machine pure tungsten! Expect to spend another 3 days on this. And probably some more tools so should end up at about 3k. And a lesson.
"lesson" should be on the roi calc right next to "cost reduction"
 
OP
N

no704

Well-known member
Joined
Apr 27, 2016
Messages
5,229
No, no, I support learning lessons through trying. I'm on your side here
No sides. Just trying my best to complete another impossible job. Glad to have you all along for the ride. And I do appreciate the feedback! Should have done this with my impossible to cast pure aluminum journey a couple years back.
 

scooby074

Well-known member
Joined
Oct 26, 2008
Messages
5,259
Location
Nova Scotia
Did you ever get much help over on Practical Machinist? They would be the guys who work with this stuff on the regular youd think?
 
OP
N

no704

Well-known member
Joined
Apr 27, 2016
Messages
5,229
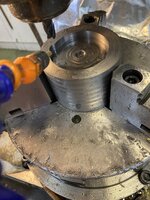
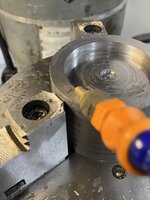
Got my cheap o mister set up today! Much better if a little more mess. Actually making chips instead of slurry. Only about another 1/2” to go 0.020” passes IMG_1973.jpeg
 
Last edited:
OP
N

no704

Well-known member
Joined
Apr 27, 2016
Messages
5,229
Was getting way too much slop in the rotab, so tore it down and cleaned and reassembled with a little more torque on the compresson sleeve. And fitted a real toothed cog on the drive. Should be back to making chips in the am. Thinking about getting a higher tooth count mil. The four flutes are really beating things up!
 

RoninB4

Well-known member
Joined
Jul 22, 2020
Messages
3,615
Location
Under My House
Was getting way too much slop in the rotab,
-Yep, no real surprise there.
Thinking about getting a higher tooth count mil. The four flutes are really beating things up!
-You might also want to consider improving chip extraction from the hole, the photo and my failing eyesight show a lot of debris remaining in the path of the cutter for re-cutting of chips. This material is rough on cutters, re-cutting chips can't be helping. I don't know if cutting fluid is as important as chip extraction here so perhaps using just a good stream of compressed air will improve tool life. I prefer using cutting fluid but sometimes liquids will allow chips to cling to surfaces and the cutter itself. When milling aluminum in a pocket the surface finish often clearly shows when re-cutting chips is evident. Evacuating ALL the chips during a cut path can improve things. This may/may not help extend the short tool life. Some strategically placed cardboard to contain the flying chips would help avoid scattering debris. This is just a suggestion from a spectator, you'll have to find what really works.
 
OP
N

no704

Well-known member
Joined
Apr 27, 2016
Messages
5,229
Using an air blast/mister on the tool. Hitting it with a shop vac and air gun to clean out around every half turn. Almost there, about another 0.100” to cut! Chips flying is not an issue. I really hope never to do this again!IMG_1981.jpeg
 

RoninB4

Well-known member
Joined
Jul 22, 2020
Messages
3,615
Location
Under My House
Using an air blast/mister on the tool. Hitting it with a shop vac and air gun to clean out around every half turn.
- I meant all chips should fly out of there as soon as they're cut, waiting to clean it out every half turn allows re-cut. It's your decision.
 
To avoid these ads, REGISTER NOW!
OP
N

no704

Well-known member
Joined
Apr 27, 2016
Messages
5,229
- I meant all chips should fly out of there as soon as they're cut, waiting to clean it out every half turn allows re-cut. It's your decision.
I understand what you’re putting down! The mist/blower keeps the tool clear of chips. And not a ton of chips being made. I’m only taking 0.020” doc.
 
OP
N

no704

Well-known member
Joined
Apr 27, 2016
Messages
5,229
Well it seemed like something was moving around. Got out my trusty Last Word and mounted it to the spindle to double check my part location. Well that’s a little bit crunchy! Will be transferring everything to the other mill and ordering spindle bearings tomorrow. Can’t say I was terribly surprised !
 

IndyGarage

Well-known member
Joined
Apr 29, 2010
Messages
9,738
Location
Indy
Sorry late to the table. I used to have some tungsten jobs when I was a manufacturing engineer a long time ago.

Really good setup. Solid carbide tools - coated. 150-300 SFPM - .002 - .004 depth of cut. In other words chips almost like dust. If you use ceramic you have to go faster, but you risk chipping the tip.
 
OP
N

no704

Well-known member
Joined
Apr 27, 2016
Messages
5,229
Sorry late to the table. I used to have some tungsten jobs when I was a manufacturing engineer a long time ago.

Really good setup. Solid carbide tools - coated. 150-300 SFPM - .002 - .004 depth of cut. In other words chips almost like dust. If you use ceramic you have to go faster, but you risk chipping the tip.
Coolant or no? I’ve been running 0.020 doc slowing down the rotary as the pocket as it gets larger. At about 2.25” now. Running around 400 rpm. Have the rotab doing a revolution in about 15 minutes. Using coated carbide 3/8” 4 flute endmills. With mist coolant. Have not calculated SFPM being a manual machine.
 

RoninB4

Well-known member
Joined
Jul 22, 2020
Messages
3,615
Location
Under My House
Well it seemed like something was moving around. Got out my trusty Last Word and mounted it to the spindle to double check my part location.
-Just as an FYI: The venerable Last Word indicators aren't very well thought of in some circles due to sticking in the antiquated open movement design. When it does start getting sticky you might not know it unless you're paying particular attention to it. Several people have reported getting burned on something they thought was dialed in. Last time I looked I don't think Long Island Indicator was willing to repair those. Just thought you might want to know. Most of the Federal indicators aren't as good as they should be either.
Well that’s a little bit crunchy! Will be transferring everything to the other mill and ordering spindle bearings tomorrow. \
-Spindle bearings? For the mill?
Can’t say I was terribly surprised !
-Then you can't be terribly disappointed either?
 
OP
N

no704

Well-known member
Joined
Apr 27, 2016
Messages
5,229
-Just as an FYI: The venerable Last Word indicators aren't very well thought of in some circles due to sticking in the antiquated open movement design. When it does start getting sticky you might not know it unless you're paying particular attention to it. Several people have reported getting burned on something they thought was dialed in. Last time I looked I don't think Long Island Indicator was willing to repair those. Just thought you might want to know. Most of the Federal indicators aren't as good as they should be either.

-Spindle bearings? For the mill?

-Then you can't be terribly disappointed either?
Yes for the mill. Not really. YouTube makes it look like a pretty easy process to change them out. Another learning opportunity!
 
OP
N

no704

Well-known member
Joined
Apr 27, 2016
Messages
5,229
I’m aware of there reputation, I’ve been using this last word for 15 years and got it used! I have others but it’s always worked well for me!
 

IndyGarage

Well-known member
Joined
Apr 29, 2010
Messages
9,738
Location
Indy
Coolant or no? I’ve been running 0.020 doc slowing down the rotary as the pocket as it gets larger. At about 2.25” now. Running around 400 rpm. Have the rotab doing a revolution in about 15 minutes. Using coated carbide 3/8” 4 flute endmills. With mist coolant. Have not calculated SFPM being a manual machine.
heavy mist is probably OK. I'm thinking your RPM and your feedrate is probably real slow, which will keep you from getting a good finish. Probably running like 25 SFPM. And I calculate your feedrate at only .00019 per tooth. That's not enough.

Increasing the speed will give you a better finish, but also strain your setup and machine more.

More depth of cut on an endmill just requires more horsepower so .02 is probably OK for now. I'm feeling like you are not biting the material enough to get a clean cut.

The endmill cuts as each tooth advances into the material - your feed rate per tooth should be .001 to .002 and it's .00019 - what that does is work harden the material at the surface and you are not digging under the heat affected zone. The problem is tungsten is a very hard material and also pretty resistant to heat.

This may sound crazy but what if you set your rotab at 3 minutes per pass vs. 15 minutes? Would it break something? That would give you 5x the cut per tooth and raise it up to .001 . I think you would get a better finish.
 
OP
N

no704

Well-known member
Joined
Apr 27, 2016
Messages
5,229
heavy mist is probably OK. I'm thinking your RPM and your feedrate is probably real slow, which will keep you from getting a good finish. Probably running like 25 SFPM. And I calculate your feedrate at only .00019 per tooth. That's not enough.

Increasing the speed will give you a better finish, but also strain your setup and machine more.

More depth of cut on an endmill just requires more horsepower so .02 is probably OK for now. I'm feeling like you are not biting the material enough to get a clean cut.

The endmill cuts as each tooth advances into the material - your feed rate per tooth should be .001 to .002 and it's .00019 - what that does is work harden the material at the surface and you are not digging under the heat affected zone. The problem is tungsten is a very hard material and also pretty resistant to heat.

This may sound crazy but what if you set your rotab at 3 minutes per pass vs. 15 minutes? Would it break something? That would give you 5x the cut per tooth and raise it up to .001 . I think you would get a better finish.
I’ll try speeding up the rotab. Thanks for the advice.
 

Grant Gunderson

Well-known member
Joined
May 17, 2013
Messages
2,330
Location
Bellingham, WA
Yes for the mill. Not really. YouTube makes it look like a pretty easy process to change them out. Another learning opportunity!
I did the ones on my Bridgeport a while back and it was pretty easy and straightforward. I upgraded to sealed bearings so no more using spindle oil and I wouldn’t go back. It’s amazing how much better it runs now and the part quality is obviously better. Only regret is I didn’t do it sooner.

My advice is if you need to replace the spindle bearings you should also do the rest of the ones in the head ******* you will already be in their and those are not too crazy expensive.
 

IndyGarage

Well-known member
Joined
Apr 29, 2010
Messages
9,738
Location
Indy
I’ll try speeding up the rotab. Thanks for the advice.
I imagine you are probably burning up end mills like crazy at the low feed rate. It seems counter intuitive, but cutting metal is just like digging in sun-drenched dry hard clay. The surface has been heated so it's rock hard. If you cut under it and dig in the material below then your tools cut better.

The question is whether a 3/8 end mill can handle the pressure of the higher feed rate. Sometimes it's balancing between burning them up and breaking them.
 

Steve_P

Well-known member
Joined
Sep 15, 2010
Messages
5,185
So, this is obviously too late, but you shouldn't use FHCS unless absolutely necessary. And I don't see why it's necessary here.

Because when used in a pattern, there can be ~.03" error in the tap and C'sink positions and this will lead to a bending stress at the bottom of the head that can easily reach 30% of the fastener's yield strength. And then the tensile stress from the torque is 70% of the yield, so now it's a TTY fastener. In the future, use SHCS. Plus, with the tiny hex in FHCS, people just love to strip them.

As said, tungsten is used for rad shielding because of density. You can use mild steel, it just needs to be ~2.5X thicker. Most rad shielding is just mild steel when there is the room for it. Then lead. Then tungsten. But lead typically needs to be enclosed now- make a sheetmetal enclosure, pour molten lead inside, seal the box with a welded cap. DOE hasn't allowed "naked" lead for decades AFAIK and has been using old lead bricks to be melted down for engineered and encased lead shielding.

OP, if you're machining lead, you better use PPE and clean up your **** or you'll be blacklisted if you ever get a DOE contract and they get a part back that's been microscopically contaminated with anything like: PB, BE, CD.... All of that is a "stop work" and you'll be fucked for months and no more work. And if you're machining lead on the same machine as other work, then that's a red flag.

We do nasty machining, but on dedicated machines in specialized ventilated cells that see nothing else but more of the same.
 
OP
N

no704

Well-known member
Joined
Apr 27, 2016
Messages
5,229
I imagine you are probably burning up end mills like crazy at the low feed rate. It seems counter intuitive, but cutting metal is just like digging in sun-drenched dry hard clay. The surface has been heated so it's rock hard. If you cut under it and dig in the material below then your tools cut better.

The question is whether a 3/8 end mill can handle the pressure of the higher feed rate. Sometimes it's balancing between burning them up and breaking them.
Speed up the rotab (after getting it set up on the other Bridgeport) working quite well. With my stepper controller set to 20 it was a 12 minute cycle, changed to 80. Yes I was burning up endmills in only a few passes. Made three passes with the new speed today and still seems good. I had just thought that was the nature of trying to machine Tungsten! It being a sintered product I was not expecting work hardining. But it obviously was. I really appreciate your input! Haven’t really gotten any real advice from anyone that had real experience with this material over several different sites. Hopefully the rest of this job will go smoothly!IMG_1983.jpeg
 
OP
N

no704

Well-known member
Joined
Apr 27, 2016
Messages
5,229
So, this is obviously too late, but you shouldn't use FHCS unless absolutely necessary. And I don't see why it's necessary here.

Because when used in a pattern, there can be ~.03" error in the tap and C'sink positions and this will lead to a bending stress at the bottom of the head that can easily reach 30% of the fastener's yield strength. And then the tensile stress from the torque is 70% of the yield, so now it's a TTY fastener. In the future, use SHCS. Plus, with the tiny hex in FHCS, people just love to strip them.

As said, tungsten is used for rad shielding because of density. You can use mild steel, it just needs to be ~2.5X thicker. Most rad shielding is just mild steel when there is the room for it. Then lead. Then tungsten. But lead typically needs to be enclosed now- make a sheetmetal enclosure, pour molten lead inside, seal the box with a welded cap. DOE hasn't allowed "naked" lead for decades AFAIK and has been using old lead bricks to be melted down for engineered and encased lead shielding.

OP, if you're machining lead, you better use PPE and clean up your **** or you'll be blacklisted if you ever get a DOE contract and they get a part back that's been microscopically contaminated with anything like: PB, BE, CD.... All of that is a "stop work" and you'll be fucked for months and no more work. And if you're machining lead on the same machine as other work, then that's a red flag.

We do nasty machining, but on dedicated machines in specialized ventilated cells that see nothing else but more of the same.
Appreciate the input. I chose FHSCs due to the thickness (lack of) of the plate. And I wanted it more locked in. I did use a pilioted counter sink.
If I had the lead shield job to do over I would definitely look into starting with a SS housing. Proper PPE was used and the area has been cleaned up. Still need to deal with the chips, I’ll probably melt them down and cast ingots.
 
OP
N

no704

Well-known member
Joined
Apr 27, 2016
Messages
5,229
I did the ones on my Bridgeport a while back and it was pretty easy and straightforward. I upgraded to sealed bearings so no more using spindle oil and I wouldn’t go back. It’s amazing how much better it runs now and the part quality is obviously better. Only regret is I didn’t do it sooner.

My advice is if you need to replace the spindle bearings you should also do the rest of the ones in the head ******* you will already be in their and those are not too crazy expensive.
Ordered a set of sealed spindle bearings today. I don’t believe that other than dropping the spindle out anything else needs to come apart. On this mill the head still seems pretty happy so I’ll only be doing the spindle. The other one I switched to today could definitely use a little more love in the top end.
 

IndyGarage

Well-known member
Joined
Apr 29, 2010
Messages
9,738
Location
Indy
Ordered a set of sealed spindle bearings today. I don’t believe that other than dropping the spindle out anything else needs to come apart. On this mill the head still seems pretty happy so I’ll only be doing the spindle. The other one I switched to today could definitely use a little more love in the top end.
Where did you order the bearings and how much were they? I have an Bridgeport head I was restoring that I'm go to put on my K&T 2H - I found a bridgeport adapter for the overarms a few years ago and just never got to the head.
 
OP
N

no704

Well-known member
Joined
Apr 27, 2016
Messages
5,229
Where did you order the bearings and how much were they? I have an Bridgeport head I was restoring that I'm go to put on my K&T 2H - I found a bridgeport adapter for the overarms a few years ago and just never got to the head.
Bridgeport Milling Head Repair
$260 with shipping. H&W was almost $500. I really wanted to support them for the great videos but not $200 much.
 
To avoid these ads, REGISTER NOW!
Top Bottom