To avoid these ads, REGISTER NOW!

What did you do "IN" your garage today?

To avoid these ads, REGISTER NOW!

Outlawmws

Well-known member
Joined
Aug 9, 2011
Messages
39,296
Location
The Badlands
Big post, lots of pics, but I got that Coleman Gypsy stove with the broken screw complete adn abck operations. some cosmetic work to do on the box, but that waits til I decide what will kill/convert rsut but not kill remainng paint:

On our last progress episode we last left our hero with a main burner cap screw twisted off: icon_evil.gif
outlawmws wrote: Tue Jul 22, 2025 7:38 pm
Then I went back to the garage and the vise, where the stuck screw is being worked and I'd decided that since I had the plate able to move a bit. the screw couldn't be far behind. so I got my small Hammer impact, checked that the bit was a good fit and immediately got some action; I wasn't even smacking it hard. About two turns worth it suddenly was lose, but not rising.... Not good.

I picked up the burner plate and sure enough, the head had twisted off:
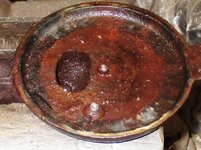
Broken-screw-1.jpg

Broken-screw-2.jpg

So now its drill and extract; or more likely drill and re-tap/peel the threads out. I do need to find a new similar screw and it looks like its 12-24 -I need to positively confirm that. I have taps, for that size, I need to see about screws...
I lost more than a day as I was still trying to be gentle(and life interfered...) with what was sticking up, and I also soaked it in De-rusto and the USC (I should have started there...) the short story of that was it never budged and my best vise grips for this work simply twisted off what was left.

Two days ago I center punched the far side, drilled small, went up a size, 4X, before kissing thread indications, and picked a bit out. Then went again on the thicker parts with a tiny die grinding burr in a Dremel, and got more out, exposing some threads, and then went with a 10-24 tap.

Victory!

Got-it-2.jpg


I'd already found and modified a replacement CS screw, and away we go! before I seasoned most of the manifold:

Gypse-Mod-10-Complete-with-fire-001.jpg


After 4 coats of seasoning with Grape seed oil - I stayed out of the inside of the burners and the burner caps:


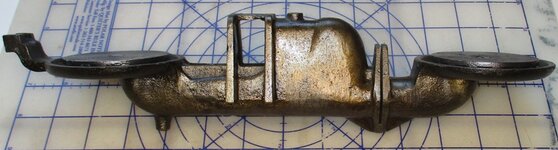
Comp-1.jpg

Comp-2.jpg

Comp-3.jpg

Comp-4.jpg


Assembled!:


Comp-5.jpg

Comp-6.jpg

Comp-7.jpg


No, the tank is not dented, some odd reflection?
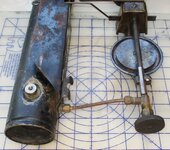
Comp-8.jpg


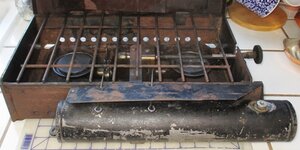
In use position:

Comp-9.jpg


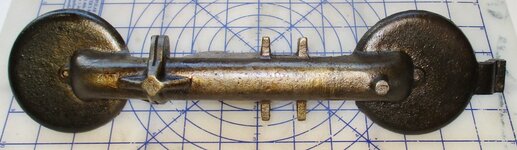
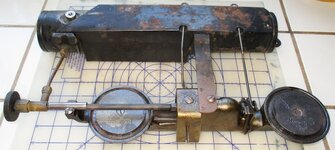
And everything that came with it, I'm assuming an original pump, and a "spare" from an iron: No funnel, those pliers were solid rust, they also got de-rusto. Tthey are actually "period correct" CEE TEE Co (Crescent Tool Co.) pliers, but not issued wit the stove. I found no "pliers marks" thankfully.
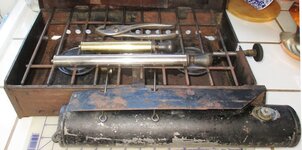
Comp-10.jpg


And the light up! I gave it less than half a tank ther was a little fule I could not pour out but what ahd was absolutly clean. It was stored with pressure adn evrythong worked to I went with the takn "As Is":


40 pumps (I had also pressure tested with 40), and filed and lit the primer cup:

Fire-1.jpg


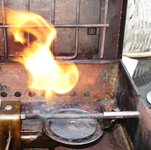
Starting to get the genny to spit during preheat - valve closed:

Fire-2.jpg


Hot blast! valve fully open:

Fire-3.jpg


Main burner lift off!

Fire-4.jpg


Secondary burn!

Fire-5.jpg

Fire-6.jpg


After at least 5 min I shut it down:

Fire-7-done.jpg

Fire-8-done.jpg

Fire-9-done.jpg


I don't think I had the camera half sorted, so case pics after basic cleaning. I need to decide how I want to kill the rust without killing the paint, I'l work on the paint a bit with automotive paint product.
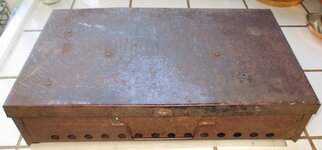
case-1.jpg

case-2.jpg

case-3.jpg

case-4.jpg


The front/handle face is the worst paint loss, leaving that aside, I'm thinking its got about 70% of the paint left. I'l use this as is at ocean cove and I don't plan on doing more than a clear coat on the box after treating the rust. This will be a user for me.
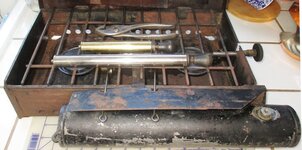

Comp-10.jpg
 

nadogail

Well-known member
Joined
Jan 23, 2009
Messages
32,010
Location
Coronado, CA
Began the disassembly of an old bed frame to get material to build a table to support my Disc Sander.
Located 4 Swivel Casters from an old Garment Rack for the Disc Sander Table.
Pulled a length of 1 5/8 X 3 5/8 steel channel for the rack, this Steel is a repurposed load beam from a Pallet Rack.

Worked out with my Fitness Trainer; if I was not paying him to show up I would skip the workout. Because I am paying him, I make the effort.
 

DGersic

Well-known member
Joined
Mar 12, 2017
Messages
6,349
Location
DeKalb, IL
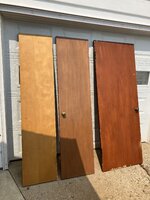
Started stripping the next three doors.

IMG_7655.jpeg

Yes, they’re all different colours. One of the reasons I’m doing this.

The one on the right is the door to the basement. Somebody previously stained it in place, with the hardware still on. There are obvious wipe marks in the stain going around the door knob, and over the hinges.

IMG_7656.jpeg

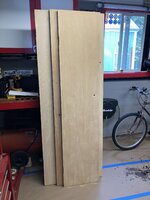
36 grit first pass, 80 grit second pass.
 

Jgaz

Well-known member
Joined
Dec 16, 2016
Messages
1,686
Location
AZ
Started stripping the next three doors.

IMG_7655.jpeg

Yes, they’re all different colours. One of the reasons I’m doing this.

The one on the right is the door to the basement. Somebody previously stained it in place, with the hardware still on. There are obvious wipe marks in the stain going around the door knob, and over the hinges.

IMG_7656.jpeg

36 grit first pass, 80 grit second pass.
RO sander? or are you just that good with a belt sander
 

Outlawmws

Well-known member
Joined
Aug 9, 2011
Messages
39,296
Location
The Badlands
After all that (and some yard work) I got a parked Project Stove -a partially disassembled Prentiss Wabers No. 4, about the age of the Gypsy I just finished - and figured out where I was and what was next and it's burner manifold is 3/4 of the way in de-greaser and USC for a couple of hours, then it gets flipped over.
 

DGersic

Well-known member
Joined
Mar 12, 2017
Messages
6,349
Location
DeKalb, IL
RO sander? or are you just that good with a belt sander

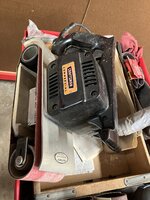
4” belt. Using Dad’s old Craftsman 4x24.

IMG_7660.jpeg

I did the first seven doors with a cheap Tool Shop 3x21 using 80 grit. It worked, eventually, but the 80 grit gummed up quickly and ruined a bunch of belts. This 4x24 using 36 grit didn't gum up as much, and has torque for days. I don’t think the cheap one could drive a 36 grit belt without stalling.

I’ll run a 120 belt across them tomorrow, and an 80 and 120 on the edges with the nice Ryobi 3x21 I also picked up from Dad as he is downsizing. There’s no way I’m holding this 4x24 horizontally to do the edges.

The three I just finished were done with this 4x24 and 3x21, followed by some 120 on a 1/4 sheet palm sander.
 

rharman

Well-known member
Joined
Apr 22, 2012
Messages
8,879
Location
SoCal
4” belt. Using Dad’s old Craftsman 4x24.

IMG_7660.jpeg

I did the first seven doors with a cheap Tool Shop 3x21 using 80 grit. It worked, eventually, but the 80 grit gummed up quickly and ruined a bunch of belts. This 4x24 using 36 grit didn't gum up as much, and has torque for days. I don’t think the cheap one could drive a 36 grit belt without stalling.

I’ll run a 120 belt across them tomorrow, and an 80 and 120 on the edges with the nice Ryobi 3x21 I also picked up from Dad as he is downsizing. There’s no way I’m holding this 4x24 horizontally to do the edges.

The three I just finished were done with this 4x24 and 3x21, followed by some 120 on a 1/4 sheet palm sander.


I have that same sander - it's a beast....
 

bugnut

ALLIANCE MEMBER
Joined
Jul 14, 2012
Messages
3,961
Location
Central Ohio
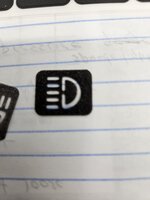
On the moneypit baja an auxbeam 12 switch keyboard was installed to replace light switches, etc. I need labels, been to Etsy to try and find a maker, striking out. I have tried making them with the labelmaker but no light penetrates. So thought why not 3d print a few as a test. I drew a couple and printed them, I immediately liked the texture imparted by the build plate. The same thickness as the factory label may be too thin and allow to much light transmission. I printed in both petg and pla, pla is much darker though both are black, head scratching and more work continues.
MY OCD wants them all 12 to match and be correct.
 

Attachments

  • 20250731_144018.jpg
    20250731_144018.jpg
    795.5 KB · Views: 14
  • 20250731_144021.jpg
    20250731_144021.jpg
    350.7 KB · Views: 12
  • 20250731_144025.jpg
    20250731_144025.jpg
    688.7 KB · Views: 12
  • 20250731_144114.jpg
    20250731_144114.jpg
    575.9 KB · Views: 12
  • 20250731_144131.jpg
    20250731_144131.jpg
    558.3 KB · Views: 15
  • 20250731_144204.jpg
    20250731_144204.jpg
    1.1 MB · Views: 19

niget2002

Well-known member
Joined
Oct 2, 2012
Messages
11,171
Location
Josephine, TX
On the moneypit baja an auxbeam 12 switch keyboard was installed to replace light switches, etc. I need labels, been to Etsy to try and find a maker, striking out. I have tried making them with the labelmaker but no light penetrates. So thought why not 3d print a few as a test. I drew a couple and printed them, I immediately liked the texture imparted by the build plate. The same thickness as the factory label may be too thin and allow to much light transmission. I printed in both petg and pla, pla is much darker though both are black, head scratching and more work continues.
MY OCD wants them all 12 to match and be correct.
Something a single layer like that will be hard to be fully opaque. You could try increasing the number of layers but decreasing the layer height to help fill in gaps. Maybe 2 layers at .2mm layer height. You could also try increasing the extrusion percentage so that it pushes more filament onto the board to help 'squish' it into itself.

Some of the slicers also offer 'ironing' for the final layer that will help smooth out the last layer. You'd still have the texture on the bottom of the first layer, but ironing the top might help close any gaps for light to get through too.

As for me, I'm 3d printing v2 of my watch holder. v1 was ok, but looks a little chunky and I didn't like how big the gap was around the usb-c connector.
 

DGersic

Well-known member
Joined
Mar 12, 2017
Messages
6,349
Location
DeKalb, IL
Saw the pictures of the other doors you did. They look excellent. Do you do any wood conditioner or prep work prior to staining?


I tried one, and it came out blotchy, still could see the sanding marks from the orbital.

Thanks!
Jim

So, yeah. Sanding to 120 with 1/4 sheet palm sander. I have a (air) RO, but I’m not using it here. Never used it on wood.

Tack rags to wipe down the surface and remove all sanding dust.

Using Minwax. First their pre-stain conditioner (oil). Apply with a rag from an old T shirt. Wait the required ~15 minutes. Then two coats of oil stain applied with foam brush and wiped down after ~10 minutes. Wait a day between coats. Then wait a few days for the oil to fully dry. When the garage doesn’t smell of stain, they’re dry.

Then two coats of clear semi gloss poly, again with the foam brushes. Scuff with red Scotchbrite between coats and tack rags to clean.

I’m using water putty for repairs, which doesn’t take stain all that well, so there may also be some time spent hiding the repairs as best I can with more coats of stain applied to the repair area with brush, rag, and whatever to blend it in. None of them are perfect, the dark colour mostly hides that, and nobody really looks at a door after it’s hung up again. They’re not fine furniture show pieces.
 

JEFFREYWisconsin

Well-known member
Joined
Oct 9, 2021
Messages
380
Finished out my own private NO AMAZON JULY.

Zero purchases. 😳

I did this mostly as an exercise of self restraint and a desire to be more thoughtful about the things I order.

Now excuse me, I have 45 things in my Amazon cart I need to purchase.

Just kidding I have none!
 

Attachments

  • IMG_3735.jpeg
    IMG_3735.jpeg
    133.5 KB · Views: 18

Prospecter

Well-known member
Joined
May 16, 2015
Messages
2,437
Location
Maine
Finished out my own private NO AMAZON JULY.

Zero purchases. 😳

I did this mostly as an exercise of self restraint and a desire to be more thoughtful about the things I order.

Now excuse me, I have 45 things in my Amazon cart I need to purchase.

Just kidding I have none!
I admire you for doing this. Following along, it made me think about my own Amazon purchases, so that I ended up spending less on Amazon, even though I did not go cold turkey. Did you need to do without? Were you able to locally source what you needed? Did you shift to other online vendors?
 

JEFFREYWisconsin

Well-known member
Joined
Oct 9, 2021
Messages
380
I admire you for doing this. Following along, it made me think about my own Amazon purchases, so that I ended up spending less on Amazon, even though I did not go cold turkey. Did you need to do without? Were you able to locally source what you needed? Did you shift to other online vendors?
No, I didn't need to go without really, this wasn't due to finances and there were times I needed a few things, so I sourced them locally meaning waiting a little longer at times or just decided I will wait. Then when I waited I realized I didn't need it after all.

I want to live better intentionally and I got tired of seeing stacks of stuff I bought on Amazon which I either soured on the project or didn't end up needing.

I didn't have a compulsive relationship with Amazon, I had an EASY one. Push the buttons and wait for my product!

After 31 days, actually more because I stopped the last 7 or so days of June,
I just consider my purchases more. Simple, I will shop at Amazon again this month probably, but it won't be the same Wham Bam!
 

M.Brane

ALLIANCE MEMBER
Joined
Feb 11, 2024
Messages
1,767
Location
1 hr N/W of LA LA Land
Few parts arrived from McMaster Carr so I cut them down to size

20250729_145347.jpg

I've had this bandsaw for well over 3 years and I got it for free. Spent a grand total of $47 bringing it back up to snuff and it's still cutting everything I throw at it on the same blade.

I cut everything from thick square tube, round, solid rod, all in mild steel and stainless.
I have pretty much the same saw, but I made a new stand for it that has an old cookie sheet for a chip tray. That stock stand is junk,
 

kaymccampbell

Well-known member
Joined
Feb 27, 2015
Messages
29,584
Location
Upstate New York
No, I didn't need to go without really, this wasn't due to finances and there were times I needed a few things, so I sourced them locally meaning waiting a little longer at times or just decided I will wait. Then when I waited I realized I didn't need it after all.

I want to live better intentionally and I got tired of seeing stacks of stuff I bought on Amazon which I either soured on the project or didn't end up needing.

I didn't have a compulsive relationship with Amazon, I had an EASY one. Push the buttons and wait for my product!

After 31 days, actually more because I stopped the last 7 or so days of June,
I just consider my purchases more. Simple, I will shop at Amazon again this month probably, but it won't be the same Wham Bam!
When I shop Crapazon, I let my items sit there for a week or more before I hit the button. Just in case my first thought was a bad one.
 
To avoid these ads, REGISTER NOW!

KwikFab

Well-known member
Joined
Jul 27, 2024
Messages
1,210
Location
Central Valley, CA
I have pretty much the same saw, but I made a new stand for it that has an old cookie sheet for a chip tray. That stock stand is junk,

Been way too lazy to do that, not to mention I wanted minimal investment in this thing.

But yeah that stock stand on wheels absolutely *****.

Maybe one day I'll make a new stand.

When I brought it back to life that consisted of cleaning it all up, modifying the blade guide with set screws, replacing all the bearings, the blade, and starting capacitor.
 

Jay__Dub

Well-known member
Joined
Nov 19, 2024
Messages
1,256
Location
Cold Country, Canada
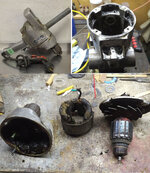
Went to put a new cord on this old Snap-On drill. Opened it up, and bare wire touching the case. Always pays to check the old stuff you buy, or you could have a very bad day. Now in pieces, trying to find good wire to hook up to. It may end up being an ornament.

Had to make an appointment to get the oil changed in my Wife's car, as the warranty won't let me do it. I hate that man, I can't tell you how much. But it is what it is. I do not trust service centers/dealers, or any of them, to do the job correctly.

I guess it's like my Granddaughter says, "you have trust issues, Grampa".

Drill.jpg
 

Beerhippie

Well-known member
Joined
Oct 13, 2023
Messages
9,925
Location
Far NE Oregon
Been way too lazy to do that, not to mention I wanted minimal investment in this thing.

But yeah that stock stand on wheels absolutely *****.

Maybe one day I'll make a new stand.

When I brought it back to life that consisted of cleaning it all up, modifying the blade guide with set screws, replacing all the bearings, the blade, and starting capacitor.
I dunno... you reckon you're up to the challenge?

:ROFLMAO:
 

Beerhippie

Well-known member
Joined
Oct 13, 2023
Messages
9,925
Location
Far NE Oregon
Went to put a new cord on this old Snap-On drill. Opened it up, and bare wire touching the case. Always pays to check the old stuff you buy, or you could have a very bad day. Now in pieces, trying to find good wire to hook up to. It may end up being an ornament.

Had to make an appointment to get the oil changed in my Wife's car, as the warranty won't let me do it. I hate that man, I can't tell you how much. But it is what it is. I do not trust service centers/dealers, or any of them, to do the job correctly.

I guess it's like my Granddaughter says, "you have trust issues, Grampa".

Drill.jpg
I use old extension cords. I can often find them for cheap (yard sale) and as long as I have ten-to-twenty-five feet of good cord, I can use them for tools. Bonus if the length is at the male plug end and it still has a ground lug. Upside (other than cheap) is that they're often the older, more flexible sheathing material.
 

Beerhippie

Well-known member
Joined
Oct 13, 2023
Messages
9,925
Location
Far NE Oregon
Rinnais....

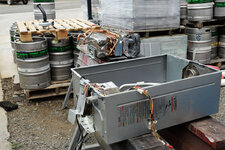
Here's where I left off the other day:

54689357652_fa74aca11c_o.jpg

The primary heat exchanger was leaking--the copper box in the middle of all that.

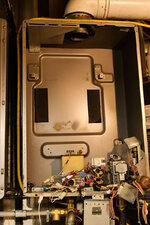
Fortunately, I have a spare Rinnai, so I'll just swap out the innards:

54692463395_9464e1d773_o.jpg

54691311127_fbde761cf2_o.jpg

54692350978_305f61b064_o.jpg

Simple, huh?

Back together and working (about 3 hrs labor):

54692463400_bb6c9d6bee_o.jpg

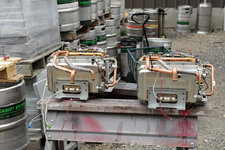
But... we use the three Rinnais to heat our 1,200 gallon hot liquor tank for brewing. The Rinnais are set up to heat by recirculating until we hit our desired temp of 185 F. The core from the "spare" Rinnai heats just fine--until the incoming water temp hits 169F--then it throws an over-heat code and shuts down. When the unit shuts down, it bypasses the incoming water, so will not heat when we're making up tank water with city water, resulting in low temperatures for brewing.

I guess I know what I'm doing this weekend....

54693666930_4eae4f15e5_o.jpg

Take that pile of parts and the innards I just installed and combine them to make one working "frankenheater". Somehow, I have a bunch of gasket sets for this so I'm good there.

Here's another great thing about Rinnais:

54692128306_1b5bf6cd55_o.jpg

All the plumbing is hard-pipe and o-ring, with silly little clips to retain them. After a year or so, the o-rings start failing (remember, we're using these HARD (and the o-rings are Viton)) and water pours out of the case. Not a big fix, but please give me flanges and flat gaskets!
 

Prospecter

Well-known member
Joined
May 16, 2015
Messages
2,437
Location
Maine
No, I didn't need to go without really, this wasn't due to finances and there were times I needed a few things, so I sourced them locally meaning waiting a little longer at times or just decided I will wait. Then when I waited I realized I didn't need it after all.

I want to live better intentionally and I got tired of seeing stacks of stuff I bought on Amazon which I either soured on the project or didn't end up needing.

I didn't have a compulsive relationship with Amazon, I had an EASY one. Push the buttons and wait for my product!

After 31 days, actually more because I stopped the last 7 or so days of June,
I just consider my purchases more. Simple, I will shop at Amazon again this month probably, but it won't be the same Wham Bam!
Intentional is good!
 

Fix Until Broke

Well-known member
Joined
Feb 21, 2016
Messages
794
Location
SE Wisconsin
Here's another great thing about Rinnais:

54692128306_1b5bf6cd55_o.jpg

All the plumbing is hard-pipe and o-ring, with silly little clips to retain them. After a year or so, the o-rings start failing (remember, we're using these HARD (and the o-rings are Viton)) and water pours out of the case. Not a big fix, but please give me flanges and flat gaskets!

Since the pressures are not very high, you shouldn't have extrusion problems and you're dealing with water, try silicone o-rings instead of Viton (fluouosilicone). There's nothing that a properly designed o-ring can't do better than a flat gasket.
 

66HertzClone

ALLIANCE MEMBER
Joined
Dec 6, 2006
Messages
4,048
Location
Long Valley, NJ
Went to put a new cord on this old Snap-On drill. Opened it up, and bare wire touching the case. Always pays to check the old stuff you buy, or you could have a very bad day. Now in pieces, trying to find good wire to hook up to. It may end up being an ornament.

Had to make an appointment to get the oil changed in my Wife's car, as the warranty won't let me do it. I hate that man, I can't tell you how much. But it is what it is. I do not trust service centers/dealers, or any of them, to do the job correctly.

I guess it's like my Granddaughter says, "you have trust issues, Grampa".

Drill.jpg
That's not permitted in the states, the Magnuson warranty act says that if a manufacturer requires their parts or service department to perform the service to maintain the warranty they must provide the service at no cost.
 

Outlawmws

Well-known member
Joined
Aug 9, 2011
Messages
39,296
Location
The Badlands
Been way too lazy to do that, not to mention I wanted minimal investment in this thing.

But yeah that stock stand on wheels absolutely *****.

Maybe one day I'll make a new stand.

When I brought it back to life that consisted of cleaning it all up, modifying the blade guide with set screws, replacing all the bearings, the blade, and starting capacitor.

A waste tray for that style is an easy fix: find or modify a tray, cake pan, or what have you, that will fit under between the legs support that with "rails" (sheet metal angle) that attaches to the inside legs, the tray/pan slides in and out as needed, and is easily emptied.

Made mine for my old saw in ten min.

Yeah the inside legs are at an angle; the slides rails are sheet metal just flatten them a bit...
 

KwikFab

Well-known member
Joined
Jul 27, 2024
Messages
1,210
Location
Central Valley, CA
A waste tray for that style is an easy fix: find or modify a tray, cake pan, or what have you, that will fit under between the legs support that with "rails" (sheet metal angle) that attaches to the inside legs, the tray/pan slides in and out as needed, and is easily emptied.

Made mine for my old saw in ten min.

Yeah the inside legs are at an angle; the slides rails are sheet metal just flatten them a bit...

Have you seen the recent stool I made? :ROFLMAO:

My OCD would get the best of me and I would overengineer a stand on casters, a catch pan underneath, making my own "stop", as well as adding little things like a built in bottle opener to the gusseted handles and more...

I've got plenty of new 11 gauge on the wall and on the CNC table just waiting to be used lol
 

Beerhippie

Well-known member
Joined
Oct 13, 2023
Messages
9,925
Location
Far NE Oregon
Since the pressures are not very high, you shouldn't have extrusion problems and you're dealing with water, try silicone o-rings instead of Viton (fluouosilicone). There's nothing that a properly designed o-ring can't do better than a flat gasket.
Our working pressure is 60 psi.

I'll look into the flourosilicone after I use up the hundred or so Viton rings I have in stock. They're what Rinnai used.
 

niget2002

Well-known member
Joined
Oct 2, 2012
Messages
11,171
Location
Josephine, TX
Finished out my own private NO AMAZON JULY.

Zero purchases. 😳

I did this mostly as an exercise of self restraint and a desire to be more thoughtful about the things I order.

Now excuse me, I have 45 things in my Amazon cart I need to purchase.

Just kidding I have none!
I didn't drop to zero after reading your post earlier this month, but I have significantly reduced my spending. It's difficult when you WFH sitting at a computer all day.
 

welder4956

Well-known member
Joined
Apr 8, 2010
Messages
3,072
Location
Birmingham, AL USA
Started stripping the next three doors.

IMG_7655.jpeg

Yes, they’re all different colours. One of the reasons I’m doing this.

The one on the right is the door to the basement. Somebody previously stained it in place, with the hardware still on. There are obvious wipe marks in the stain going around the door knob, and over the hinges.

IMG_7656.jpeg

36 grit first pass, 80 grit second pass.
What is your weapon of choice for sanding these? Belt sander or hand sanding?
 

JEFFREYWisconsin

Well-known member
Joined
Oct 9, 2021
Messages
380
I didn't drop to zero after reading your post earlier this month, but I have significantly reduced my spending. It's difficult when you WFH sitting at a computer all day.
Maybe I should start promoting the idea next year and see if more people will take part!

Imagine it goes viral, gets huge and Bezos just comes looking for me! Awesome!

🤣🤣🤣
 

Outlawmws

Well-known member
Joined
Aug 9, 2011
Messages
39,296
Location
The Badlands
After all that (and some yard work) I got a parked Project Stove -a partially disassembled Prentiss Wabers No. 4, about the age of the Gypsy I just finished - and figured out where I was and what was next and it's burner manifold is 3/4 of the way in de-greaser and USC for a couple of hours, then it gets flipped over.

Progress and a scare on the PW #4 the manifold completed de-greasing and low and behold almost no rust on the thing! Did some final cleaning with a fine wire wheel and a nylon abrasive wheel, and started on the brass pumps and tank Pumps are polished (the factory pump and an extra large Coleman pump that was with the "box O' parts"), and I pressure tested the stove tank seems good the NRV works properly and it holds pressure.

I tested the output of the generator,and nothing. Hmm. removed the genny tip, and tried opening the valve and, not good, the tip is not moving... I'm thinking this is all one piece to the valve stem and tried removing the valve stem. The Usual solutes is to hrt the genny really hot. not doing anything usually flames will come out of the ends and not even that. The genny barrel had pliers marks already so I give it a try, nada...

I inspect the tip of the valve stem to see if it has evidence of breakage. Look s clean, nad e ti is hollow. I look with magnification and it is very clean and no rough broken edges, in fact the inside is threaded

I get needle nose on the exposed end of the pricker rod, being very careful about the tiny pricker wire, and get ti to move a fraction. I switch to regular pliers and more movement and finally the pricker rod comes out. Beauty! its threaded too! nothing is broken the rod was stuck and came un-threaded when I took the valve stem out!

Some cleanup and the pricker is working again, and its flowing!

I still have some seasoning of the manifold to do and I may give the genny a soak with something nasty to see if the spring inside will come loose or at least clean anything loose out, but progress!

Dodged a bullet there though!
 
Last edited:
To avoid these ads, REGISTER NOW!
Top Bottom