
You are using an out of date browser. It may not display this or other websites correctly.
You should upgrade or use an alternative browser.
You should upgrade or use an alternative browser.
How would you build a 40x64x16 garage in New England?
- Thread starter Mattilac
- Start date
STIBuilder
Well-known member
I'm trying to decide how to control attic conditioning, with either a door at the top, I don't plan to condition that space right away.
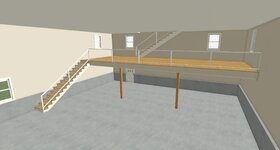
Thats a nice rendering, my design team isn't doing anything 3D kind of lame.
Thats a nice rendering, my design team isn't doing anything 3D kind of lame.
Yea, I probably need to be think about separating the attic from the main space too. Not sure if I'd put a door at the top or the bottom. My instinct would be at the top.
Anyway, here are a few pics of the opening as it currently sits:

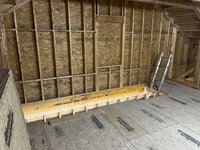
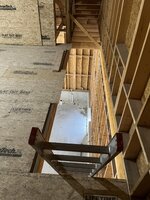
Anyway, here are a few pics of the opening as it currently sits:
HotRod68Camaro
Well-known member
I'd put it at the top, but make sure to leave that landing outside of the door.Yea, I probably need to be think about separating the attic from the main space too. Not sure if I'd put a door at the top or the bottom. My instinct would be at the top.
Anyway, here are a few pics of the opening as it currently sits:
puttinonthekritz
Well-known member
Is that eventually going to be a window on the back side of shed on at the top of the stairs in the attic? If so, your additional natural light will be lost to the attic stairwell that you'll have to create after you close off and wall along the stair well if you put a door at the top of the stairs. Additionally, you need to insulate that whole well area on the exterior side of the attic where the window looks to go and essentially make that part of your conditioned space. If you close it off on the bottom and put the door at the bottom on the mezzanine side you can just frame a wall insulate the wall cavity and essentially have a closet or small storage room under that stair case. I have a similar set up and went this route. I filled under my stairs with rockwool batt insulation, then as my stairs are 4 feet wide, I ran multiple 2", 4x8 xps foam board running along the stair stringers from floor to the ceiling.
kaymccampbell
Well-known member
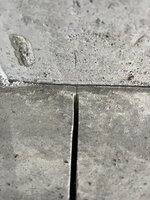
Lucky dog.Happy to report that five months and one winter later, the slab has cracked exactly where it was supposed to in the control joints. No cracks that I can see in the field.

HotRod68Camaro
Well-known member
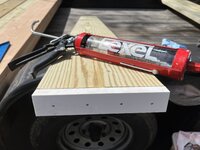
Love the idea! I'm going to have to copy that. My builder cut the bottom of mine at an angle and it lets rodents/mice in. I assume they did that to prevent rot but i'm gonna rip it off and copy what you did.Getting ready to install garage doors and man doors. Got cute with the details and added a little PVC foot to the bottom of all the PT jambs.
AC-WC
Well-known member
Would someone school me on why there is an overhang of the PT to the concrete? Drainage?
SamYoung
Well-known member
Question on the mezzanine. Is there a reason you decided to run the stairs out into the main shop vs tucking them under the attic stairs? You wouldn't loose any useful mezzanine space, they'd be easy to access from the man door, and it wouldn't protrude out into the vehicle area. I'm guessing it might be a framing thing if you're running floor joist depth wise vs putting it post/wall on the back edge by the stairs or possibly planning to storing long objects that would make that open access more ideal.
It's always hard to tell from photo's without vehicles/equipment in there yet, but park the largest vehicle you may park on that side and lay the purposed stairs out on the floor to make sure they don't make a pinch point that's hard to maneuver around. Easier to change plans now before the mezzanine is built.
It's always hard to tell from photo's without vehicles/equipment in there yet, but park the largest vehicle you may park on that side and lay the purposed stairs out on the floor to make sure they don't make a pinch point that's hard to maneuver around. Easier to change plans now before the mezzanine is built.
A few reasons I was thinking about putting the stairs there:
1. I'm expecting to spend a lot of time on the mezzanine as it will be more of an office / hang out area, so I figured having the stairs along the wall offered the best 'flow' from entering the building to being up on the mezzanine. The man door you see under the mezzanine is not the main entrance; it's a back door mostly for emergency egress.
2. I'm planning to have my main workshop under the mezzanine. The idea is to line that back wall with my larger machine tools.
3. (Least importantly) It's easier to build.
I will give it some more thought though. Your point about placing stairs under other stairs does make sense.
1. I'm expecting to spend a lot of time on the mezzanine as it will be more of an office / hang out area, so I figured having the stairs along the wall offered the best 'flow' from entering the building to being up on the mezzanine. The man door you see under the mezzanine is not the main entrance; it's a back door mostly for emergency egress.
2. I'm planning to have my main workshop under the mezzanine. The idea is to line that back wall with my larger machine tools.
3. (Least importantly) It's easier to build.
I will give it some more thought though. Your point about placing stairs under other stairs does make sense.
SamYoung
Well-known member
I somewhat assumed that was the case with machines and/or tool boxes under the mezzanine. Consider putting a wall on the shop side of the stairs if you were to move it there so it would just be a bump out along the back wall. Whichever you choose, if you're planning to keep the air compressor at ground level consider tucking it under the stairs in an insolated room for noise. Its a good use of generally lost space.
I do understand the ease of ingress/egress point. Current setup is longer walk if coming from the workshop to take a break, but shorter if just headed down to the loft to hang out for a bit. Consider which is more likely use case. If you like to take breaks while working it may be better to move. If you tend to do only one or the other, it may not matter.
I'm trying to remember who's build it is on here, but they had some larger vehicles including a fire engine. Parking wasn't exactly where they thought it would be on their sketchup. In real life it made a tight point around the base of the stairs. Not the end of the world, but enough they mentioned they wished they would've thought it out more. You seemed to have some larger vehicles including a trailer and a not fully finalized 4-post location in your layout so was concerned about similar issues. Depending on the walking height under/over your 4-post and if you'll use it for storage, you may have to make a loop all the way out and around it whenever you go from the workshop area to the mezzanine. Depends on how you like to work on if that will be a rare inconvenience or a frequent annoyance.
I do understand the ease of ingress/egress point. Current setup is longer walk if coming from the workshop to take a break, but shorter if just headed down to the loft to hang out for a bit. Consider which is more likely use case. If you like to take breaks while working it may be better to move. If you tend to do only one or the other, it may not matter.
I'm trying to remember who's build it is on here, but they had some larger vehicles including a fire engine. Parking wasn't exactly where they thought it would be on their sketchup. In real life it made a tight point around the base of the stairs. Not the end of the world, but enough they mentioned they wished they would've thought it out more. You seemed to have some larger vehicles including a trailer and a not fully finalized 4-post location in your layout so was concerned about similar issues. Depending on the walking height under/over your 4-post and if you'll use it for storage, you may have to make a loop all the way out and around it whenever you go from the workshop area to the mezzanine. Depends on how you like to work on if that will be a rare inconvenience or a frequent annoyance.
Man doors are installed, though not sealed in yet. Feather River fiberglass doors with PVC jambs from Home Depot. I'm reasonably happy with the quality.

I had to shim one of the foundation openings to get the door to sit level. I used leftover asphalt shingles, cut into strips, and sealed together with Lexel. Was this a bad idea? I can't think of an issue using shingles but I also couldn't find anyone else doing this online. I've seen people use peel & stick membranes like ice & water shield to build up an uneven floor. I think shingles are actually a better choice because they are less compressible and should support the door threshold better. Anyway, there's still time to redo it if I made a mistake.


I intentionally ran the shingle strips at half the depth of the threshold so that I can dial in support for the front edge of the sill plate after the door was in place.

I had to shim one of the foundation openings to get the door to sit level. I used leftover asphalt shingles, cut into strips, and sealed together with Lexel. Was this a bad idea? I can't think of an issue using shingles but I also couldn't find anyone else doing this online. I've seen people use peel & stick membranes like ice & water shield to build up an uneven floor. I think shingles are actually a better choice because they are less compressible and should support the door threshold better. Anyway, there's still time to redo it if I made a mistake.
I intentionally ran the shingle strips at half the depth of the threshold so that I can dial in support for the front edge of the sill plate after the door was in place.
Last edited:
kaymccampbell
Well-known member
It's fine. Did you put something under and between the shingles?
kaymccampbell
Well-known member
Then you're fine. Carry on.
The space feels so much different with the garage doors in!
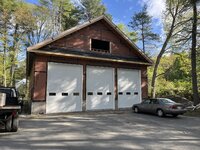

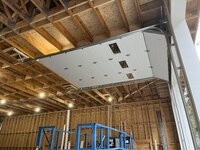
I wanted the absolute maximum opening width possible, so I ordered 10'2" wide doors. In order to fit them, I made my own custom brackets to attach the bottom of the tracks to the concrete wall. It worked out pretty well.

I have to say, while there's a bit to know about garage door installation, it's not as big a deal as garage door guys make it out to be. A lot of them talk about it like it's the most dangerous thing in the world. With a little awareness and care, I had no problem winding up those big 6" springs.
The doors in the open position rest about 1' from the ceiling. So that still gives me 15' down to the floor. Plenty of room for shenanigans.
I wanted the absolute maximum opening width possible, so I ordered 10'2" wide doors. In order to fit them, I made my own custom brackets to attach the bottom of the tracks to the concrete wall. It worked out pretty well.
I have to say, while there's a bit to know about garage door installation, it's not as big a deal as garage door guys make it out to be. A lot of them talk about it like it's the most dangerous thing in the world. With a little awareness and care, I had no problem winding up those big 6" springs.
The doors in the open position rest about 1' from the ceiling. So that still gives me 15' down to the floor. Plenty of room for shenanigans.
Last edited:
67CarGuy
Well-known member
Nice work! You've got plenty of room to go up on the inside, that's for sure!
Bigger construction outfits often use plastic U-shaped shims to level/plumb doors and windows, but your shingle trick should work just fine.
And you're spot on about the garage doors, too. We had two 9x7s put in, and for the price.... I probably could have done it myself with a helper, and saved a decent amount. I still had to install the light, and have had to program / reprogram the various openers a couple of times. It doesn't help that the installer threw all of the installation docs away, along with various screws and whatnot...
Bigger construction outfits often use plastic U-shaped shims to level/plumb doors and windows, but your shingle trick should work just fine.
And you're spot on about the garage doors, too. We had two 9x7s put in, and for the price.... I probably could have done it myself with a helper, and saved a decent amount. I still had to install the light, and have had to program / reprogram the various openers a couple of times. It doesn't help that the installer threw all of the installation docs away, along with various screws and whatnot...
A garage door company (Overhead Door Co.) wanted $27K for the three doors installed! I nearly fell over when I saw the quote.And you're spot on about the garage doors, too. We had two 9x7s put in, and for the price.... I probably could have done it myself with a helper, and saved a decent amount.
I'm in to these insulated doors with upgraded springs for right around $10K. Another $1800 for three LiftMaster 98022 openers. I'll take the $15K+ in savings every day of the week.
kaymccampbell
Well-known member
Your door guy was awful proud of his work. My guy only wanted $300 over the least cost of the parts for both doors that I could find anywhere. I couldn't hand him the cash fast enough.A garage door company (Overhead Door Co.) wanted $27K for the three doors installed! I nearly fell over when I saw the quote.
I'm in to these insulated doors with upgraded springs for right around $10K. Another $1800 for three LiftMaster 98022 openers. I'll take the $15K+ in savings every day of the week.
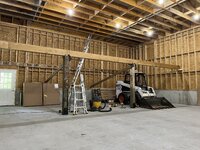
I built the mezzanine and got some windows installed too. I used some 100 year old posts from my current shop which is an old mill building to add a little character to the garage. Fun to work with old wood. Much denser than new stuff!
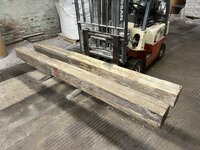

Drilling the holes for the post bases would have been routine if not for the fact that I hit rebar in every hole. Got it done though, and bolted down the post bases with 5/8" Simpson Titen HD screws.

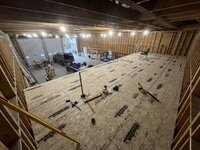

It's pretty much what I expected. Kinda fun to sit up on the mezzanine overlooking the main floor. And the windows really make it inviting to be up there.
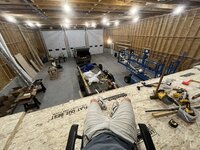
I will build stair cases next. After that, maybe just go ahead and do the hardwood flooring.
I need to get an electrician involved sooner than later too.
Drilling the holes for the post bases would have been routine if not for the fact that I hit rebar in every hole.
Got it done though, and bolted down the post bases with 5/8" Simpson Titen HD screws.It's pretty much what I expected. Kinda fun to sit up on the mezzanine overlooking the main floor. And the windows really make it inviting to be up there.
I will build stair cases next. After that, maybe just go ahead and do the hardwood flooring.
I need to get an electrician involved sooner than later too.
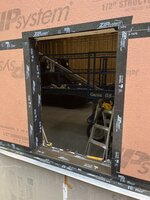
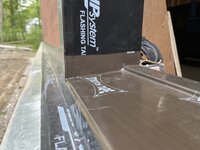
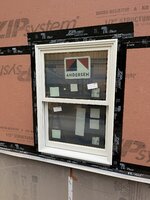
For the windows, I went a little overboard with the prep work. I started by sloping the sill which is just a piece of pine lap siding nailed down. I also added a 1x2 to act as a back dam. Then I flashed the whole sill with ZIP stretch tape and the rest of the opening with regular ZIP tape. I pre-shimmed and dropped the window in with some Lexel behind the top and sides of the nailing fin. Finally, I taped the top and sides as well. A little belt-and-suspenders approach for hopefully an enduring installation.

AC-WC
Well-known member
Zip tape is the best thing in window water and air leak stoppage. You won't regret it!
Soffit and fascia done. First time using a trim brake; it's actually pretty easy. Overall a much less miserable a job than roofing, for example.
I pre-installed 2" foam before attaching the F-channel, that way it will plane out with the siding when the time comes. I then used 3" cabinet screws to get through the foam and into the wood. Planning to use the same screws for the siding.


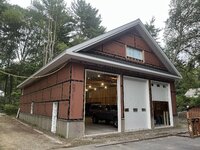
I pre-installed 2" foam before attaching the F-channel, that way it will plane out with the siding when the time comes. I then used 3" cabinet screws to get through the foam and into the wood. Planning to use the same screws for the siding.
Last edited:
captain14
Well-known member
Looks good. I like the brow. I wish I would have thought of that when I had my garage gable redone.
kaymccampbell
Well-known member
Nice. That gable really minimizes the scale of the building.
bams50
Well-known member


67CarGuy
Well-known member
That overhang looks great enough to keep most rain off the siding, unless there's a lot of wind 
Alrighty, first time stair builder here. Went a little overkill on both staircases, but very happy with how rock solid they feel.
First stair was from the ground floor up to the mezzanine. 4x LVL stringers + leftover pieces of ZIP and Advantech for the risers and treads. Very stiff feeling even with no mid-span support.
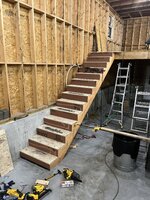

I will eventually cap this staircase with finish treads and risers.
So with that done, I thought to myself - okay, that was fun, now let's try something else.
For the second staircase (from the mezzanine to attic), I went for a timber frame design. 4x12 Doug Fir boards for both the stringers and treads. Mortise and tenon but also glued and screwed. I'll probably go back and cover the screw heads with a little wood button plugs or something.
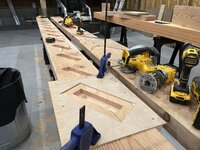
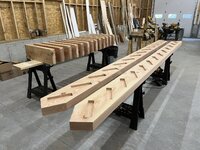
Boy is it nice to be able to use the building as intended - to build stuff in!
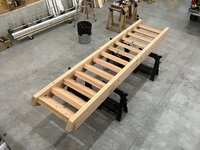

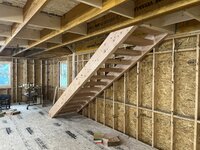
I think it came out great. Very robust looking and feeling.
I'm not planning to enclose the space under these stairs, so I figured the open riser style would be more visually attractive from the backside.
Now I'm wondering if I should put anything on the treads to protect them. Whether a coating of sorts or a physical film or something else. I could also just do nothing and leave them bare.
First stair was from the ground floor up to the mezzanine. 4x LVL stringers + leftover pieces of ZIP and Advantech for the risers and treads. Very stiff feeling even with no mid-span support.
I will eventually cap this staircase with finish treads and risers.
So with that done, I thought to myself - okay, that was fun, now let's try something else.
For the second staircase (from the mezzanine to attic), I went for a timber frame design. 4x12 Doug Fir boards for both the stringers and treads. Mortise and tenon but also glued and screwed. I'll probably go back and cover the screw heads with a little wood button plugs or something.
Boy is it nice to be able to use the building as intended - to build stuff in!
I think it came out great. Very robust looking and feeling.
I'm not planning to enclose the space under these stairs, so I figured the open riser style would be more visually attractive from the backside.
Now I'm wondering if I should put anything on the treads to protect them. Whether a coating of sorts or a physical film or something else. I could also just do nothing and leave them bare.
puttinonthekritz
Well-known member
Looking clean. I prefer the natural look. Coatings and films might get slippery especially wet. Could always do a light sanding if it gets marked up and stained and coat it then?
What are you plans for the upstairs loft railing? Will it be made to be easily removable with pins or some kind of hinge system to fold down to accommodate larger storage items? Or if its a 'hang out' finished space, to carry up furniture or larger items. Your top landing area doesn't look the largest and might be a tight swing for big items and such plus clear a 3-4ft tall railing height.
What are you plans for the upstairs loft railing? Will it be made to be easily removable with pins or some kind of hinge system to fold down to accommodate larger storage items? Or if its a 'hang out' finished space, to carry up furniture or larger items. Your top landing area doesn't look the largest and might be a tight swing for big items and such plus clear a 3-4ft tall railing height.
67CarGuy
Well-known member
That second staircase looks great!
And the first one ain't too shabby either, but it's not straight grain fir, so...
And the first one ain't too shabby either, but it's not straight grain fir, so...
theoldwizard1
Well-known member
Absolutely ! Both of them !!!I think it came out great. Very robust looking and feeling.
Seeing as you are not afraid of a little extra work, you could have used 1/2" hardwood dowels instead of screws. No plugs required !For the second staircase (from the mezzanine to attic), I went for a timber frame design. 4x12 Doug Fir boards for both the stringers and treads. Mortise and tenon but also glued and screwed. I'll probably go back and cover the screw heads with a little wood button plugs or something.
(You can get Doug Fir in New England ? Not even sure if i can get it in the Midwest !)
Looking clean. I prefer the natural look. Coatings and films might get slippery especially wet. Could always do a light sanding if it gets marked up and stained and coat it then?
What are you plans for the upstairs loft railing? Will it be made to be easily removable with pins or some kind of hinge system to fold down to accommodate larger storage items? Or if its a 'hang out' finished space, to carry up furniture or larger items. Your top landing area doesn't look the largest and might be a tight swing for big items and such plus clear a 3-4ft tall railing height.
I like the natural look too. Just not sure how quickly the treads will get dirty looking. But when the building is "done", these stairs won't see too much traffic.
As for a railing, yea I'm planning to make it all removable. Probably a metal railing of some sort, either a kit or custom fabricated. Time will tell.
The top landing is about 5' deep. I had no problem carrying up some 16' lumber, but of course that's without a railing there yet.
Seeing as you are not afraid of a little extra work, you could have used 1/2" hardwood dowels instead of screws. No plugs required !
Yea, that would've been true timber frame!
theoldwizard1
Well-known member
Only if you hand carved the pegs !Yea, that would've been true timber frame!

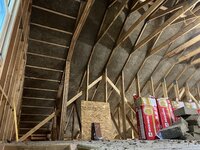
While I continue to hem and haw on what to do next, I went ahead and installed Rockwool R30 batts in the roof. That brings the roof to around R50. Good enough for me. I noticed the Rockwool also cut down on the echo big time, as well as reduced the creaking noises the roof was making from expansion and contraction on a hot day.
I want to install vinyl siding next but there are a couple things holding me up:
- Building penetrations, what and where? I'd rather get most of the penetrations done before siding. Power meter? Exterior lights? Outlets? Bathroom vent? What else?
- Window extension trims. I can't decide exactly how to trim out the windows while accounting for the 2" of rigid foam I want to install behind the siding.
I want to install vinyl siding next but there are a couple things holding me up:
- Building penetrations, what and where? I'd rather get most of the penetrations done before siding. Power meter? Exterior lights? Outlets? Bathroom vent? What else?
- Window extension trims. I can't decide exactly how to trim out the windows while accounting for the 2" of rigid foam I want to install behind the siding.
kaymccampbell
Well-known member
PVC wood or you can make tins for it. I prefer the PVC wood.Window extension trims. I can't decide exactly how to trim out the windows while accounting for the 2" of rigid foam I want to install behind the siding.
SamYoung
Well-known member
- Window extension trims. I can't decide exactly how to trim out the windows while accounting for the 2" of rigid foam I want to install behind the siding.
Not sure if you're familiar with the Build Show Network and there builders, but that have a lot of in depth videos on the individual Youtube Channels. I know Matt Rissinger and Jake Bruton both have videos going over ways builders trim and flash with exterior insulation on the build sites. Steve Baczek has some more architect focused details on them including this one which would be essentially what you have except with rigid foam outside of the ply instead of ZIP-R which places it sandwiched in the middle. Sill support details would essentially be the same, you would just be taping seams behind the insulation vs over the face due to the insulation switch.