coldh2o
Well-known member
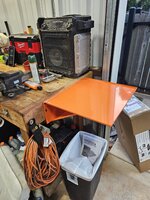
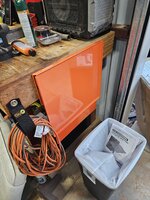
Instructions in the trash can. Per SOP I hope they went in there before assembly began, or your GJ card should be revoked.
Of course they went straight in the trash, haha. Also, according to GJ tradition, I installed it with different fasteners than what came with it.Instructions in the trash can. Per SOP I hope they went in there before assembly began, or your GJ card should be revoked.


but there WILL be a time when I need a few extra square inches of space to place things while I'm working.

and then we had .................. the truth !That thing will go up horizontal and never see vertical again...![]()


My first post of hopefully many more!
My boss had these 2 metal bolt bins laying around in an old shop on a property he owned. He said get them out there and they are yours. The pictures don't really do justice to how FULL the bins were with hardware. Total height is around 8ft. I would have stacked them side by side but my shops wall space is a premium right now.
![]()
A neighbor of mine suggested that same thing! I considered it, but in the end I decided that I couldn't have something sticking out 4ft from the wall where I pull cars in. Little too cramped. My shop is only 20x45 in a rectangle shape (originally it was a large 3 car garage). I have since converted it into a full work shop - more photos to come!Free is always good!
Something like that you might consider placing them back to back (Bolt them together for stability), and "T" them off the wall. That also gives you some "counter space" to work from.
I've got a HF powdercoat gun. I use Prismatic Powders products. The result is nicer than HF or others I've used. I think @CudaChick1968 turned me on to them.Kay,
What do you use to powdercoat? Any specific brand or procedure?
Metal work ooks great!
Did you search under the mattress for the pair of dykes he used to cut the zip tie?Not garage related but figured y'all would get a kick out of it
While not exactly impressive at first glance, it's important to note that I placed a zip tie on this thing months ago
Didn't realize he was up until my dog woke me up growling under her breath - that's when I got up and my kid was walking into the bedroom asking me to put on 'Paw Patrol' with his favorite snack in his hand
Yep, he goes to the pantry for his favorite snacks and he's only 2.5


Good info!I haven't checked the GJ forum for a while...extremely busy with all kinds of things...so I'll post a few things that I've done or worked on over the past few weeks to get caught up a bit.
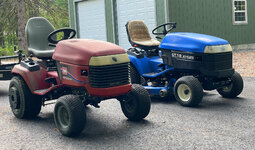
The mower deck on my old 2001 Toro Wheel Horse 522xi garden tractor finally got so rusty that it looked like Swiss cheese, and the center spindle started to pull loose. Not surprising after having lived outside for so many years (and I admit that I should have cleaned the deck more often). I found a good deal on a 2001 New Holland 48-inch mower deck, which not only fits my 522xi tractor, but the deck came with a 2001 New Holland GT18 tractor attached to it.
My understanding is that these two tractors are essentially the same machine, with minor differences such as engine size, cosmetics, and some fancier features on the 522xi, such as power steering and cruise control.
The New Holland's mower deck was solid, with no rust holes or deep rust. It needed work, but it had 'good bones,' so I figured that it was worth spending a bit of time and cash on it. I'm currently finishing the 'rejuvenation' of the mower deck, which I'll post soon.
But first things first. There were two problems with the steering on the GT18: It had a lot of play in it, and it turned sharper to the left than to the right. First, here's how I dealt with the play:
The old steering tie rod ends were quite worn. One of them even had a washer welded onto it to keep it from falling apart. Replacement OEM rod ends were really pricey, so I found some general-purpose low-cost tie rod ends that had the same thread sizes and about the same outside dimensions. However, when I slid back the dust boots, I found that the old rod end appeared to be heavier duty than the new one, with a larger ball and a larger neck where the stud meets the ball.
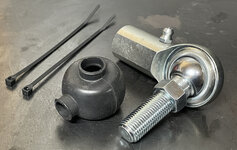
I don't like to replace OEM parts with lighter-duty parts, and lacking comparative load rating data, I decided not to use those new tie-rod ends. Instead, I found some studded spherical rod ends (aka, studded Heim joints) that should be able to handle a sizeable load and looked like they would fit (threads, dimensions, and ball swivel angle range). I wanted to install dust boots on the joints,, and I finally found some that I thought 'might' fit, although one of the holes would have to be stretched quite a bit to fit over the large-diameter female-threaded body of the joint. Here's one of the Heim joints and a dust boot (the cable ties did not come with the boot).
Some merchants who were selling dust boots were also hawking a "boot installation tool" for stretching dust boots over a rod end joint. The tool looked to me like what is politely known as a 'goat banding tool,' used for attaching rubber bands to facilitate the removal of certain, shall we say, 'unwanted anatomical appendages' from farm animals. I found this tool in the veterinary supply section of a farm store for about 12 bucks:
![]()
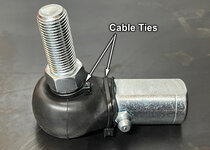
It did a good job stretching the neoprene rubber boots over the joints. I purposely stretched one of the boots even farther than shown above to make sure it wouldn't tear, and I managed to install all four boots without tearing any of them. I'm hoping that they'll last a long time without splitting or tearing: Here's one of the Heim joints after installing the boot, greasing it, and adding cable ties (I don't know if the cable ties were necessary, but I figured it wouldn't hurt):
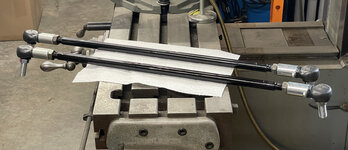
Here are the completed tie rods with their new Heim joint rod ends:
And one of the tie rods installed on the tractor:
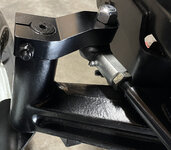
The steering is nice and snug now, with virtually no play in it. More to come: Fixing the turning issue.
Beat me to it!Did you search under the mattress for the pair of dykes he used to cut the zip tie?![]()


Have you ever tried the passthrough RJ45 ends?Strung some more spaghetti (CAT 6 cable) around the pub and kitchen and terminated two more cables.
I hate those terminals (T568B)--they are not friendly to over-65 eyes (hence the mag googles) and fingers.
But I have this handy tester set:
which says I did it right! That's eight out of eight terminals!
The case is from a cheap Chinesium tester I finally didn't trust, so I bought the nice yellow one, which not only didn't come with a case, but sure looks identical to the cheap one except for color. But I trust it, 'cause, y'know, Klein.
Came to a realization: Color code doesn't matter if I'm the only one working on the cables. I had been terminating them backwards--right-to-left--and caught myself today--but the ones I did backwards worked just fine, because pin 1 went to pin 1, etc. It only matters if someone else needs to replace one end of a cable, which isn't even likely. I just have to be consistent, so I'll just follow the damned T568B color code.
Hung the Toast terminals. One the PTB wanted hung on the wall had a pole/tabletop mount, so I had to modify that. Then I opened the box for one that needed to be hung on a pole--and it had a wall mount, so I modded that, too. Now I know to open all the boxes first so I can mix and match.
Boss is setting the Toast terminals up, so the cables do work just fine.
Took a long, casual walk for the afternoon--behind a mower.
Beer thirty!

Beat me to it!How do you make 21 pairs of parents hate you?
I hate those terminals (T568B)--they are not friendly to over-65 eyes (hence the mag googles) and fingers.
Came to a realization: Color code doesn't matter if I'm the only one working on the cables.
Let's see... The Heim joints were from McMaster-Carr, listed as an "Internally Threaded Ball Joint Linkage with Grease Fitting." I ordered two left-hand and two right-hand-threaded versions, female thread, 1/2-20 thread. Your needs may vary, of course.Where did you source the Heim joints, dust boots, and goat deballer wrench?
The ones I use have pass-through inserts that make it much easier to this vintage guy.
OK!The retired networking guy here has to disagree with you. Using the wires in a different order may work ok, probably, most of the time. But the engineering specs are for the twists in the pairs and between the pairs, and really should be used as specified so that weird things don’t happen later.
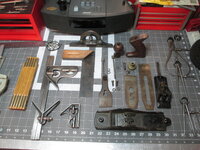
So here a couple pics of the assembled Hercules Wood Plane after cleaning, sanding and a little light polishing.Getting redy for our HOA's village garage sale on the 20th. Started going thru some old tool boxes and pulled these tools out among others. A couple of pieces may be good candidates for a soak in the new ultrasonic cleaner I bought last week.
The Starrett combination Square on the far left/top need a good cleaning and I'l repaint. The 3 Starrett compass tools on the right just need some sticky gunk removed, cleaned and a drop of light oil on the screws and a wipe down.
The rusty Hercules wood plane is in sad shape. I took it apart and started cleaning it up. Just about done with it. That old wood handle Tri Square's bluing is damaged and has a few rusted places. I'll sand and polish the ruler as well the nice brass insert, then clean and oil the wood handle.
Oh yeah, these I'm keeping.
![]()


The retired networking guy here has to disagree with you. Using the wires in a different order may work ok, probably, most of the time. But the engineering specs are for the twists in the pairs and between the pairs, and really should be used as specified so that weird things don’t happen later.