To avoid these ads, REGISTER NOW!

What did you do "IN" your garage today?

To avoid these ads, REGISTER NOW!

Beerhippie

Well-known member
Joined
Oct 13, 2023
Messages
9,935
Location
Far NE Oregon
Back to the desk leveling project today.

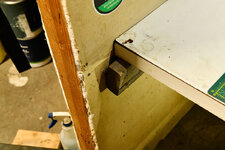
Janky-*** ledger on the east end of the desk:

54941410727_2e0774b670_o.jpg

54941410722_d8ce6f052c_o.jpg

What the actual F*&# is that?

I inherited this desk with the job. Apparently, whoever installed the desk was really worried about wasting a few inches of 2 X 4.

De-jankified:

54942544434_f4b7eb8c43_o.jpg

While the main job of the desk is to support a computer, my desk drawers (SIPCO chest) and a few books, on the odd occasion I need to stand on it to access a loft above.

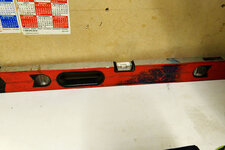
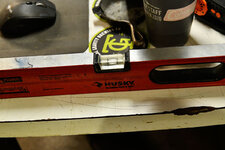
Now to level it all out. I first retracted the adjustable legs all the way, found the highest point of the desk and set the ledger level at that height. I had to use a shim to fine-tune the N_S direction on the ledger due to some irregularity in the desktop.

East end:

54942544459_9a017c8872_o.jpg

North edge:

54942392426_d73bf92946_o.jpg

West end:

54941519502_504a5bd7a4_o.jpg

Those bubble pics look good, but:

54941519312_157594e603_o.jpg

A steel ball never lies--except when it lies perfectly still wherever I put it on the desktop. No more tools or parts trying to escape when I'm fettling something on the desk.

Now I can get back to doing something actually important.
 
Last edited:

Beerhippie

Well-known member
Joined
Oct 13, 2023
Messages
9,935
Location
Far NE Oregon
Ah, now the desk is comfortably re-cluttered:

54942710879_b7edbce126_o.jpg

Here's a question for you HTTP nerds out there:

Up to sometime this week, this:


was what a link to one of my photos on Flickr looked like.

Now it looks like this:


I can put either one between imgs and it shows up identically here, but what's with all the new alphabet soup?
 

niget2002

Well-known member
Joined
Oct 2, 2012
Messages
11,184
Location
Josephine, TX
Unloaded the truck from our mini-vacation.

Then I went out to the shop and got some shop therapy.

I modified my charging console where I put all my wearables to charge (phone, watch, ring). The new watch stand didn't fit the little chunk of wood I routed to hold everything. I re-routed parts of the stand and then also made some thin pieces of wood to screw over cables to help keep things in place.
 

kaymccampbell

Well-known member
Joined
Feb 27, 2015
Messages
29,588
Location
Upstate New York
I think the main problem was that that railing had been sitting outside in the boneyard for over twenty years. It's heavily pitted in the areas I was welding. Kind of like old exhaust pipe. From the sounds of the welding, I may not have had the best grounding, either.

The beads wouldn't build and wanted to drip and run--but, as I said, it'll do fine to support my "office" desk.
Do you think that railing was wroght iron? It often does weird things when arc welding.
 

kaymccampbell

Well-known member
Joined
Feb 27, 2015
Messages
29,588
Location
Upstate New York
Ah, now the desk is comfortably re-cluttered:

54942710879_b7edbce126_o.jpg

Here's a question for you HTTP nerds out there:

Up to sometime this week, this:


was what a link to one of my photos on Flickr looked like.

Now it looks like this:


I can put either one between imgs and it shows up identically here, but what's with all the new alphabet soup?
Probably some kind of session data, that's passed from screen to screen, and for some reason it's being displayed in the address bar. It could be a lot of things that cause it. A browser update, a website update, a server update, a different server than you're usually connected to. I've seen two identical cloned servers have different responses to http requests, for no explicable reason. Turns out the only difference was that the two machines had different batch numbers of the same CPU. Go figure.
 

Jgaz

Well-known member
Joined
Dec 16, 2016
Messages
1,688
Location
AZ
Worked on the eco throttle of the 2000w Honda.
First real problem Ive had in over 15 years. No, it’s not carb, it appears to be the stepper motor.
IMG_5941.jpeg

Resawed some Spalted birch to make the lids for a few more boxes.
IMG_5949.jpeg
I was hoping to get (5) 1/2” lids out of the birch chunk but only got (4) due to a crack clear thru the last piece.

The lids were close to flat but I put them on a sled with side runners, ran them thru the planer, cut them to a hair over 1/2” and made them even flatter.
IMG_5952.jpeg

Don’t laugh but this is how I sanded the opposite side to match the reference face I planed
IMG_5953.jpeg
 

kaymccampbell

Well-known member
Joined
Feb 27, 2015
Messages
29,588
Location
Upstate New York
Failed to start the Dingo. Brought in the tractor and the big charger. Put the charger on the Dingo. Found the oil sucker. Drained and refilled the engine oil on the tractor. Cleaned the air filter. Blew off the clippings that covered the tractor. Put it away. Started the Dingo. Changed the engine oil in the Dingo. Greased it. Put the maintainer on the Dingo. Cleaned up my mess. Fixed the homemade flexible extension funnel for the Dingo. Reorganized some **** that I disturbed. Fixed a chipped nail. Popped the dogeater off the Dingo. Retrieved the pallet forks and parked it. Put the maintainer on the Burg.
 

Jgaz

Well-known member
Joined
Dec 16, 2016
Messages
1,688
Location
AZ
Failed to start the Dingo. Brought in the tractor and the big charger. Put the charger on the Dingo. Found the oil sucker. Drained and refilled the engine oil on the tractor. Cleaned the air filter. Blew off the clippings that covered the tractor. Put it away. Started the Dingo. Changed the engine oil in the Dingo. Greased it. Put the maintainer on the Dingo. Cleaned up my mess. Fixed the homemade flexible extension funnel for the Dingo. Reorganized some **** that I disturbed. Fixed a chipped nail. Popped the dogeater off the Dingo. Retrieved the pallet forks and parked it. Put the maintainer on the Burg.
Whew! That wore me out just reading about it.
 

Outlawmws

Well-known member
Joined
Aug 9, 2011
Messages
39,302
Location
The Badlands
Put stuff away - took pics of the Bird and put it up for sale.

Took my original Dorcy single AAA LED flashlight apart and cleaned every contact, as it was going dimmer and dimmer.. - It's Baaack!

Not the brightest light ever, (and never was) but enough for dim/dark corners and to get me home in the dark without tripping... 8 hours on a single Alkaline AAA, probably longer on the Liths I use now...

A film capsule full of AAA's, and you have 80 hours of light. That's my fanny pack setup.
 

Spikes

Well-known member
Joined
Mar 19, 2021
Messages
161
Location
Arkansas
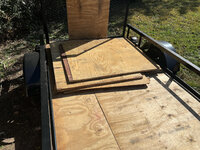
I sold my Cummins truck since I barely use it any more and immediately needed it several times for piddly stuff, so I bought a cheap 5x8 trailer from the big blue box store to drag behind the Jeep.

The expanded metal they use on these now is ridiculously thin, so I used up some of the junky half sheets of plywood from the garage, then used the trailer for the first time moving more cutoffs out to the shed. I want to soak some diesel / oil mix into the plywood, so obviously it rained like crazy later in the day.

Spent some time fixing small things on the trailer and reinforcing here and there. It'll do for picking motorcycles up for buddies and stuff I buy here and there. The Jeep is only rated for 2,000 Lbs so this is as big as I want to go.
Then I sat down looking at trucks on Marketplace :rolleyes:


trailer.jpg
 

GreenIron

Well-known member
Joined
Sep 26, 2021
Messages
2,092
Location
A bit north of the GOA
Wrapped up the work going from this hot mess:

Beautiful. (y)
-----------


It's the tip over switch. $5.59 Amazon.
I have 2 spares. :rolleyes:
----------


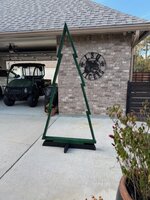
In the garage shop today, I installed the base and outriggers to the 7' tall wooden Christmas tree.
It can barely be seen in the image below, but I also installed a brace from side-to-side about half way up.
Wife will string lights on it tomorrow. ;)
IMG_2790.jpeg

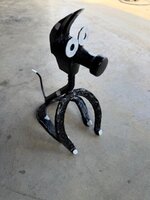
I also spent some time on a metalcraft. :)
IMG_2782.jpeg

I usually give away the metalcrafts I make, but wife wants to keep this one. :D
IMG_2780.jpeg
 

Beerhippie

Well-known member
Joined
Oct 13, 2023
Messages
9,935
Location
Far NE Oregon
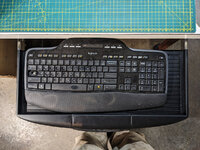
Since one of the reasons for the desk project was to clear up room to mount a sliding keyboard tray, I assembled and installed it:

54942893653_fb18e9e490_o.jpg

Just f'in' NOPE. Not only doesn't it fit a newer keyboard, but WHAT ABOUT THE MOUSE? Junk.

I bought this over a year ago so no returning it now.

54943003135_b28b2155d4_o.jpg

FFS, it doesn't even fit in my circular file!

Hardware is so flimsy it isn't worth saving and repurposing. Off to the dumpster it goes.
 

rharman

Well-known member
Joined
Apr 22, 2012
Messages
8,879
Location
SoCal
< snip >
Don’t laugh but this is how I sanded the opposite side to match the reference face I planed
IMG_5953.jpeg
< /snip >

Shopsmith to the rescue!

Seeing your dust chute reminds me of how frustrating it can be at times with the aluminum table. I have a chute similar to that that has a magnetic base. Doesn't help on the Shopsmith. And... since I built an auxiliary table for my drill press, it doesn't work on that either unless I can hang it on the column. I usually end up using a clamp-on flexible arm that has a cradle for the hose on the other end.
 
To avoid these ads, REGISTER NOW!

kaymccampbell

Well-known member
Joined
Feb 27, 2015
Messages
29,588
Location
Upstate New York
Since one of the reasons for the desk project was to clear up room to mount a sliding keyboard tray, I assembled and installed it:

54942893653_fb18e9e490_o.jpg

Just f'in' NOPE. Not only doesn't it fit a newer keyboard, but WHAT ABOUT THE MOUSE? Junk.

I bought this over a year ago so no returning it now.

54943003135_b28b2155d4_o.jpg

FFS, it doesn't even fit in my circular file!

Hardware is so flimsy it isn't worth saving and repurposing. Off to the dumpster it goes.
I cobbled one up out of a couple leftover drawer slides, scrap wood and an odd chunk of melamine shelving.
 

Jgaz

Well-known member
Joined
Dec 16, 2016
Messages
1,688
Location
AZ
Shopsmith to the rescue!

Seeing your dust chute reminds me of how frustrating it can be at times with the aluminum table. I have a chute similar to that that has a magnetic base. Doesn't help on the Shopsmith. And... since I built an auxiliary table for my drill press, it doesn't work on that either unless I can hang it on the column. I usually end up using a clamp-on flexible arm that has a cradle for the hose on the other end.
Yes sir!
 

Beerhippie

Well-known member
Joined
Oct 13, 2023
Messages
9,935
Location
Far NE Oregon
I cobbled one up out of a couple leftover drawer slides, scrap wood and an odd chunk of melamine shelving.
I may end up doing just that. The damned slides that came with the shelf weren't worth saving.

Hurling it into the dumpser from fifteen feet was somewhat cathartic.
 
Last edited:

Prospecter

Well-known member
Joined
May 16, 2015
Messages
2,437
Location
Maine
Fired up the antique, took it out for a nice ride, filled its go-juice container, and hosed off the fiberglass dust from all of the sanding. Pulled it back into the garage, and did an oil change on the DD.

1763943117676.jpeg
What are the pieces of paper taped to the floor?
 

rktinc

Well-known member
Joined
Nov 25, 2007
Messages
387
Location
Midwest/USA
Also posted in "flooring"


UPDATE:

Well I finally got my materials to experiment on my aging/failing building floor. I have to say that the results seem to be working out just as I had hoped.

1.) Polyurethane based (expensive) rock/gravel glue

2.) Common water based gravel/mulch glue

I purchased a couple buckets of 1/8" to 1/4" gravel. I bought both "clean" and lime/dirty/dusty versions

I further washed and cleaned a five gallon bucket of this rock and mixed a batch up per the Polyurethane directions.

I also mixed up a batch of the water-based gravel/mulch glue using the clean rock and also a batch using the "dirty/dusty" lime filled rock.


The results have been pretty amazing. All three of my mixes have worked well in filling the failure points of my 100 year old floors. These floors are way beyond conventional repair in many spot and I am just tying to fill holes and safety and appearance reasons.

The winner by far is the more expensive Gravel-Lok brand polyurethane mix. It is similar to molasses or maple syrup and only requires about 5 oz per gallon of clean rock. It sets up over night, is very firm/hard yet feels somewhat flexible. I plan to move forward using it as the primary fix.

The less expensive water-based gravel/mulch glue has also worked well. Surprisingly, I mixed it full strength with the dirty rock and it created a very nice slurry-type spead that works great in small cracks and shallower holes. My prototype test spots were all allowed to set up hard, then I brushed another coat on top of the mixed fill I used the day before.

I think i have found a solution, I also think it will hold up well inside a cliamate controlled building not expased to UV or weather conditions.

I plan to spend the rest of the week finished it out so I hope to be finished by early December. Here are a few pics. As you will see, the floor is a real disaster so traditional concrete patch products applied by the previous owners just kept failing over the years. The second two pics are of the water-based mulch glue product. The first pic is of the Polyurethane product in a very uneven spot under a wall.
IMG_3977.jpeg


IMG_3976.jpeg

IMG_3975.jpeg
 

DGersic

Well-known member
Joined
Mar 12, 2017
Messages
6,354
Location
DeKalb, IL
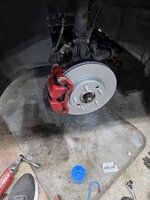
About a week ago, I pulled the wheels off looking for a grindy noise on braking. Found one pad shed. Started to do pads and rotors, then found a cracked piston. Then got distracted by a coolant leak and family “stuff” and lousy weather.

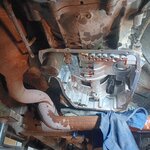
As time permitted, I tracked the leak to seeping around the front cover. Enough to make a drip, but not enough to scrap the truck. It’s 180k miles, rusty, but it runs. I’m not pulling it apart for a seepage.

Today was beautiful out. Mid 50s, sunny, no wind.

Time to get the brakes done and get this thing mobile again.

First rotor on. First caliper loaded and on and … (swearing). The lower slide pin won’t even think about tightening. The threads are gone. I didn’t strip it, the threads must have come out with the old bolt.

Bailed on that one, did the other. Rotor, caliper, new pads all on. Swapped the hose off the old one, on to the new.

Searching for an M9x1.25 helicoil kit … Nobody local has one, and is open. I can get it tomorrow. Or I can drive up to Rockford today.

Two hours later, I’m back with my new $50 helicoil kit. These things have gotten expensive since I last needed to buy one. Turns out I don’t have a 23/64” drill bit. Drilled it to 11/32”, because I have that one. Tap won’t fit, so I opened up the first little bit of the hole to 3/8”. Tapped, and inserted the helicoil.

Back to assembly. Rotor, caliper, new pads all on. Swapped over the hose.

Bled the brakes, fronts only. I didn’t touch the rears, and have no desire to find a seized bleeder today.

IMG_8289.jpeg


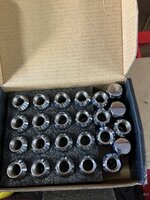
Putting the wheels back on. I got tired of dealing with the crappy swollen lug nuts. Found a set of 24 solid nuts on eBay for $20.

IMG_8288.jpeg

I should have done this years ago.

With the brakes and wheels back together, I poured a bottle of stop leak in the radiator, and went for a test drive.

Tomorrow I’ll clean up.
 

Motorman55

Well-known member
Joined
Apr 10, 2016
Messages
2,641
Location
South Jersey
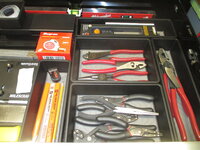
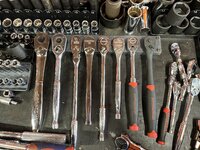
Picked up some more of those $1.50 black trays from the Dollar Tree Store and proceeded to organize the 52" USG tool box in the office. Mostly storing the new wood working tools plus plyers and electrical tools.

I found I could actually stack the trays two high if I needed to and still close the taller top drawer. All the shallow drawers allow for 1 high (1st Pic) Note: the trays will slip under the lip of the drawer sides.

This is not my main mechanics tool box, so I don't need to use any special socket or wrench tool holders in it.

Anybody else use these trays?
1763966173287.jpeg1763966061584.jpeg 1763965833218.jpeg1763965797052.jpeg
 
Last edited:

bugnut

ALLIANCE MEMBER
Joined
Jul 14, 2012
Messages
3,967
Location
Central Ohio
Sunny but windy day here. Just outside the garage, removed the flat front tire and put a spare on the blue 73 beetle. Tried airing it up but it was down in a few hours so spare installed. Studied the linkage on the Ford 2000 tractor, still looking for what keeps it from accelerating/decelerating smoothly. Read about what to check, cracked the gas cap, fired up and she seemed to like that a lot. Let it run a while, did laps in the yard and it seemed a whole lot better. Filled all the bird feeders. Then, with tractors outside swept and cleaned. Started a print on the bambu. Into the house for a break before heading to the deer woods.
 
To avoid these ads, REGISTER NOW!
Top Bottom