To avoid these ads, REGISTER NOW!

Garage Roof/Ceiling Framing Damage / Questions

pancho400cid

Well-known member
Joined
Sep 26, 2014
Messages
4,521
Location
Austin, TX
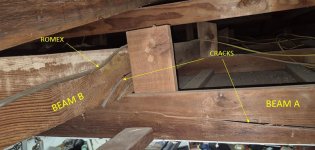
It all started with Christmas Lights. To add an outlet in the soffit out by my main 16' garage door, I intentionally knocked a sizeable hole in my garage ceiling. The plan for yesterday was to cut out the damaged sheet of drywall and replace it. Unfortunately, when I removed the damaged sheet of drywall, it revealed two cracked 2 x 6 beams in the roof/ceiling framing!

The pics below show the basic issues. "BEAM A" runs across the garage "side-to-side" and has 2 x 4 "nailers" (not sure that's the right term) for the ceiling laid flat and attached at 24" intervals. "BEAM B" runs lengthwise through the garage. Beam B sits on top of BEAM A and is joined via nailed vertical short piece of 2 x 6. I "think" BEAM B is acting as a collar tie for the rafter it is nailed to, but there is a dizzying array of beams up there and I'm not clear of the the intent of all of them.

I'm not sure when or how the damage was done. We did some extensive remodeling about 10 years ago and I had two 8' doors replaced by a single 16' door - requiring the installation of a LVL header beam over the door. Moving/jacking for that to get done may have been when the damage happened.

55026456560_a4c04b90bd_c.jpg

55026130286_cfe449358e_c.jpg

55026383939_4b041f6301_c.jpg

I am planning to repair BEAM A by sistering a new beam in as below:

1 - Jack up under the damage with bottle jack on a 4 x 4 to get it high enough, with a slab of lumber to spread the load (I don't think it will take much force - needs to come up an inch or two I think).

2 - Trim the 2 x 4 nailers 1.5" back on one side of the beam to make room for a new beam.

3 - Cut a new 2 x 6 beam long enough to be at least 2' on either side of the damage. Pre-drill it 1/4" for 5/16" lag bolts. Maybe 4 bolts either side and 4 in the cracked area = 12 total?

4 - Shoot high strength construction adhesive into the crack and onto the new beam. Clamp the new beam in place.

5 - Drive lag bolts through the new beam and into the broken one

6 - Attach the 2 x 4 nailers to the new beam by toe-nailing or similar.

I would basically do something similar to repair BEAM A. Then I'd be back at the original starting point with drywall repairs.

Any comments, corrections, concerns?

Thanks!

...
 
Last edited:
To avoid these ads, REGISTER NOW!

billconner

Well-known member
Joined
Jul 20, 2021
Messages
6,971
Location
Thousand Islands NYS
Isn't beam A parallel to the roof rafters? If so A is the rafter tie, resisting rafter thrust. B is a strong back intended to support the As.

Is there sagging elsewhere? If not, I'll offer a guess that this point was loaded and cracked the beams, and your fixes will be fine. If, on the other hand, the entire structure is under designed, it may not be. I wondered if the collar ties - ceiling rafters - were not designed for the weight of the ceiling. A common occurrence.

I think for fixing the cracks I'd plate both sides with 3/4 ply gussets. 4' long would be fine cut a notch for the 2x4 blocking and other obstructions, and let them be an inch or so taller than the rafter they are repairing. Glue and structural screws.
 

BillK

Well-known member
Joined
Aug 24, 2006
Messages
9,349
Location
Beautiful Southern Maryland
I think the cracks in beam "B" are just from the absolutely lousy grain pattern. That probably should never been used in the first place. Crack in "A" might be some of the same. Your plan of attack seems fine.

I cant tell from your picture exactly what beam "B" does ? It might be fine just left alone.
 

PCustoms

Well-known member
Joined
Jul 23, 2011
Messages
23,210
Location
VT
I really can't tell how that attic is framed, but from what I can see it appears to have been modified. Likely what caused the issue.

Pic from outside to show roof relative to door?

No hatch into attic I take it?
 
OP
P

pancho400cid

Well-known member
Joined
Sep 26, 2014
Messages
4,521
Location
Austin, TX
Thanks for the replies guys -

I'm playing catch-up at work after the Holidays. I'll put up some more pics etc. as soon as I'm able to.

...
 

walta

Well-known member
Joined
Jan 13, 2017
Messages
2,313
Location
Dutzow Missouri
It is nice that the roof did not fall and crush you. Before you start adding more wood and glue to the failed mistakes of the past consider paying for a professional engineers opinion. My guess is it was built without a plan by someone who mistakenly thought they knew what they were doing. Lord knows free advice from the internet would have help a lot.

Walta
 

BobnCO

Well-known member
Joined
Apr 2, 2023
Messages
209
It's not unusual and you don't need to re-engineer the garage, support pull back together and sister it with ample construction glue and screws. It would have never catostofically failed and "fallen on your head, Ive demolished numerous older hand framed wooden structures, you can't get them to collapse no matter how hard you try.. you can "shatter them up with a backhoe... but it is basically one peice at a time. Easy repair.
 

iadr

Well-known member
Joined
Jan 1, 2016
Messages
77
Location
Alberta
Rather than lag bolts I'd probably do a through bolt (or grade 5 threaded rod, maybe 1/2").
I know... little about this whole situation or wood repair theory, but my take is the wood is... brittle. Lag screws create a (small) bursting force. Therefore a through bolt and clamping force is less likely to promote the same thing again. I could be wrong.

That's a dark wood relative to any framing I've ever seen in person. Aged to that tone, or is it Redwood, or Cedar?
 

theoldwizard1

Well-known member
Joined
Feb 22, 2011
Messages
43,216
Location
SE MI
You want the sistered lumber to be as long as possible. Tightbond III is acceptable. Though bolts. Washers on each side.
 

duneslider

Well-known member
Joined
Jan 20, 2013
Messages
2,266
Location
Riverton, Utah
You want the sistered lumber to be as long as possible. Tightbond III is acceptable. Though bolts. Washers on each side.
It's a dry area, why use tightbond 3? Tightbond 2 should be just fine. TB3 is runnier and more expensive. Anytime I use it I find it drips all over everything. I try not to use it unless it is on something that will be outside all the time but if its really gonna get wet I am gonna use polyurethane glue.
 
OP
P

pancho400cid

Well-known member
Joined
Sep 26, 2014
Messages
4,521
Location
Austin, TX
Hey all -

Checking back in. I've read all posts with interest.

I have some comments and questions.

As far as the danger of collapse and hiring a structural engineer, I don't believe that is necessary. I'm a mechanical engineer and I have a fair amount of construction work in my background. I'm not a certified structural engineer and there is plenty I don't know, but in my opinion the danger of serious collapse is negligible. I believe the damage was done by very large external forces (jacking for beams as mentioned, loads of shingles during one of the multiple re-roofings over the decades, etc.) - not day-to-day stress.

The house was built in 1955 by professional carpenters. It was originally owned by one of the developers of the neighborhood I live in. The roof framing is stick built as mentioned, in a time before engineered joists were common. The roof is a double-hip type, and after more study - BEAM A and its many cousins tie the rafter ends for one "hip" (roof slope). BEAM B and its many cousins sit on top of, and are perpendicular to, the "A" beams and tie the ends of the rafters for the other "hip" (roof slope). I "think" the lumber is Fir which is why it looks so red-brown. Apparently Lowes sell Fir lumber locally so I might get that to make the repairs.

Based on comments here and elsewhere, it appears the general consensus is that through-bolting is preferred for structural repairs so I'm planning to go that route instead of lag bolts or screws. Right now I'm planning on drilling the holes the same size as the bolts so the bolts are tight in the holes.

The house is 50s Ranch style. There are access holes to the attic but the roof has a low peak and the shallow pitch make space cramped, and VERY cramped out at the perimeter. I can tell you from previous experience that working up there *****! That's why I opted to knock a hole in the ceiling in the first place. I may have to knock out more drywall to get the repairs made. I don't know if the framing was intended to support a ceiling or if the ceiling was original construction or added later. It's 3/8" thick drywall and all they did was tape the joints - no floating. It cracks/breaks very easily, but is a bit lighter than modern 1/2" or thicker.

As far as adhesive, I was thinking more along the lines of LOCTITE PL Max as opposed to Titebond, but I'm open to discussion.

I haven't taken any more photos, but below is one showing the opening vs. the garage door.

Thanks!

55029536196_ece3317af3_c.jpg
 
Last edited:
To avoid these ads, REGISTER NOW!

PCustoms

Well-known member
Joined
Jul 23, 2011
Messages
23,210
Location
VT
Don't glue a busted joist, and certainly don't us PL for it.

Really need to see how it's framed to determine why that broke and the correct way to fix it
 

walta

Well-known member
Joined
Jan 13, 2017
Messages
2,313
Location
Dutzow Missouri
As far as the danger of collapse and hiring a structural engineer, I don't believe that is necessary. I'm a mechanical engineer and I have a fair amount of construction work in my background.
OK what is to purpose of beam B in the load path? How much load can a 2x6 spanning 20-25 feet carry? Get out the span tables and have a look. If it is supposed support the midpoint of the joists, should it not be considerably stronger than the multiple joists it supports?

Beam A looks to be a 2x6 joist spanning 20-25 that seem to be 4 feet on center maybe that is normal for someplace that never get a snow load. I would not know.

My gut says when it was built it was just strong enough as open framing. The drywall was added later with no math to consider its weight.


Walta
 

PCustoms

Well-known member
Joined
Jul 23, 2011
Messages
23,210
Location
VT
OK what is to purpose of beam B in the load path? How much load can a 2x6 spanning 20-25 feet carry? Get out the span tables and have a look. If it is supposed support the midpoint of the joists, should it not be considerably stronger than the multiple joists it supports?

Beam A looks to be a 2x6 joist spanning 20-25 that seem to be 4 feet on center maybe that is normal for someplace that never get a snow load. I would not know.

My gut says when it was built it was just strong enough as open framing. The drywall was added later with no math to consider its weight.


Walta


I also question this in red

1000002974.jpg


I can't tell if it's been cut or what, but it appears out of place an not really doing anything. Can't tell what the similar member in the background is connected to either
 
OP
P

pancho400cid

Well-known member
Joined
Sep 26, 2014
Messages
4,521
Location
Austin, TX
The short vertical pieces of 2 x 6 were used to tie the "B" beams to the "A" beams with nails. They are random lengths cut from drops/scraps and don't connect to anything else.

It is very difficult to get a photo that shows the whole situation clearly due to the low headroom.

As said, we did a remodel about 10 years ago and an LVL beam was put in above the 16' door. A structural engineer designed it and made drawings for how to install it and tie it in. He had no comments about the existing framing.
 

firebirdparts

Well-known member
Joined
Jun 8, 2016
Messages
10,637
Location
Kingsport, TN
That's a pretty big garage and that stuff is just way too long. If it was going to stay up, the roof would have to be involved. Roof pitch is evidently low (you tell me) which is very difficult to strengthen. Overall just a weak design I think.
 
OP
P

pancho400cid

Well-known member
Joined
Sep 26, 2014
Messages
4,521
Location
Austin, TX
I agree that the roof framing seems kinda weak, and the rafter and A/B beam boards are very long. On the other hand, it's been in place for 70 years and hanging in there fairly well. The cracked beams did not result in noticeable issues. I found them by accident.

I don't plan on any major structural re-work. I'm going to fix the two beams and monitor them. My confidence level is good. Time will tell whether it's born of stupidity or good judgment LOL. If the forecast ever calls for a freak 15" snow storm, I might get a hotel.
 

Bert_

Well-known member
Joined
Dec 24, 2016
Messages
9,759
Location
NW Iowa
The short vertical pieces of 2 x 6 were used to tie the "B" beams to the "A" beams with nails. They are random lengths cut from drops/scraps and don't connect to anything else.

It is very difficult to get a photo that shows the whole situation clearly due to the low headroom.

As said, we did a remodel about 10 years ago and an LVL beam was put in above the 16' door. A structural engineer designed it and made drawings for how to install it and tie it in. He had no comments about the existing framing.

I'm going to guess that the beam over the door had sagged, along with all this other framing. When the new beam was installed everything was back forced up. This other framing probably cracked then or shortly after.

What does the roof look like from outside? That would help give us an idea what the framing in your pictures is doing.
 

reader2580

Well-known member
Joined
Dec 31, 2014
Messages
14,557
Location
Minneapolis, MN
I've always read the best way to sister something is to run the new wood all the way to the load bearing points on either end. In this case it would probably be the walls on either side.
 

matt_i

Well-known member
Joined
Mar 14, 2008
Messages
10,730
Location
SE Michigan
Agree with support or clamp to try to close up the split but not 100% necessary. Sister as far as you can go. Use Loctite 8x in an "X" pattern when temps are above 50F so it can cure correctly. Clamp it with C- or bar clamps. Use GRK-RSS screws in a staggered pattern to hold it permanently. This is a standard truss repair although they would ask for 16d nails driven thru and clinched over. That's a pain in the buttocks. The GRK is nice as it "saws" a round hole with its point and does not split the grain apart like a lag bolt will. If you can sister both sides, even better. You'll be good for a hundred years with this type of repair in my opinion as any failure will occur at a weaker point which is somewhere else.
 

MoonRise

Well-known member
Joined
Nov 5, 2010
Messages
4,030
Location
NJ
The 2x6 lumber on edge is NOT a beam.

Beams are big and beefy and typically have other framing members (like floor or ceiling joists) laid on edge on top of them.

If they go from wall top plate to the opposite wall top plate, then they are ceiling joists. Probably what you are calling 'Beam A'.

What you are calling 'Beam B' is probably a "strong back" on top of the ceiling joists (what you called 'Beam A').

Collar ties connect the opposing roof rafters together, usually about 1/3 of the way down from the roof ridge. You don't have collar ties, all that framing and nailers are planer with the wall top plates and drywall as far as I can see from your few pictures.

The 2x4 that are flat and connected to the ceiling joists are nailers for the drywall.

Look up construction terminology and practices using some google-fu or similar.

Things may seem 'fine', until they are not. 😮

Without more pictures showing the framing better all around and some actual dimensions of the garage space, we are all just guessing here.

1950's garage I'm guessing that it would usually have had an annoying vertical metal post or two or three running down the middle of the garage from front to back (garage door is either the front or the back) holding up a beam that ran fully from front to back that would have been holding up the 2x6's that you labeled as 'Beam A'. Sometime in the past, someone MAY have removed those metal post(s) because they were annoying and caused some door dings.

The fix is to first look more closely at the existing framing and try to figure out WHY those 2x6's cracked.

Could just be the lumber cracked over time from drying, could be something was overloaded and cracked, could be something sagged and the 2x6's cracked, could be something was changed and caused sagging or overloaded conditions, could be some combination of those.

The engineer who speced the LVL beam for the change from two individual garage doors to a 16 foot wide single garage door MAY have only looked at and considered the framing needs for THAT wall and the garage door change and not the overall framing of the garage (all of the walls and how they connect to each other and the ceiling and the roof framing).

Fixing a cracked joist via "sistering"is a common approach, you want the "sister" to be as long as possible and preferably from end-to-end over the supporting structure. The connection needs to be with "structural" fasteners to the broken member, and with more fasteners than you would think. Adhesives don't really do anything, because most will "creep" under load and thus not really connect things permanently. Especially in a hot attic, with old dry dusty lumber that adhesive bonding would be to old dry dusty surfaces.

For the fasteners of the sistering joists, I would use either modern structural screws (that self drill) and/or beefy framing nails of the appropriate length and/or through bolting with appropriate beefy washers to minimize fasteners embedding into the wood but NOT "lag screws" (because of splitting concerns with old dry wood even with predrilled holes).

But first figure out the existing framing structure and try to figure out WHY it cracked and IF the structural framing is adequate or not. That might require some consultation with some competent construction contractors and/or engineering types. Some measuring and checking and a few hours of consultation would be worth it, even if you have to pay for a few hours of consultation time.

IMNSHO, based on a few pictures over the Net and no overall dimensions or detailed pictures or information about the layout of the structure.

🍺
 

MoonRise

Well-known member
Joined
Nov 5, 2010
Messages
4,030
Location
NJ
Article with some pics of hip roof framing and ceiling joists and considerations for drywall nailing:

 
OP
P

pancho400cid

Well-known member
Joined
Sep 26, 2014
Messages
4,521
Location
Austin, TX
Hey all -
Apologies for the delay in getting back. It's been busy around here. There were some very informative posts that arrived after I had already made repairs on Saturday 1/10/25. I'll put up what I did.

I'll keep using the terms Beam A and Beam B for consistency. I readily acknowledge that is not the exact construction term, but they are horizontal structural members... beams in the general sense. Right or wrong, we proceeded as below:

I bought materials on Friday night. I looked at Fir lumber for repairs but it felt very light. I opted for SYP 2x6x8' for the repair beams.

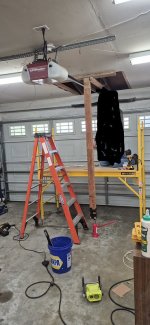
I got a friend and neighbor to help me. We cleaned out some space and set up a scaffold and set a jack up in the damaged area under Beam A. We screwed a 2x6 spreader under the beam and screwed a 4x4 (actually two 2x4s scabbed together) to the spreader as a lift post. We used an 8 ton HF bottle jack. We set up a laser level and found, to no one's surprise, that Beam A was sagging more than 2" at the center. We played with jacking to close the gap in the crack area of Beam A vs. "level" vs. matching the sag of the other cousins of Beam A.

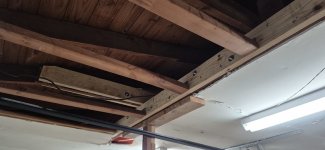
We marked the level we wanted to put Beam A at and pre-drilled 3/8" holes into a new 2x6x8' repair board. We trimmed 1.5" from the 2x4 flat-laid nailers attached to Beam A to make room for the repair board. We removed a second sheet of drywall to get access to make the repairs. We then buttered the repair board with Titebond III adhesive, clamped it in place and screwed it in a few places with GRK screws to hold it. We match-drilled 3/8 holes into Beam to the holes in the repair board and installed the repair board with 3/8 thru-bolts. I used two 3/8 fender washers at each end (4 per bolt total) to help distribute the bolt load. The bolts are on 16 to 24 inch centers to miss other obstructions, and staggered side-to-side. I put loctite on the nuts just to help hold them if they got loose due to shrinkage or whatever. Hey - can't hurt and might help. Once it was all together, we added some more GRK screws just for good measure.

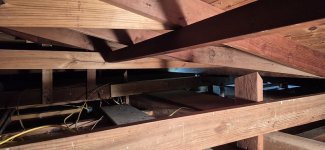
Beam B was pretty much cracked all the way through and the access was better (but also worse in that it had to be done from in the attic). We decided to put repair boards on both sides of it. We had to get longer bolts and a long drill bit to do that. I also added hurricane ties to tie Beam B to Beam A.

Photos are below:

55042066182_004f59bb6e_c.jpg
1 - Requested photo from the outside of the garage

55043304940_684353523d_c.jpg
2 - Jack set up

55042069587_1aa3793ec7_c.jpg
3 - Beams with repairs well along.

55042971711_6e7d239b40_c.jpg
4 - Level/sag checking,

55043152448_ef4299b048_c.jpg
5 - Inward end of Beam B repairs

55042976506_fd588abac4_c.jpg
6 - Outward end of Beam B repairs.

.....
 
Last edited:
To avoid these ads, REGISTER NOW!
Top Bottom