JustVicingIt
Well-known member
- Joined
- May 6, 2025
- Messages
- 179
Thanks! Was the most fun I had with that build. It toed up perfectly the first time I installed it and was so relieved lolNice vice!


Thanks! Was the most fun I had with that build. It toed up perfectly the first time I installed it and was so relieved lolNice vice!


Looks like there's room for a pair of Klein crimpers in the long slot on the right!I picked up this small parts storage organizer that had seen better days and thought I'd do a refresh...
Hit it with some degreaser and scotch padded the rusty spots...
Grabbed a can of Rustoleum Hammered silver and sprayed the unit...
Loaded it up with terminal ends...
I picked up this small parts storage organizer that had seen better days and thought I'd do a refresh...
Hit it with some degreaser and scotch padded the rusty spots...
Grabbed a can of Rustoleum Hammered silver and sprayed the unit...
Loaded it up with terminal ends...

For heavy draw and/or vibration uses, I crimp and solder--and use heat-shrink tubing for a stress-relief.Do you solder those? Or crimp them? Or both?
I usually solder mine, easy to do and makes a secure connection, even with high current.
Lessee. Solder drop catcher. Casting overflow catcher. Ingot mold. Hot, drippy utensil holder. Soldering iron trivet.Like a few folks here could not bring myself to throw the cast iron skillet in the recycle bin. I have no use for it or any idea what to use it for. I took the time to melt the candlewax and separate it from the skillet, warmed the skillet enough to be able to wipe clean. Sprayed with cleaner and set it on the work bench. Threw the wax away.
That looks handy. Wonder if it would work on my Clausing drill press.Assembled a HF wheel base for the drill press.
Pondered where I want to put the drill press, and how I’m going to fit it in there.
That looks handy. Wonder if it would work on my Clausing drill press.
I have no use for it or any idea what to use it for.
Cornbread.
Why was it full of wax?

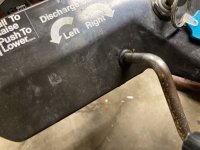
 Harbor Freight 29 gallon compressor regulator knob failed on me last night, can't adjust tank output pressure. Store rep informed me I can find parts on their website online however it doesn't have a picture of the regulator so how do I know what exactly I'm purchasing for $15.81? I emailed HF for specifics so here i wait and posted my first contribution to Garage Journal.
Pics?

Gauges and regulators are consumables in the pressurized air game. I've replaced mine several times over the years. They get wonky, they go.
I removed the cover, gauges, air hose connector and spun the regulator out. No factory pipe dope was ever used I noticed. Hopefully HF can assist me or I'll look for a decent regulator upgrade for this $500 compressor.


I didn't know that was a thing. How do you like it? Is it adjustable to fit multiple bases? How do you like it?Assembled a HF wheel base for the drill press.
Pondered where I want to put the drill press, and how I’m going to fit it in there.

 )
)


FFS! It's a trailer!Got up early this morning with coffee and headed out to keep working on that panel section.
Next up - considering this is a trailer, we don’t need a filler neck. Several people had suggested to just go over the top with a piece of steel and weld the circumference - I’m sure that would work. My thought was to hammer it back flat and into the body line, reversing the factory stamping operation. My line of thinking was that this was a much smaller section to weld, resulting in less heat, so less warpage.
This is what they look like from the back (example shown of the bad section since I had already started on the good one
Got to hammering it out and roughing it in.
Lot of beating on it and chasing it around.
I eventually had to burr out the tabs, they had split and started folding onto each other. Then I opened them up a bit more into a more uniform shape before I did the patch.
I cut a small section out of the old scrap body panels from the truck to keep the same steel thickness - it’s obviously too flat.
I neglected to get a photo, but I fumbled it through a few passes on the English wheel and got close enough crown into the patch that it would work. I covered it in black sharpie, inserted behind the opening and used my scribe to trace the outline before cutting and fine tuning the patch.
I hate these magnets but it worked for a few tacks.
Fusion welded as much as possible, couple little spots I had to cram some filler in - count it as good practice.
Worked it with the hammer and dolly a bit and hit it with the DA. I’ll consider that filler neck deleted. Little more bumping and a swipe of filler and it’ll be our secret.
That's half the fun! It's just a trailer so I don't have to drive myself crazy if I'm not 100% happy, but since it's a trailer, it leaves plenty of excuses to practice new tricks!FFS! It's a trailer!
You're a better (body)man than I, Gunga Din.
Started removing the rats nest of wiring not necessary for the Pikes Peak car. It's been running endurance racing series since it ran PPIHC in 2015, which require all sorts of lights, GPS, flagging systems, etc., that aren't not necessary for hillclimbs.
")


I've learned--the hard way--to run individual 20A circuits to each outlet box. You will overload the circuits eventually.I bought a new house with a 2 car garage that no cars will ever fit in because of all my tools. It only had one outlet and we have a fridge and a deep freezer in it, so basically zero outlets for me which won't work as I've got a table saw, miter saw, bandsaw, router, planer, drill press, bench grinder etc. I installed a sub panel (main was full), then ran each wall on its own circuit so its tougher to trip the breaker. Each wall got three 4-gang boxes giving me 36 outlets now. I've never done wiring like this so I got a permit and got it inspected, they signed off on the first inspection so I was happy about that. Next project is a lighting upgrade!
I've learned--the hard way--to run individual 20A circuits to each outlet box. You will overload the circuits eventually.
Want a beer 'fridge and microwave in the shop? There's one 20A circuit right there.Now you tell me!


You’re putting so much work into this car I think you might be missing the point of that particular race.lol As for that divit, I would have taken down the highs and polished it a bit. It’s not like you’re building a high revving race engine.Found a divot in the crank for my AMC 360 build for the 24 Hours of Lemons.
Tore down my spare 360 to harvest the crank and it was nasty and stuck.
While trying to turn it over I broke the crank bolt head off. Snapped flush.
Tried grinding a slot in it with a Dremel cutoff wheel and getting it out with an impact screwdriver but I just broke a bunch of bits.
Busted out the MIG. Welded a washer to the bolt. Then welded a nut to the washer. That did the trick.
You’re putting so much work into this car I think you might be missing the point of that particular race.lol As for that divit, I would have taken down the highs and polished it a bit. It’s not like you’re building a high revving race engine.