To avoid these ads, REGISTER NOW!

Yankeefarmer’s 1928 Model A Roadster Pickup (by request)

Yankeefarmer

Well-known member
Joined
Jul 25, 2011
Messages
1,200
Location
Connecticut
In an unrelated thread, @larry4406 requested more details on my RPU that appears in my avatar. So as not to completely derail that thread, I’m answering his request here.

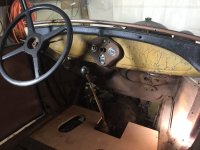
Here’s a picture of what it looked like on the day I bought it. I had been looking for a Model A pickup, preferably open cab, for a couple of years, when this one appeared on Craigslist just 3 miles from my house. The guy I bought it from had apparently burned out/lost interest in it, and wanted to recover his investment to put into other projects. He was storing the car in an enclosed trailer, and had to move the trailer before it could be loaded, so I asked if he would drive it to my house and unload it in my driveway. A deal was struck, and it was unloaded at about 8:30 pm on a cold, dark, December night. This photo was taken the next morning.IMG_2175.jpegMore to come…
 
To avoid these ads, REGISTER NOW!
OP
Y

Yankeefarmer

Well-known member
Joined
Jul 25, 2011
Messages
1,200
Location
Connecticut
It was pretty rough, but the guy I bought it from told me it ran. I didn’t care about that; I wanted a platform into which I could install an 8BA flathead I was going through. A big attraction for me was the number of parts he had bought for the car that were included, such as a new seat support, a better steering column, pickup bed new sheet metal parts, etc. Even though it was reported to run, it couldn’t be driven because the passenger side rear quarter panel had rotted off from the subfram, leaving the rear panel free to flop backwards. The pickup bed was just sitting on the frame, being kept from flopping backwards by a ratchet strap looped around the torque tube.

I wasn’t looking to do a restoration, since there are many finely restored specimens. Instead, I wanted to create a version that 65 year old teenager that I am envisioned. After 7 years, interrupted by building my new shop, here is what it currently looks like.RPUHome3.jpeg
 
OP
Y

Yankeefarmer

Well-known member
Joined
Jul 25, 2011
Messages
1,200
Location
Connecticut
Actually, it still has a 1930 Model A four banger in it. I started the project with the idea that if the engine was decent, I wanted to drive it as a Model A before making big changes. I love how the engine fires immediately even after sitting for months. As for the brakes, the Model A community believes that properly set up brakes provide all the stopping power needed. I have upgraded the fronts with cast iron drums and flatheadted’s floater system, but haven’t even inspected the rears yet. The fronts had to get new drums so I could install the 1935 wheels. The original 1928 drums cannot safely be used with later Ford wheels, due to geometry differences. I’ll get to the rears in due time.
 
OP
Y

Yankeefarmer

Well-known member
Joined
Jul 25, 2011
Messages
1,200
Location
Connecticut
The interior was pretty rough. As you could see in the early picture, the passenger side door wasn’t even attached, and it had enough rot with the inner panel barely connected to the door skin such that the door didn’t have enough structure to fit the curvature of the body. My skills are very modest, but I fabricated a new inner panel and using a plywood template achieved what I considered a satisfactory fit.

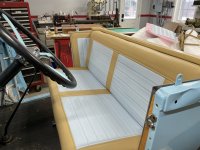
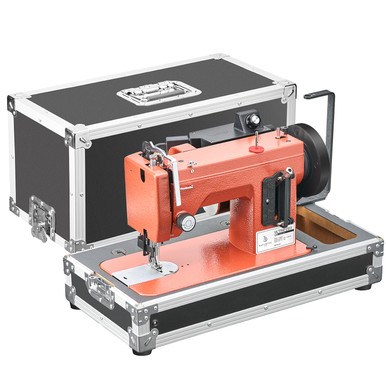
Although it came with a seat and seat back, a bit of research revealed they were not correct for a ‘28 RPU. They fit, but attachment points were wrong. So I bought a walking foot sewing machine, watched a bunch of videos, did a bunch of practice sewing, and built myself an interior.IMG_2189.jpegIMG_1194.jpeg
 
OP
Y

Yankeefarmer

Well-known member
Joined
Jul 25, 2011
Messages
1,200
Location
Connecticut
Larry4406, thanks for the link!

@Yankeefarmer, nice work! How long did it take you to achieve this level of skill for the upholstery? What did you do for seat frame and cushion? I see a variety of upholstery supplies in the bed of the truck...
It wasn’t that long. I bought the sewing machine about two years before I did the upholstery, and stitched up a cover for my metal lathe out of Cordura material. Then I sewed a sleeve to store my cutting mat in. Then I didn’t use the machine for about two years. Around September before I did the interior, I bought foam and marine vinyl to make a new seat cushion for our tired old golf cart as practice for doing my Model A. The golf cart project was done over about a week. It gave me confidence that I could do a presentable job for my ”A,” but I knew worst case I’d only be out my time and the cost of the materials if I screwed up. It was also an opportunity for me to try out different stiffnesses of foam for my project. The Model A Seat is done just like the golf cart- nothing more than an appropriate foam shaped with an electric knife, covered in marine vinyl that was first stitched to scrim foam, then stapled to a plywood backer. Of course, before I tackled the real pieces, I experimented with stitching together smaller pieces with cording, different types of seams, etc. I think I did all the Model A pieces over about a 3 week period, working at a comfortable pace. (I’m retired, so comfortable= no hurry, have fun, walk away if frustrated.)
 

Ohmthis

Well-known member
Joined
Jan 20, 2013
Messages
3,019
Location
Outside of Louisville KY
The interior was pretty rough. As you could see in the early picture, the passenger side door wasn’t even attached, and it had enough rot with the inner panel barely connected to the door skin such that the door didn’t have enough structure to fit the curvature of the body. My skills are very modest, but I fabricated a new inner panel and using a plywood template achieved what I considered a satisfactory fit.

Although it came with a seat and seat back, a bit of research revealed they were not correct for a ‘28 RPU. They fit, but attachment points were wrong. So I bought a walking foot sewing machine, watched a bunch of videos, did a bunch of practice sewing, and built myself an interior.IMG_2189.jpegIMG_1194.jpeg
I zoomed in on the picture of the dashboard. Man, the names written over the years are really neat.
 
OP
Y

Yankeefarmer

Well-known member
Joined
Jul 25, 2011
Messages
1,200
Location
Connecticut
I zoomed in on the picture of the dashboard. Man, the names written over the years are really neat.
Yeah, I preserved it in photos before sandblasting and repainting. I had a tough time deciding whether to leave the bullet holes in the body or weld them up. Similarly, there’s a bad battle scar dent on the driver’s side that would have been a ton of work to remove so I elected to leave it out of respect for the vehicle’s history. The tailgate was badly cracked, rusted, and dented. I thought it would wrong to replace it with a reproduction piece, so I “repaired” it by welding up the cracks, fabricating a new corner gusset, then repainting it with its hard earned battle scars.IMG_1690.jpegIMG_1691.jpegIMG_1204.jpeg
 

Ohmthis

Well-known member
Joined
Jan 20, 2013
Messages
3,019
Location
Outside of Louisville KY
Yankeefarmer, I’m loving the idea of keeping the “character” of the truck! It is more of a conversation “piece” that way. If I was looking over the truck and it is pristine, I would say wow and walk away. With the “Character” I’m more inclined to ask you about the scars and why you decided to keep it. Then, I’d hear about the names on the dash and other details and I’d “Get It”.
 
To avoid these ads, REGISTER NOW!
OP
Y

Yankeefarmer

Well-known member
Joined
Jul 25, 2011
Messages
1,200
Location
Connecticut
Would you be willing to share the sewing machine model that you used for this project?
Sure- it’s the basic Sailrite machine, with the option of servo motor drive and speed reduction flywheel. You can see it on my bench in the photo of the upholstery.
 
OP
Y

Yankeefarmer

Well-known member
Joined
Jul 25, 2011
Messages
1,200
Location
Connecticut
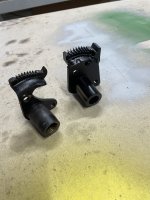
One of the more satisfying parts of this project was restoring functionality to the parking brake. The early 28’s had a primitive parking brake that simply activated the service brakes, and many states objected to the lack of a separate emergency brake system. On mine, the sector gear that held the parking brake engaged was worn enough that it wouldn’t hold. None of the parts vendors offer a replacement; the market is limited to only about 6 months of Model A production, and there’s likely liability concerns.

My car has a later model rear axle with separate emergency/parking brake shoes, and I’ll be modifying mine so the old parking brake lever activates those, so I needed a part that was unavailable. So I made one. The original is on the left. This part is very difficult to see on the car, so I focused on functionality without concern about appearing original. It works great! The second picture illustrates the finishing cut of the gear teeth.IMG_1442.jpegIMG_1437.jpeg
 

larry4406

Well-known member
Joined
Jan 27, 2006
Messages
19,562
Location
Northern Virginia
One of the more satisfying parts of this project was restoring functionality to the parking brake. The early 28’s had a primitive parking brake that simply activated the service brakes, and many states objected to the lack of a separate emergency brake system. On mine, the sector gear that held the parking brake engaged was worn enough that it wouldn’t hold. None of the parts vendors offer a replacement; the market is limited to only about 6 months of Model A production, and there’s likely liability concerns.

My car has a later model rear axle with separate emergency/parking brake shoes, and I’ll be modifying mine so the old parking brake lever activates those, so I needed a part that was unavailable. So I made one. The original is on the left. This part is very difficult to see on the car, so I focused on functionality without concern about appearing original. It works great! The second picture illustrates the finishing cut of the gear teeth.IMG_1442.jpegIMG_1437.jpeg
Nice work!

And a machine shop too!

I think you have been holding out on us!
 

rdoty

ALLIANCE MEMBER
Joined
Feb 7, 2018
Messages
650
Location
Massachusetts
Yankeefarmer, the body of the part looks like stacked plates. Did you make it that way, or am I seeing things?

In any case, nice work!
 
OP
Y

Yankeefarmer

Well-known member
Joined
Jul 25, 2011
Messages
1,200
Location
Connecticut
Yankeefarmer, the body of the part looks like stacked plates. Did you make it that way, or am I seeing things?

In any case, nice work!
It’s actually a piece of 1” bar stock welded to a piece of 1/4” plate. What looks like stacked plates is the result of machining the curve in the plate portion with a roughing end mill, and not bothering with a finish cut.
 
OP
Y

Yankeefarmer

Well-known member
Joined
Jul 25, 2011
Messages
1,200
Location
Connecticut
The only background I have was a 7 week course in college (50 years ago) covering casting, welding, and machining. I might have some machining in my DNA as my father spent his career setting up production machines finishing forged products like door hinges for Ford and Craftsman tools. Mostly, I’ve just been playing with machinery since childhood. And I’m thankful for the resources available to us today when venturing into unfamiliar territory, such as support here on the GJ and numerous YouTube videos.
 

rdoty

ALLIANCE MEMBER
Joined
Feb 7, 2018
Messages
650
Location
Massachusetts
Well, keep up the good work!

How did you get the curved edges on the backing plate? CNC? Multiple setups on the rotary table? Other tricks?
 

plain2car

Well-known member
Joined
Nov 27, 2008
Messages
514
Location
Gilbert, Arizona
really cool work!! the theme you are keeping is spot on. AND since this is garage journal... and you did the work in a garage... it would not bother us if you shared the build space and tools used for the project at hand... I am sure that the work space is just as interesting as the project.... :rocker: (y) if you don't mind to share ;)
 
OP
Y

Yankeefarmer

Well-known member
Joined
Jul 25, 2011
Messages
1,200
Location
Connecticut
I guess you’d say multiple setups on the rotary table. I first cut the curves into the piece of bar stock that formed the gear portion. That was really a single setup to locate the center, then I cut the outer arc defining the tips of the gear teeth. With the same setup, just moving the y axis, I cut the smaller, inner radius. I then setup the plate and cut the radius matching the inner radius of the gear portion. This served as a guide for aligning the two pieces for welding. These were all done with the rotary table horizontal. I then welded the two pieces together, and setup the rotary table vertical to cut the using the slitting saw. I had to do some layout calculations to figure out how to space the workpiece from the rotary table and get the right diameter slitting saw to make those cuts without hitting the table or the mill’s spindle interfering.

Like so many projects of this nature, if I were to make a second (or more) piece(s), I‘d do it a little differently. I would attach the gear to the plate with machine screws instead of welding. I’d also use a different method of piloting the pivot boss in the plate. But the prototype worked great, so no need to do a second!
 
OP
Y

Yankeefarmer

Well-known member
Joined
Jul 25, 2011
Messages
1,200
Location
Connecticut
really cool work!! the theme you are keeping is spot on. AND since this is garage journal... and you did the work in a garage... it would not bother us if you shared the build space and tools used for the project at hand... I am sure that the work space is just as interesting as the project.... :rocker: (y) if you don't mind to share ;)
The work space is fairly basic, but I put a bunch of thought into it, based on 40 years of making do with my old workspace at the north side of the property. I was limited on size by zoning setback to the east, a 20’cliff to the west, zoning setback to the south, and my wife’s sugar maple tree that she got on Arbor Day of 4 th grade to the north. With a 26 x 48 footprint thus defined, I developed a design that had two vehicle bays to the south with a 15’ ceiling to accomodate lifting my 3/4 ton 4x4 pickup, and a workshop area to the north with a storage loft above. I wanted the outside to be attractive in a colonial way, and match the arch top window of our house which looks out toward it.

This picture of the exterior was taken the day I moved the Model A from my old shop into the new one.IMG_0451.jpeg
And here’s a shot of the inside looking from the south vehicle bay towards the workshop area.IMG_1386.jpeg
 

plain2car

Well-known member
Joined
Nov 27, 2008
Messages
514
Location
Gilbert, Arizona
Yankee thank you for the reply. it looks like you accomplished your goal (colonial style) thanks for sharing more insight!! keep us posted on the garage & the car.... (y) :beer:
 
OP
Y

Yankeefarmer

Well-known member
Joined
Jul 25, 2011
Messages
1,200
Location
Connecticut
@zanyad, I appreciate your interest in me doing a thread on my shop. I have to admit I have no real desire to do so. I am happy to answer questions about why my shop is designed and furnished the way it is, but after almost 15 years here, I recognize that there are many people here with hard opinions about what’s good and bad, and many feel they must express their disagreement with choices others make. I have made many such choices, including:

-All electrical is in pvc conduit. Criticized for sagging, looking unprofessional or cheap, etc. 6 years in, there is no sagging anywhere in my installation, and the gray blends well with my wall color scheme.

-My HVAC is a floor standing conventional heat pump system. My biggest HVAC need is cold weather heating, and this choice enables picking up return air at floor level (where it is coldest) and then discharging the heated air downward, so the tall ceiling isn’t a factor. Many here don’t want to give up “valuable” floor space to a heating appliance. I understand that, but I like the ease with which I can change air filters and the air handler uses less floor area than a refrigerator would.

-My lighting is two circuits of switched ceiling mounted receptacles, into which are plugged HF LED shop lights. Inexpensive, and gives me the ability to move lights around or replace as needed.

-I also have an indoor stairwell to the storage loft which is above the workshop portion of the shop. Many here say an indoor stairwell is a waste of floor space, but I have overcome that with the stair arrangement and locating my metal lathe underneath it. I didn’t want to have to deal with an outside staircase in the snowy/icy months, or deal with another entry point to the building.

So, happy to answer any questions about the choices I have made, but not interested in publicizing them as fodder for argument.
 
To avoid these ads, REGISTER NOW!
Top Bottom