To avoid these ads, REGISTER NOW!

Lighted TEXACO letters - how would you do it?

Vintage_MPG

Active member
Joined
Jul 30, 2012
Messages
27
Hey all -

So I have a set of large TEXACO letters that I've had for years; for as long as I've owned them, I have wanted to bring them back to some sort of funtional form - but I've never pulled the trigger...but now I think it's time!

I'm wondering how you experts would go about bringing light to these letters? Strip LEDs on the inside? Small directional LED spotlights that just point at the letters from the outside?

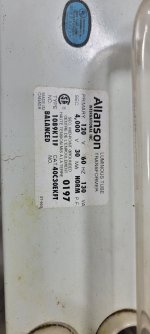
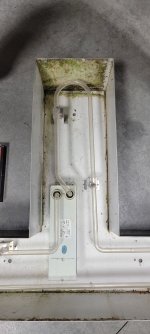
The original fluorescent tubes are all inside and in place, but I can't imagine that rewiring the original transformers/ballasts would be efficient/quick & easy, or affordable. The bulbs are likely near-impossible to find as well.

I'd love your input on how to do this. I have a little experience with strip LEDs, but not with separate letters like this; that might take 5 different power sources, wouldn't it (one for the T, one for the E, one for the XA, one for the C, and one for the O)?

Teach me your ways!

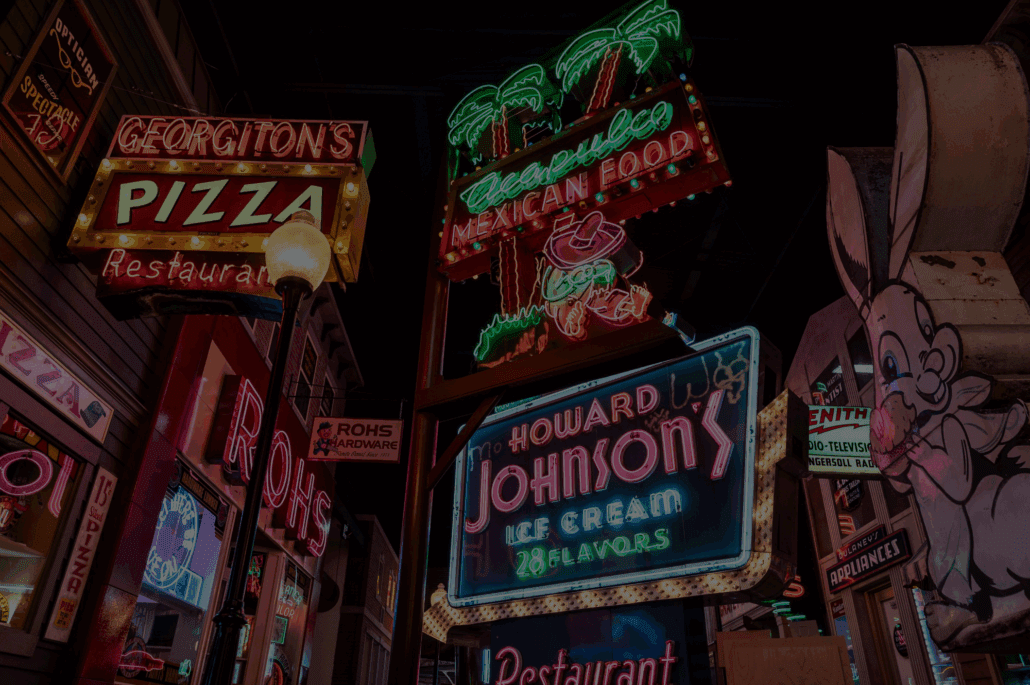
Here's a pic of the letters - right where they've been living for years and years. Time to do something with them -

texaco letters.jpg
 
To avoid these ads, REGISTER NOW!

cybrdyke

Well-known member
Joined
Sep 9, 2014
Messages
3,442
Location
USA
People in the sign business call those "channel letters" and so they use "channel lights" inside of them. These are an electric cord that have LED "pods" spaced evenly along the cord. They mount these inside the letters, stuffed in there in whatever quantity they think they need to make the letters as bright as they require them to be. Here's a link: channel lights

As an alternate, you can back light the letters by simply mounting LED tape on the back of them. You could do this pretty cheaply and even have color-changing capability.

Good luck,
CD
 

dscheidt

Well-known member
Joined
Apr 26, 2017
Messages
2,880
led tape is the easy way. The original way would have depended on their age. First were incandescent bulbs mounted on a shiny metal board. s11 or s14 were the common bulbs, I think, bulb spacing depends on how bright it needed to be.
You can sometimes see the discoloration where the bulbs were, and could usually see the brighter spots directly in ront of a bulb when they were on, if you looked. If it's somewhat newer, fluorescent tubes got used.

S11 and S14 bulbs are the commonly used bulbs in patio string lights, which suggests another easy solution.
 

gte718p

Well-known member
Joined
Mar 12, 2009
Messages
3,949
I'm in the LED crowd. Five years ago I would say it would be a cheap and easy project. Now it is going to be moderately expensive, but still simple project.

Do the letters have backs? If not you really want to make some. Preferably shiny. Even white cardboard will help get a good uniform display accross the letters face.

At the most basic, put a strip of LEDs around the outside edge near the back. That may not give you uniform intensity across the letter. The edges will be brighter than the centers. You can add a strip or two of LEDs along the centerline of each letter. That should get a pretty uniform glow. With the red diffusers, I wouldn't bother with multicolor LEDs.

If you want to go next level, you do the addressable LEDs, line up the individual strips and put each strip on a controller like WLED. Then you can do effects like simulate a flicker, make the lights look like they have a fire behind them, or act like a VU meter or spectrum analyzer.

For power sources I would put a barrel plug on each letter. You could do one larger 12v power supply, but generally 2-3 smaller ones are cheaper and easier to package. Make the cables you need to plug a couple of letters into each power supply. The exact power requirements will be determined by the LED type you choose and the density of LEDs, but it is probably 2-3 amps of 12v per letter.
 

Stuart in MN

Well-known member
Joined
Sep 8, 2005
Messages
22,971
Location
Minneapolis
I'm curious, are the existing fluorescent tubes shaped to match the letters?
LEDs in strip or rope format should be the easy way. For running the strip/rope from one letter to the next, to hide any exposed LEDs you could probably hide it inside a small section of 1/2" PVC pipe. Paint the pipe matte black to make it unobtrusive.
 

BreeStephany

ALLIANCE MEMBER
Joined
May 19, 2012
Messages
849
Location
Oregon
Back lighting the individual letters with cut to length LED strip lighting is the easiest way. The strip lighting is all 12VDC, so all you have to do is know the wattage / foot of the lighting you are installing and the size your 12VDC power supply/lighting driver accordingly.

This way you dont need an individual power supply for each letter, you can do a remote driver and then run 12VDC via appropriately sized CMR or similar LV cable to individual letters, daisy chain the feed between letters, etc.

With that said... most LED strip lighting comes with adhesive backing... DONT use it... it is absolutely terrible and generally fails under just the heat of the strip lighting itself... get yourself a roll of 3M VHB 5952 double sided 'emblem tape' to mount lighting... its rated to 250F long-term/300F short term (4 hours or less) and has GREAT grip strength... you can also get cut to length strip lighting with screw mounts and use tape and the screw mounts together to ensure that your light strips stay where you want them for life!

Just my two cents!
 

strength_and_power

Well-known member
Joined
Apr 26, 2015
Messages
1,391
I used rope LED lights in several things. In my whiskey barrel, I did them top and bottom. The vertical section that you’d see connecting the top to the bottom, I just wrapped that section in black tape so you don’t see the light output.

Made this sign for my GF who is a middle school teacher so she doesn’t have to keep repeating herself. It’s worked well with a couple of her teacher friends asking about getting one for their rooms
 

Attachments

  • IMG_0656.jpeg
    IMG_0656.jpeg
    495.7 KB · Views: 53

txvwnut

Well-known member
Joined
Jan 1, 2015
Messages
7,587
Location
Bedford, Texas
LED strips would be the easiest and you'd only need one power supply for all the letters, you would just have to connect each light to the other with a jumper.
 

Racer_X

Well-known member
Joined
Jun 25, 2007
Messages
367
Location
MI
Have you actually tried the existing lamps ? Personally that would be the first thing I would do. And I bet the bulbs are easier to find than you think.

Especially if presented to the audience here, who have a great combined skill of knowing where to find things.
 
OP
V

Vintage_MPG

Active member
Joined
Jul 30, 2012
Messages
27
You guys are good!

I haven't tried them as they are; I'll peel off the back of one of the letters and snap a pic of what's going on inside. I'll also shoot you a photo of the transformer/ballast that came with the letters. You might have a great idea on how to bring them back to life.
 

gahrajmahal

Well-known member
Joined
Dec 12, 2008
Messages
2,515
Location
Cincinnati, Ohio
Here in Cincinnati we have “The American Sign Museum” , a depository for old and historical signs. I know they have extensive skills and workshops for neon lighting, but they also must have ways to modernize signs like yours to be easier to service and energy efficient.


IMG_1843.jpeg
 
OP
V

Vintage_MPG

Active member
Joined
Jul 30, 2012
Messages
27
Here's what I found when I popped the lid on the "T" -

The label says Luminous Tube Transformer.

Looks intimidating. Not going to lie.

1000027360.jpg
 

Attachments

  • 20260318_184215.jpg
    20260318_184215.jpg
    390.1 KB · Views: 41
  • 20260318_184238.jpg
    20260318_184238.jpg
    472.9 KB · Views: 23
  • 20260318_184245.jpg
    20260318_184245.jpg
    257.7 KB · Views: 35
To avoid these ads, REGISTER NOW!
OP
V

Vintage_MPG

Active member
Joined
Jul 30, 2012
Messages
27
The gentleman I got the letters from also handed me two transformers (?) - I don't even know what these things do! But he gave them to me, and I still have them.

I've forgotten all that was involved with these. From the surface it seems like an LED conversion would be much simpler, yeah?

Furthermore, the letters are pretty heavy, probably 35 pounds each, more for the double letter. I bet that transformer is 70% of that weight. Ditching that would make mounting them much easier.

Anybody know what these things are/do?
 

Attachments

  • 20260318_185436.jpg
    20260318_185436.jpg
    405.3 KB · Views: 40
  • 20260318_185445.jpg
    20260318_185445.jpg
    472.2 KB · Views: 38
Last edited:

Copymutt

Well-known member
Joined
Sep 3, 2016
Messages
3,381
Location
Colorado
The power supplies you posted consume 145 watts each x however many are used in the sign. Go LED unless you have some incentive to return the sign to original.
 

kbuhagiar

Well-known member
Joined
Dec 27, 2005
Messages
1,730
Location
Escondido, CA
At least neon is cool. Led is boring.
Neon IS cool, and LED may seem boring, but it is lighter and safer, and a lot easier to work with.
You can get a helluva 'tickle' from the 7500 volts that most neon transformers generate.

I just converted all of my larger signs to LED, either by converting from fluorescent to LED tubes, or installing strip lighting. Either way I saved lots of weight by tossing all of the ballasts, and the lighter weight made all the difference when it came to hanging the signs.

Still have my one neon tribute sign ('No Left Turn') from back in my traffic-signal-maintenance days.

signs.jpg
 
OP
V

Vintage_MPG

Active member
Joined
Jul 30, 2012
Messages
27
So just getting back to thinking on this....but if each letter has its own built-in transformer, I likely don't need the grey units, correct? Each light looks to be a self-contained unit. Am I thinking of this correctly? The grey units are 9000V units, looks like - they must have come from some other sort of light.

If I wire the black to black, the white to white, and the yellow with green to ground (is yellow with green stripe for ground? I've not seen that before - but again, I'm a noob) - can I just plug that hog into the wall?! Looks like it's putting out 4000V, so I don't wanna have an eyeball pop out! I definitely want to play it safe! Haha!

It would be interesting to see if any of them will light up at all....

But at the end of the day, I don't know if anyone would even know that it was neon hiding behind those red letters. If it worked with just some simple wiring - that would be quick, easy, and neat to say that it was all original. If it takes some rewiring, it sure sounds like the LED move would be the way to go. @kbuhagiar seems to have the process dialed in, from the looks of his garage!

Tell me what you think and I'll try it out. It might just need a male end wired to it - then KaPOW - she's lightin' up!

Let me see what I can learn - and I'll report back....

I sure appreciate your help!


gte718p

Well-known member
Joined
Mar 12, 2009
Messages
3,949
Each light looks like it has its own transformer, so you just need 120 to the transformer. It cost you nothing to see if they work.

Watch your fingers and have a good multimeter standing by. The insulation in the old transformers can break down an allow it to escape. Everything should be potted and encased, but age is not your friend on old transformers. 4k is annoying to work with. It really likes to get out of where it is supposed to be and 4K 30mA will hurt. You are also well above the break down voltage for air, so if there are cracks in the insulation, it can arc unexpectedly.

High voltage is to be respect, but no necessarily feared. Once you plug it in check for voltage to ground before you touch the case. Your HF special is not going to work in this case. You need a Cat III meter and preferably a Cat IV. A Cat III meter is supposed to take transients to 4k.

If they work, great. Run them. When the bulbs burn out go LED. If they don't work, go LED.
 

txvwnut

Well-known member
Joined
Jan 1, 2015
Messages
7,587
Location
Bedford, Texas
If I wire the black to black, the white to white, and the yellow with green to ground (is yellow with green stripe for ground? I've not seen that before - but again, I'm a noob) - can I just plug that hog into the wall?! Looks like it's putting out 4000V, so I don't wanna have an eyeball pop out! I definitely want to play it safe! Haha!
You are correct on the wiring, and yes its 120 in and 4000 out so watch where you put your fingers when it's plugged in.
 

Old tool guy

Well-known member
Joined
Apr 13, 2023
Messages
3,150
Speaking of neon vs led. 10-ish yrs ago i worked as a project manager for a large financial institution, and one of my roles was building and/or managing mockups and prototypes. One project was to build a neon-like led sign. They wanted the classic look of neon lighting but using led’s. We went through quite a few samples with a major sign vendor and finally built one that was essentially identical. We had a real neon sign, and would put the mockups next to it for comparison. Finally got one that nobody could tell apart.
 

Bert_

Well-known member
Joined
Dec 24, 2016
Messages
9,687
Location
NW Iowa
Speaking of neon vs led. 10-ish yrs ago i worked as a project manager for a large financial institution, and one of my roles was building and/or managing mockups and prototypes. One project was to build a neon-like led sign. They wanted the classic look of neon lighting but using led’s. We went through quite a few samples with a major sign vendor and finally built one that was essentially identical. We had a real neon sign, and would put the mockups next to it for comparison. Finally got one that nobody could tell apart.

Now you just need to mimic the buzz of the transformer.
 
OP
V

Vintage_MPG

Active member
Joined
Jul 30, 2012
Messages
27
Each light looks like it has its own transformer, so you just need 120 to the transformer. It cost you nothing to see if they work.

Watch your fingers and have a good multimeter standing by. The insulation in the old transformers can break down an allow it to escape. Everything should be potted and encased, but age is not your friend on old transformers. 4k is annoying to work with. It really likes to get out of where it is supposed to be and 4K 30mA will hurt. You are also well above the break down voltage for air, so if there are cracks in the insulation, it can arc unexpectedly.

High voltage is to be respect, but no necessarily feared. Once you plug it in check for voltage to ground before you touch the case. Your HF special is not going to work in this case. You need a Cat III meter and preferably a Cat IV. A Cat III meter is supposed to take transients to 4k.

If they work, great. Run them. When the bulbs burn out go LED. If they don't work, go LED.
Would a multimeter like this one be sufficient?

Seems like things really jump in price from Cat III to Cat IV. Just want to be sure I'm chasing the correct tool -

https://www.grainger.com/product/80...MI-oD25MCskwMVcyZECB1gdBfSEAQYAiABEgKMnPD_BwE


I see many Cat III say good to 1000V, but the Cat IV up to 600V. Not sure how to interpret that, because I'm not an electrician - but with all the comments about watching where I put my hands, I want to make sure I'm doing this right!
 
Last edited:

Tuhls

Member
Joined
Jan 29, 2025
Messages
17
This may have been mentioned, I admit to not reading all of the above, many mentioned LEDs, how about a step further back in time and just stuff each letter with white miniature holiday lights? many online retailers sell them in great lengths…if there are numerous ‘hot’ points of light from the bulbs near the surface and if this is not desirable just use some frosted film as a diffuser…good luck with your project.
 
Last edited:
OP
V

Vintage_MPG

Active member
Joined
Jul 30, 2012
Messages
27
So I have this multimeter now. It's rated for Cat III, 600V.

If I wire up one of my letters and plug it in, I can use this to chase down stray voltage, is that correct? Instead of finding it with my body?!

I'm trying to learn this as quickly as I can. Also trying to be safe.
 

Attachments

  • 20260319_172014.jpg
    20260319_172014.jpg
    388.2 KB · Views: 23
  • 20260319_171958.jpg
    20260319_171958.jpg
    429.5 KB · Views: 32
Last edited:
OP
V

Vintage_MPG

Active member
Joined
Jul 30, 2012
Messages
27
Here's what I know about T:
 

Attachments

  • 20260319_180348.jpg
    20260319_180348.jpg
    488.4 KB · Views: 31
  • 20260319_180334.jpg
    20260319_180334.jpg
    513.2 KB · Views: 30
OP
V

Vintage_MPG

Active member
Joined
Jul 30, 2012
Messages
27
That thing fired right up with no noise or anything. ****!

But - now I'm scared to go near it! Is there voltage floating around that beast? Can I test the case with my cheap Klein multimeter?

Getting close with the T! Haha! WAHOO!
 
To avoid these ads, REGISTER NOW!
Top Bottom