To avoid these ads, REGISTER NOW!

What did you do "IN" your garage today?

Wrench97

Well-known member
Joined
Jun 23, 2018
Messages
12,130
Location
Southeastern Pa
You mean this tab:

55183834463_1a94ce2c93_o.jpg?

It's not exactly springy.

I'll watch that video after work.

These are the only other marks on the lantern:

55183932744_53472248b0_o.jpg

They're on the left side of the lantern with it facing me.

BTW: When they call this a "Battle Lantern", they ain't kidding! It's made of heavy gauge steel and fully welded. It double as a flashlight and anti-boarding weapon.
The bracket from Kay's video.
The tab engages the ramp on the bottom to hold it tight.
1775164849874.png
 
To avoid these ads, REGISTER NOW!

Beerhippie

Well-known member
Joined
Oct 13, 2023
Messages
9,864
Location
Far NE Oregon
I managed to get the tab bent back out:

55184481059_a4d1cc6e70_o.jpg

Without damaging the case much. I had to drive a large screwdriver and then a 3/4" cold chisel behind it to bend it out.

Thanks for the picture! I think I can make one using the drill press and a Dremel/die grinder. Then to figure out where to mount it....

Kay, when you were removing hundreds of these, did it ever occur to you to save a couple for me? See, that's the problem with the world today: too few people stop and ask themselves "How will this affect Timm?" before doing things.
 

kaymccampbell

Well-known member
Joined
Feb 27, 2015
Messages
29,561
Location
Upstate New York
Kay, when you were removing hundreds of these, did it ever occur to you to save a couple for me? See, that's the problem with the world today: too few people stop and ask themselves "How will this affect Timm?" before doing things.
You were probably smeared in ****, formula, n oatmeal, and didn't even know your name, when I was doing that.
 

welder4956

Well-known member
Joined
Apr 8, 2010
Messages
3,072
Location
Birmingham, AL USA
Drilled out some stainless steel ATV tie down brackets to fit the F150 bed bolts, then installed them in the truck. The brackets come with a 5/16" mounting hole, but are wide enough to accommodate a 5/8" hole to fit the bed bolts. I have never been pleased with the OEM Ford tie down brackets because they are too high up on the bedside for the things I need to tie down, such as welding gas cylinders. These are going to work just fine.

https://bsfabutv.com/product/hd-ss-tie-down-loop/

1-HD-Stainless-Steel-Tie-Down-Loop-0000100533-1.jpg

20260402_164755.jpg
 

Benw455

Well-known member
Joined
Dec 20, 2005
Messages
752
Location
WV
I finally got the mustang out of the garage. Moved some shelving and put my toolbox in its place. Starting to make some room for the 79 Trans Am it going to be painted this year. I still need to move the 65 GTO for extra room.
 

Attachments

  • IMG_7637.jpg
    IMG_7637.jpg
    835.4 KB · Views: 39
  • IMG_7635.jpg
    IMG_7635.jpg
    784.5 KB · Views: 31
  • IMG_7636.jpg
    IMG_7636.jpg
    842.2 KB · Views: 29

Beerhippie

Well-known member
Joined
Oct 13, 2023
Messages
9,864
Location
Far NE Oregon
A lot of clean-up around the shop today. Took 20 gallons of used motor oil to the truck shop up the hill--where they use it for heating. It was in fie gal. cubies that were beginning to deteriorate from exposure to the sun. I handled them like they were filled with nitroglycerin.

Found out that they'll come pump out a 55 gal barrel, making this a much less unpleasant task. Found a nice, clean poly barrel with both bung plugs for it.

Then I had to get some distilled water.... The local mom-and-pop grocery store I've been shopping at for about thirty years closed down recently when the inconsiderate asses decided that they wanted to retire. That leaves Safeway as the only grocer in town. Safeway *****--and I don't mean that in a good way. I'm sure they'll find some more ways to make the shopping experience as unpleasant as possible, but they're a fair ways there already.

Did some other work-related **** that I don't recall. Got a little more to do when the brewers are done with the hot water.

Worked on the Brick some more. Inside work, under the bed installing lights, so I was able to mostly keep the doors closed and keep the snow out. Yep, snow--Happy April!

55184665549_acc4637296_o.jpg

It wasn't the most comfortable job I've done recently, but it's done.
 

Metallitubby

Well-known member
Joined
Aug 12, 2019
Messages
25,831
Location
ATL OTP North
For the EP3 hillclimb car:
  • Disassembled the windshield cowl and associated bits in preparation for windshield replacement
  • Windshield guy replaced windshield and all trim w/ new OE bits
  • Reassembled windshield cowl w/ wiper arms
  • Planned and started mounting the GoPro mount on the underside of the roof near the roll cage
  • Started packing the new "PackOut" with track-related items, with some planning needed to replenish trackside tools/spares
  • Rebranded the "PackOut" with Honda branding using NOS decals from EU2000 generators (w/ specific adhesive for textured plastic)
  • Put the car back on the float charger in preparation for dyno-day
For the Korrado Pikes Peak:
  • Planned shifter placement on existing VW tunnel, which will likely be modified
  • Started removing the bits and bobs on the roof in preparation for the carbon roof (post roll cage install)
  • Removed hood in preparation for making a mould to build a carbon fiber version
 

bmwrd0

Well-known member
Joined
Nov 7, 2010
Messages
5,484
Location
Beaver Fever Oregon
Got the back gears installed in the Logan, and in the process to get everything adjusted correctly, you need to install the spindle and all that is entailed in that assembly at least 50% of the way, and that is when you realize that if you had just installed the spacers, it would be no trouble to install it 100%.
55183818809_6ab42ff8fe_b.jpg

So, tonight, out it comes, the two spacers and remaining bearing shields go in, and that will be buttoned up.
 

rollinlower

Well-known member
Joined
Oct 17, 2017
Messages
189
Location
Rogersville TN
its good friday first time in months no one in the house has to be awake at 5am but for some reason i wake up freezing, so ill be going to the barn to clean up some more after i finish my coffee and clean up my desk. hopefully put the oldest to work moving some big stuff around when he crawls out of bed.
 

PhantomEB

Well-known member
Joined
Feb 6, 2006
Messages
6,787
Location
Medicine Hat, AB, Canuckistan
Straightened out a bent lip on the power steering pulley on the better halfs Honda CRV the other night. waiting on a Gearwrench surpentine belt tool to finish off the job.

Battery pulled out of the enclosed trailer and put inside the bronco last night and immediately put on the onboard maintainener.

Today is wait for Amazon on the tool and bang that out so my car can go back into the shop.

other plans are to align pulleys on the bronco way better so I ain’t chewing up belts either. As well wire in a secondary switch to the electric fan. Not confident the sniper is kickin in the fan when I want it. Then engine compartment lights and the light bar. Sounds more like what am I doing in the garage this weekend.
 

Ultradog MN

Well-known member
Joined
Jan 20, 2024
Messages
775
Location
Twin Cities
I moved the Twins around this morning so I could get the mowing tractor in the shop for some service. Oil and filters, a couple of leaks and I will rewire it this year.
It is a Franken Tractor - built out of parts and pieces from several models. I lowered it, shortened the wheel base, switched to horizontal exhaust, upgraded the steering and gave it the nose and color from an industrial model. It looked like the blue one before.
Oh, and it will get some ballast in the rear tires too.
 

Attachments

  • 5ad61e1e-361d-42fb-a217-4df87f4632bf-4090051020.jpg
    5ad61e1e-361d-42fb-a217-4df87f4632bf-4090051020.jpg
    172.7 KB · Views: 42
  • 33202613453.jpg
    33202613453.jpg
    789.8 KB · Views: 45
  • 332026114922.jpg
    332026114922.jpg
    989.8 KB · Views: 49

Wrench97

Well-known member
Joined
Jun 23, 2018
Messages
12,130
Location
Southeastern Pa
I moved the Twins around this morning so I could get the mowing tractor in the shop for some service. Oil and filters, a couple of leaks and I will rewire it this year.
It is a Franken Tractor - built out of parts and pieces from several models. I lowered it, shortened the wheel base, switched to horizontal exhaust, upgraded the steering and gave it the nose and color from an industrial model. It looked like the blue one before.
Oh, and it will get some ballast in the rear tires too.
Curious as to how you shorten the wheel base?
 

Hooked

Well-known member
Joined
Sep 24, 2010
Messages
438
Location
League City, Texas
Replaced the pump drive belt on a friends Bad Boy ZTR. They do NOT make these machines to be easily repaired.
He thought the belt was broke but what I found was the belt had been knocked off a drive pulley. I only discovered caused the problem after having watched several videos trying to learn how to replace the belt. Fortunately, for me, one of the videos showed how one of the battery hold down bolts had dropped down catching the cooling fan blade which somehow caught the belt and popped if off the pulley.
 

Beerhippie

Well-known member
Joined
Oct 13, 2023
Messages
9,864
Location
Far NE Oregon
I spent the morning Jinga'ing this new prep table out of the shipping crate and box:

55186282294_0a511fcd4d_o.jpg

I saved the crate parts--I actually have a use for a lot of that plywood.

That was the easy part. Getting it off the pallet wasn't. Whoever shipped this had an entire engineering dept. dedicated soley to making that part as hard as possible. The feet of the prep sit in hollows inside the upper pallet and there are two boards atop the pallet to prevent the forks of the fork lift--or lifting slings--from fitting underneath, even after I pried the table up and put some blocking under it.

Fortunately, an old employee stopped by to BS, so I put him to work. Between us, we got it out of that damned thing.

Then I had to get the old prep table out of the kitchen. It seems like we may have built some additions to the kitchen since it was installed, as there was no doorway it was going out through.

I got a bit medieval on its ***

55185073082_e1153606a0_o.jpg

and tore it down to the bare carcass, which passed through the door easily.

Again, fortunately, the new table is narrower and fit through after removing the rear door of the kitchen.

55186357610_ccf69af5d6_o.jpg

I'll salvage any good pieces of the SS sheet metal for projects. I also got the cutting board off it

55186030481_6768a7101c_o.jpg

3/4" UHMW is always useful around the shop, and I'm running low on it.

Then diagnosed the shot alternator on my Vanagon, which died on the way home last night. I still got home, but the headlights were mighty dim by the time I pulled in the drive.
 
To avoid these ads, REGISTER NOW!

GrayFlattop

Well-known member
Joined
Jan 18, 2018
Messages
1,051
Location
Chicago
Moved some tools from the house to the wood shop. Cut up some Baltic birch plywood to make a few drawers and used my new 1/4” wide grooving blade to make the required dados and tenons. It wasn’t cheap, but it certainly performed better than expected, so I’m happy.

Took a good walk to feign good habits and hopefully forestall further decline, then back to the shop. Listened to the ballgame while fiddling with the dust chute for one of the trim routers. Made it function with the vacuum and rounded over edges of the drawer sides. Sanding and assembly will be tomorrow’s plan.

Far too wet outside to do any yard work, but I picked up some downed branches and checked on the sugar snap peas in the raised beds, seedlings are now about 2” high. More storms in a few hours, I hope we don’t get hail again (destroyed some of my daffodils a couple nights ago).
 

racecougar

Well-known member
Joined
Jan 26, 2021
Messages
5,138
Location
Missouri
Started hacking out the rusty floor pan in the '73 Mustang.

IMG_4092.JPG


It felt a little familiar. This pic was a few builds and 4,626 days ago:

P1070034.jpg


Took an hour off this afternoon to go grab some morels from the woods, and they were delicious.

IMG_4116.JPG

This guy helped me look.

IMG_4124.JPG
 

Ultradog MN

Well-known member
Joined
Jan 20, 2024
Messages
775
Location
Twin Cities
Curious as to how you shorten the wheel base?
Was trying to make the tractor a little more nimble.
Specs on the standard ford 4000 (blue one)
say it has a wheel base of 84.5"
I put a 4400 front axle, bolster and cast iron pan under it which gave it a wheel base of 81" .
It also lowered the front end about 5"
Used the steering from another model - a 3500 which turns the wheels a bit sharper.
Between the two mods I probably gained about 8" in shorter turning radius. I also used a different integral power steering box from a 4600 which gave it quicker, easier steering with a smaller steering wheel than before. And smaller rear tires
These tractors were all modular so it's pretty easy to swap parts around on them. It has a spinner knob on it and I can whip it around pretty quickly.
 

driftpin

Well-known member
Joined
Dec 22, 2016
Messages
11,284
Location
Miami-Dade/Broward Co. Florida
I got a new roof on the carport, and added strap-over rafter tie-downs, the work was subbed-out. I wrote the check. The job included new roof rafters and sheathing, & a waterproof barrier beneath the hot-mop slate roll roofing. The fascia is 2X8's. In FL you get a discount for those things, on your insurance. They did a decent clean-up, but because I didn't empty the carport, a lot of debris from the old roof ended-up inside the carport. I spent today vacuuming the debris all up. It also helped me to discard some things, and to organize what was left.

20260319_182501.jpg
Hot mop slate roll roofing done. The metal roof shed in the back is from Lark, in GA. Very well-designed & built.

I posted about the shed previously (link, below) but because I think its info may be of interest to someone looking for a reputable shed contractor I'm going to re-visit the project.

The shed underlayment is 3/4" plywood w/membrane housewrap and Hardi-Board exterior sheathing. The framing is galvanized steel. It's approved to withstand 180 mph wind gusts, and has a Miami-Dade County Building Dept. Product Approval to that. While the carport roof and the shed seem to be very different in size, from the picture above, the footprint of each is identical. The seemingly-great difference in size according to the picture is really a trompe l'oeil, an illusion.
https://www.garagejournal.com/forum/threads/lazy-way-to-a-garage.376826/

1775306683733.png

The little fella above, we had for 15 years and was a shelter dog, a Manchester terrier mix. A sweet dog, fleet of foot, and lots of fun, every day. He underwent two different bouts of radiation therapy for cancer, and it doubled his lifespan. It was worth every penny. We called him, "Our little Lexus."

My neighbor, who volunteered to help me, after I fired the hack 'shed installer,' was favorably-impressed by the quality of the shed build, and he is a structural engineer.

I had removed the original asphalt driveway, and replaced it w/a concrete spread-footer driveway, and an adjoining slab for the shed.

1775306868294.png

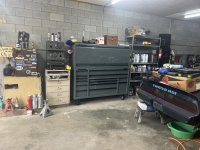
The pic here shows the carport roof as it was previously, and probably halfway through its 20-year lifespan from the last hot mop tar installation. Inside the carport PT 2" X 6" roof support posts are 4" steel square lolly columns.
1775306923358.png

The shed was craned into place. Another trompe l'oeil but this time, it's the shed slab looking much-larger than the carport slab, though they are the same size.

1775307457949.png

I anchored it to the slab w/hilti concrete threaded anchors, 2' o.c. which was far-above what was required by code. I had originally used a shed installation 'specialist' recommended by the shed sales person. He turned out to be an incompetent hack without tools necessary to anchor the shed as I requested. When he started attempting to install the hilti threaded anchor pins, and couldn't even drill one hole to the required-by code depth, I fired him. The hack 'installer' started banging-away on one of the hilti threaded pins which was nowhere deep enough to do its job of anchoring the building to the slab. I guess he was hoping he could 'muscle' the hole into the concrete deeper w/his hammer. He couldn't, and I fired him before he wasted any more of my hilti threaded pins. The hilti pin with a couple of inches of thread showing is the one and only piece of hardware he attempted to set, before I fired him. The threads should barely-show at-all, above the nut, maybe two threads.

1775308549658.png

1775307333256.png

My HFT SDS-Max demolition hammer/impact drill drilled ~24 pin holes in a 1/2 hour, which paid for itself on this one job alone. Lay-out the hole pattern, drill through the galvanized steel wall footer, and the PT 2" X 8" footer board beneath it, and then switch tools and use the hammer drill through the concrete to the required depth. To the hack tradesman 'installer': choose another line of work!

The shed has a 100 amp service laid underground from the meter can & Square D Homeline 200 amp main house disconnect which replaced an original to the house 1961 Federal Pacific branch circuit panel, and the outside main disconnect.

1775309045594.png

There are 120V duplex outlets every 4' and several 240V outlets for a 60 gal. upright air compressor, a 12" Craftsman radial arm saw I bought new in 1979, and a HFT Vulcan OmniPro multi-process welder I bought w/my class action lawsuit payout.

New rafters, new sheathing, replacing a 65 year old roof. The last similar flat roof was done 20 years ago. The rafters & sheathing then were original to the house, so 45 years old.
20260317_145340.jpg

Here you see the strap-over rafter steel brackets, this earns me an insurance discount. The waterproof underlayment also qualifies for a % discount. I still need to paint the fascia.

The new neighbor's tree overhangs my new roof. I'm going to ask about cutting it back to the property line to lessen the potential for damage. We have a good tree surgeon, licensed and insured, He has some neat Vermeer tree maintenance machines.
20260317_145418.jpg
 
Last edited:

strength_and_power

Well-known member
Joined
Apr 26, 2015
Messages
1,407
Started moving items from the back of the shop to anywhere else so I can start the mezzanine build. Had a buddy call me Wednesday evening on his way to pick up a motorcycle lift he bought. He brought a trailer to carry said lift and also brought his small forklift to load it. He was going to be 9 minutes from my place and said he was dropping the forklift off so I could use it for the mezzanine build. I don’t want to be that guy who borrows tools for extended periods so it’s time to get cracking on the mezzanine.
 

driftpin

Well-known member
Joined
Dec 22, 2016
Messages
11,284
Location
Miami-Dade/Broward Co. Florida
Had a buddy call me Wednesday evening on his way to pick up a motorcycle lift he bought.
Show us some pics of that, please. Black Widow, Handy-Lift, Harbor Freight, or other? Several years ago, my Daytona Beach Bike Week ridin' partner said he was interested in a bike lift. I have a Handy Lift, w/the accessory side ramps, the loading ramp, and the two-wheel dolly handle to move the lift as needed. I started searching the social media 'for sale' ads, and I found a Miami area Handy-Lift quickly. I called him to ensure he still wanted one, and I went and bought it for him. $500, after a bit of negotiating. Maybe he will start to build the two Ironhead Sportsters he has been collecting parts for, for many years. He has a set of S&S stroker flywheels & jugs he's thought of putting in one of them. I suggested that he just do a stock build. We're both in our 70's and neither of us is a 'hotshoe' these days, though I do have a VMax (among others).
 
Last edited:

strength_and_power

Well-known member
Joined
Apr 26, 2015
Messages
1,407
Show us some pics of that, please. Black Widow, Handy-Lift, Harbor Freight, or other? Several years ago, my Daytona Beach Bike Week ridin' partner said he was interested in a bike lift. I have a Handy Lift, w/the accessory side ramps, the loading ramp, and the two-wheel dolly handle to move the lift as needed. I started searching the social media 'for sale' ads, and I found a Miami area Handy-Lift quickly. I called him to ensure he still wanted one, and I went and bought it for him. $500, after a bit of negotiating. Maybe he will start to build the two Ironhead Sportsters he has been collecting parts for, for many years. He has a set of S&S stroker flywheels & jugs he's thought of putting in one of them. I suggested that he just do a stock build. We're both in our 70's and neither of us is a 'hotshoe' these days, though I do have a VMax (among others).
Here ya go. Track torch controller and rail not included
 

Attachments

  • IMG_0790.jpeg
    IMG_0790.jpeg
    803.3 KB · Views: 24
  • IMG_0791.jpeg
    IMG_0791.jpeg
    776.4 KB · Views: 25

Pexto

Well-known member
Joined
May 5, 2018
Messages
640
Well, this didn't happen today, but last weekend I finally fixed a long-standing problem with my Skandic 900 ACE. It would occasionally rev up without me touching the throttle. This happened both at idle and while riding. And when this happened the speedo would go crazy, like reading 112 mph while sitting still, and then coming right back down to zero. And at high speed or load the speedo would start bouncing up and down and the engine would bog down, as if the ECM was trying to adjust mixture based on speed. Over the course of a year the problem got progressively worse, none of my buddies had helpful advice, none of the local shops had experienced the problem, and my casual troubleshooting didn't help matters. Frankly the only people who believed me when I described the problems were the ones who had stood next to my idling machine and observed the speedo when it acted up - which it didn't always do.

Finally I got serious and tracked the issue down to the speed sensor, which is located in the gearbox cover. Of course Skidoo won't sell you the speed sensor by itself - much to my disbelief I had to order a whole new gearbox cover for $200.

Here's the new cover next to the old one.
20260324_145338.jpg

Here's the outside of the two covers. The speed sensor is glued into a channel, then covered with an aluminum strip. On the old cover, you can see a dent right where the punch is pointing. I believe the wiring was probably damaged there; I've no idea how that dent got there.
20260324_150740.jpg

The inside of the gear case - you can see the four little magnets on the drive shaft that actuate the speed sensor in the cover.
20260324_145420.jpg

The only tricky part was removing the shift fork from the old cover and transferring it to the new cover. Two roll pins hold the fork onto the shaft that passes through the cover:
20260324_145941.jpg

Getting the fork out was easy enough, but I needed four hands to install it in the new cover; one to hold the shift fork steady, one to hold the roll pin in place, one to hold the punch, and one for the hammer. Despite my best efforts I couldn't get a pin started. It didn't help that I don't have any starter punches, and my pin punch wasn't quite the right size.
20260324_150610.jpg

Finally I had a little inspiration: I carefully taped the roll pin onto the punch. That made it a three-handed job and after a few tries I was able to coax my left hand into doing two of those jobs at once.
20260324_152801.jpg

Off to the woods for a test run, and to replenish the cabin with firewood. Such a relief to have everything working right again!
Oh, and I'm looking for ideas on what to do with the old cover. Best idea so far is to turn it into a lamp. :)
20260328_131649.jpg
 

Beerhippie

Well-known member
Joined
Oct 13, 2023
Messages
9,864
Location
Far NE Oregon
Got suckered into working again today. Oh, well, baby needs new shoes and an alternator. A few more hours will help with that.

55187854399_114cd4418d_o.jpg

******** (what sick ******* came up with that name?) court deployed for the first big weekend of the season.

The guy who put the astroturf away last fall--who doesn't work here anymore--somehow managed to put it away rolled backwards--it wouldn't just unroll from the forks of the forklift. It was also in a place I wasn't comfortable going with the forklift, which is a solid-tire rig meant for concrete only--stuck forklifts are stuck stuck. I had to get a helper to help get that damned thing--which must weigh over a hundred pounds--drug out and turned around so I could get the forks under it.

Now I need to get rid of these bollards:

55186712977_7c3e196fa4_o.jpg

Seeing as we don't really need them anymore and people just run over them in full daylight. I mean, how can you be expected to see a four-foot tall, foot-and-a-half thick pole made of kegs with reflective tape? They used to have lights on top, which got broken after being run over a few times.

Time to go crawling around the parking lot with the forklift....
 
Last edited:
To avoid these ads, REGISTER NOW!
Top Bottom