To avoid these ads, REGISTER NOW!

let's see your craftsman block grinders

PacificaVette

Well-known member
Joined
Nov 30, 2013
Messages
189
Location
Pacifica, CA
Thanks everyone!

Well I bought her. Bearings sound smooth and free spins for about 2.5 minutes after shutdown. Everything appears in good condition overall, minus the imperfect paint job and minor surface rust here and there. Switch is tight and accessories are in good condition. Light works, but the bulb holder was worked on or replaced at some point as indicated by glue residue. Anybody know what years this model was produced or if there is a date code somewhere on the grinder?
A grinder that runs that long (2.5 minutes) after shutdown may have dry bearings. You might want to check their condition.
 
To avoid these ads, REGISTER NOW!

FrankLee

Well-known member
Joined
Sep 13, 2010
Messages
3,650
Location
seMI, 48317
A grinder that runs that long (2.5 minutes) after shutdown may have dry bearings. You might want to check their condition.
Exactly.

Here's one of my refurbs with new sealed bearings and 7" stones installed. They're all different, but this spun for just under one minute after power off. This grinder also has the much larger rotor assembly which adds to the flywheel inertia.
 
Last edited:
To avoid these ads, REGISTER NOW!

carbon

Well-known member
Joined
May 31, 2009
Messages
239
I own a 397.19360 model, which is a 1 hp 6.8amp beast of a thing. In 2013 I had managed to get it sorta balanced and running sorta smooth. But, I just took the wheels off to ring test them and now I'm back to square one. Note that I do use steel bushings vs the stock Norton 3x plastic ones.

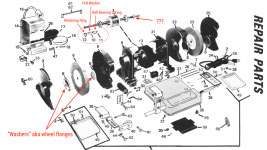
In the spirit of reducing the time it’s going to take me to re-balance the wheels, I have a question about the arbor: it doesn't seem to have a decent shoulder for the large diameter stamped steel washers (part #5) to register against. Rather, it just has a little shoulder and what the manual describes as "retaining rings" (part #12).

This seems far from a precision setup.

Note that I am not a machinist. Hopefully this question isn't out of place in this thread.

1788447370573.png

Assumptions:
  1. I assume the parts #10, #11, & #12 are duplicated on each side of the 5/8" arbor, even though that isn't shown in the schematic.
  2. I assume the parts #10 & #11 are in-between the main housing (#9 & #21) and butted up against the bearings, as I don't see them on the arbor after the grinding wheel is removed.
  3. Also assumed is the c-clip is shown installed on the right arbor (see my "???" note on the diagram)
Notes:
  1. The "retaining ring" #12 is on my machine is an external circlip/c-clip/snap ring, whatever you want to call it. My grinder has one on each side of the arbor when I bought it used.
  2. One of the c-clips is bent, meaning the two ends don't come together in a relatively flat plane
  3. Even with just the flat-ish c-clip installed + flanges + wheel on the grinder's one side (the other side being empty), there is still wobble
  4. Without anything installed on the arbors (incl. the c-clips) the machine runs super smooth. If I touch the spinning arbor with a little piece of wood, there is no discernible movement of the wood. It's so smooth it doesn't even seem like it is spinning.
  5. Note that a decade ago I had managed to get the thing to be relatively wobble-free. Definitely not perfect, but it still ran that way yesterday. However, I forgot a) how I had accomplished that, b) I just took the wheels off yesterday to ring-test them, and c) neglected to note exactly how I had previously lined everything up! D'oh!!!
  6. I do know that I had previously followed some balancing guide as I have a bunch of lines, numbers, and colored dots on the flanges and wheels.
  7. I had prev purchased & used steel bushings to replace the wussy plastic ones that come with the Norton 3x wheels
  8. My goal with this thing is to grind the primary bevel on chisels and plane irons, doing the secondary bevel on waterstones (à la Chris Schwarz). Once I had gotten it to run ok, I barely used the grinder and now I'm getting back into woodworking.
Questions:
  1. Are my above assumptions correct?
  2. Is my grinder assembled correctly? (the c-clip part)
  3. Are the flanges really designed to only press up against a c-clip, which is itself pressed up against a wimpy ~1/16” to 1/32" shoulder? This seems like a cost-saving measure vs. using a thicker arbor with a decent machined shoulder.
  4. I'd prefer to get the grinder to run smoother than I had previously gotten it to be…and that was a pain in the *** to do! Are any of these parts going to help to more-efficiently remove the wobble? Stuff like:
    1. Raptor machined washers
    2. Raptor R3X Grinding Wheel Bushings
    3. Self-Aligning Spherical Washers
  5. If you have links to good tutorials to balance the wheels, let me know. I am aware of stuff like the One-Way balancer.
  6. Edit: given a tightly machined steel or aluminum bushing, is it safe to run the machine without the c-clip? I noted yesterday that the aftermarket steel bushings I had bought years ago do indeed stop at the minimal shoulder on arbor, but I’ve never tried running it without the c-clips.
Here is the Vintage Machinery page on my grinder with its manual. http://vintagemachinery.org/pubs/detail.aspx?id=6144

edit: ha! I found my 2013 question about the retaining rings on this grinder, and someone said that that is how they were made: https://www.garagejournal.com/forum/threads/craftsman-block-bench-grinder-problem.211625/. If you want to confirm that, that'd be great. Still would love answers to my other questions, however.
 
Last edited:

Michael_PE2003

Well-known member
Joined
Jan 8, 2022
Messages
102
Location
Cleveland, Ohio
Do the wheels have any radial runout? (The clearance from the front edge of the wheel and steady rest changing as you rotate the wheel). Mine had noticeable runout and would vibrate everything off the edge of my bench until I made a tool to true the wheels up. I also made a tight-fitting aluminum bushing to eliminate any slop at the center of the wheel; I won't use the plastic multi-piece bushings as they are way too lose. Then made a truing tool from an Amazon diamond point and a couple of clamp collars.

1788457053209.jpeg 1788457084930.jpeg

The reason for two collars is to make it easily adjustable by small increments as the wheel wears. I just loosen the back collar, put a 0.010"-0.020" feeler gauge between the collars, tighten the back collar and then move the front collar until it touches the back collar and tighten it to move the diamond closer to the wheel for the next cut. Just hold the front collar against the tool rest and run it back and forth across the face of the wheel until it cuts evenly across the entire face of the wheel. After truing, the vibration was probably less than 10% of the original and grinding was far easier on top of it as the workpiece wasn't bouncing on the wheel while grinding. I didn't invent this, I saw it somewhere on the internet, probably YouTube, the only thing I did different was use the second collar and shim to adjust it.
 

carbon

Well-known member
Joined
May 31, 2009
Messages
239
Do the wheels have any radial runout? (The clearance from the front edge of the wheel and steady rest changing as you rotate the wheel). Mine had noticeable runout and would vibrate everything off the edge of my bench until I made a tool to true the wheels up. I also made a tight-fitting aluminum bushing to eliminate any slop at the center of the wheel; I won't use the plastic multi-piece bushings as they are way too lose. Then made a truing tool from an Amazon diamond point and a couple of clamp collars.

1788457053209.jpeg 1788457084930.jpeg

The reason for two collars is to make it easily adjustable by small increments as the wheel wears. I just loosen the back collar, put a 0.010"-0.020" feeler gauge between the collars, tighten the back collar and then move the front collar until it touches the back collar and tighten it to move the diamond closer to the wheel for the next cut. Just hold the front collar against the tool rest and run it back and forth across the face of the wheel until it cuts evenly across the entire face of the wheel. After truing, the vibration was probably less than 10% of the original and grinding was far easier on top of it as the workpiece wasn't bouncing on the wheel while grinding. I didn't invent this, I saw it somewhere on the internet, probably YouTube, the only thing I did different was use the second collar and shim to adjust it.
Let me explain myself better and more concisely.

I’m mainly wondering that if I buy tighter fitting machined flanges to register against the tiny shoulder on the arbor, then can I safely remove the c-clips?

I already use steel machined bushings.

First, fresh out of storage, yesterday I ran the grinder. Not too much vibration. It’s no Baldor, but not horrible. Given the little sticky dots and lines and notes on the wheels, I must’ve done the attached sort of balancing way back in 2013 (see the attached tutorial. Also, source.)

So, way back I must’ve gotten the grinding edge fairly flat with my t-shaped diamond flattener or otherwise it would’ve initially vibrated everywhere.

But I like your DIY single point flattener! That’s better! Thanks.

After I dismounted/remounted the wheels for a ring test, then that’s when I got crazy vibration, just like I had way back.

I suspect the way the grinder is made with its dumb retaining clip acting as a shoulder for the inner flange might limit the ultimate smoothness I will be able to achieve. Even with machined flanges. For if the shoulder isn’t square I am back to using sticky dots to correct the crazy side-to-side wobble.

At minimum I’ll try some new retaining clips from McMaster.

I have also read that buying replacement nuts from McMaster can work wonders, as their faces (and thread angle!) might give you more square clamping pressure against the flange.
 

Attachments

  • Balancing grinder wheels.pdf
    517.3 KB · Views: 5
To avoid these ads, REGISTER NOW!
Top Bottom