To avoid these ads, REGISTER NOW!

rattle_snake's random shop projects v0.1

OP
R

rattle_snake

Well-known member
Joined
Jun 25, 2015
Messages
5,243
Location
Chandler, AZ
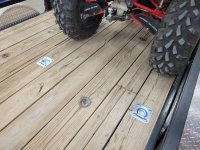
Still working on the trailer. Getting closer. Got the heavy duty recessed d-rings installed. Decided to put then just in front of the rear storage area, so I can put a 2x10 into the side rail posts.
vaVbFQT4WKbS2WyKqTmQ=w1214-h911-s-no-gm?authuser=1.jpg

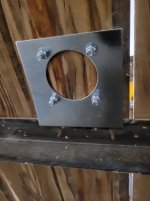
Just close enough to the nearest cross member to get the backing plate to overlap.
qE-v4pQkVMWBh95tt0Atw=w683-h911-s-no-gm?authuser=1.jpg

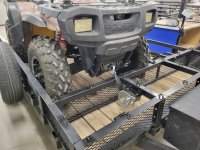
I attempted to buy some chain but didn't find what I wanted. So fiddled with the lift strap to get it to work temporarily. Test the concept.
iWmwLDdYaqH9KHzPRq9BA=w683-h911-s-no-gm?authuser=1.jpg

Once rear strap is the perfect length, just crank down the front until tires touch and done.
YJugDbu6dDLCXcmeyT6g=w1214-h911-s-no-gm?authuser=1.jpg

One thing that has always bothered me when securing a motorcycle are the open hooks on most cam straps. If they get loose, they can come off, and bike can fall off trailer. Bike has suspension so it's a concern.
So I cut off all the open hooks and used 'human climbing' rated carabiners. Welded dedicated mounts on the rails with an extra chain link.
nJwYKiA7vAL2grGeuh28A=w683-h911-s-no-gm?authuser=1.jpg

For the upper handlebar end, I reworked the soft straps I already had. Instead of one end captive to the cam strap and hooking the other I decided to use them like they were intended. A pull though loop which can be left on and stuffed behind the number plate. Then another carabiner to attach.
aJizadqSgjsc4e95Djbw=w1214-h911-s-no-gm?authuser=1.jpg

Also shortened the straps, and re-sewed the ends to have a hand loop to get a good grip on when tightening them down. No more 3 feet of red strap flapping in the rear view, or having to tie up the loose ends.
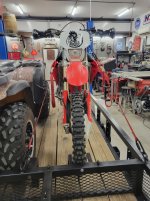
5tgZng2skmyFiekiTsqZw=w683-h911-s-no-gm?authuser=1.jpg

Trailers are bouncy and the back end of a bike will move around. Adding the forward bulkhead moved the bike back and the old tiedown scheme doesn't work. Needed to add another d-ring to outside of tire. Stole one from another location, ironically the place I had just installed one for the last trip. Quad is also moved back also and that point is now useless underneath the tire.
Customized an orphan cam strap (the other three are MIA) to fit just right. Shortened the cam side with a new loop. cut most of the strap length off and made a handle on the end. Simple and compact.
jhD2KggQdsV78ctKYYiw=w1214-h911-s-no-gm?authuser=1.jpg

Test fit stuff to figure out the lengths for bungees. Ordered some more 15s as that seems to be the magic length.
AdYysCG0iXWqePT8qd_Q=w1214-h911-s-no-gm?authuser=1.jpg

Getting closer to my goal of making things quick and easy. Hope to finish it out this weekend and move on to the next project.
 
To avoid these ads, REGISTER NOW!
OP
R

rattle_snake

Well-known member
Joined
Jun 25, 2015
Messages
5,243
Location
Chandler, AZ
Looking for ideas on how to better secure the ramp.

Currently the system uses spring loaded hooks. They are quick and easy but not very secure. The ramp flops around and is noisy. I want something to hold it tight, probably only need to do one side. I've used a ratchet strap in the past but want something dedicated to the purpose, quick and easy. Maybe a link, or some type of over center latch (like a chain binder). Simple, light, UV resistant.
 

ntsqd

Well-known member
Joined
Jan 22, 2005
Messages
1,001
Location
Lower left coast
What about a turn-buckle or two to secure the gate? Replace any jam nuts with wing nuts, or add them. Add a simple pin with a cross hole for a linch pin to the side(s) of the gate. Remove the linch pin, loosen the turn-buckle and pull it off the side pin to lower the gate.

I'll post it when I find it, but recently a guy on another forum posted a diagram of the relative strengths of different sewing patterns on webbing. I'd not expected it to matter as much as it apparently does.
 

WoodsTruck

Well-known member
Joined
Jan 12, 2013
Messages
1,028
With a weld on jack mount on each rear corner you should be able to lift the rear of the trailer for a tire change while the trailer is hooked. I need to get some ordered for my work trailer. I hate climbing under a muddy trailer to place a jack under the axle.
 

OutlawDrifter

Well-known member
Joined
Jan 20, 2015
Messages
3,905
Location
KS
Just food for thought...that strap coming off the winch and going over the rail corner, it might end up cutting it. It doesn't look like a sharp corner, but that rubbing eventually will eat its way through. A guy could fashion a roller to run the strap over and alleviate some of that.

I like Thom's turnbuckle idea, or find a quality set of cantilever latches to add to one or both sides.
 
OP
R

rattle_snake

Well-known member
Joined
Jun 25, 2015
Messages
5,243
Location
Chandler, AZ
What about a turn-buckle or two to secure the gate? Replace any jam nuts with wing nuts, or add them. Add a simple pin with a cross hole for a linch pin to the side(s) of the gate. Remove the linch pin, loosen the turn-buckle and pull it off the side pin to lower the gate.

I'll post it when I find it, but recently a guy on another forum posted a diagram of the relative strengths of different sewing patterns on webbing. I'd not expected it to matter as much as it apparently does.
Not sure I understand exactly.
Yes the web sewing makes a difference. I just plow over things in all directions if it's just a grab handle.
Yeah here come the Rooster. You know he ain't gonna die! Great name for a dirt bike!
Thanks. It will throw a hell of a roost with a paddle tire in the sand.
With a weld on jack mount on each rear corner you should be able to lift the rear of the trailer for a tire change while the trailer is hooked. I need to get some ordered for my work trailer. I hate climbing under a muddy trailer to place a jack under the axle.
Great idea, that was what I was thinking, just add the short post on both sides.
Just food for thought...that strap coming off the winch and going over the rail corner, it might end up cutting it. It doesn't look like a sharp corner, but that rubbing eventually will eat its way through. A guy could fashion a roller to run the strap over and alleviate some of that.

I like Thom's turnbuckle idea, or find a quality set of cantilever latches to add to one or both sides.
Yes it could, I considered that. Put the winch where the handle would work and not ideal for the working angle. I don't think it will have much if any movement to rub being so short. I can wind the strap the opposite direction and reduce the angle/interference.
 

ntsqd

Well-known member
Joined
Jan 22, 2005
Messages
1,001
Location
Lower left coast
Yeah, can't see getting wound around the axle over a pull-handle.

Turn-buckle gate "latch":
i-7w6znCG-L.jpg

SBC wrist pins are good rollers for things like deflecting the strap over the edge of the tube. ;)
I'm guessing that the crank runs into the front-most tube if you try to move the winch further forwards to get a better angle on things and miss that tube that the strap is bent over.
 
OP
R

rattle_snake

Well-known member
Joined
Jun 25, 2015
Messages
5,243
Location
Chandler, AZ
Thanks, that is what I was thinking but a fixed length link. The ramp doesn't have any type of stop beyond the existing latches. I have some old worn out rod ends and bushings that could work. Pin on one end.
Or I could extend the rail a few inches and put a pin though it and the ramp. Have to make it as hard as possible and expensive.

I could tilt the winch, but that complicates the mount.

As for strap chafing, my dad used a long strap to hold a boat down on a trailer. The trailer had a tilting rear set of rollers, so attaching straps from transom to end of trailer didn't hold much. So instead a strap over the whole hull at the end of the fixed frame part of the trailer. The strap oscillated a lot in the wind, even twisted. We used chunks of rubber or fabric on all the edges. PITA to put them back each time. The strap went thousands of miles. When the boat became mine, I put on a new strap and never used any pads.
 

ntsqd

Well-known member
Joined
Jan 22, 2005
Messages
1,001
Location
Lower left coast
If you want to stop the rattles you need a hard stop and a means to pull the gate against it. A couple gusseted tabs welded to the side of the gate that tag the ends of the side rails should be enough. Anything with a fixed length is just going to rattle and wear the pins or holes or both increasing the rattle potential. Got to be able to take the slop out of the system.
 
To avoid these ads, REGISTER NOW!

bugnut

ALLIANCE MEMBER
Joined
Jul 14, 2012
Messages
4,013
Location
Central Ohio
I have used a jackstand centered to the ramps, very portable and you already have them in stock. And since you are taking bikes, got a motorcycle stand on hand as it could support one corner also.

Similar to Thoms thoughts my previous trailed had flatstock bolted on one end and pinned as he showed on the ramp side.
 
  • Like
Reactions: 555

OutlawDrifter

Well-known member
Joined
Jan 20, 2015
Messages
3,905
Location
KS
Also, thinking back to your bungy cords. I've bought bulk cord and made custom lengths with carabiners and hooks as needed. Works great, you can tie or clamp them dending how you want to attache the hook/carabiner.
 

ntsqd

Well-known member
Joined
Jan 22, 2005
Messages
1,001
Location
Lower left coast
I don't use elastic cords for a tie-down. Most are ratchet straps that range from hardware store cheapies to several Mac's and U.S.C., but there are a couple Rocky Mtn ATV cams floating around somewhere. I've had stuff disappear while 'secured' by an elastic strap.
 

PhantomEB

Well-known member
Joined
Feb 6, 2006
Messages
6,858
Location
Medicine Hat, AB, Canuckistan
I don't use elastic cords for a tie-down. Most are ratchet straps that range from hardware store cheapies to several Mac's and U.S.C., but there are a couple Rocky Mtn ATV cams floating around somewhere. I've had stuff disappear while 'secured' by an elastic strap.
Me either. Especially In this day and age of retractable ratchet straps. Take up way less room. I think I have 8 in a pouch under the seat of the Ram3500.
 

Bigblue&Goldie

Well-known member
Joined
Mar 12, 2009
Messages
10,745
Location
AZ
I couldn't find a better picture, but my trailer had a gate that defied physics and would inevitably arrive with a latch open. It also was obnoxious with how much it rattled and banged. I added solid metal "straps" fixed to the top of the rails with a bolt and ran a Clevis pin into the gate. The rail side simply used two tabs like you'd use to double shear a limiting strap. I drilled the gate pin holes at an angle so they wouldn't try to walk out. It was perfect. I've since bobbed the trailer and gone to ramps.

Screenshot_20260719_195623_Gallery.jpg
 
OP
R

rattle_snake

Well-known member
Joined
Jun 25, 2015
Messages
5,243
Location
Chandler, AZ
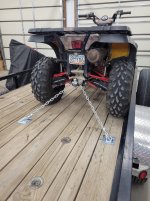
Bought some 5/16 chain and a pair of slip hooks to secure the rear of the quad.
pZePn6UP4g2Z2d08dQM2A=w683-h911-s-no-gm?authuser=1.jpg

Can leave the chain on the deck and drive over it.
1LXLOpdB4mSihsNnbws1w=w683-h911-s-no-gm?authuser=1.jpg

Wound the strap the opposite direction to reduce the angle and contact with rail.
_dh_nEUKu62MQ-SQTDJA=w1214-h911-s-no-gm?authuser=1.jpg

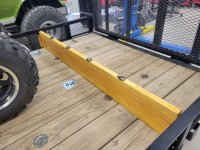
Cut a 2x10 to fit inside the rail posts, to enclose a 'triage' area. Trash bags, wet tent, dirty rug, greasy BBQ, firewood and so on.
This is another reason I didn't run the expanded steel over the top of the posts. The divider can go on any set of posts along the trailer deck.
u_1lmlJUmPlGdnj-qCqQ=w1214-h911-s-no-gm?authuser=1.jpg

Treated the wood and added some D-rings on top. It happens to blocks the d-rings on the deck below it in this position.
yYXUtPg5PdV5NCEwTIKA=w1214-h911-s-no-gm?authuser=1.jpg

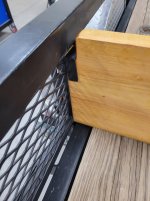
The board length is cut so one end fits into one post pocket and the other can just fit perpendicular. Then slide it over 1/2 the post gap distance. To secure, made some blocks to take up gap and some metal clips to pin the blocks and prevent the board from moving side to side.
l-xSwTkhC1doGJ4rNx41g=w683-h911-s-no-gm?authuser=1.jpg

EzDBawEh6OLQM4ZHuNm_w=w683-h911-s-no-gm?authuser=1.jpg

wX94ThbeqlrUyNF4LPuEQ=w683-h911-s-no-gm?authuser=1.jpg

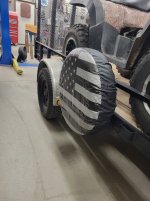
The spare tire sat up pretty high and looked a bit goofy, especially after I flipped the axle. So I re-drilled one of the stud holes to lower the tire on the mount as much as possible. Bought another tire cover as the neighbor's horse ate the last two.
BHBJrJ3mm6rhTZNkiVtCg=w683-h911-s-no-gm?authuser=1.jpg
 
OP
R

rattle_snake

Well-known member
Joined
Jun 25, 2015
Messages
5,243
Location
Chandler, AZ
To secure the ramp, I decided to use the hinge barrel provisions I had recently added to fold the ramp down flat. Perhaps not ideal, but already there. The welds were no up to the new purpose so ground and re-welded them.
Then just a fixed length strap. The rail side can have a captive pin, so made one out of 5/8 stock. Added some bends to take up the side-to-side slop in the ramp
dN6q7_6LIOhLkRKHcY5A=w1214-h911-s-no-gm?authuser=1.jpg

2nd side weld came out more uniformly heated.
mpe6e6PiehYuWuI12TDQ=w1214-h911-s-no-gm?authuser=1.jpg

Cut off all the mounts from the old latches. Waiting on some 5/8" square hitch pins to use in place of the bolt on the ramp side.
8Mlbs2ECVvFO3A7UwPfA=w1214-h911-s-no-gm?authuser=1.jpg

Without a positive stop there is still some slop in the latches, however the ramp hinges themselves are pretty sloppy. Even if the latches were 100% solid the ramp would still move and bang around. But the system is so much improved.

The old latch system put a in/out force on the rails as the ramp moved around. Last guy had tack welded it. Instead some horizontal bolts to the end posts to hold the rail more secure.
Mwdxnt8fmoDGCX49RKBQ=w1214-h911-s-no-gm?authuser=1.jpg

Treated the deck with sealer I had on hand.
_3aJRNHSOCrIxoSy6-v9A=w683-h911-s-no-gm?authuser=1.jpg

Added jack mount on the rear of the trailer to prevent the tongue from pointing at the sky again.
Vq_qCG_D9smuV4h1pKovw=w683-h911-s-no-gm?authuser=1.jpg

Bought one $50 jack with a side facing handle. Fixed foot.
0yfcMBR9u1CV3t_uZTIGA=w683-h911-s-no-gm?authuser=1.jpg

Made a 2nd jack mount for the other side. Otherwise that side would get a flat on next use.
q7mq3EePLkyKUmmU8uMXg=w683-h911-s-no-gm?authuser=1.jpg

Jack fits in the tongue box. Also organized the straps into zip-lock bags.
2VUsFXvrtx7BmfjKVpVQ=w1214-h911-s-no-gm?authuser=1.jpg

And with that the trailer project is done for now. Might grind the splinters off the deck and treat it again when it is time.
 
OP
R

rattle_snake

Well-known member
Joined
Jun 25, 2015
Messages
5,243
Location
Chandler, AZ
Decided to address two things on my quad that have annoyed me for a long time. The bright red rear control arms with 'independent rear suspension' plaques. 25 years ago that was a cool feature, now just normal and is dated. And the yellow underside of the plastics in the wheel wells.
hZq71M0hL8mZbWwj3KeSg=w683-h911-s-no-gm?authuser=1.jpg

Have to pull the axle to get the upper control arm off, so spent some time cleaning everything up a bit farther. With the CV boots in good shape the knuckles should stay clean. Broke the arms down for paint and regreased all the pins and bushings. All the bushing were in good shape as they are not that old.
7BWkmYLXzeQEsmUtVhFqA=w683-h911-s-no-gm?authuser=1.jpg

Same for other other side. Cleaned up the chassis. For the plastics I cleaned the underside as best I could, coat of primer, then topcoat. Over time the paint will chip, easy to touch up.
vJLZmoNNvZd-OUch9jpsg=w683-h911-s-no-gm?authuser=1.jpg

Wanting to get some high heat exhaust paint for the muffler, in black.
ComPOfdGHnPeqzs5dBFg=w1214-h911-s-no-gm?authuser=1.jpg

Looking much better.
WX5VZstbGfzYGSwMsS5LA=w683-h911-s-no-gm?authuser=1.jpg
 

ntsqd

Well-known member
Joined
Jan 22, 2005
Messages
1,001
Location
Lower left coast
I was around when that rear caliper was being R&D'd! Twas a shock to see it as I'd no idea who the customer was.
I've used bbq paint on exhaust systems. Nothing lasts forever, but it seems to last as long or longer than "Header Paint." Easier to source, and usually less expensive even for a quality paint brand.
 
To avoid these ads, REGISTER NOW!
Top Bottom