To avoid these ads, REGISTER NOW!

The Everything 3D Printer Thread

draco_1967

Well-known member
Joined
Jan 3, 2021
Messages
217
Location
Utah
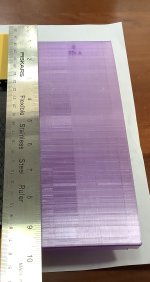
The color/sheen change could be from the layers having more opportunity to cool as the printer goes between both parts on the plate. Once the shorter part is done printing, the layers on the taller part will print faster, with less cooling between layers. That looks like a transparent PETG, which will often have different finish appearance based on speed, layer temperatures, layer height, etc.
 
To avoid these ads, REGISTER NOW!

Old tool guy

Well-known member
Joined
Apr 13, 2023
Messages
3,573
It is transparent purple petg, looks nice when done properly. I did reduce the purge volume, i’ll put it back to 1. What test prints should i consider running?
 

pcrov

Well-known member
Joined
Feb 27, 2023
Messages
387
Location
Ontario, CA
I did reduce the purge volume, i’ll put it back to 1.

You will likely need to increase the value in the table above that too (I know it doesn't look editable but click on it.) Even if it's just a little too low while you might not get a split your print will be extremely weak at that layer boundary. PETG just really doesn't want to stick to any amount of PLA.
 

Citation

Well-known member
Joined
Jan 20, 2016
Messages
3,268
Location
Indy
Can’t change the design, only options are number of walls and fill. This one had honeycomb, you think gyroid would be better? Would it help to be in an enclosure?
An enclosure should help. Read up on some of the tricks the people used to print ABS. This sort of shrinkage problem was a big deal with ABS. A friend did some box like enclosures with abs on an open printer. He covered the whole thing with a box and designed in a big, wide base for his part. The base got cut off in the end.
 

moto_ridah

Well-known member
Joined
Jun 13, 2009
Messages
94
Location
PNW
Need help … desperately. Bambu A1 petg. This is the second time this has happened, two different parts. One problem is the split and the warped edge. The split lines up with the top layer of pla supports, same on the other one. Also curious about the color shift and sheen change. There were 2 parts printing at the same time, the other part had supports at a higher level … and that aligns with the color shift.
.
I hate losing the filament, but even more i hate losing the time. This was about 20 hrs.

The warping is a cooling issue or bed adhesion; some of those larger TMT parts might pull the bed corners up but this isn't one of those parts. An enclosure would help but it could also be fan settings.

I would recommend dropping the PLA support when printing PETG for these TMT parts unless you get a dual nozzle machine. To me it looks like the pla is contaminating the PETG up to the last support layer of the other part you mentioned. You can dial in the support settings to get them to release pretty well, plus your print speeds are going to go up without all PETG to PLA switching and your waste is going to go down.

There's a separate TMT thread on here that has a decent amount of info. There's even more info and on the forum on the 3D-mobility website and a growing Facebook group.
 

Old tool guy

Well-known member
Joined
Apr 13, 2023
Messages
3,573
It’s on a work table in my office/workroom. Plenty of room, but i have recently read that an enclosure can overheat the brain.
.
Recent (yesterday) research made me realize i might have caused some of the failures myself.
* I had changed the 0.20 mm standard to 0.16 thinking that would increase the strength. It actually makes it weaker but smoother. So now i’m using the 0.20 mm Strength setting
* i had reduced the purge volume way down, didn’t realize there would be contamination. I’m leaving it at 1. I was trying to reduce the color change time. Backfired.
* somewhere i saw a recommendation to turn the fan off. I set it to a max of 30%.
* i did a temperature tower test, and have raised the temp from 250 to 260.
* one of the builders on the tmt site had posted a comment yesterday (timely!) about changing the “support object first layer gap” from 0.2 to 0.35 which would make it easier to remove the supports from dovetails.
 

moto_ridah

Well-known member
Joined
Jun 13, 2009
Messages
94
Location
PNW
It’s on a work table in my office/workroom. Plenty of room, but i have recently read that an enclosure can overheat the brain.
.
Recent (yesterday) research made me realize i might have caused some of the failures myself.
* I had changed the 0.20 mm standard to 0.16 thinking that would increase the strength. It actually makes it weaker but smoother. So now i’m using the 0.20 mm Strength setting
* i had reduced the purge volume way down, didn’t realize there would be contamination. I’m leaving it at 1. I was trying to reduce the color change time. Backfired.
* somewhere i saw a recommendation to turn the fan off. I set it to a max of 30%.
* i did a temperature tower test, and have raised the temp from 250 to 260.
* one of the builders on the tmt site had posted a comment yesterday (timely!) about changing the “support object first layer gap” from 0.2 to 0.35 which would make it easier to remove the supports from dovetails.

- The box and question about placement is more about considering drafts in the room. Warping is from the temperature differentials between nozzle, part, bed and air.
- You have to purge a ton to get rid of PLA to switch to PETG during support and layer changes. Not recommended to mix the two in the same nozzle, especially in these builds were part strength is a safety concern.
- 30% isn't too bad but I would leave it off for first 3 layers or so, you might still have air draft issues. Printing directly from the maker world profile would eliminate some variables.
- Higher nozzle temps make the temperature differential greater which can contribute further to warping.
- Support first layer gap is more about the support brim not sticking to the part. Look at top Z interface spacing. The recommendation (from NWCC) is 0.35mm for 0.6mm nozzle (0.3mm layer) and like 0.28mm for 0.4mm nozzle (0.2mm layer). I use 0.3-0.28mm and 0.24mm respectively; little bit hard to remove but easy enough and it seems to give me less joint post processing for proper fit.

Might recommend moving to the other thread for TMT discussion, since people didn't like it clogging up the normal 3D print thread. https://www.garagejournal.com/forum...shoot-thread-wheelchairs-for-toddlers.555626/
(edit to add link)
 

Old tool guy

Well-known member
Joined
Apr 13, 2023
Messages
3,573
I want to use pla for easier removal of the supports, i don’t have a second nozzle.
.
One of the parts that failed last week is printing now, looking forward to seeing how it finishes.

I put the questions here because, to me, they are generic printing questions, not specific to the tmt device.
 

Firstram

Well-known member
Joined
May 16, 2017
Messages
1,405
Need help … desperately. Bambu A1 petg. This is the second time this has happened, two different parts. One problem is the split and the warped edge. The split lines up with the top layer of pla supports, same on the other one. Also curious about the color shift and sheen change. There were 2 parts printing at the same time, the other part had supports at a higher level … and that aligns with the color shift.
.
I hate losing the filament, but even more i hate losing the time. This was about 20 hrs.
.
IMG_0025.jpegIMG_0027.jpegIMG_0028.jpeg
Are you using PLA for the entire support or only the interface layer?
 

fourjeepin

Well-known member
Joined
Feb 12, 2011
Messages
3,682
Location
Atlanta, GA
The last couple of weeks I’ve been working on my drill bit cabinet. It is a Vevor knockoff I got a couple of years ago after winning a local estate sale auction for a bunch of drill bits.

It started with just replacing the labels. Here’s the before which worked but wasn’t good:
1788402131564.jpeg

Here’s the new labels
1788402232866.jpeg

And while I was working on this, I decided to address my largest complaint with this cabinet - getting bits out of it. With the square bottom and narrow slots, it can be a real challenge.

So I made pieces which give the bottom a curve and had a stop (to replace the black foam pieces seen in the above. Four of the five drawers are done. Last one should finish tomorrow afternoon.

1788402516678.jpeg
 

kaymccampbell

Well-known member
Joined
Feb 27, 2015
Messages
29,923
Location
Upstate New York
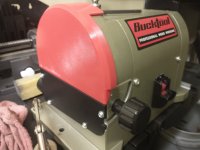
No, I was reaching for that stick of rubber hiding behind it to clean the belt
You will make yourself a little trough to contain the rubber thing, that goes someplace safer. A 3D printed one would be ideal. I keep my belt cleaner in a spot where there is minimal chance to accidentally find the belt or disc on my sander. I do not believe in reaching across whirling death machines.
 

senlow

Well-known member
Joined
Apr 26, 2008
Messages
2,279
Location
Wheat Ridge, Colorado
You will make yourself a little trough to contain the rubber thing, that goes someplace safer. A 3D printed one would be ideal. I keep my belt cleaner in a spot where there is minimal chance to accidentally find the belt or disc on my sander. I do not believe in reaching across whirling death machines.
No sense of adventure. ;)
 
To avoid these ads, REGISTER NOW!

Old tool guy

Well-known member
Joined
Apr 13, 2023
Messages
3,573
Why am i getting these terrible layers at the end if the print? Bambu A1 and petg. It had been dried, and the first 24 hours of the print look very good. The last 2 hours have stringing and layer offsets. There is quite a bit of stringing you can’t see on the back side. I really really don’t want to reprint, i think there should be enough shell layers that i can sand it smooth.
.
IMG_0046.jpeg
 

kaymccampbell

Well-known member
Joined
Feb 27, 2015
Messages
29,923
Location
Upstate New York
Why am i getting these terrible layers at the end if the print? Bambu A1 and petg. It had been dried, and the first 24 hours of the print look very good. The last 2 hours have stringing and layer offsets. There is quite a bit of stringing you can’t see on the back side. I really really don’t want to reprint, i think there should be enough shell layers that i can sand it smooth.
.
IMG_0046.jpeg
Looks like the print warped slightly while cooling unevenly.

Or the top was jiggling around, because it's far enough away from the bed and it flexed a bit.

The second thing is why I bought a corexy printer this time around, to prevent the jiggling bed from ruining taller prints.
 

jayz66ragtop

Well-known member
Joined
Sep 11, 2009
Messages
1,551
Location
SoCal
Why am i getting these terrible layers at the end if the print? Bambu A1 and petg. It had been dried, and the first 24 hours of the print look very good. The last 2 hours have stringing and layer offsets. There is quite a bit of stringing you can’t see on the back side. I really really don’t want to reprint, i think there should be enough shell layers that i can sand it smooth.
.
I agree with kaymccampbell's comment/assessment.

I think you have cooling issues based on this print and the transparent PETG above.

Bed slingers ( traditional 3D printers, non core XY) tend to have weird line separations like that on taller prints due to the part jiggling the further away from the bed the print gets. Taller prints can benefit from slower print speeds but then you start to have cooling issues, too much time passes between layers being put down that they cool and don't bond as well.

I think you would benefit from buying or making an enclosure for your printer. Some filaments are very sensitive to temperature variations between layers. I don't recall you saying, what brand of filament are you using? Some work better in certain printers than others.


ON Edit: Looking at the picture a little closer, I think you have part jiggling causing some of the issue. Looks like some of the layers have drifted forward and aft of the center of the part. No enclosure is going to fix that but maybe placing the printer on something more solid would but that's just part of that type of a printer.
 

Old tool guy

Well-known member
Joined
Apr 13, 2023
Messages
3,573
I have considered an xy printer, problem is the cost coupled with this one being new. Maybe next print when it gets close to the top i can change it to silent mode, which cuts the movement to 50%.
 

kaymccampbell

Well-known member
Joined
Feb 27, 2015
Messages
29,923
Location
Upstate New York
I have considered an xy printer, problem is the cost coupled with this one being new. Maybe next print when it gets close to the top i can change it to silent mode, which cuts the movement to 50%.
My FlashForge AD5M was about $250 with the enclosure kit. Then I had to print about 15 parts, and it was fully enclosed and capable of printing things like ASA and ABS. I've noticed that print quality is massively improved with the enclosure, even on PLA prints.

@WildBill turned me on to FlashForge. No regrets here.
 
Last edited:

Old tool guy

Well-known member
Joined
Apr 13, 2023
Messages
3,573
Is the bambu p1s a good printer? They are advertising a refurbished unit with ams for $467.

I can probably swing that, but if i go to the finance minister for mire it’s going to cost me a bundle in shoes and handbags.
.
edit … $467 refurb vs $549 new … i’m leaning to the refurb unit from bambu, i would think it would be essentislly good as new.
 

KwikFab

Well-known member
Joined
Jul 27, 2024
Messages
1,386
Location
Central Valley, CA
Is the bambu p1s a good printer? They are advertising a refurbished unit with ams for $467.

I can probably swing that, but if i go to the finance minister for mire it’s going to cost me a bundle in shoes and handbags.

I have one and it works wonderfully, but it's an older unit that's been replaced by the P2S.

I'd opt for the newer unit instead.
 

signcrafter

Well-known member
Joined
May 9, 2012
Messages
12,644
I have one and it works wonderfully, but it's an older unit that's been replaced by the P2S.

I'd opt for the newer unit instead.
It's a slippery slope when I started looking at a printer. Started looking at the P1S after recommendations on here and then looked at the P2S and then someone on here said they would step up to the X2D with AMS2. Started out looking to spend around 4-500 bucks and next thing I know that doubled. Figured I would save up a little longer and buy once and cry once and hopefully have a printer that will do everything and anything I want for a while to come.
 
Last edited:

KwikFab

Well-known member
Joined
Jul 27, 2024
Messages
1,386
Location
Central Valley, CA
It's a slippery slope when I started looking at a printer. Started looking at the P1S after recommendations on here and then looked at the P2S and then someone on here said they would step up to the H2D with AMS2. Started out looking to spend around 4-500 bucks and next thing I know that doubled. Figured I would save up a little longer and buy once and cry once and hopefully have a printer that will do everything and anything I want for a while to come.

Very true!

Any of the H series are a bit overkill for us so if I did ever "move up" it'd be to a P2S

My P1S has 1,262 hours printed on it now, which tells me I don't print enough to justify even getting rid of it lol
 

draco_1967

Well-known member
Joined
Jan 3, 2021
Messages
217
Location
Utah
The P1S is still a fantastic printer. Unless you absolutely need the second print head, you'll be fine with that. Of course, as pointed out, it's a sickness and you will always want more printer:bounce:
 

Max

ALLIANCE MEMBER
Joined
Jun 16, 2018
Messages
3,405
Location
Georgia
Is the bambu p1s a good printer? They are advertising a refurbished unit with ams for $467.

I can probably swing that, but if i go to the finance minister for mire it’s going to cost me a bundle in shoes and handbags.
.
edit … $467 refurb vs $549 new … i’m leaning to the refurb unit from bambu, i would think it would be essentislly good as new.
I have a P1S and it's worked very well for me. FWIW, most of my printing has been PLA and I'm just now starting to get into other filaments.

There is a good comparison article between the P1S and the P2S here: https://makers101.com/bambulab-p2s-vs-p1s/
TLDR: The PS2 offers improvements such as: it drives filament much better, has better error detection, has an easy to swap hotend, a better display, and the AMS2 also dries your filament in standby. Print area is unchanged, and print quality seems about the same.

If you decide on the P2S, one option is to skip the AMS2 and use a single filament until you can afford to add the AMS2 later.
 

signcrafter

Well-known member
Joined
May 9, 2012
Messages
12,644
Very true!

Any of the H series are a bit overkill for us so if I did ever "move up" it'd be to a P2S

My P1S has 1,262 hours printed on it now, which tells me I don't print enough to justify even getting rid of it lol
I typed the wrong one, I meant the X2D and just corrected that.
 

fourjeepin

Well-known member
Joined
Feb 12, 2011
Messages
3,682
Location
Atlanta, GA
Is the bambu p1s a good printer? They are advertising a refurbished unit with ams for $467.

I can probably swing that, but if i go to the finance minister for mire it’s going to cost me a bundle in shoes and handbags.
.
edit … $467 refurb vs $549 new … i’m leaning to the refurb unit from bambu, i would think it would be essentislly good as new.
I got a P2S with AMS2 a couple of months ago for $550 at Microcenter. I would have liked to have stepped up to the H series for another hundred or so, but had to draw the line somewhere and had told the Mrs I would only spend $400.
 

Old tool guy

Well-known member
Joined
Apr 13, 2023
Messages
3,573
So i went ahead and ordered the refurbished p1. I don’t need the second head as nice as it would be, but what i do need is the xy function. I have recently had 2 long overnight prints ruined when the object either fell off or was jostled, that’s not good.
 

burger

Well-known member
Joined
Jun 6, 2005
Messages
1,022
Location
Erf
I don’t have any complaints about my P1S. The AMS though, I upgraded it with a Sunloo heater. That cost me ~$100 and is included with the AMS2. I mostly print PETG and PLA.
 

jayz66ragtop

Well-known member
Joined
Sep 11, 2009
Messages
1,551
Location
SoCal
So i went ahead and ordered the refurbished p1. I don’t need the second head as nice as it would be, but what i do need is the xy function. I have recently had 2 long overnight prints ruined when the object either fell off or was jostled, that’s not good.
I think you'll be much happier with the P1. It's an older model but still a good one. Did you get the combo or just the P1S?
 
To avoid these ads, REGISTER NOW!
Top Bottom