@Mr onetwo. I'm glad I did the single colour, as IMO the multi-coloured flakes don't look right. You don't see that type of finish in commercial and industrial applications.Wow, really looks great! Another step done

You are using an out of date browser. It may not display this or other websites correctly.
You should upgrade or use an alternative browser.
You should upgrade or use an alternative browser.
Above 1200 Sq/FT The Cow Pasture Garage - Australia
- Thread starter kitdoctor
- Start date
Wokspaces above 1200 squarefeet.
Post #0076a - Construction work continues - More progress at accommodation module - Part LXXI
Fitting out the interior kicked off with preparing the concrete slab in the accommodation module for tiling but first up the tiles arrived on site.
Nothing exotic was chosen. A single grey 600 x 600 mm (2’ x 2’) floor tile is used throughout, a small grey and white square tile laid in a checkerboard pattern for the kitchen bench splashback, subway pattern splashback for the laundrette bench and stack pattern feature wall in the bathroom combined with textured white tiles.
All the tiles were selected from Beaumont Tiles. Looks like those shown are made in China and Vietnam.


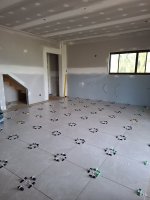
Off to a good start. The centre of the room has been identified and tile laying has commenced from the centre and also from a saw cut in the slab.
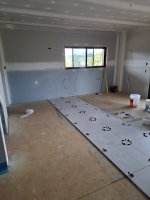
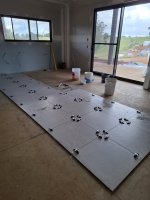
When talking to the tiler he said the demanding, physical nature of the trade was catching up with him, even though he was only in his late 30s. He’s given up starting apprentices as they’ve all quit in the first week.
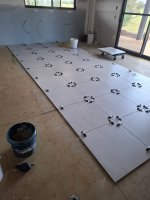
Notice how the tiler has only laid two tiles away from the saw cut, so that a walkway is maintained to allow him to keep working towards the sliding glass door.
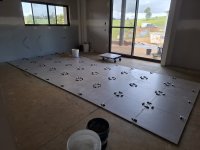
Next up, the full tiles were laid towards the laundrette. From what I understand, to maintain efficiency, the approach is to lay as many full tiles as possible, leaving the tile cuts to another stage.

Actually, this floor tile was a substitution due to the discontinuation of our first preference.
To be continued.
Fitting out the interior kicked off with preparing the concrete slab in the accommodation module for tiling but first up the tiles arrived on site.
Nothing exotic was chosen. A single grey 600 x 600 mm (2’ x 2’) floor tile is used throughout, a small grey and white square tile laid in a checkerboard pattern for the kitchen bench splashback, subway pattern splashback for the laundrette bench and stack pattern feature wall in the bathroom combined with textured white tiles.
All the tiles were selected from Beaumont Tiles. Looks like those shown are made in China and Vietnam.
Off to a good start. The centre of the room has been identified and tile laying has commenced from the centre and also from a saw cut in the slab.
When talking to the tiler he said the demanding, physical nature of the trade was catching up with him, even though he was only in his late 30s. He’s given up starting apprentices as they’ve all quit in the first week.
Notice how the tiler has only laid two tiles away from the saw cut, so that a walkway is maintained to allow him to keep working towards the sliding glass door.
Next up, the full tiles were laid towards the laundrette. From what I understand, to maintain efficiency, the approach is to lay as many full tiles as possible, leaving the tile cuts to another stage.
Actually, this floor tile was a substitution due to the discontinuation of our first preference.
To be continued.
Mr onetwo
Well-known member
Just curious  why lay tile before the drywall isn't at least primed?
why lay tile before the drywall isn't at least primed?Coolabah
Well-known member
I've done a few builds in Australia over the years, and I would say that is indeed a good question and I guess building practices vary over the world. A friend of mine used to live in Hong Kong, and told me that the usual practice for a bathroom was to lay all the tiles in an empty room, then bash holes through all the tiles , install plumbing , then replace all the broken tiles ( I do not know if this was actually true, surprised me to be sure !!).Just curious
Usually I find the tilers splash stuff up the walls so I'm glad I haven't painted them yet !!
So, usually : floor tiles, paint walls , skirting boards install ( or skirting boards before painting, depends on when the painters are available or if I'm doing it myself)
@Mr onetwo @Coolabah is on the right track in terms of the trade order and bathroom walls can cop a bit of splash when the tiler lays the screed floor.Just curious
The main determining factor in this case is the painting was being done by spray painting which is becoming very common to achieve very high standard finishes. So, the process demands reducing the likelihood of damage to painted surfaces post painting. Hence all possible trades, where possible, are completed before painting.
Hence, the order here is: 1) door jambs, door headers, door/window trim before tiling where tiles are laid to meet these, 2) floor screed laid, floor tiling and some wall/skirting tiles, 3) staircase treads and risers, 4) door jambs, door headers, remaining door/window trim and skirting boards, 5) test fit and resize doors as needed, cut handle recesses etc. 6) cabinetry, 7) tile splash backs, 8) painting...
Last edited:
Post #0076b - Construction work continues - More progress at accommodation module continued - Part LXXI
The next few photos show the completed tiles in the living area (except for grouting). To the left-hand-side of the plastic, cardboard floor protection has been laid and it doesn’t look like it’s been tiled.


I opted to install a floor drain in the laundrette, even though one is not mandatory. To me, it's just common sense to have one.

Meanwhile, the specialists laying the reclaimed timber on the staircase were also on site. To do this you need a stockpile of pre-cut treads and risers.

The pine stiles or side rails will simply be painted.
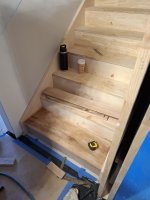
All done, except for final sanding and application of an anti-slip coating.

To be continued.
The next few photos show the completed tiles in the living area (except for grouting). To the left-hand-side of the plastic, cardboard floor protection has been laid and it doesn’t look like it’s been tiled.
I opted to install a floor drain in the laundrette, even though one is not mandatory. To me, it's just common sense to have one.
Meanwhile, the specialists laying the reclaimed timber on the staircase were also on site. To do this you need a stockpile of pre-cut treads and risers.
The pine stiles or side rails will simply be painted.
All done, except for final sanding and application of an anti-slip coating.
To be continued.
Post #0076c - Construction work continues - More progress at accommodation module continued - Part LXXI
With the tiles laid in the living area the tiler then progressed to laying a mortar screed in the bathroom.
This photo shows about half of the floor area done.

Now completed, looking in from the main shed space.


Taped off to prevent entry.

Toilet suite area.

Entry area to bathroom from living area. Again, I opted to include a floor drain, even though it’s not a mandatory plumbing code requirement.

Vanity basin area.

Shower cubicle area.

The plasterers also returned and enclosed the laundrette by filling in the hole to the staircase and adding a ceiling.
Again, I opted to include a floor drain, even though it’s not a mandatory plumbing code requirement.

With the tiles laid in the living area the tiler then progressed to laying a mortar screed in the bathroom.
This photo shows about half of the floor area done.
Now completed, looking in from the main shed space.
Taped off to prevent entry.
Toilet suite area.
Entry area to bathroom from living area. Again, I opted to include a floor drain, even though it’s not a mandatory plumbing code requirement.
Vanity basin area.
Shower cubicle area.
The plasterers also returned and enclosed the laundrette by filling in the hole to the staircase and adding a ceiling.
Again, I opted to include a floor drain, even though it’s not a mandatory plumbing code requirement.
Coolabah
Well-known member
Indeed, and I guess order can change depending on Trades availability etc- bear in mind they'd rather attend once rather than twice, which I totally understand@Mr onetwo @Coolabah is on the right track in terms of the trade order and bathroom walls can cop a bit of splash when the tiler lays the screed floor.
The main determining factor in this case is the painting was being done by spray painting which is becoming very common to achieve very high standard finishes. So, the process demands reducing the likelihood of damage to painted surfaces post painting. Hence all possible trades, where possible, are completed before painting.
Hence, the order here is: 1) door jambs, door headers, door/window trim before tiling where tiles are laid to meet these, 2) floor screed laid, floor tiling and some wall/skirting tiles, 3) staircase treads and risers, 4) door jambs, door headers, remaining door/window trim and skirting boards, 5) test fit and resize doors as needed, cut handle recesses etc. 6) cabinetry, 7) tile splash backs, 8) painting...
In my recent build, (second storey addition and complete strip out and remodel, where I did all interior painting and cabinet work/ kitchen install etc ) order ended up being:
a) framing b) drywall or fibre cement panels 1) door jambs, door headers, door/window trim before tiling where tiles are laid to meet these, 2) floor screed laid, floor tiling and skirting tiles, 3) staircase treads and risers, c) paint walls , paint doors & woodwork, and woodwork (eg skirting boards) yet to be installed d) install cabinetry 4) remaining door/window trim and INSTALL skirting boards, 5) doors- cut handle recesses etc. 6) - 7) tile splash backs, 8) painting- touch up as needed
so - needs be as needs must I guess !
Enjoying your build progress !!!
Geoff289
Well-known member
Not to be critical, but your choice of tile supplier suggests you like wasting money as much as Coolabah does. Maybe they were having a sale.
No doubt that's a bit harsh of me but on reading that bit of your update I recalled finding the floor tile we had picked, the exact same tile, at a non-descript tile place without a big fancy showroom display for exactly half the price of the place you got yours.
Anyway, your place is coming along very nicely and there seems to be an increasing risk of it being finished, for which I bet you can't wait.
No doubt that's a bit harsh of me but on reading that bit of your update I recalled finding the floor tile we had picked, the exact same tile, at a non-descript tile place without a big fancy showroom display for exactly half the price of the place you got yours.
Anyway, your place is coming along very nicely and there seems to be an increasing risk of it being finished, for which I bet you can't wait.
Coolabah
Well-known member
I don't know Geoff, not to be critical (see what I did there ?) that certainly sounded exactly like most very critical comments that I've heard . Even if your assumption is correct, I'm not sure it needed to be said. Tile deals vary from state to state in Aus, and good on you for finding a cheap deal. Interestingly, in my recent build I purchased similar floor tiles through the cheapest supplier I could find- Beaumont tiles, who were also having a sale at the time. I picked up the tiles from their store to save delivery fee, and they were very helpful when I needed more tiles from the same batch in a hurry due to a tiler's apprentice snafu.Not to be critical, but your choice of tile supplier suggests you like wasting money as much as Coolabah does. Maybe they were having a sale.
No doubt that's a bit harsh of me but on reading that bit of your update I recalled finding the floor tile we had picked, the exact same tile, at a non-descript tile place without a big fancy showroom display for exactly half the price of the place you got yours.
Anyway, your place is coming along very nicely and there seems to be an increasing risk of it being finished, for which I bet you can't wait.
Edit: and Geoff, I appreciate a joke and being roasted, more so than most. But , hey , the occasional positive comment would distinguish your online behaviour towards me from joking amongst mates ( note: I have never met you ) to just plain bullying. Just MHO.
Last edited:
Geoff289
Well-known member
Greg, two possibilities come to mind.
The first is that I've unintentionally actually offended either you or Kitdoctor. If so, I unreservedly apologise. The point was not to be critical of either of you, rather to be critical of the large, prominent tile supplier he used, and the margins they place on their products. Who do you think pays for those flashy showrooms and displays? Including you in the comment was, in my mind, just continuing the banter we've enjoyed on here for years. I note that I have always been positive in my comments about this impressive project, including in my last paragraph above.
The second is that you're actually winding me up now, in which case well done.
The first is that I've unintentionally actually offended either you or Kitdoctor. If so, I unreservedly apologise. The point was not to be critical of either of you, rather to be critical of the large, prominent tile supplier he used, and the margins they place on their products. Who do you think pays for those flashy showrooms and displays? Including you in the comment was, in my mind, just continuing the banter we've enjoyed on here for years. I note that I have always been positive in my comments about this impressive project, including in my last paragraph above.
The second is that you're actually winding me up now, in which case well done.
Coolabah
Well-known member
Yeh, winding you up of course but upon re-reading my post , I might have overdone it a bit :shock:Greg, two possibilities come to mind.
The first is that I've unintentionally actually offended either you or Kitdoctor. If so, I unreservedly apologise. The point was not to be critical of either of you, rather to be critical of the large, prominent tile supplier he used, and the margins they place on their products. Who do you think pays for those flashy showrooms and displays? Including you in the comment was, in my mind, just continuing the banter we've enjoyed on here for years. I note that I have always been positive in my comments about this impressive project, including in my last paragraph above.
The second is that you're actually winding me up now, in which case well done.
My good friend Shaynna Blaze recommended them (Beaumont Tiles) and helped me with the selections.
That's it, I'm crossing her off my Xmas card list.
That's it, I'm crossing her off my Xmas card list.
Now this is the right colour (Grabber Lime) and shape for me, 1971 Mustang 429 SCJ.
Sold for USD $120000, even though it was not fitted with its original engine. There were only 613 '71 Mustangs manufactured with the 429 Super Cobra Jet engine.

Sold for USD $120000, even though it was not fitted with its original engine. There were only 613 '71 Mustangs manufactured with the 429 Super Cobra Jet engine.
@Coolabah, yes certainly and there's always a few tasks that get mostly finished but there's a nagging bit left unfinished.Indeed, and I guess order can change depending on Trades availability etc- bear in mind they'd rather attend once rather than twice, which I totally understand
@Geoff289, I'm not offended at all. Even I know they are expensive but they were the only tile supplier my builder held an account with.The first is that I've unintentionally actually offended either you or Kitdoctor. If so, I unreservedly apologise.
Even worse, staffed by a bunch of girls who are too busy gossiping to serve customers and expect you to make an appointment when you ask for some assistance
A chapter just closed  with the contract for the sale of our home in Darwin of 25 years going unconditional.
So, we are just waiting for settlement to occur and it has a new owner.
I do hate buyers who haggle (amongst other traits, like not meeting deadlines) when they get a great deal buying the best property in the entire estate with many extras thrown in but there's nothing to be gained holding onto that for too long.
with the contract for the sale of our home in Darwin of 25 years going unconditional.So, we are just waiting for settlement to occur
and it has a new owner.I do hate buyers who haggle (amongst other traits, like not meeting deadlines) when they get a great deal buying the best property in the entire estate with many extras thrown in
but there's nothing to be gained holding onto that for too long.
Last edited:
Mr onetwo
Well-known member
Congratulations and that green is pretty awesome, although I like Mopar's better(not mine but I can dream) 

Post #0077a - Construction work continues - Water tank installation at shed - Part LXXII
Finally, the point had been reached where it was time to install the three 25 kL (6600 US gallons) water tanks. All of them were being placed against the north wall of the shed. Two of them would be connected in series and be used for “indoor water”. The third which receives some water from charged downpipes, would be used for “outdoor water”.
The colour of the tanks is Charcoal and was confirmed as an exact match to Dulux Monument. This was the colour chosen for the aluminium sliding glass window frames, exterior personnel doors etc.
The tanks had been strapped down for Tropical Cyclone Alfred in March using star pickets and ratchet straps. Each star picket was an absolute PIA to remove as they were inserted at least 400+ mm (16”) into the ground and the suction between them and the red clay soil was enormous.
If I recall correctly, I think I worked on removing the star pickets over the course of two days. I thought, if I didn’t do it, I’d just be paying the plumber to do it. Here are the tanks, with all the star pickets and straps removed.

The site constraints required that the foundation preparation start with that required for the tank (TANK 1) closest to the retaining wall, on the west side of the shed. The set out required the bottom floor level of each tank to be at the same level as the others.
A couple of the tanks were relocated to make room for a spoil pile.

Then, the site for the TANK 1 was levelled. Some of this material will eventually be returned and placed around each tank to reinstate the fall away from the building slab.

The excavator brought in buckets of crusher dust from the stockpile which the plumber spread and levelled.


Here’s the completed crusher dust pad.
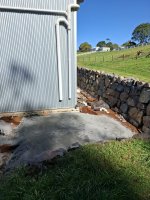
A similar crusher dust pad was laid for TANK 2. The middle tank’s (TANK 2) position was easily set relative to the concrete pump plinth, so it was placed into position first.


It was then a case positioning the other tank (TANK 1) relative to the middle tank.
Here are the guys getting ready for the lift.

When I returned, they had it safely in place.

To be continued below.
Finally, the point had been reached where it was time to install the three 25 kL (6600 US gallons) water tanks. All of them were being placed against the north wall of the shed. Two of them would be connected in series and be used for “indoor water”. The third which receives some water from charged downpipes, would be used for “outdoor water”.
The colour of the tanks is Charcoal and was confirmed as an exact match to Dulux Monument. This was the colour chosen for the aluminium sliding glass window frames, exterior personnel doors etc.
The tanks had been strapped down for Tropical Cyclone Alfred in March using star pickets and ratchet straps. Each star picket was an absolute PIA to remove as they were inserted at least 400+ mm (16”) into the ground and the suction between them and the red clay soil was enormous.
If I recall correctly, I think I worked on removing the star pickets over the course of two days. I thought, if I didn’t do it, I’d just be paying the plumber to do it. Here are the tanks, with all the star pickets and straps removed.
The site constraints required that the foundation preparation start with that required for the tank (TANK 1) closest to the retaining wall, on the west side of the shed. The set out required the bottom floor level of each tank to be at the same level as the others.
A couple of the tanks were relocated to make room for a spoil pile.
Then, the site for the TANK 1 was levelled. Some of this material will eventually be returned and placed around each tank to reinstate the fall away from the building slab.
The excavator brought in buckets of crusher dust from the stockpile which the plumber spread and levelled.
Here’s the completed crusher dust pad.
A similar crusher dust pad was laid for TANK 2. The middle tank’s (TANK 2) position was easily set relative to the concrete pump plinth, so it was placed into position first.
It was then a case positioning the other tank (TANK 1) relative to the middle tank.
Here are the guys getting ready for the lift.
When I returned, they had it safely in place.
To be continued below.
Post #0077b - Construction work continues - Water tank installation at shed continued - Part LXXII
With TANK 1 and TANK 2 in position, the crusher dust pad was placed for TANK 3.
In this next photo, the initial part of the inlet pipe to TANK 3 can also be seen near the excavator’s bucket.

TANK 3 was then moved into position.

With all three tanks in position, it was now time to rough in the overflow pipework required from each tank and make connections to the perimeter stormwater system.
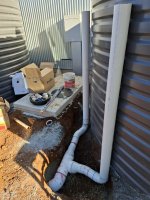
Each tank has two 100 mm (4”) overflows. At TANK 3 a drain was also routed to a small pit that is located behind TANK 2. This pit picks up the condensate from the workshop’s air conditioner.
I’m not sure I’ve ever mentioned it, but I sacked the hydraulic consultants who performed the design…

On the advice of the tank’s supplier’s, a 100 mm (4”) interconnection was proposed between TANK 1 and TANK 2. This is to avoid any balancing issues under sudden, increased inflow conditions to TANK 1.

Here it’s possible to see just how close the tanks are to the north wall of the shed. There is sufficient room to walk past them and between them but not around each of them.
The tanks have a diameter of 3.690 m (145”) and the space that they were inserted into is 4.7 m (185”) wide.
In this next photo, the pipe just sticking out of the ground, on the edge of the crusher dust pad, will be plumbed into a pit at the corner of the building. This pit will receive first flush water from the roof. The water is released via a manually operated valve.

Here’s a previous photo that shows the clearance to the retaining wall at the north.

To be continued below.
With TANK 1 and TANK 2 in position, the crusher dust pad was placed for TANK 3.
In this next photo, the initial part of the inlet pipe to TANK 3 can also be seen near the excavator’s bucket.
TANK 3 was then moved into position.
With all three tanks in position, it was now time to rough in the overflow pipework required from each tank and make connections to the perimeter stormwater system.
Each tank has two 100 mm (4”) overflows. At TANK 3 a drain was also routed to a small pit that is located behind TANK 2. This pit picks up the condensate from the workshop’s air conditioner.
I’m not sure I’ve ever mentioned it, but I sacked the hydraulic consultants who performed the design…
On the advice of the tank’s supplier’s, a 100 mm (4”) interconnection was proposed between TANK 1 and TANK 2. This is to avoid any balancing issues under sudden, increased inflow conditions to TANK 1.
Here it’s possible to see just how close the tanks are to the north wall of the shed. There is sufficient room to walk past them and between them but not around each of them.
The tanks have a diameter of 3.690 m (145”) and the space that they were inserted into is 4.7 m (185”) wide.
In this next photo, the pipe just sticking out of the ground, on the edge of the crusher dust pad, will be plumbed into a pit at the corner of the building. This pit will receive first flush water from the roof. The water is released via a manually operated valve.
Here’s a previous photo that shows the clearance to the retaining wall at the north.
To be continued below.
Coolabah
Well-known member
I do admit, I have succumbed to these self imposed challenges to my manhood more than once (f*ing starposts) , usually accompanied with "hey, hold my beer mate"The tanks had been strapped down for Tropical Cyclone Alfred in March using star pickets and ratchet straps. Each star picket was an absolute PIA to remove as they were inserted at least 400+ mm (16”) into the ground and the suction between them and the red clay soil was enormous.
If I recall correctly, I think I worked on removing the star pickets over the course of two days. I thought, if I didn’t do it, I’d just be paying the plumber to do it. Here are the tanks, with all the star pickets and straps removed.
We both know that the Kubota, when it arrived, would've wiggled out those starposts in minutes. But, absolutely , it appeals to my sense of pride , as it has yours, to have beaten the machine to the draw, so if it helps- I assure you AI could not have done what you did in two days

Mr onetwo
Well-known member
Lots of work and cost involved in this part of things.You are fortunate to live in a climate where you don't have to worry about freezing temps along with snow and ice 
 .I really want to do something like this on my new place next year, but it averages between 100 & 110 inches of snow per year.Ice is also becoming a bigger problem, so I'm not sure what to do yet. Why did you sack the 1st hydraulic consultants?
.I really want to do something like this on my new place next year, but it averages between 100 & 110 inches of snow per year.Ice is also becoming a bigger problem, so I'm not sure what to do yet. Why did you sack the 1st hydraulic consultants?Post #0077c - Construction work continues - Water tank installation at shed continued - Part LXXII
Day two of the installation started with this, so it was now mainly the details to start working on.

Completed inlet to TANK 1, minus a support that will be needed at the entry point at the roof.

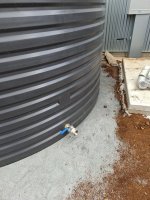
Ball valve to allow emptying of TANK 1.

Gate valve between TANK 2 (LHS) and TANK 1 (RHS).

Drainage pit to receive to receive condensate from the workshop’s air conditioner.

Outlet ball valve from TANK 2 which will be connected to one of the variable speed pumps.

Inlet to TANK 3.

Outlet ball valve from TANK 3 which will be connected to one of the variable speed pumps.
To be continued below.
Day two of the installation started with this, so it was now mainly the details to start working on.
Completed inlet to TANK 1, minus a support that will be needed at the entry point at the roof.
Ball valve to allow emptying of TANK 1.
Gate valve between TANK 2 (LHS) and TANK 1 (RHS).
Drainage pit to receive to receive condensate from the workshop’s air conditioner.
Outlet ball valve from TANK 2 which will be connected to one of the variable speed pumps.
Inlet to TANK 3.
Outlet ball valve from TANK 3 which will be connected to one of the variable speed pumps.
To be continued below.
@Coolabah, yes the B2601 would have made easy work of those pickets but it arrived about three weeks later in mid August.I do admit, I have succumbed to these self imposed challenges to my manhood more than once (f*ing starposts) , usually accompanied with "hey, hold my beer mate"
We both know that the Kubota, when it arrived, would've wiggled out those starposts in minutes. But, absolutely , it appeals to my sense of pride , as it has yours, to have beaten the machine to the draw, so if it helps- I assure you AI could not have done what you did in two days
So, I just whacked, whacked, whacked and whacked away with a small (2 kg?) hammer, interspersed with the rocking each picket back and forth trying to break the suction. The initial danger is the hammer bouncing off the picket after each strike. Yes, progress is happening but will my body wear this hammer
 ? Eventually, the point is reached where you think this picket is so loose it will just pull out , but no the earth's grip still won't release it Lots of huffing and puffing with the odd rest
 @Mr onetwo many, many reasons.Why did you sack the 1st hydraulic consultants?
I gave them a very detailed written brief that included many clear directions. For example, I made it clear the common sense thing to do was to have the underground sanitary drainage pipework exit the shed's building pad to the south, at the sweet spot where the pad's excavation changed from cut to fill. At this point, there's no retaining wall to have to get past or under.
Did they do that? No. They had the sanitary drainage heading to the east, dropped it vertically by 2+ m to pass under the existing retaining wall at the edge of the shed's carport. Why go under an existing retaining wall 1.8 m high that is sitting on a massive concrete foundation when you don't have to?
That was just the tip of the iceberg. I recall doing three comprehensive reviews of their drawing set which were just exercises in picking up mistakes, errors, non-compliances with the plumbing code etc. and thinking: 1) the fxxx-ups aren't reducing and 2) this is now beyond six months.
It reached the point where it was preventing me from obtaining a plumbing and drainage permit (from council) which was preventing me from obtaining the second building permit (from the private building certifier) to commence construction of the shed and garage.
The final straw was they sent me an invoice requesting full payment with the work still incomplete and no indication of when they'd finish.
Getting out of the situation without having to start the design again was the key goal, as I simply couldn't afford a set back of six months. I knew the council's officers wouldn't review the drawing set very closely (they should but they don't), so I just pushed back on the designers and advanced the drawing set to get it to the point that it was tolerable and I had something to submit to council.
The designers were supposed to also prepare and submit the application for the plumbing and drainage permit, so I checked that I as an individual could do that via council's on-line system and found yes I could.
So, the hatchet
 came down, I paid zero and parted ways.
Coolabah
Well-known member
You’ll kick yourself when I tell you the trick my grandfather taught me: keep adding water into the gap as you wriggle, turns everything into a slurry so the post comes out easy peasy@Coolabah, yes the B2601 would have made easy work of those pickets but it arrived about three weeks later in mid August.
So, I just whacked, whacked, whacked and whacked away with a small (2 kg?) hammer, interspersed with the rocking each picket back and forth trying to break the suction. The initial danger is the hammer bouncing off the picket after each strike. Yes, progress is happening but will my body wear this hammer

Mr onetwo
Well-known member
I am a master plumber here in Maine.It is too bad that you had to put up with all that. Drainage is pretty simple.As the saying goes...."Sh*t runs downhill and payday's on Friday"
runs downhill and payday's on Friday"