To avoid these ads, REGISTER NOW!

ZMotorsports Shop Projects 2.0

Jgaz

Well-known member
Joined
Dec 16, 2016
Messages
1,786
Location
AZ

This is a thread on the YA862 and how it magically takes compressed air and turns it into hot and cold air. Now I even know how it did it!
Much better idea to use that tool than trying to cool the choke coil down by spraying it with R12!

A mechanic next to me did this back in the late 70’s while the engine was running.
R12 was sucked into the engine, burned, and came out the tailpipe as phosgene gas!
Cleared out the whole service Dept.🤣
 
To avoid these ads, REGISTER NOW!

bugnut

ALLIANCE MEMBER
Joined
Jul 14, 2012
Messages
4,181
Location
Central Ohio
@zmotorsports can't add to what Gary said, enjoy the daylights out of them they grow up fast!

Greatness, Mike - just greatness! The quality time you're spending with the little guy will pay HUGE dividends now and in the future, and you get the opportunity to reinforce the character traits and world views that have shaped your and your family's lives. Not that your son and DIL can't or don't do that each and every day, but a grandpa is just different!!! It just warms my heart every time my granddaughter tells my bride she is her "best friend"!!! I'm sure your little guys feels the same way about you!
Carry on!
 
OP
Z

zmotorsports

ALLIANCE MEMBER
Joined
Oct 20, 2009
Messages
21,639
Location
Northern Utah
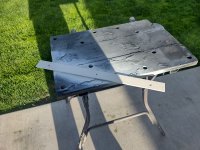
Some of you may remember the new Wypall bulk towels and holder that I started using in my shop about a month or so ago. Well, I cannot for the life of me figure out why the manufacturer of the wall rack made it 14" wide center to center on the mounting holes vs. 16" on center. I can only think they intended for them to be mounted to a wall, but maybe they were intending on something a little more industrial like concrete, block or plywood walls like you'd find in an industrial shop vs. a home shop.

Either way, it would have been easy for them to make the holes on 16" centers. When I originally hung mine I found a stud and used it for one of the 3 mounting screws. However, the other two were just into sheetrock so I used a wall anchor style that collapses behind the sheetrock. I have a love/hate relationship with these things and after having 2 of them pull out I shifted gears last night after mowing lawns and opted to come up with a more permanent solution and be done with it.

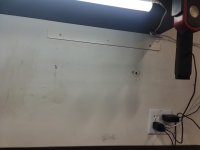
I cut a piece of .250" x 1.5" stock enough to span well across two studs, then drilled and countersunk for grabbers and the center hole was drilled and tapped to accept a 10-32 machine screw for the top center screw of the wall dispenser. I then sanded, primed and painted it white while I moved on to modifying the other two mounting locations.
wypall1.jpg

Upper mount installed under the cabinets.
wypall2.jpg

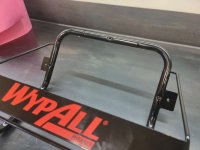
I then used the same stock cut into 2" long pieces and drilled and countersunk them to be welded alongside the existing holes, offset by 1" on either side to equal the 16" center to center spacing of the studs. Lastly I matched the black paint of the wall mount.
wypall3.jpg

That's not going anywhere. I still need to fill the hole from the pulled out wall anchor, but this is much more sturdy.
wypall4.jpg

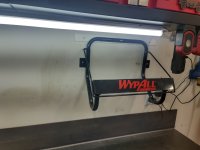
Done.
wypall5.jpg


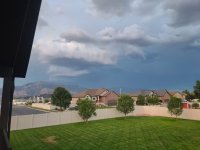
As the wife and I were finishing up dinner, we had another storm rolling through and I snapped a couple shots of the dark sky. We had a little lightning and thunder, but nothing like the night before where it was nonstop for a couple of hours.
sky1.jpg

sky2.jpg


Now with the shop towel rack mounted and not bugging the **** out of me, I can move on to the project that I have wanted to get to this week.

Thanks for looking.
 

SilverJimmy

Well-known member
Joined
Apr 14, 2012
Messages
1,795
Location
Prescott/Flagstaff, AZ
Mike, now that I’m an accomplished painter I’ve decided to expand my palette and paint some of my equipment some other color than black. I’m thinking that once again I’d like to “Be like Mike” and try that RustOleum Hammer Gray for my different stands I have in my shop. I thinned the black with acetone and it worked great and at a very low cost. What have you used to thin the Hammer paint with for best results? Thanks again!
 
OP
Z

zmotorsports

ALLIANCE MEMBER
Joined
Oct 20, 2009
Messages
21,639
Location
Northern Utah
Mike, now that I’m an accomplished painter I’ve decided to expand my palette and paint some of my equipment some other color than black. I’m thinking that once again I’d like to “Be like Mike” and try that RustOleum Hammer Gray for my different stands I have in my shop. I thinned the black with acetone and it worked great and at a very low cost. What have you used to thin the Hammer paint with for best results? Thanks again!

Sterling, I generally use the aerosol version due to convenience and because I am usually painting smaller items. Plus I have this cool paint shaker. ;) However, for larger components such as when I built my workbenches and such, purchasing in quarts is much more economical and it sprays out nicely. For spraying I have had best results with Xylene, but I've used Mineral Spirits in a pinch.
 

SilverJimmy

Well-known member
Joined
Apr 14, 2012
Messages
1,795
Location
Prescott/Flagstaff, AZ
I did read the instructions and they did recommend Xylene for thinning. Did you thin about 10% or so? The stands I want to paint are made out of semi air brake drums and 4” square tubing. Three of those stands and then a couple built with 1” thick plate and junk Cummins Big Cams camshafts. So using spray cans might wear out my finger!
 
OP
Z

zmotorsports

ALLIANCE MEMBER
Joined
Oct 20, 2009
Messages
21,639
Location
Northern Utah
I did read the instructions and they did recommend Xylene for thinning. Did you thin about 10% or so? The stands I want to paint are made out of semi air brake drums and 4” square tubing. Three of those stands and then a couple built with 1” thick plate and junk Cummins Big Cams camshafts. So using spray cans might wear out my finger!

I think it ended up being a little more than 10% reduction. I remember the instructions stating 10%, but it didn't spray worth the ****, so I added a little more just to find that balance of spray ability vs. coverage.
 

ntsqd

Well-known member
Joined
Jan 22, 2005
Messages
1,045
Location
Lower left coast
My goodness but that boy is growing!

Backing up a page or so, when building the front axle under the FSB I looked at RCV's for it. Then I found out how often they suggested that they be serviced and that just about kilt that idea dead. Digging into it a little further and I realized that there was no way to grease the TTB's inner CVJ in place, it had to come out to get greased. If I recall correctly the recommended service interval was 3500 miles or so? For every service the whole RS axle assembly had to come out to grease the center joint? Yea, that's so not going to happen. Instead I clearanced the yokes so that they can't bind in droop (shocking how little angularity the OEM parts have and how little metal needed to be removed), and put Dana u-joints in all three places.
 
OP
Z

zmotorsports

ALLIANCE MEMBER
Joined
Oct 20, 2009
Messages
21,639
Location
Northern Utah
My goodness but that boy is growing!

Backing up a page or so, when building the front axle under the FSB I looked at RCV's for it. Then I found out how often they suggested that they be serviced and that just about kilt that idea dead. Digging into it a little further and I realized that there was no way to grease the TTB's inner CVJ in place, it had to come out to get greased. If I recall correctly the recommended service interval was 3500 miles or so? For every service the whole RS axle assembly had to come out to grease the center joint? Yea, that's so not going to happen. Instead I clearanced the yokes so that they can't bind in droop (shocking how little angularity the OEM parts have and how little metal needed to be removed), and put Dana u-joints in all three places.

Yeah, I don't think I'll run RCV's ever again Thom. What's funny is that "now" there is more information/data available and enough of it that they can't dispute the fact that there is a lot of maintenance on them. Fifteen or so years ago when I purchased mine, I spoke to RCV quite a bit before buying because there just wasn't a lot of information on the internet yet and they informed me that there is no maintenance other than their recommended grease interval of 5k miles. I thought no big deal, I rotate my tires every 5k anyways so that's easy enough.

What they did not tell me is that "when" (not if), they start making noise, they will require a rebuild of the balls and cages which is NOT covered under warranty, despite my asking very specific questions about longevity. They told me as long as you keep them greased there is not rebuild intervals. I call BS on that now.

When I contacted them the first time about the clicking, they informed me that their warranty does not cover that because the components that are causing the noise are considered "wear items". Wear items? They sure as hell didn't mention that even when I specifically asked about service intervals.

While I still believe that they are probably the strongest axle shafts available for most applications, I also now, after many years, am under the belief that I don't think they are actually worth the initial cost and especially when the maintenance is figured in. Maybe for a race built or purpose built vehicle, but for a vehicle that plans on having a lot of miles racked up on it, I cannot recommend them. I think they're a solution that went in search of a problem that really didn't exist.

Also worth mentioning, is the fact that it makes greasing ball joints difficult as well. I have had to use a needle attachment to great my lower ball joints all this time and now I can actually get a standard grease coupler on my lowers. :bounce:

I can attest that the 1350 joints are quite a bit larger than my son's standard 1310 (5-760x) joint and fill the knuckle almost completely. The standard 1310 series (5-760x) joint would have been plenty strong for the kind of off-roading we currently do but just went the 1350 route to get as much strength as possible and it wasn't a lot more $$, especially compared to the RCV's.
 
Last edited:
OP
Z

zmotorsports

ALLIANCE MEMBER
Joined
Oct 20, 2009
Messages
21,639
Location
Northern Utah
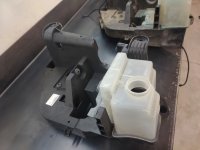
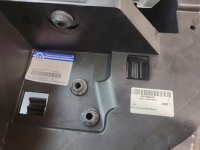
I finally got around to replacing the windshield washer reservoir on my Jeep last night. What a PITA that was. It would have been bad enough with just dealing with the Chrysler PCM that bolts to it, but then that front corner is also where I have my GM ECM and all of the related wiring. Getting the wiring out of the way wasn't terrible, but that shoehorn that thing down in there and then attach the ABS module to it as well, so you have to lift up slightly on the ABS module, then lift up on the whole reservoir/tray assembly to clear the upper shock bolt and try to wiggle it out.

The washer fluid reservoir is part of the entire tray and cannot be purchased separately as it appears to be hot molded or melted together to form the seal between the two pieces and it is at that seam where mine has been leaking.

Old one out.
ws1.jpg

New one at the ready.
ws3.jpg

ws4.jpg

Back in place and wiring reconnected. I also tidied up a little of the wiring while I was there. I noticed some poly loom was cracking and deteriorating so I replaced a few sections as well as routed a few behind the tray along the factory wiring loom. I sure hope I don't have to do that job again and this one lasts.
ws7.jpg

ws8.jpg

While moving on to reconnect the battery, I also installed some Grote mil-spec style of battery connectors and rerouted a few of my grounds landing them on the fender grounding connection points rather than right at the battery. I'm a little late to the game and only recently started using these military spec or grade battery terminals and so far I have been impressed. I didn't like a couple of the insulated crimped rings on the ARB wiring harness, so I cut them off and went with the non-insulated ones I've been using and adding heat shrink for a much more watertight and cleaner looking electrical connection. That is still a little busier looking positive connection than I prefer, but I haven't added any additional loads (accessories) since doing the LS swap, so I don't want to add another bus as I don't see myself adding any additional accessories. On the positive terminal, I currently have the 3 OEM cables, winch, Camaro SS fan, ARB leads and the one jumper to a remote fused load distribution box for accessories such as lighting. IF I were to offload some loads I think I would at most only lose one wire from the positive so the juice ain't worth the squeeze.
ws9.jpg


Thanks for looking.
 

SilverJimmy

Well-known member
Joined
Apr 14, 2012
Messages
1,795
Location
Prescott/Flagstaff, AZ
I have no knowledge of the RCV axles and how well they last but I wonder if in an application with locking hubs with not as much rotational time would they still be a good choice? My 1992 Toyota Land Cruiser has almost 300k on it with the original OEM Burfield joints. I had them repacked and resealed at about 250k and they are still quiet and going strong. And my Samurai also has Burfields in the front axle, never broke one either, and it’s done the Rubicon 3 times!6EA9D7BB-97A7-40C0-974C-813A730B4898.jpeg
33” Swampers aired down to 7 psi and 6.5:1 gears in the transfer case. If the stock Burfields were weak I would have seen it! Japanese steel, made from the finest American scrap!
 

ntsqd

Well-known member
Joined
Jan 22, 2005
Messages
1,045
Location
Lower left coast
From over 3 decades of observation the recipe to break a Toyota Birfield is to pick any two of these options: V8, 4+:1 Ring & pinion, doubler, tires taller than 33", Tires wider than 10.5", Heavy right foot, throttle while turned. Combine the two and BANG!

As I understand it the main difference between a Birfield (Toyota, Samurai) and a Rzeppa CVJ (VW Bug & Bus, Porsche 930/5, etc.) is that the grooves for the balls in the Birfield are parallel to the shaft centerline while the CVJ's grooves are at a slight angle and the balls are inserted in opposing angle grooves. I used Redline's CV2 grease exclusively in Patch's Birfields and steering bearings. I brinnelled the bottom steering bearings about every 2.5-3.0 years, but never had a Birfield problem.
I've no idea which design RCV uses.
 
OP
Z

zmotorsports

ALLIANCE MEMBER
Joined
Oct 20, 2009
Messages
21,639
Location
Northern Utah
Birfields? Yup, learn something every time I’m on your thread! Thanks Mike!

Going back to your comment about locking hubs Sterling, yes, I do think that would make a difference because the shafts would turn much less with lockout hubs and therefore exhibit less overall wear. That being said, the RCV's require a "special" stub shaft, (read EXPENSIVE) and must be custom ordered in order for you to be able to purchase another kit (read, more expense) from one of only about 2 or 3 companies that offer lockout hub kits for the late model Jeep Wranglers. Spyntec is the ones I looked into many years ago but opted against the conversion for a couple reasons. One being special order and I have owned enough highly modified vehicles to know that when traveling into the back country from multiple different small towns, custom made parts are not conducive in the event of a breakdown and needing parts. Secondly, I didn't think the efficiency that they were claiming was as reliable on a vehicle with the aerodynamics of a phone booth, so any kind of ROI, at least from a fuel economy perspective, is negligible if any.
 

stockerwithalocker

Well-known member
Joined
Dec 26, 2015
Messages
82
Location
So Cal
I'm not necessarily trying to promote these, but ya'll need to go get one now....:whistle:

Mike, wanted to thank you for all the must haves, as last weekend i was using my newly purchased used kent moore boost leak testing kit, air lift coolant kit and my owners manuals to test for boost leaks and remove my intercooler and radiator to clean the fins.

I was surprised even with cleaning the stack pretty frequently, how much dirt built up in the gap between rad and intercooler restricting the airflow.

Hope all is well and you enjoy your weekend.
 

PhantomEB

Well-known member
Joined
Feb 6, 2006
Messages
7,004
Location
Medicine Hat, AB, Canuckistan
I have no knowledge of the RCV axles and how well they last but I wonder if in an application with locking hubs with not as much rotational time would they still be a good choice? My 1992 Toyota Land Cruiser has almost 300k on it with the original OEM Burfield joints. I had them repacked and resealed at about 250k and they are still quiet and going strong. And my Samurai also has Burfields in the front axle, never broke one either, and it’s done the Rubicon 3 times!6EA9D7BB-97A7-40C0-974C-813A730B4898.jpeg
33” Swampers aired down to 7 psi and 6.5:1 gears in the transfer case. If the stock Burfields were weak I would have seen it! Japanese steel, made from the finest American scrap!
Rubicon is on the list for next year. Currently on Yukons with my front 60 but RCVs will be the choice I go with if the Yukons don’t last with my 42s.6C69A3DB-5F1E-48DA-ABD7-38A95756D303.jpeg
 
To avoid these ads, REGISTER NOW!
OP
Z

zmotorsports

ALLIANCE MEMBER
Joined
Oct 20, 2009
Messages
21,639
Location
Northern Utah
I had to do some work on my 35-year old Snapper 21" walk-behind mower over the last couple of evenings and thought maybe some of you may find it interesting.


I have noticed over the past few months, most of the season, that I have had to chase the adjustment on the drive clutch as it appeared to not want to grab like it used to. Hint, that should have been more of an indicator looking back.

A couple of weeks ago the wife and I took off for a road trip and my son text me to let me know that it was no longer self-propelling. I told him I had noticed that and I would look at it upon arriving home.

Upon initial inspection I noticed that the main drive belt was severely worn, to the point that I could turn the blade (crankshaft) and the belt wouldn't turn. I tried to find one locally and no one had the exact one I needed. I found one a half inch shorter and a half inch longer. I ordered a 2-pack because I could get two belts online cheaper than I could purchase one belt locally and delivery was the next day. I thought I would pull it down and be ready to install the belt the next day while I cleaned the grass from the v-pulleys.
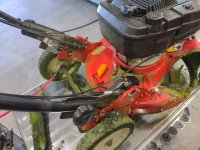
mow1.jpg

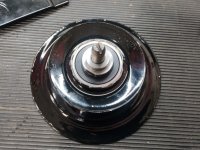
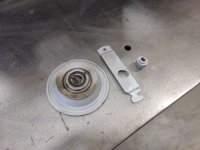
Upon disassembly I discovered the "actual" issue. The pivot plate and the adapters exhibited severe wear as well as the bearing in the driven pulley was "growling". The pulley was not available from any of my normal suppliers and although the other two parts showed in stock, I opted to just refurbish them all. Here they are bead blasted to begin the work.
mow2.jpg

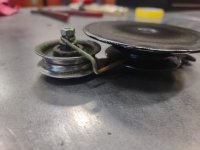
The adapter is severely worn. almost to the bolt.
mow3.jpg

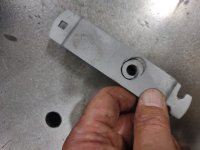
And the pivot plate is ovaled out quite badly as well.
mow4.jpg

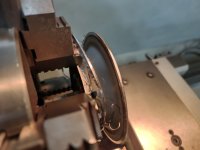
The bearing is captured fully inside of the driven pulley and it appears to have a folder over or crimped edge joining the outer disc to the pulley. After giving it a think, I opted to cut chuck it up in the lathe and remove the inner folded seam with the thinking I could TIG weld it back on afterwards.
mow5.jpg

Out disc removed. I was surprised when I found that the inside was also a folded over edge securing the bearing. With the outer edge formed, I "assumed" the inside must have a snap-ring. :rolleyes:
mow6.jpg

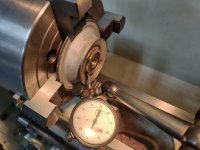
Well, I'm this far in, may as well not stop now and just knock the formed edge off securing the bearing as well. Using my 4-jaw to dial it right in.
mow7.jpg

Formed edge removed.
mow8.jpg

Scott, aka @signcrafter ; these fancy EZ Driver's have so many uses. There's always the right size for whatever job is at hand. ;)

Ya know, @Grant Gunderson already purchased one, so you're next.....:bounce:
mow9.jpg

Pressing the bearing out.
mow10.jpg

Nearly out.
mow11.jpg

With the bearing out, I discovered it was just a standard 6203-2RS bearing. Should be easy to find.
mow12.jpg

Old belt vs. the new belt that showed up the next day.
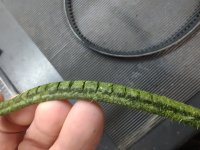
mow13.jpg

I also grabbed an SKF bearing on the way home so I have all of the parts now.
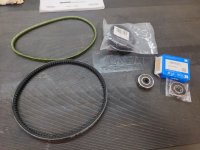
mow14.jpg

Some quick rough measurements to determine the next steps.
mow15.jpg


Stay tuned for more.
 
OP
Z

zmotorsports

ALLIANCE MEMBER
Joined
Oct 20, 2009
Messages
21,639
Location
Northern Utah
Continuing on with the Snapper lawnmower repair.

I wanted to get the bearing installed to ensure I could fold the edges over enough to fully capture the bearing before continuing on with this part. Sure enough, there was enough lip remaining that it folded over nicely.
mow16.jpg

Bolt cleaned up and reinstalled from the backside.
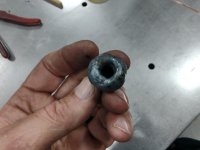
mow17.jpg

Adapter mocked into place to ensure no surprises after welding the disc back onto the pulley. This is more than likely a one-shot deal. I chose a high quality bearing rather than a cheap/inexpensive so I hopefully can get this to last another 35-years.
mow18.jpg

Outer disc sits nicely against the pulley.
mow19.jpg

Just needed a little deburring around the circumference to let everything sit together flat and tight.
mow20.jpg

With the pulley ready to weld back together, I focused my attention on the pivot plate next. At first thought I was just going to weld up the ovaled out hole, but I switched gears and decided to find center, bore it out to clean up all of the damaged hole and then machine a spacer which will press and weld in to correct the hole and re-center it.
mow21.jpg

Taking the hole out to 1" got me 98.4% of the way to clean up all of the damage. There will just be a very small low spot, but it will fill in with weld easily enough.
mow22.jpg

Time to measure and then go back to the lathe to machine a spacer.
mow23.jpg

Small drop located that will serve as the spacer.
mow24.jpg

OD turned to .001" larger than the hole and then the ID bored to accept the adapter, which will be the next item addressed.
mow25.jpg

Spacer ready to test fit.
mow26.jpg

Won't quite slide in, which is what I wanted.
mow27.jpg

A trip to the vise and it pressed right into place.
mow28.jpg

Ready for welding.
mow29.jpg

Welded on both sides.
mow30.jpg


Stay tuned for more.
 
OP
Z

zmotorsports

ALLIANCE MEMBER
Joined
Oct 20, 2009
Messages
21,639
Location
Northern Utah
Continuing on.

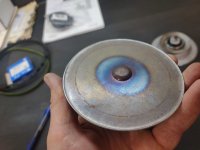
On the welding bench I autogenously TIG welded the disc back onto the pulley skipping around. I also prepped the pivot plate by knocking down the welds to flush and giving it another shot in the bead blasting cabinet before paint.
mow31.jpg

Pivot plate painted.
mow32.jpg

Bearing masked off and pulley painted.
mow33.jpg

While the paint was drying I allowed the adapter to cool so I could move on to machining it back to size.
mow34.jpg

mow35.jpg

In the 5C collet and roughing to size.
mow36.jpg

Paint turned out well.
mow37.jpg


Stay tuned for more.
 
OP
Z

zmotorsports

ALLIANCE MEMBER
Joined
Oct 20, 2009
Messages
21,639
Location
Northern Utah
The last of the mower repair.

I haven't used the lathe or mill in quite a while, but each time I do I am so pleased with how they perform. I also really like how rigid the lathe is and love the DRO that I should have installed when I first bought the lathe. It is so nice to make a couple of passes, measure, determine the remaining to be removed, offset the DRO to land on zero when the needed material is removed and have it land right on size.
mow38.jpg

Last pass.
mow39.jpg

I wanted to be .001"-.002" under the ID of the hole in the spacer which was .700". Right on the money.
mow40.jpg

With the paint cleaned off the ID of the hole in the pivot plate it fell right into place and moved freely, but didn't flop around.
mow41.jpg

Now for the final assembly. Adapter going onto the pulley.
mow42.jpg

Nice fitment over the bolt and snug fit into the bearing.
mow43.jpg

Pivot plate sits perfectly on the adapter with about .015" protruding to firmly seat against the deck without binding or locking the pivot plate. Just as the original design allowed.
mow44.jpg

Tensioner pulley attached to the pivot plate.
mow45.jpg

Belt slipped through the opening and installed on the crankshaft.
mow46.jpg

Driven assembly installed and tension spring connected. The spring lying in the picture is for the upper pivot assembly, the pivot plate tension spring is barely visible at the 4 o'clock position of the driven pulley. I still have to tighten the tensioner pulley and move the guide arm into position in this photo.
mow47.jpg

Completed, tested and ready to go.
mow48.jpg

The mower is a little dirty as it is late in the season, but for a 35-year old mower I am pleased with how it is still holding out.
mow49.jpg


All in all, I spent about $30 to complete this repair. The bearing was $18 with tax and the two belts were just over $12.

Thanks for looking.
 

signcrafter

Well-known member
Joined
May 9, 2012
Messages
12,675
Scott, aka @signcrafter ; these fancy EZ Driver's have so many uses. There's always the right size for whatever job is at hand. ;)

Ya know, @Grant Gunderson already purchased one, so you're next.....:bounce:
So Mike goes MIA for a couple weeks and first thing he does when back is call me out and try to open my wallet! :ROFLMAO:

I know I need them and hopefully will be in the near future, thanks for the reminder so I don't forget about them. :LOL:

Glad to see the post this morning Mike. Nice write up on the mower repair. I'm not sure I know anyone else that would cut those lips off to replace that bearing. I tried to order a bearing like that for my Grandpa's old craftsman rider I use. But the part number it showed in the book and that I ordered came with a different ID so wouldn't work. Online searching showed that part number could be either measurement for some reason. Still need to fix that sometime. Might have to put the press adapter set on hold again and buy a lathe to replace the bearing like you did. Oh, and a tig welder too I guess. Every time I get close to pulling the trigger on that set something else comes up I need.
 
OP
Z

zmotorsports

ALLIANCE MEMBER
Joined
Oct 20, 2009
Messages
21,639
Location
Northern Utah
So Mike goes MIA for a couple weeks and first thing he does when back is call me out and try to open my wallet! :ROFLMAO:

I know I need them and hopefully will be in the near future, thanks for the reminder so I don't forget about them. :LOL:

Glad to see the post this morning Mike. Nice write up on the mower repair. I'm not sure I know anyone else that would cut those lips off to replace that bearing. I tried to order a bearing like that for my Grandpa's old craftsman rider I use. But the part number it showed in the book and that I ordered came with a different ID so wouldn't work. Online searching showed that part number could be either measurement for some reason. Still need to fix that sometime. Might have to put the press adapter set on hold again and buy a lathe to replace the bearing like you did. Oh, and a tig welder too I guess. Every time I get close to pulling the trigger on that set something else comes up I need.


Just trying to keep you from forgetting about the driver set Scott. It's just what I do.....you're welcome... :bounce:


I often joke around with the wife about having $20k- $30k in machining tools and equipment and another $15k plus in welding equipment just to fix a $20 part, but like the old saying goes, if the only tool you own is a hammer, then everything is a nail. :LOL:


The wife and I were reflecting the other night sitting on the deck about what we wanted our life to look when we first started dating in the 80's. I remembered going to a friend's older brother's home shop one night and then telling my wife (girlfriend then) about someday after we're married and before retirement, I wanted to have a fully equipped shop in our backyard with all of the tools and equipment I would ever need to fix about anything. Now that we have our dream home and dream shop, I wonder if we sometimes forget about all of the hard work and sacrifice that went into achieving our dream.

I also need to remember that "our" dream is not everyone's dream and I need to keep my opinions and thoughts to myself. Seems like today most people just want to complain about not being able to do this or that and they don't want to hear other people's opinions on how they got to where they are at.

I have a saying I used to say that said "if you aren't willing to work for it, don't complain about not having it". Although I don't think that is the philosophy of most people these days as most just want to complain and don't realize that hard work and sacrifice is something people have been doing for many, many years and were able to get ahead in life but in our instant gratification society, that mindset is less popular these days.


As for the mower repair, I felt "fairly" confident when I commenced the repair that if I could save the pulley, the other parts were a no brainer. When I first began cutting the pulley apart, I still had some reservations. My wife mentioned that maybe this was the straw that broke the camel's back and I may have to break down and buy a new mower. :mad: I tackled the pulley first because if that wasn't to be then I may have to go down that path, but once I got into it, my confidence of saving it grew. I actually quite enjoy projects like this and maybe it was what I needed after the mindset I've been in for the past few weeks.


Great write up and repair, Mike! Love seeing you keep that thing alive.

One burning question though, as we roll into fall/winter, is the Wheel Horse going to ratchet up on the project list? :oops:

Thanks Mike.

It's been a hell of a past few weeks. Kind of had the wind knocked out of my sails where I really didn't feel like doing much of anything. I just puttered around the house maintaining the yard and vehicles but not much more than that.

We watched our grandson a few weeks back and he "helped" me do some work on the Wheel Horse and it got me excited, but then I haven't touched it since. I looked up an engine kit for it but don't dare order any parts until I get it torn down to determine wear and exactly which kit I want to go with. I was pleased to find engine parts readily available. I have some welding and machining work to do on the chassis of the tractor as well as a few links and one spindle, but those are actually fun tasks and I'm not too worried about them. I am more worried about missing my window of opportunity to paint the tractor however as that needs to be done outside.

I backed my car trailer up to the shop last week and started working on it, but then put it on the back burner again as my head wasn't in the game. My phone has been blowing up the past week or so with side jobs, but I have so many personal projects to get done before that white **** falls and I'm losing my window.
 

aka Larry

Well-known member
Joined
May 2, 2012
Messages
8,178
Location
Eastern, NC
When I first began cutting the pulley apart, I still had some reservations. My wife mentioned that maybe this was the straw that broke the camel's back and I may have to break down and buy a new mower. :mad:

<Voice inside Mike's head> "Buy a new mower because you think I can't fix this one? Challenge accepted"!
 

ntsqd

Well-known member
Joined
Jan 22, 2005
Messages
1,045
Location
Lower left coast
Mike, nice to have you back!

........ I'm not sure I know anyone else that would cut those lips off to replace that bearing.
My '84 Xcab Yota had similar idler pulleys in it's accessory drive system. Being of a broke college student mindset (or is that simply "Frugal"?) I did the same thing when one of them had a bad bearing in it. Along the way I discovered that the carrier bearing in the drive-shaft was made more or less the same way, so it got a similar process.
 

LXCam

ALLIANCE MEMBER
Joined
Apr 23, 2013
Messages
19,464
Location
AZ
Pretty much Vincent. When the wife mentioned a new mower, I cringed and thought "new mower my ***"! :LOL:
Damn straight Mike!! 👊

Personally I could have never managed welding that shell back together, that’s beyond my tig skills (since I **** at tig)

But! Some 7075 round stock and that sumbitch would have become its first billet accessory 😉
 

PugetDude

ALLIANCE MEMBER
Joined
Mar 13, 2013
Messages
22,811
Location
Superstition Mountains, AZ
Damn straight Mike!! 👊

Personally I could have never managed welding that shell back together, that’s beyond my tig skills (since I **** at tig)

But! Some 7075 round stock and that sumbitch would have become its first billet accessory 😉
Watch a couple of Pakistani impossible machining repair videos on YouTube for inspiration. Apparently you can succesfully repair missing or broken helical gear teeth with an old truck leaf spring using a lathe, angle grinder and a 80 year old arc welder. 😉
 

ntsqd

Well-known member
Joined
Jan 22, 2005
Messages
1,045
Location
Lower left coast
After his cast pot metal one broke, MISF & I made a remote oil filter plate for his Pontiac 400 out of an old truck leaf. Holy smokes is that stuff hard to drill and tap!!! We could barely file it flat. I'm sure that it would make an excellent gear tooth, I just don't know how successful welding it to the rest of the gear is going to be.
 
OP
Z

zmotorsports

ALLIANCE MEMBER
Joined
Oct 20, 2009
Messages
21,639
Location
Northern Utah
It's satisfying to be able to fix stuff because you can, not because you have to.


Amen Scott. That feeling is priceless. Yeah, we could buy a new mower, but at this point on a 35+ year old mower it has become a mission to keep it alive and in good working order and condition. Just doing my part to save the planet by refreshing/maintaining. ;)


Damn straight Mike!! 👊

Personally I could have never managed welding that shell back together, that’s beyond my tig skills (since I **** at tig)

But! Some 7075 round stock and that sumbitch would have become its first billet accessory 😉

Yeah, there would have been that option as well. Pretty good size chunk of billet that would have cost a pretty penny though. :LOL:
 
To avoid these ads, REGISTER NOW!
Top Bottom