To avoid these ads, REGISTER NOW!

The Skunkworks Build begins

OP
B

bluesman2a

Well-known member
Joined
Aug 16, 2005
Messages
1,312
Location
Atlanta, Ga.
Wow......interesting......why did you wait to start on this? Couldn't you have done this when you started the project?

Honestly... Money... I've paid cash for everything I've done on this project. Some of it I didn't think I would be able to do this soon, and have taken more of a long-term approach (originally, I was thinking YEARS). I've tried to minimize re-work and plan ahead, so I think I've come out pretty well over-all. Some of it, I had no choice on, I had to tear into what was already there when I bought the house.

With the bind that most contractors and builders are in these days, I've been able to get some very competitive pricing, so I've done some of it a little sooner than I anticipated. Depending on what this year's tax return looks like, I should have this dried in and have the bathroom complete by the end of January/February.

I think I may have mentioned a while back in this thread (and many moons), I'm doing the work that I can, and subbing out what I can't or is cheaper/easier to hire out. So at this point, I'll frame out the walls, roof the compressor shed, sheath it, do the electrical, and wrap it, then wait until I get the cash to mess with the bathroom before I continue with the siding and soffit/fascia work.

The next big hit will be the garage door/opener. It's getting a fully insulated door and another LM3800. I just haven't decided yet how big the door is going to be.
 
To avoid these ads, REGISTER NOW!

78fj40

Well-known member
Joined
Nov 21, 2006
Messages
458
Location
Arlington, VA
Yeah I can see that, I'm the same way.......it's too bad about spending the money on the overhead door in the back only to replace it with another.....almost too bad you couldn't re-use it somehow.
 

PurdueSD

Well-known member
Joined
Mar 25, 2006
Messages
1,577
Location
Indiana
DSCF0839.jpg


Care to comment on how you like this? I have been looking for one for a while. Do you remember which model you got?

The place is looking great!
 
OP
B

bluesman2a

Well-known member
Joined
Aug 16, 2005
Messages
1,312
Location
Atlanta, Ga.
Yeah I can see that, I'm the same way.......it's too bad about spending the money on the overhead door in the back only to replace it with another.....almost too bad you couldn't re-use it somehow.

Actually, that was part of the plan, and I did it on purpose. The only thing I would change in retrospect is I would have put an insulated door in. The idea here is that I want to be able to move large objects between the lift bay and the machine shop easily, I like the cross-vent breeze in the warmer months, but I still want to be able to close it off and isolate either side for clean/not-clean projects.

DSCF0839.jpg


Care to comment on how you like this? I have been looking for one for a while. Do you remember which model you got?

I'd have to check it, but as I remember, I got the faster of the two models. It'll take your arm off if you aren't paying attention. I'd buy it again in a heartbeat. Well worth the money, it's one of THE most used tools in my shop. Nice for deburring and finish work too. The one caveat I would put out there, is do NOT use cheap abrasives with it. I got in a bind and wound up using some HF belts/pads and they truly sucked, not machine's fault, but if I didn't know better it could look like it was attributable to the machine.
 

ZRX61

Well-known member
Joined
Aug 15, 2006
Messages
28,716
Location
Solar Blight Valley, SoCal
I'd have to check it, but as I remember, I got the faster of the two models. It'll take your arm off if you aren't paying attention. I'd buy it again in a heartbeat. Well worth the money, it's one of THE most used tools in my shop. Nice for deburring and finish work too. The one caveat I would put out there, is do NOT use cheap abrasives with it. I got in a bind and wound up using some HF belts/pads and they truly sucked, not machine's fault, but if I didn't know better it could look like it was attributable to the machine.

We have one of those at work, but painted blue with an Enco label. Had it for years & it works great.... once you get it adjusted for the belt to run straight...
 

ZRX61

Well-known member
Joined
Aug 15, 2006
Messages
28,716
Location
Solar Blight Valley, SoCal
Something is bugging ther A&P part of my brain..

That line from the compressor that joins to the filter etc horiziontally should have a 90 so it's vertical like the other ones :)
 
OP
B

bluesman2a

Well-known member
Joined
Aug 16, 2005
Messages
1,312
Location
Atlanta, Ga.
Something is bugging ther A&P part of my brain..
That line from the compressor that joins to the filter etc horiziontally should have a 90 so it's vertical like the other ones :)

haha... that's OK, I had the same thought, but Northern ran out of 90* 3/4" swivels. I haven't been too worried about it, though, because that's not the permanent home for the compressor (notice the wheels on it still).

haven't been on the forum in months and months but your project is coming along nicely :thumbup:

Thanks for the kind words, funny this should come up today though. I spent the better part of the afternoon working on the framing. Right now, I have 3 sides closed into the weather. The exterior man-door is framed/hung and the garage door has been installed.

I just need to set the doors into the bathroom area, compressor room, and the old part of the shop. Then I'll be weather-tight, which would be nice with our recent cold snap.

I've also got a pro coming in tomorrow to frame and roof the compressor room. It's small, but there are a couple of things in it that I wasn't confident doing myself, so I'm just going to have them get it roofed/flashed, then I'll take it from there.

How is your shop coming? As I remember, quite the place...

Some update pics:

Exterior shot with man-door and garage door. I went with a fully insulated double steel door from CHI, so I could get the tax credits, plus I just think they are beefier/better made.
DSCF0922.jpg


Interior shot from bathroom section... Still missing one stud and blocking.
DSCF0923.jpg


Side shot of the door. Had it installed as a high-lift, it's only about 6" off the rafters. I'll be mounting an LM3800 on the near side.
Oh, and notice what the HomeDesperate lumber pro's consider a usable 2X6X12 stud.
DSCF0924.jpg


Looking back towards the bathroom/compressor room.
DSCF0925.jpg


It's kind of hard to see here, but I've also framed for 2 12"X60" transom windows up high, and the compressor room will get 2 12"X36" windows. They're non-opening, but they are dual-pane and I got a heck of a deal on them, got all 4 for $60.
 
Last edited:
OP
B

bluesman2a

Well-known member
Joined
Aug 16, 2005
Messages
1,312
Location
Atlanta, Ga.
Some updates here, nothing huge, mainly been working inside now that things are buttoned up and weather tight. 3 out of the 4 doors are mounted. I used exterior doors because they have a better heft, more soundproof, and I was able to get a tax credit for them.

Here's the door to the compressor room.
DSCF0952.jpg


Here's the framed-in wall. The gravel area will be the bathroom. That will be commencing in the near future, once the tax returns come in.

DSCF0949.jpg


Here you can see the electrical in the far wall. It's ready for insulation and buttoning up.
DSCF0950.jpg


Looking back in the opposite direction.
DSCF0951.jpg


Have Tyvek on the outside, and it'll probably stay that way until the bathroom is complete and I can side the whole thing at one time. Here you can also see the compressor room is complete/roofed.
DSCF0953.jpg
 
OP
B

bluesman2a

Well-known member
Joined
Aug 16, 2005
Messages
1,312
Location
Atlanta, Ga.
You've been busy. :thumbup:

Haha, thanks. Sometimes it doesn't seem like it. I have a LOT of projects that are "in-flight", and a lot more queued up behind those (bandsaw, mill, lathe, gas-tank in the truck, repaint the bed in the truck, blah, blah, blah). I manage to get some done on a regular basis, but I find that I often have to stop X and complete Y in order to move forward with X and Z.

I really like the feeling of finishing a significant stage or a complete project, and sometimes it seems like that just doesn't happen often/soon enough.

In addition to what you see here, I've also been finishing furniture for my wife. We got a couple of nice display cases, a table, and a bookcase. Not bad in themselves, but they have about a bajillion freakin shelves too.

Here's a pic of the table... It's not quite the way I want it yet, I was shooting for a two-tone, dark top and light drawer/legs, but the legs got a bit darker than I wanted, so it's back to the shop to stain the drawer so it doesn't look retarded... Oh well, just a few nights this week I won't be working on the shop.

DSCF0961.jpg
 
OP
B

bluesman2a

Well-known member
Joined
Aug 16, 2005
Messages
1,312
Location
Atlanta, Ga.
So in between the rain and all the other distractions, I HAVE been able to make a little more progress.... BUT in a different direction. This month saw tax refunds come back, so I started back on the bathroom.

Slab/layout design:
BathroomLayout.jpg


Stubbed up for everything:
DSCF0984.jpg


When your plumber has issues with the layout/walkthrough, sometimes you gotta go low-tech:
DSCF0985.jpg


Floor drain:
DSCF0997.jpg


Formed:
DSCF0998.jpg


Shower formed (yes, at 5'X5' interior dimensions, it IS huge, it'll have two separate heads with body sprays on each):
DSCF0996.jpg


Completed Slab with curbs poured in for the shower enclosure:
DSCF0999.jpg


Septic got trenched and hooked in today. While we were at it, I had the guys tie my gutter downspouts into an existing line that empties into our pond.

As I can, I'll get this framed in, but two critical areas I need to figure out first is what I need to have open for the ac/heat/ptac unit in the wall for rough framing, and what I'm going to do for a dog door and how to frame around it.
 
OP
B

bluesman2a

Well-known member
Joined
Aug 16, 2005
Messages
1,312
Location
Atlanta, Ga.
Thanks for the kind words there guys. At this point I'm having to kind of sit back and look at things to think them through. I hit Home Desperate last weekend for the supplies to bring pretty much everything to a closed-in state. Have my electrical started as well.

But at this point I'm having to take a look at stuff as it will sit in the space and think about how to best setup the space. We had some great weather this weekend, so between re-seeding the yard and the supply run I just setup some lawn chairs to look at the bathroom area and talk about what would work/not work. A couple of friends came over and we shot the breeze for a while. I find these types of sessions quiet useful as I don't always have all the details worked out. It's easy to take a 10X10 box and say this will be the bathroom, but making it useful takes a bit more skull-sweat.

Hopefully I'll start some framing this week.
 
OP
B

bluesman2a

Well-known member
Joined
Aug 16, 2005
Messages
1,312
Location
Atlanta, Ga.
Wow, I just realized this is ready for an update!!!

The crapper is now functional, along with a HD toilet-paper dispenser as previously discussed.
DSCF1021.jpg


Finally got permanently tied into the plumbing (was running temporary on the hose for a while. Also had the plumber come in and setup all my inside stuff except the shower stuff. One thing I had him do was set it up so I could turn off and blow out the lines individually. There's a cutoff in the house, then just outside he put in a fitting with a schrader valve inside of an underground meter box. Then each individual line has it's own shutoff in the shop. All I have to do is turn it off at the house, then drag an air hose over to the meter case and I can clear out the lines. It doesn't get particularly cold here, but I wanted to make sure that I didn't have to heat all the time if I didn't want to.

The wash tub is now functional (sans hot water). I went with a pull-down kitchen faucet/sprayer here that I think will work very well. Mounted that to a plastic wash tub. I'll eventually take that and mount it in a cabinet to make it a little more sturdy aesthetically pleasing, but it's great now for cleaning up and washing the dog in there. :beer:

Water heater is plumbed and installed. I went with a 50 gallon Rheem Marathon electric. I've got gas run back to the shop, but I thought it would be nice to be able to turn it off durning the week when I'm not using it, just in case. Now all I have to do is wire it.

The compressor is now back in the compressor room and MUCH quieter there, next to the water heater.

Here lately, I've been working ON stuff IN the shop, not so much ON the shop itself so things have slowed down a bit. Here's the latest project: a CJ-7, we redid the rear end, with custom suspension, mounted a custom tank and swapped in a ford 9" axle to the rear.

DSCF0728.jpg


DSCF1015.jpg


Outboarded the front springs and swapped a Dana 44 with high-steer into the front:
DSCF1016.jpg


New front end, bumper, winch-plate, and this is what happens when your junk sits too long on the lift at my house:
DSCF1009.jpg


So that project pulled out about a week ago, and I've been cleaning up and trying to get stuff more squared away with all the little projects I've been ignoring.

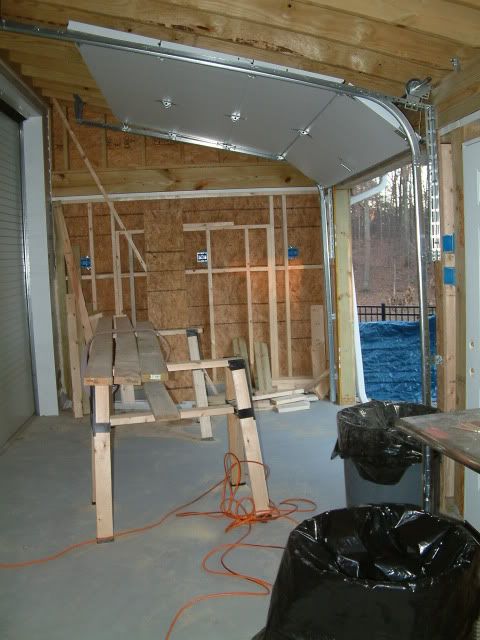
Ever since I put the rear door in, I've had an LM3800 laying around that I just haven't taken the time to install. Honestly, after reading a couple of posts here, I was dreading fooling with it. When they put my first one it, it was a package deal with the door and I was happy to pay. This time around, the guy wanted like $500 just to install the opener. I told him to go pound sand. He made it sound like they were just WAY too complicated to install. In retrospect, I'm glad I didn't.

Installation is stupidly simple:
1) put the collar on, tighten one side.
2) hang it on the shaft.
3) tighten the mounting bracket to the wall.
4) hook up all the sensors (it took me longer to get this done than anything, and it was mainly drilling holes to run the wires behind the walls/ceiling.
4A) The biggest deal with these is the cable tension sensor. I had to reposition mine twice so it would cycle smoothly. But it's only 2 screws, no big deal.
5) Set the travel limits (2 buttons).
6) Set the force (1 button).
7) learn the remotes and light.

All in all, I was done in about 3 hours at a liesurely pace, from start to clean-up and finish. When I got done I was purely pissed that somebody would have the stones to ask for $500 to install it. Glad I didn't pay!!!

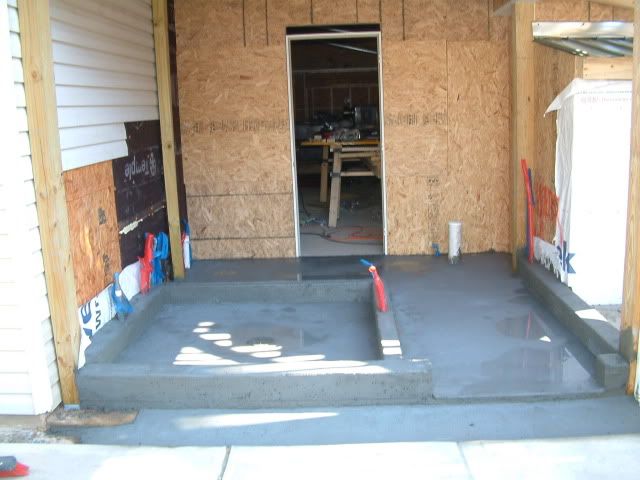
Well, enough rambling, back to insulating, framing and sheathing. :beer:
 

Mustanger

Well-known member
Joined
Feb 14, 2010
Messages
105
Location
VA
Great build - just read the whole thread in one sitting - couldn't get the earlier pictures to come up, but the close to finished product looks awesome! Great systematic approach to what you want.
 

hb_hound

Active member
Joined
Aug 7, 2008
Messages
41
Considering that the LAST one took a YEAR, I'm not sure how much I'm signing up for... Unless you're bringing the BBQ... :beer:
A year??????????????, I was thinking prior to the C&C in June :bounce:
BBQ can be arranged, and this time it will be a lot easier since you have already worked all the bugs out
 
To avoid these ads, REGISTER NOW!

mustangmccance

Well-known member
Joined
Sep 8, 2009
Messages
832
very cool build. It is cool that you built it in stages. I did it similar but different this time around, I had a large steel building assembled 40 x 60 and I have been gradually working on doing the interior. I am just now finishing my bathroom as well. It has been 2 years since I had the building built but it is coming along. I am considering a lift but I really like my open bay and I have 3 project cars permently parked in the other bay so I don't know yet. anyway cool project I will be following along as you finish it out.
 
OP
B

bluesman2a

Well-known member
Joined
Aug 16, 2005
Messages
1,312
Location
Atlanta, Ga.
any new updates? your garage is awesome!

Things have slowed down a bit. Not much that's photogenic at the moment. I'll try to get some update pics up in the next couple of days though.

Since the last update, we've pulled about 700' of wire for the machine shop. I've just about exhausted my supply of insulation (gawd I hate insulation). Today some buddies and I put up the OSB for the ceiling. Happy to have that done.

Also have most of my interior framing done, the shower is framed in. The dropped ceiling in the bathroom is mostly complete. Maybe one day I will get all the sawdust outta my machine shop!!!

Next on the agenda:
1. set the exterior windows in the machine shop.
2. paint the ceiling.
3. Get A/C unit mounted and functional.
4. hang lights in the machine shop for better night-time projects.
5. wire up hot water heater and compressor in utility room.

Longer term (most likely in the August/September timeframe):

1) get shower plumbing roughed in.
2) get gas plumbing roughed in.
3) get exterior siding finished.
4) get shower tiled and complete for use.

Man I will be SOOO happy to take the first shower in my shop, words cannot express.
 

Suprman

Well-known member
Joined
Nov 16, 2008
Messages
224
Things have slowed down a bit. Not much that's photogenic at the moment. I'll try to get some update pics up in the next couple of days though.

Since the last update, we've pulled about 700' of wire for the machine shop. I've just about exhausted my supply of insulation (gawd I hate insulation). Today some buddies and I put up the OSB for the ceiling. Happy to have that done.

Also have most of my interior framing done, the shower is framed in. The dropped ceiling in the bathroom is mostly complete. Maybe one day I will get all the sawdust outta my machine shop!!!

Next on the agenda:
1. set the exterior windows in the machine shop.
2. paint the ceiling.
3. Get A/C unit mounted and functional.
4. hang lights in the machine shop for better night-time projects.
5. wire up hot water heater and compressor in utility room.

Longer term (most likely in the August/September timeframe):

1) get shower plumbing roughed in.
2) get gas plumbing roughed in.
3) get exterior siding finished.
4) get shower tiled and complete for use.

Man I will be SOOO happy to take the first shower in my shop, words cannot express.

Thanks for the update, since i live in a apartment in midtown, i have to live through your build! i need to find some commercial space or something.
 
OP
B

bluesman2a

Well-known member
Joined
Aug 16, 2005
Messages
1,312
Location
Atlanta, Ga.
Well, it's been a while since my last update. Been working more IN my shop than ON my shop. I've about got it ready for winter (even though we're still in shirtsleeves here). Way behind the goals I had listed above, had to slow down and let my wallet catch back up to me.

On the main shop got the ceiling in and painted.
Got the lights set.
Got 95% of the electrical done.
Compressor is permanently wired, but still temporarily plumbed.

I'm not gonna post pics, cause frankly it's embarrassing at the moment.

BUT!!!

The wife and I just finiahed another little project in the attached garage... It was sadly in need of attention, other than some additional wiring, we hadn't really touched it since we moved in so we took advantage of some good weather to get in a quick project:

DSCF0893.jpg


DSCF0894.jpg


The downside of this is that now that my garage is clean and fresh, the garage fridge I got for free and runs just FINE seems wholely inadequate. It also underscores the need for some work on the floor and epoxy. The UP side is that since it's where 90% of our guests enter through, the wife is 110% onboard with the idea.
 
OP
B

bluesman2a

Well-known member
Joined
Aug 16, 2005
Messages
1,312
Location
Atlanta, Ga.
Well, it's been a busy couple of weeks. Finally got everything loaded back into the attached garage and setup the new fridge. I got a killer Black Friday deal on it at Sears.

DSCF0896.jpg


The old fridge is still awaiting haul-off, but it still seems a LOT smaller now that it's not empty.

Here it is with the wife's grocery getter:

DSCF0897.jpg


Now back to the real work in the shop... I've got a crew setup to come out and start on the last of the siding in the next couple of weeks.
 
Last edited:
OP
B

bluesman2a

Well-known member
Joined
Aug 16, 2005
Messages
1,312
Location
Atlanta, Ga.
Long past time for an update... LOTS of stuff happening since the last update...

Got the ceilings and upper walls insulated painted and lights hung up in the machine shop (no pics yet, it's a mess).

Got the windows installed before that. I particularly liked these, they are only about 10" wide and I got all three of them for $60 from a local supply house.
DSCF1132.jpg

DSCF1131.jpg


Got the siding finished so now most of the external work is done.
DSCF0969.jpg

DSCF0966.jpg

DSCF0964.jpg


So now we move on to the main meat of the interior for the shop... BUT I got side swiped into another issue with the wife (again). New decks this time.

So we have an existing deck that we're extending to attach to the back of the shop, adding two arbors for some comfy hammock time, and extending accross the entire back of the house.

First step: strip the old rails off the existing deck.
DSCF0956.jpg


Next step start framing the far side addition.
DSCF0963.jpg

DSCF0962.jpg


Granted we won't be able to enjoy the deck at this point until it starts to warm up some, but a) it makes the wife happy b) you can get a SCREAMIN' deal on a deck in the winter time when the deck companies are sitting on their hands.:pimpflash
 

4StarCstms

Well-known member
Joined
Mar 14, 2008
Messages
938
Location
Kentucky
Glad Im not fitting the bill for all this, I'd be broke for forever and a day I do beleive!

Looks Awesome thou
 
OP
B

bluesman2a

Well-known member
Joined
Aug 16, 2005
Messages
1,312
Location
Atlanta, Ga.
Glad Im not fitting the bill for all this, I'd be broke for forever and a day I do beleive!

Looks Awesome thou

Thanks for the kind words, guys...
Costs haven't been as bad as you might think. First, this entire build has been done with cash-outta-pocket. If I ain't got it, I don't do it. A lot of stuff I do myself and it's just material-cost plus my time. For other stuff, I shop around, I use subs I like or know on a personal level, some, I've traded work with. My welding/fab skills for their XXXX skills.

And frankly, if you have cash in this economy, there are opportunities you wouldn't normally see. With this new deck for instance, I was quoted some OUTRAGEOUS prices and figured that I'd just walk and DIY it later. As you may be able to tell by my scattered approach to projects, I just have too frikken many projects that need to get done at my place and not enough time to get them all done.

When I found out how much of my money Uncle Sam was gonna let me keep this year, I decided to take another look at decking contractors. Found a good one, with all the right construction methods I liked based less than a mile from my house. I would certainly not have gotten this kind of pricing had I decided to do this in better/warmer weather.
 
Last edited:
OP
B

bluesman2a

Well-known member
Joined
Aug 16, 2005
Messages
1,312
Location
Atlanta, Ga.
A bit more progress today...
The uprights for the arbors are mostly in, and all the framing is done... The shop is there on the far right.
DSCF0981.jpg


Little better view of the back of the shop.
DSCF0977.jpg


Looking from off the left side of the house back towards the shop
DSCF0974.jpg


From the top of the stairs in the 2nd story of the shop down on to the deck.
DSCF0972.jpg
 
OP
B

bluesman2a

Well-known member
Joined
Aug 16, 2005
Messages
1,312
Location
Atlanta, Ga.
Well, we've been having some rain, but the deck guys have still been kicking *** and taking names. Things have gone so well thus far that I've thrown them my secondary/DIY project to re-deck the existing/old deck. They're doing a pretty cool herringbone patern on it. Still not 100% complete but should be close by the end of the day.

DSCF0997.jpg

DSCF0994.jpg

DSCF0992.jpg

DSCF0991.jpg

DSCF0989.jpg

DSCF0985.jpg

DSCF0984.jpg
 
OP
B

bluesman2a

Well-known member
Joined
Aug 16, 2005
Messages
1,312
Location
Atlanta, Ga.
Bluesman, is that a Lagun mill? Love the setup!

Thanks for the kind words, guys...

No, it's a Hercules Ajax, as best I can tell it's a knock-off. I haven't had it operational just yet, it's on the project list.... Here's a pic of when I brought it home... It's a beast. Have I mentioned lately how much I love my lift?

DSCF0955.jpg


Only about 5 million other things to get straight before I can strart learning to work my machines...
 
OP
B

bluesman2a

Well-known member
Joined
Aug 16, 2005
Messages
1,312
Location
Atlanta, Ga.
So when we contracted having the decks built, there were several things we specifically wanted them to leave off, both for cost savings and because I wanted them done very specifically. The first was the rails.

We have a GREAT backyard with a pond and some woods. We frequently have deer and other wildlife and like to be able to see off the deck even when seated. I looked into cable railing systems but they were all stupidly expensive. Especially with the amount I had to run. There's a little over 400' of cable in these rails.

So with a little research I found that Lowes had about the best deals on hardware and turnbuckles, all aluminum/galvanized with vinyl coated galvanized 3/16" cable. Based on local codes, we had to space them 3.5" apart, so the top and bottom rail helped take up some space too.

It's kind of hard to see the cables because they disappear into the background just like we planned on.

7cce27e1.jpg

532f857c.jpg

b7b5b348.jpg

c68ff78d.jpg

c8365e7c.jpg


In addition to that, we have a neighbor on one side, and we don't want to look at her house when we're out there, plus the lattice does a nice job of blocking the later afternoon sun.

e3cfed2b.jpg


All in all I don't consider myself much of a wood-guy, but I think this turned out pretty well. Two tools I could NOT have done this without I picked up especially for this: a Lowes/Kobalt sliding compound miter saw, and a Makita impact driver.

The for the price the saw did everything I could have asked and more, it's no snap-on, but it's a solid little workhorse. For those of you who haven't used an impact driver vs. a drill OH MY GAWD!!! Never knew there was such a difference (and I have NICE drills), get thee to the tool-store!!!
 
OP
B

bluesman2a

Well-known member
Joined
Aug 16, 2005
Messages
1,312
Location
Atlanta, Ga.
To keep this somewhat shop related... This weekend pretty much finishes my commitment to the little-woman. The plumbers came late last week and did all the plumbing for the shop-bathroom and what I have come to think of as the "MAN-wash" (like when a car goes through a carwash, many jets/sprayers).

Here's a sample of the tile I chose for the shower:
79a974e8.jpg


Next week should see the tile guys coming in... :beer:
 
OP
B

bluesman2a

Well-known member
Joined
Aug 16, 2005
Messages
1,312
Location
Atlanta, Ga.
Gentlemen,

I give you: MAN-wash.

Shower-wall#1:
DSCF10252.jpg


To the right of that, shower-wall#2:
DSCF10232.jpg


Have you ever had one of those stupidly expensive projects that turns out to be TOTALLY worth it? My wife says this shower is one of them. :beer::pimpflash

Here we have the beginnings of MAN-vanity:
DSCF10202.jpg

things that should describe most man-accoutrements: stainless, roller-bearing drawers, on casters. I plan on framing this area out after the drywall goes up, mounting the sink up on the wall, and putting in some nice counter material to finish it properly.

Last but not least we have the MAN-Towel-bar:
DSCF10192.jpg

DSCF10262.jpg

Much like the TP dispenser previously showcased, this was my solution to the wimpy selection of towel bars out there. It can be used to hold towels, as a chin-up bar for midgets, or something to chain a pit-bull to. Speaking of which note the dog door for my killer-hounds:
DSCF1012.jpg


Things are still in a very rough state for most of it. I need to finish the electrical and insulation and then get the sheetrock guys to come out, then I'll be ready for the floor. I think I've decided on Epoxy for in here.
 
To avoid these ads, REGISTER NOW!
Top Bottom