To avoid these ads, REGISTER NOW!

Above 1200 Sq/FT Bald is Beautiful - 7k sq feet+ of Gruntledness

Wokspaces above 1200 squarefeet.
OP
T

tig

Well-known member
Joined
Feb 7, 2011
Messages
1,068
Location
Durango, CO
You may have seen my thread asking about Backyard Buddy lifts, but if not, here's the deets on my "new" lift.

After deciding a 4 post lift was what I wanted I started doing the research. I quickly decided that the BendPak HD-9 was what I wanted and started selling old computer parts and stuff on eBay to fund it (a great way to "defend" a purchase like this from the spouse :evil:).

Then over beer at a local bar (if you live near Bellevue, WA The Pump House is GREAT!) I was talking about my scheme with a friend. His friend who was there as well overheard me and said he had a friend who knew a friend who was selling a lift. Would I be interested?

I was confused by which friend was which, but by the next day I had an email in my inbox from the guy actually selling a 4 post lift. An ex-professional basketball player who was switching hobbies from muscle cars to pinball machines and needed room. He didn't want to Craigslist it for privacy reasons and was willing to sell it "aggressively" to someone less sketchy. I guess I was less sketchy because after a few emails back and forth with pictures and details we settled on a price. $1000.

This is for a Backyard Buddy 7000 lbs extended height lift, in barely used condition, with a rolling jack platform, rolling casters, and a set of drip trays. New this setup would go for north of $5K.

The challenge then became how I would move it to my house from his. He lives on an island in the Puget Sound.

The original plan was for me to rent a truck and head over there with a buddy and tools. We'd disassemble the lift, load it on the truck, and then re-assemble it at my house. I figured $100 to rent the truck and 6+ hours of disassemble/re-assembly.

I called Backyard Buddy and asked for their advice on disassembly. I wanted to know if they had any tricks or techniques to make it as easy as possible. The guy I spoke to asked me "Does the lift have the rolling casters? If it does, it will roll right onto a large flatbed tow truck."

Given the lift had the casters I was in luck and this idea made a lot of sense. I called around the tow truck companies in my area and found one with a tow truck large enough (the BYB lift is actually just over 9' wide at the base of the posts and the bed of the tow truck would have to be flat; some have rails on the sides).

The fee for the tow truck would be expensive: $100/hr. I decided that even if it took 5 hours it was worth the trouble/labor of assembly disassembly so I pulled the trigger (in the end I paid for 3.5 hours plus ferry fees).

Two days after first communicating with the seller I was on the ferry to the island:
5432818078_f20fa98e12_z_d.jpg


At the seller's house I got a quick tour of the pinball machines and video games, checked out his Mustangs, and rolled the lift out of his garage onto the driveway:

5432208459_9539d877a3_z_d.jpg


The tow truck arrived shortly after I did and it took us only a few minutes to get it on the truck and tied down. I followed him to the ferry terminal:

5432818526_2bbe72c255_z_d.jpg


I had asked a buddy to meet me at my house to help unload the lift. Unloading went well...until the truck driver moved the truck forward AFTER we had loosened the straps and the right front side of the lift rolled off the truck!

I wish I would have taken a picture but I was to freaked out. Fortunately it only came partially off the truck and it was really simple for the 3 of us to push it back on. No damage was done. But it was scary.

We got the lift off and slid it into the garage...
 
To avoid these ads, REGISTER NOW!
OP
T

tig

Well-known member
Joined
Feb 7, 2011
Messages
1,068
Location
Durango, CO
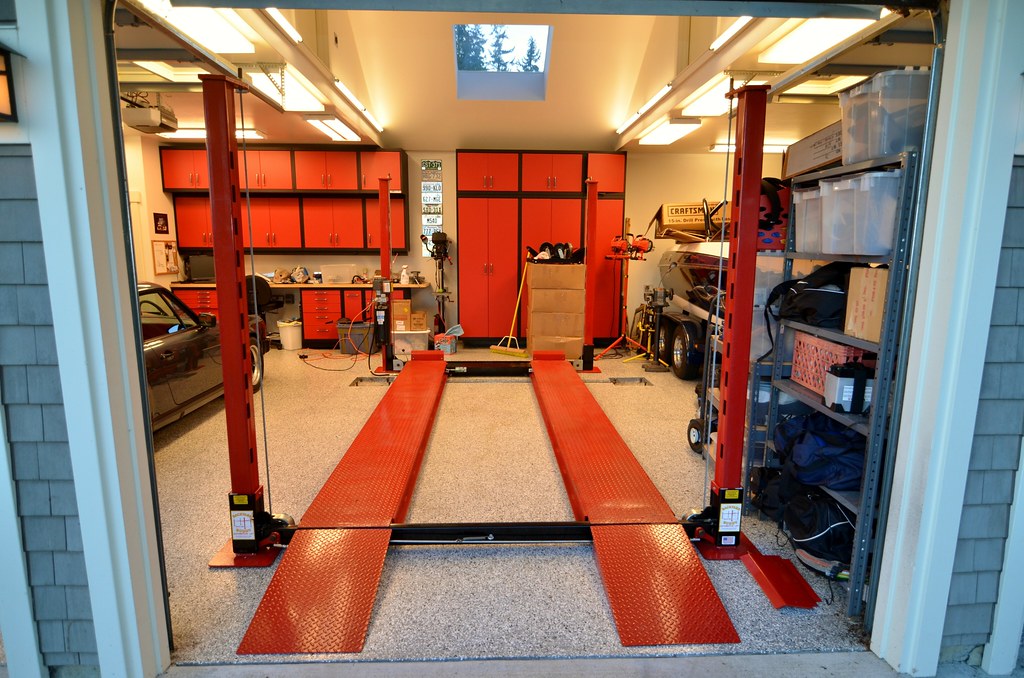
Here's what the lift looks like in my garage:

5432853638_9c6353ee27_b_d.jpg


5432242679_efc49bd6ac_b_d.jpg


5432854076_bc3db0ec77_b_d.jpg


5432855356_4b0021c8ca_b_d.jpg


I am going to change the electrical connection to the lift motor over to 220v (the motor can support either) because I have a 220v plug in the ceiling right above the power post.

I am also working on getting a rolling bridge jack, but that is going to require some adaptation (see my thread on the topic).

I also need to fill/cover the hole in the floor where the 2 post lift was going to go. My currently thinking is to get a piece of diamond plate steel fabricated and painted red!
 

markito

Well-known member
Joined
Feb 13, 2009
Messages
136
you sir in my opinion have the best/nicest garage ever! that's my dream garage! thanks for sharing and enjoy!
 

On Edge

Well-known member
Joined
Jan 25, 2005
Messages
110
Location
Cincinnati, OH
I don't know what is more impressive...

The garage...

The cars....

or the view!

I love the story you told of the whole process. That is some 40th birthday present you got there. I love the colors of the garage. Are the cabinets smooth or do they have a wrinkle finish to them? In one of the pictures up close of the floor and the cabinets it kind of makes the cabinets look wrinkle and almost a matte finish. Either way the look stunning!

Ryan
 
OP
T

tig

Well-known member
Joined
Feb 7, 2011
Messages
1,068
Location
Durango, CO
In one of the pictures up close of the floor and the cabinets it kind of makes the cabinets look wrinkle and almost a matte finish. Either way the look stunning!

Ryan

Glad you like it. I know I do!

The cabinets are a matte finish. It does have a light texture.
 

Motown 454

Well-known member
Joined
Sep 25, 2008
Messages
1,359
Awesome find on the lift. If you said it was brand new I would believe it its so clean. How tall are the posts and your cieling in the center? That was a great idea to use the ramp truck. If it was me I would have taken it apart muscled it home then called to ask a question, then I would've found out that idea. lol I love that Landcruiser!!
 

glsmaverick

Well-known member
Joined
Dec 22, 2009
Messages
141
Location
Mid Michigan
Awesome garage.

I love the skylights; do you feel they add a decent amount of light to justify the cost? I have them in my home over the living room and would love to put a couple in the garage as it is a south facing roof that would get sun 80% of the day.
 
OP
T

tig

Well-known member
Joined
Feb 7, 2011
Messages
1,068
Location
Durango, CO
Awesome garage.

I love the skylights; do you feel they add a decent amount of light to justify the cost? I have them in my home over the living room and would love to put a couple in the garage as it is a south facing roof that would get sun 80% of the day.

the skylights are nice, but they don't really add that much light when the lights are on. Just a nice touch I think. Probably not worth it.
 
OP
T

tig

Well-known member
Joined
Feb 7, 2011
Messages
1,068
Location
Durango, CO
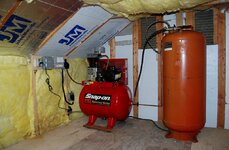
Just for grins I took a photo while up in the attic installing the compressor:

5513020700_c9754794ec_b_d.jpg


The compressor is installed (thread here) and all working!

5513224644_8c5714701d_b_d.jpg


We've also poured the concrete to fill in the floor where the 2 post lift was to go. I'm having a steel diamond plate cover made, powder coated red, to sit in there. I did not want to paint the new stuff because I really don't think it would hold up well and the red cover will just look cool.

5513247354_d69330770c_b_d.jpg
 

wormwood

Well-known member
Joined
Apr 9, 2010
Messages
950
Location
Dixie
You paid $1000 for that BYB!!!

You are right, the original price is >$5000, ask me how I know! :(
 
Last edited:

6SpeedBowtie

Well-known member
Joined
Feb 7, 2005
Messages
70
Location
WV / MD
Just fantastic!!! :bowdown: I love how you did the garage, and truly love your vehicle selections. That Porsche is in outstanding condition, and I love the color. Do you Daily drive the Toyota?

I really like the design of the garage, how you oriented it on the lot, and how you finished it (inside and out). Do you have any pics of your house -- does the architecture/style of the garage match that of the house??

The BYB couldn't have worked out better for you --- saved a ton of money, was easy to set-up/install, and the color even coordinated with your garage decor. You were definitely meant to get that lift.

The acquisition of our "toy" was somewhat similar to yours. I talked my wife into my dreamcar by illustrating the fact that at the time we only needed two seats, so why not go ahead and get the car. Ours turned into a bit of a garage queen much quicker, and plan to keep it around for a LONG time.

:beer:
 
OP
T

tig

Well-known member
Joined
Feb 7, 2011
Messages
1,068
Location
Durango, CO
I'm running another thread that documents my adventure in finishing my air compressor system. It's almost done. All that remains is to hook up a few more fittings and build the system that will let me control the power remotely via my home control system.

The short story is I found a Snap-On BRA5140H compressor on Craigslist for $850. It came with a second 60 gallon tank. I've hooked them up in series and installed them in the attic where the noise is minimal. I used a automatic drain valve as well.

Here are some pics:

Here's the attic with the compressor and 60 gal tank all plumbed in.
5513224644_8c5714701d_b_d.jpg


Here's the auto-drain.
5512628349_3a708fe99d_b_d.jpg


The auto drain is pumbed to a tube that runs out the eve of the garage to the ground:
5512627423_69ce3c1872_z_d.jpg


And the plumbing to the 60 gal tank and my air regulator/filter:
5512628799_878578db2d_b_d.jpg
 

rickairmedic

Well-known member
Joined
May 31, 2005
Messages
4,165
Location
louisville ,Ky
I think my favorite pic sofar is the onew looking down from the attic where we can see that the tops of the workbenches are covered over. This tells me you are using the space and not just using it to store the pretty toys :D.


Rick
 
OP
T

tig

Well-known member
Joined
Feb 7, 2011
Messages
1,068
Location
Durango, CO
I think my favorite pic sofar is the onew looking down from the attic where we can see that the tops of the workbenches are covered over. This tells me you are using the space and not just using it to store the pretty toys :D.

Or, it means I'm a slob :rocker:

Seriously, I really like that photo too.
 

bazzateer

Well-known member
Joined
Oct 8, 2009
Messages
6,075
Location
Watford, Great Britain
Exactly 2 years ago I was a few miles across town from you in Ballard visiting a friend. That is a beautiful part of the world. I'll re-visit in a few years time.

I wonder if there's a way I can steal your view?......................................
 
To avoid these ads, REGISTER NOW!
OP
T

tig

Well-known member
Joined
Feb 7, 2011
Messages
1,068
Location
Durango, CO
Beautiful garage!

What happened to the cabinets in front of the lift?

Oh. That?

I wondered if anyone would notice...

I decided to move them to make more room in the "working" area. I moved them to the 3rd stall where I used to have some steel shelves from Home Depot.

This way I can have real room for my drill press, grinder, and (eventually) blast cabinet. I also now have some place to hang some posters! :thumbup:
 
OP
T

tig

Well-known member
Joined
Feb 7, 2011
Messages
1,068
Location
Durango, CO
Sweet compressor set up.

Thanks. I just completed a little upgrade: The power to the compressor and to the auto-drain valve are now controlled via my home control system. Note the pump-start relays in this photo.

The compressor power turns on whenever motion is detected in garage or a garage door opens. It stays on for 3 hours after the last motion/door open event.

5566088253_5acc579828_b_d.jpg

Details here.
 
OP
T

tig

Well-known member
Joined
Feb 7, 2011
Messages
1,068
Location
Durango, CO
I know it's really a trivial job, and that I'm insanely spoiled, but I just have to rave about this. I've imagined having a lift and always available compressed air for soooo long...

This morning I swapped the winter tires off my daughter's car. I felt like such a pro putting the car up on the lift, using the air hydraulic jack to lift it, and using my air impact wrench to pull the bolts. I then used my air compressor to ensure the summer tires were inflated correctly.

I'm sure I shaved at least 10 minutes off the job of doing it "the hard way". :lol_hitti

Totally worth it.

5571792920_6b513edce6_b_d.jpg
 

427cobra

Active member
Joined
Mar 24, 2008
Messages
39
Location
Fresno CA
This is one of my favorites on garage journal. Love the whole setup including the air compressor location.
 

texasguy

Well-known member
Joined
Mar 24, 2011
Messages
55
Location
North Texas
tig - an outstanding place. great use of color and space. And kudos for keeping the FJ stock and extending it's life - you did an excellent job.
 
OP
T

tig

Well-known member
Joined
Feb 7, 2011
Messages
1,068
Location
Durango, CO
That is a great looking garage. DROOL:bowdown:

This is one of my favorites on garage journal. Love the whole setup including the air compressor location.

Thanks guys.

tig - an outstanding place. great use of color and space. And kudos for keeping the FJ stock and extending it's life - you did an excellent job.

It's a work in progress, but has been very rewarding. I love the attention it gets when I drive it; it's really fun meeting people who ask "What year is that? I had a **; aren't they great?"

That compressor controller is slick! I would love to get a lift for my garage.

It was an interesting project/adventure figuring how to make the controller work. I love it when a vision comes together.
 
OP
T

tig

Well-known member
Joined
Feb 7, 2011
Messages
1,068
Location
Durango, CO
Today's garage project was to clean up the home control panel for the upper garage.

I wish I could find a picture of "before" because the difference is shocking...

In the garage I have a home control panel/box (on the West wall) that contains

  • Ethernet switch that connects the main house Ethernet network into the garage
  • A Ethernet to RS-485 bridge (Lantronix) that enables my home automation server to control & monitor the devices listed below via a set of RS-485 controlled ADICON digital I/O controllers:
  • Lighting & fan patch panel for the Lutron lighting system
  • Security camera feeds (two for the upper garage)
  • Security system extender
  • Garage door actuators
  • Temperature sensor
  • Irrigation system (12 zones + a pump)

A bunch of these things require power supplies. Previously I had 3 different 12v DC wall warts, and 3 24VAC wall warts connected via two power strips powering all this ****. To say that I didn't plan for enough outlets here when we built the house is an understatement.

I wish you could have seen the spaghetti of power supply cords, power strips, etc. that were in place before today. I couldn't come close to closing the door of the panel and God forbid someone other than me ever tried to change something... it really was a mess.

The installation of the air compressor in the attic, and the requirement for an additional 24VAC power supply to feed the pump-start relays pushed me over the top and motivated me to finally fix it.

Step one was to buy a wall mount 24VAC power supply that had 4 independent fusable outputs. Here's what it looks like installed:
5573528576_b184ee890a_b_d.jpg


This replaced the 3 24AV wall warts and could accommodate the new compressor relays.

I drilled a hole in the side of the panel, through the 2x4 and pulled some romex from the 110V socket at the bottom of the panel to where the new power supply would go. This meant none of the 24VAC loads would require one of the two receptacles in the panel.

I then ran the 24VAC lines out of the new power supply back through that hole into the panel and wired them in.

I had a separate 12V power supply for the RS-485<->Ethernet adapter and the digital IO devices. Both take 12V and use less than 0.5amps. So I picked the best of the two 12V power adapters and wired it to both devices. That left the one remaining 110v receptacle available for the wall wart for the Ethernet switch.

And here's the panel all cleaned up nice (or as nice as it will ever be):
5573528348_9f72ae1420_b_d.jpg


(BTW, the picture above was stitched together automagically from 3 different photos using Windows Live Photo Gallery's panorama feature.)
 
Last edited:
OP
T

tig

Well-known member
Joined
Feb 7, 2011
Messages
1,068
Location
Durango, CO
The replacement hose reel from Griot's came today. I installed matching Craftsman regulator/filters and hooked it up. Pictures below.

I have two regulators here so that the hose reel can be set to ~85 PSI as most of my tools require 90 PSI MAX but my Bend-Pak RJ45 bridge jack can take up to 120 PSI and it operates faster the more pressure it gets.

I still have to fabricate the final hose for the jack; for now I have a quick connect up there and a temporary flexible hose I use.

5601304891_fc026ef771_b_d.jpg


5601889966_766b60fa58_b_d.jpg


I did not realize Griot's Garage had such a FANTASTIC return policy. They replaced my 5 year old hose reel that was leaking for a brand new one, no questions asked. They even paid for shipping. I'm a huge fan.

It's an extra bonus that Griot's colors are red & black just like my garage theme!

It was a nice day in the Seattle area (!) so I took advantage of it and gave the Porsche a bath. I spent extra time detailing the Fuch wheels. The trick to keeping these wheels looking new is to use very mild/pH balanced cleaner (I use P21S Wheel Cleaner), never use anything abrasive (they are anodized), and apply a light coat of petroleum jelly after clean.

5601888924_c34c7bbd35_b_d.jpg


5601889188_c9a2713c3c_b_d.jpg
 

santagary

Well-known member
Joined
Mar 23, 2010
Messages
821
Location
Pagosa Springs, Colorado
Nice digs, FJ, garage, Porsche...makes me miss my 2001 Boxter I just sold, but we bought a 2011 Jeep Wrangler...we'll use that more here in the Rocky Mountains, jeep trails etc., plus we can use it in winter. The Porsche here was a 5 month car, what with all the snow and mud the other 7 months. None of my business, but what's your profession??;)
 
Last edited:

JMartel

Well-known member
Joined
Jan 4, 2009
Messages
1,403
Location
Seattle, WA
Awesome garage, awesome cars, awesome location. I'm very jealous of all of it (I want to move to Seattle in the next few years)
 
OP
T

tig

Well-known member
Joined
Feb 7, 2011
Messages
1,068
Location
Durango, CO
Today I did phase one of a "detail" of the garage. I had been really lazy about putting stuff away and cleaning. So today I put most everything away and tomorrow I will deep clean (if my wife gives me garage pass :headscrat).

Before:
5513020700_c9754794ec_b_d.jpg


After:
5604952734_07b1671fcd_b_d.jpg


A panorama:
5604367325_c6c6bf3737_b_d.jpg
 

xcgates

Well-known member
Joined
Apr 7, 2008
Messages
678
Location
TX
She's got 1/2 a tank, and new front rubber, how fast can you get here?:3gears:
 
OP
T

tig

Well-known member
Joined
Feb 7, 2011
Messages
1,068
Location
Durango, CO
Well, until I pull the boat out of the 3rd stall for the summer (sometime in May) this is as clean as it's gonna get.

5607412784_e42289ae36_b_d.jpg
 

ssleepingbeauty

Well-known member
Joined
Jan 17, 2006
Messages
106
Location
Washington
Awesome build! So is this near Lake Sammamish? The reason I ask is, I have bean spending the last 4 1/2 months working on the build of the new Swedish Hospital up on the hill in Issaquah. And not a day goes by where I catch myself in a window enjoying the view of the lake and the surrounding mountains. :lol:

We are truly blessed in the NW :thumbup:
 
To avoid these ads, REGISTER NOW!
Top Bottom