To avoid these ads, REGISTER NOW!

Between 265 & 485 SQ/FT 1950s Craftsman Garage retro remodel

Workspaces sized between 265 and 485 squarefeet.

GirlnAgarage

Well-known member
Joined
Jan 21, 2011
Messages
4,669
Location
Texas
Red Leader, I'm all caught up now. Congratulations on your new arrival....a little bit belated I think :lol:

My opinion on the floor color you should keep it light. Use the tan for the majority and accent with the blue.

Keep it coming. Great read :beer:
 
To avoid these ads, REGISTER NOW!
OP
R

Red Leader

Well-known member
Joined
May 15, 2011
Messages
2,689
Location
Denver, CO
Okay guys, here are the different floor plans I could do with all these new thoughts in mind. Does one stand out to you?

#1
floordesign9.jpg


#2
floordesign1.jpg


#3
floordesign2.jpg


#4
floordesign4.jpg


#5
floordesign5.jpg


#6
floordesign6.jpg


#7
floordesign7.jpg


#8
floordesign8.jpg
 
OP
R

Red Leader

Well-known member
Joined
May 15, 2011
Messages
2,689
Location
Denver, CO
Hey hey, just thought I would stop by and show you my newest purchase! (thanks to you!)
1002222o.jpg

By bobcat719 at 2011-09-26
for some reason I could not get them to show up like this on my thread, so check the others out on my page, and maybe some day soon I can upload them like you do! Thanks for all the advice, and encouragement to go out and buy this stuff, it is soooo much better than anything you could buy today new.

BK

Very nice 1950s Craftsman grinder! Good score!!!:thumbup:
 

Wingnut65

Well-known member
Joined
Apr 21, 2010
Messages
3,170
Location
Tampa Bay, FL
I like #1, but would like to see if with the inside stripe half as wide. This would give two sizes of lines. I'm afraid #3 with the pinstripe would not be as noticeable or the pinstripe would wear off too easily. Although #5 is not bad bringing the colors together.

Easiest way to resolve the issue, ask Mrs RL.
 

ddrewyor

Well-known member
Joined
Dec 23, 2007
Messages
250
Red Leader,
awesome build! Just a thought if it has not been mentioned is to have the floor "mud jacked" until level. We had a company come in and do our approach and front walkway for about $400. They drilled some holes in the cement and pumped a slurry underneath until level. Worked great and relatively inexpensive.
Also, if you still have a radial arm saw, look for a blade that has a low or negative hook to the tooth. That way it will not grab and pull forward or try to climb the piece being cut. Take care

Dave
 

GirlnAgarage

Well-known member
Joined
Jan 21, 2011
Messages
4,669
Location
Texas
#1 and #3, but more #3. And on #3 make the pinstripe line a little bit thicker to equal the tan stripe width.
 
OP
R

Red Leader

Well-known member
Joined
May 15, 2011
Messages
2,689
Location
Denver, CO
Everyone, thanks for your thoughts.

I can do this one of two ways.

1. Get half beige, half blue, and lay down some massive blue on the floor

OR

2. Get the full beige kit, then get a 'touch up' kit of blue good for 60 sq ft.

If I was to do a smaller trim stripe, it would have to fall under 60 sq ft.

Okay, so lets say I do the first stripe 2 ft from the border. my garage pad is 19x21. So that would be 17ft of stripe on two sides, and 15ft on the other. Now multiply each one by 2 (17x2 + 15x2) and that gives me: 64ft. Now, lets say I make that stripe 4 inches. Per foot, it would be a 4x12" stripe, which would be 1/3 of a foot. So I take 64/3= 21.3.

So the #2 design up there would require 21.3 sq ft of coverage. That leaves me with plenty to do a second stripe. And the second stripe would be smaller. Lets say I do the 1 large stripe and 1 small stripe (6" and 3") with 4" in between. Okay this is getting tough:D

the 6" stripe would be the 64/2 which = 32 sq ft. So then the second stripes perimeter would be 2ft 10" from the walls, which would give me 15' 4" x2 and 13' 4" x2, which would be 30' 8" + 26" 8" = 57' 4". Since the second stripe would be, lets say 3", I divide by 4 and get 14.3 ft.

So then, 32 + 14.3 = 46.3, way under the 60sq ft max of the touch up kit. So I could get away with 2x 4" stripes, 1x 6" stripe and 1x 3" stripe, or various other similar combinations.

I apologize if this post made people's heads hurt:D
 
To avoid these ads, REGISTER NOW!

Nightshift

Well-known member
Joined
Jan 13, 2005
Messages
295
Location
London, Ontario
Okay guys, here are the different floor plans I could do with all these new thoughts in mind. Does one stand out to you?

#1
floordesign9.jpg


#2
floordesign1.jpg

My preference is #2. But #1 would look great also if you have your heart set on a double stripe. Cheers, Bill

ps ... you might try turning your images horizontally ... since that's the way you'll see most of the floor with the overhead door up. Ya never know ... it might change your perspective on the pattern.
 
Last edited:
OP
R

Red Leader

Well-known member
Joined
May 15, 2011
Messages
2,689
Location
Denver, CO
Red Leader,
awesome build! Just a thought if it has not been mentioned is to have the floor "mud jacked" until level. We had a company come in and do our approach and front walkway for about $400. They drilled some holes in the cement and pumped a slurry underneath until level. Worked great and relatively inexpensive.
Also, if you still have a radial arm saw, look for a blade that has a low or negative hook to the tooth. That way it will not grab and pull forward or try to climb the piece being cut. Take care

Dave

I do appreciate the thought - I have thought about it. However the raised lip on one of the concrete pads is only in one corner and the other end doesn't drop below the other pad next to it. Perhaps even more than that though is the fact that it would be $200-$400 even before epoxy goes down, which would be me doing a tile floor:D
 

ddrewyor

Well-known member
Joined
Dec 23, 2007
Messages
250
Not every solution is a good one for each individual, it's just nice to have all the options on the table to possibly choose from. Incredible thread!

Dave
 

GirlnAgarage

Well-known member
Joined
Jan 21, 2011
Messages
4,669
Location
Texas
Not every solution is a good one for each individual, it's just nice to have all the options on the table to possibly choose from. Incredible thread!

Dave


Uh we're expecting him to change the floor design every moth to suit each one of our suggestions. :dunno:


:lol:
 
OP
R

Red Leader

Well-known member
Joined
May 15, 2011
Messages
2,689
Location
Denver, CO
All,

I'm just throwing this out there...but let me know if there is anyone located in NJ who reads this thread.

I'm looking at some tools out there (very, very nice tools) and might need a hand in picking them up. This 'source' also has some other tools that I either don't have the interest, $$, or room for.

Here is the deal - if anyone can help me pick up some tools, it looks like all the others are fair game. If you are in NJ and are interested in some incredible woodworking tools, I guarantee you it will be worth your time. Think pennies on the dollar.

PM me for details:)

-RL
 

Wingnut65

Well-known member
Joined
Apr 21, 2010
Messages
3,170
Location
Tampa Bay, FL
Dave,

Try taping the lines down with the blue tape and then set your tools against the wall. I think a line 2' off the wall will still be under all your toys, I mean tools. The lines may need to start 3' out or more to be visible and give you the effect you (and we) are looking for.

Also, I think a full order of Beige and accent in Blue. Too much blue on the floor and walls will make the place darker.
 

shopnut

Well-known member
Joined
Feb 22, 2006
Messages
4,237
Location
Florida
I guess I really haven’t selected one of your eight floor choices yet since they were presented, so here it goes. In recommending not just what looks the best, but what is a complete solution, I must first look at all the aspects of the job and consider the following:

Assumptions/Constraints:
- Outer perimeter of beige in choices 1-8 is not part of the floor scheme (duh - had to say it).
- The blue from mfr matches your wall blue
- The beige from mfr is acceptable as is
- Entire batch of one color must be mixed and applied at once. (Eliminates possibility to do base color on right side one day, then left side the other). Other color(s) are applied as second or third steps.
- You are not going to come back and apply a stripe of the same color on a later date (this would require a touchup kit of the base color, right?)
- Need staging area inside garage to put machine tools while floor is being finished. (this one is key from my understanding)


The only choices that satisfy all these conditions are choices #5, 6, and 8, since the tools can be staged along the wall while the middle base color is applied (or visa-versa). From a purely looks standpoint, I like #7 best, but it doesn’t meet all needs and I had to throw it out. Perhaps a touchup kit of beige would make this option viable again since it can be applied after the tools are moved to the middle.

#6 doesn’t really do anything for me.

From early on, #8 seemed like a great solution to me. It’s a two step process that satisfies all your needs and it looked good in remington’s rendering. It’s runner up for me.

The winner is now #5 for me, assuming you do the same on the walls. I would really like to see that one rendered to be certain. Perimeter line widths could be varied to suit presonal preference. In my opinion, I think the place would look better with a little more “pop” and you already have black accents elsewhere. The extra black stripe will help the tools from just blending in to the wide blue stripe when sitting around the perimeter. Three colors will require 3 steps, so more work is involved, and it will be harder to touchup later. In the grand scheme of things, however, the extra work for that black stripe is really nothing. And as far as touchup goes, my epoxy has been down now for 6 years without needing any touchup, and I’m not easy on it.

Okay guys, what wrong assumptions did I make? What did I overlook?

Sorry this was so long RL - just trying to help with your decision making process.
 
OP
R

Red Leader

Well-known member
Joined
May 15, 2011
Messages
2,689
Location
Denver, CO
The only choices that satisfy all these conditions are choices #5, 6, and 8, since the tools can be staged along the wall while the middle base color is applied (or visa-versa). From a purely looks standpoint, I like #7 best, but it doesn’t meet all needs and I had to throw it out. Perhaps a touchup kit of beige would make this option viable again since it can be applied after the tools are moved to the middle.

Shopnut,

Wow, thank you for such a detailed examination of the options. Thats awesome.

Are you saying that those 3 are the only ones that work because they are the only ones that don't have an isolated beige stripe in the center?

Also, when you talk about mixing and laying down the flooring (I have very limited knowledge of this), are you referring to doing the outside perimeter first (with tools in the center), then doing the center (tools on the edges), then hiding the eopxy joint lines where they meet with the blue stripe or whatever design?

How were you imagining the floor going down?

I was thinking that if I did #1, I would completely tape and shield off the blue stripe areas, lay down the inside (or outside) perimeter, throw some chips down, then once dry, move the tools and do the other beige part, throw down chips, then after that dries mask off the bare concrete strip and do the blue stripe.

Sounds like if I do 2 colors of anything, I'd need to let it all completely dry then scuff it up a bit before laying down the clear coat. I don't mind doing several steps, but since you have thought about this in detail, it would be good to know the steps or reasons you feel that might make all the other designs non-workable. Or, in other words, what are the limitations, in your mind, that make all the designs other than 5, 6, and 8 impractical?

Thanks again for your great feedback!!!:thumbup::beer:
 

shopnut

Well-known member
Joined
Feb 22, 2006
Messages
4,237
Location
Florida
I was thinking that if I did #1, I would completely tape and shield off the blue stripe areas, lay down the inside (or outside) perimeter, throw some chips down, then once dry, move the tools and do the other beige part, throw down chips, then after that dries mask off the bare concrete strip and do the blue stripe.

MORE detail? Are you sure? Well, okay.

First off, one of my assumptions states the beige would be done in one application. I was following this thread pretty closely, but maybe I missed the fact that the beige can be done in two separate applications on different days. Your quote above makes it sound like this is a possibility. Is Epoxy-Coat splitting it up for you? If you are splitting it yourself, you will need to be very careful to get the A/B ratio correct. If the beige can be applied in two separate batches, then really the sky is the limit as far as color schemes go.

With my original assumption of a single beige application, #5, 6, and 8 are the only ones that offer a "beige-free" perimeter large enough to phyically store your equipment while the center is being applied.

For comparison sake and assuming 2 batches of beige CAN be applied, AND you have enough blue to do it, I would apply #1 scheme as follows:
- Move equipment to center (I would apply perimeter first so the more noticable center has less chance of getting scratched in the end)
- Roughly mark some guide lines in the center of the future beige stripe and about 4" into the future beige main center from the innermost blue stripe. These guide lines are just small bits of tape every 12" or so.
- Apply blue coat. Save epoxy by getting only 100% full coverage were it will eventually be needed in the two blue stripes and feather it out (to 0% coverage) up to your guide lines. My epoxy was thick and any tape line would have left a pronounced line you can feel. (If blue epoxy is plentiful, skip the outer guide line and apply the entire (2') blue perimeter and follow up with the beige stripe to save time and effort)
- Let dry
- Tape off single beige stripe in perimeter and apply
- Apply clear coat to perimeter (if doing this)
- Move equipment onto perimeter (see caster note below)
- Tape off and apply main center beige
- Apply clear coat to center (if doing this)
- Enjoy!

Casters - I would strongly suggest you get your equipment up on locking casters. It will make this job and future garage life much easier. It will also protect your epoxy for years to come. See if there is an industrial surplus store that has recycled ones to save some money on high quality units.

You already know how I feel about flakes.

One last note: I think I would keep the black accent stripes on the wall and floor fairly narrow.
 

flybefree

Well-known member
Joined
May 18, 2008
Messages
1,111
Location
Ohio/Kentucky
Shopnut, think you gave a great answer. I have only done one floor with epoxy and I was just assuming he would do the background beige first and wait two days then apply the accent colors. I would ask the dealer, but I think you would be safe to mask after 48hrs. I did the "move everything around" kabuki in my garage and it was not fun...plus the two cans of beige ended up not matching pefectly. I know, I know, I should have mixed them together, but I was nervous about potlife and I blew it a little.

Personal opinion: only two ways to do chips...light random dusting or broadcast to rejection. I was chip challenged as well.

Shaun
 
OP
R

Red Leader

Well-known member
Joined
May 15, 2011
Messages
2,689
Location
Denver, CO
Guys,

Great ideas fellas. I appreciate your insight. I know Epoxy-Coat sells 1/2 floor kits (250sq ft) so maybe I can do is ask Christine at E/C to send me 2x 1/2 kits instead of the full thing. This breaks it up into two packages. I'll see what she can do.

If I can do that, I am really leaning towards either the double stripe or 2 stripe pattern with 1 thick stripe and one thin.

Shopnut I was checking out your floor and it looks like you didn't use any chips, correct?

I think I'll have to use them to cover up some of the imperfections in the floor.

And with that, here are some samples! I was playing around with this a few nights ago and thought I'd take some pictures just to see what everybody thought (is this getting old? I hope not!)

In any case, if something stands out to you, let me know.

I'm gonna have to order this thing from them at some point!:lol:

Okay, here they are (there are a LOT of them)


#1
p9264401.jpg


#2
p9264402.jpg


#3
p9264404.jpg


#4
p9264405.jpg

By daveamy at 2011-09-27


#5
p9264407.jpg


#6
p9264408.jpg


#7
p9264409.jpg


#8
p9264411.jpg


#9
p9264412.jpg


#10
p9264413.jpg


#11
p9264414.jpg


#12
p9264417.jpg


#13
p9264420.jpg


#14
p9264421.jpg


#15
p9264422.jpg
 
OP
R

Red Leader

Well-known member
Joined
May 15, 2011
Messages
2,689
Location
Denver, CO
My preference is #2. But #1 would look great also if you have your heart set on a double stripe. Cheers, Bill

ps ... you might try turning your images horizontally ... since that's the way you'll see most of the floor with the overhead door up. Ya never know ... it might change your perspective on the pattern.

Thanks for your feedback Nightshift. Actually, the overhead door is facing up in relation to the orientation of the pictures. My garage is more long than it is fat. Maybe it's a weird garage?

:)
 
OP
R

Red Leader

Well-known member
Joined
May 15, 2011
Messages
2,689
Location
Denver, CO
Dave,

Try taping the lines down with the blue tape and then set your tools against the wall. I think a line 2' off the wall will still be under all your toys, I mean tools. The lines may need to start 3' out or more to be visible and give you the effect you (and we) are looking for.

Also, I think a full order of Beige and accent in Blue. Too much blue on the floor and walls will make the place darker.

Good thoughts Jeff - I'll have to take a look see at what a 'general' tool line away from the walls is - the 18" bandsaw would be a good place to start.
 

GirlnAgarage

Well-known member
Joined
Jan 21, 2011
Messages
4,669
Location
Texas
Oh man, look at those color combos. I'm gonna need to spend a little time before I give my preference. They all initially look great. Each color change makes such a subtle difference it is hard to choose. That's a pretty good problem to have.
 

GirlnAgarage

Well-known member
Joined
Jan 21, 2011
Messages
4,669
Location
Texas
And fyi, today I was staring at my garage door hardware as I tried to bend up some drawers. Thanks alot Red Leader :lol_hitti
 

GirlnAgarage

Well-known member
Joined
Jan 21, 2011
Messages
4,669
Location
Texas
Ok what I did was scroll up and down through the options watching for the one that jumped out at me . The winner was #6 for me .


Rick


So I tried that. #15 is getting the initial notice

Oh, don't have adult beverages and try that scroll thing.
 
OP
R

Red Leader

Well-known member
Joined
May 15, 2011
Messages
2,689
Location
Denver, CO
Okay, so...

This is one of those 'tool accountability' posts.

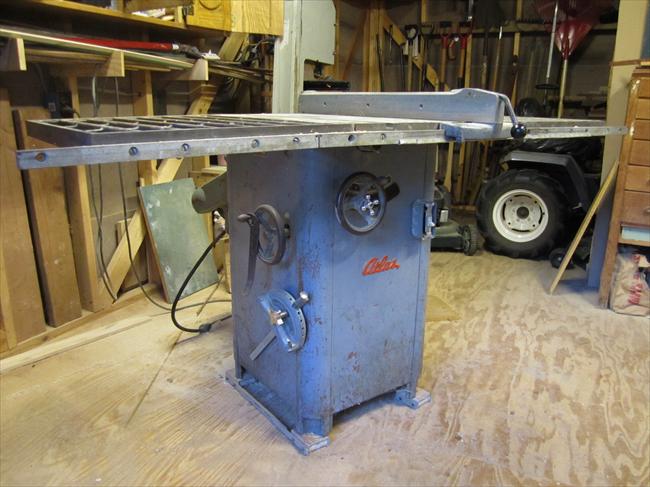
I picked up an old Atlas cabinet saw last year. Model 3160. 10".

It is a fine saw. I use my Unisaw because it is plug and play. However, I saw this for sale and I had to rescue it. You all know I have a weak spot for Atlas tools.

Okay, so a while back I put it up for sale. Thing is, saws like this (especially in its current condition) just don't fetch hardly anything. I primarily wanted to sell it just to get some space in the garage back. However, I've decided to restore it.

I will probably get rid of it in the future, but maybe it will be given to a relative or someone that could really use it. Heck maybe it could even be a 'Garage Journal' give-a-way or something like that to keep the cool 'pay-it-forward' vibes going. In any case, I am making a post about it so that you can all keep me accountable.

It will go slow, but it will get done.

Here is what a put-together Atlas 3160 looks like:

12308-A.jpg


And here is what my sad little saw looks like:

p9294424.jpg

p9294423.jpg


These are actually pretty cool saws. The cabinet saw (any cabinet saw) is my favorite type of tool. I don't see myself owning 5 jointers, or 5 band saws, or 5 planers, or 5 whatever else. But I could see myself owning 5 table saws...from a collectible and functional point of view.

Here are the guts(EDIT: wow, terrible picture!):
p9294426.jpg


This is a well designed saw. It has two main flaws. The tilt actuation piece and trunions are made out of zamak, which I believe is a distant cousin of pot metal. Heaven only knows why many of the saws of this day had one of its most important components (trunions) made out of anything less that solid steel. Actually, I do know. Cost:D

All that being said, if someone was to machine steel trunions and the t-bolt for the tilt screw, this saw would be absolutely bomb proof. As it is, though, it is pretty stout. I like it.

Some more disassembly:
p9294425.jpg

p9294428.jpg

p9294430.jpg


The guts are mounted to the underside of the table, so it is a little less 'cabinet saw-ish' and more 'bench saw-ish' with a floor cabinet. Which isn't a bad thing. I do believe it helps with rigidity, but makes aligning the blade to the miter slot a little more touchy.

Here is the cabinet with everything (original and non-ugly) removed:

p9294431.jpg


As you can see, the cabinet base had random wheels bolted on. These will be removed and holes patched.

Since the bottom of the saw cabinet is pretty rusty, I'm going to used electrolysis to removed the bottom 4" of rust. Everything else can get touched up by a wire wheel and sandpaper, but it would be pretty hard to get all the rust out of the nooks and crannies of the feet.

More pictures to follow...
 
Last edited:
To avoid these ads, REGISTER NOW!
Top Bottom