To avoid these ads, REGISTER NOW!

Reorganization, it's like a renovation.

Status
Not open for further replies.

rickairmedic

Well-known member
Joined
May 31, 2005
Messages
4,165
Location
louisville ,Ky
Well somebody has been having fun with Rattle cans today :D. I like the choice to go gray . The colors work well together . At least judging by the pic with the vise and the green in the background :D.


Rick
 
To avoid these ads, REGISTER NOW!
OP
G

GirlnAgarage

Well-known member
Joined
Jan 21, 2011
Messages
4,671
Location
Texas
:D Thanks. Yeah, I ordered my drawer hardware from McMaster-Car this morning so I'm not drilling holes in drawers until that arrives to test fit my tab there. Got a couple days to goof around.
 

Red Leader

Well-known member
Joined
May 15, 2011
Messages
2,689
Location
Denver, CO
Looked at paint today. That green was, how you say, ugly. Instead I grabbed some hammered gray. Last night I got to thinking about it and decided to keep gray on the drill press and switch my carts & vise and the new drawers will go to gray as well.

So, grabbed the FC cart first. Roughed it, wiped it down and sprayed. Done. Wait to cure before putting it back together.

Next grabbed the vise. Figured it would get my feet wet taking apart a cast iron piece with dirty metal bits that need to be shiny....ie, the drill press. I dunked the painted parts in Jasco paint remover and removed pretty much everything. Then primed and painted. The first coat on the bottom side was taking forever to dry as it cooled off after the sun went away. So, I'll be waiting 48hrs before I can flip and do the top side. So far so good.

I think your decision to go with gray was a good one. Gray is pretty reliable when it comes to tools for the last 100 years haha.

About the vise - looking good. If you want a deeper, glossier finish, you can probably go a little thicker. The pores and crevices in cast iron tend to soak in the paint and leave a gritty surface with just a few passes. Any time I've painted cast iron I've had to spend quite a while getting it to fill in. Then again, it is all about the type of result you want.

You're smart to leave it for 48 hours...I'd barely have the patience to do so haha.
 
OP
G

GirlnAgarage

Well-known member
Joined
Jan 21, 2011
Messages
4,671
Location
Texas
I think your decision to go with gray was a good one. Gray is pretty reliable when it comes to tools for the last 100 years haha.

About the vise - looking good. If you want a deeper, glossier finish, you can probably go a little thicker. The pores and crevices in cast iron tend to soak in the paint and leave a gritty surface with just a few passes. Any time I've painted cast iron I've had to spend quite a while getting it to fill in. Then again, it is all about the type of result you want.

You're smart to leave it for 48 hours...I'd barely have the patience to do so haha.


I'm so glad you pointed out I was smart to wait 48hrs. Right before I read this I was contemplating not waiting :spit: I set the parts back out in the sun to cure a little more.


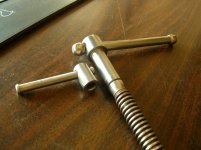
I polished the metal handles today. Took me long enough anyway :eek: Used 120, 220 then metal polish. Since I left some good dings and dents I wasn't too interested in getting to any kind of show finish. I think next time I do hard-to-handle parts I'll put on a flap wheel to the Dremel and try it that way. Working on small items is extremely tedious with one hand. I guess another idea is a tumbler (which I don't have of course).

The jaws are kinda beat up. Two of the screws are stuck in there from the edge of the hole getting distorted. Would love new jaws but I can probably live without them.

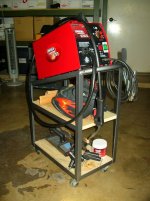
Here's my cart. I put it back together 24hrs ahead of schedule because I'm impatient. No laughing at my NT cheapo hood with flames.
 

Attachments

  • shinyhandles.jpg
    shinyhandles.jpg
    85.6 KB · Views: 207
  • beatupjaws.jpg
    beatupjaws.jpg
    101.6 KB · Views: 214
  • graycart2.jpg
    graycart2.jpg
    87.8 KB · Views: 302
Last edited:

mdbeck1

Well-known member
Joined
Mar 7, 2010
Messages
2,297
Location
Norman, OK
...I think next time I do hard-to-handle parts I'll put on a flap wheel to the Dremel and try it that way. Working on small items is extremely tedious with one hand. I guess another idea is a tumbler (which I don't have of course)....

I've got a little HF dual drum tumbler. It takes 6-10 hours to get my reloading brass clean. ...but hey, I just have to put the stuff in, turn it on, and leave it alone.

Next time get your power drill, put it in the vice, and put a flap wheel on it. It works just like your grinder.
 

shopnut

Well-known member
Joined
Feb 22, 2006
Messages
4,237
Location
Florida
I'm so glad you pointed out I was smart to wait 48hrs. Right before I read this I was contemplating not waiting :spit: I set the parts back out in the sun to cure a little more.
Some (most???) of the rattle cans say to recoat within 2 hours OR after 48 hours. I know from experience that a recoat between this time can lift (wrinkle) the first coat - not good at all unless you were after that look :(
 
OP
G

GirlnAgarage

Well-known member
Joined
Jan 21, 2011
Messages
4,671
Location
Texas
Some (most???) of the rattle cans say to recoat within 2 hours OR after 48 hours. I know from experience that a recoat between this time can lift (wrinkle) the first coat - not good at all unless you were after that look :(

Yeah, that's exactly why I didn't. The Rustoleum cans said before 1hr or after 48hrs. Interesting though, I sprayed my cart about 3hrs after the first coat and I can't find (or don't see) the wrinkling that can occur. I decided though that stripping and redoing the vise was chore enough to wait out the 48hrs :eek:
 

shopnut

Well-known member
Joined
Feb 22, 2006
Messages
4,237
Location
Florida
It certainly doesn't happen every time. In fact, I think it is very rare to have it happen - maybe 3 or four times that I can ever remember in the last 20 years (and that's something you don't forget!).

Recently I was sanding a paint run out of a part the next day after painting and thought if the paint was dry enough to wet sand, it should be fine to recoat it. Wrong! About half the paint wrinkled on it. I decided to read the can instructions and the light came on. Maybe it has something to do with scuffing the fresh paint :dunno:

The bad thing is, the run was tiny to begin with and it would have been hidden where the part was being mounted, so removing the run wasn't really even needed. Sometimes I think I should stop and call stuff "good enough".
 

rickairmedic

Well-known member
Joined
May 31, 2005
Messages
4,165
Location
louisville ,Ky
Girl the handles came out nice for only going to 220 before hitting them with the polish :D. The cart looks good to .


You can most likely get new jaws for the vise if it is a name brand . Heck my OLD York Vise is still being made and I can get most of the parts for it still.


The polishing thing if 220 is good enough then get yourself " an old bench grinder " and put a wire wheel on one end :D. Wire wheels will actually give a nice finish on parts like you did today and you should be able to handle it single handedly :D.


Rick
 

Outlawmws

Well-known member
Joined
Aug 9, 2011
Messages
39,325
Location
The Badlands
Wow, Lots of progress here in the 6 days I was gone! new DP, drawers going together, painting party...

Like the others, Very impressed with your attention to details and patience for getting it right. The whole projects is going great!

You are going to love having a DP, that is certain! If you haven't already, post it on the cool old DP thread!
 
Last edited:
OP
G

GirlnAgarage

Well-known member
Joined
Jan 21, 2011
Messages
4,671
Location
Texas
It certainly doesn't happen every time. In fact, I think it is very rare to have it happen - maybe 3 or four times that I can ever remember in the last 20 years (and that's something you don't forget!).

Recently I was sanding a paint run out of a part the next day after painting and thought if the paint was dry enough to wet sand, it should be fine to recoat it. Wrong! About half the paint wrinkled on it. I decided to read the can instructions and the light came on. Maybe it has something to do with scuffing the fresh paint :dunno:

The bad thing is, the run was tiny to begin with and it would have been hidden where the part was being mounted, so removing the run wasn't really even needed. Sometimes I think I should stop and call stuff "good enough".


:willy_nil I feel for you on that one. It's a hard kick in the teeth to end up having to redo it all when you were trying to get it right anyway.

Remember "good enough for government work"


Girl the handles came out nice for only going to 220 before hitting them with the polish :D. The cart looks good to .


You can most likely get new jaws for the vise if it is a name brand . Heck my OLD York Vise is still being made and I can get most of the parts for it still.


The polishing thing if 220 is good enough then get yourself " an old bench grinder " and put a wire wheel on one end :D. Wire wheels will actually give a nice finish on parts like you did today and you should be able to handle it single handedly :D.


Rick


Yup, only 220. I cross crossed the direction of sanding six times for each grit so that helped bring out a nice surface.

Did like this:

-->
<--
-->
<--
-->
<--

The polish was Mother's Mag and Aluminum polish. Haven't used it before but it was on my shelf. So I figured why not.


Wow, Lots of progress here in the 6 days I was gone! new DP, drawers going together, painting party...

Like the others, Very impressed with your attention to details and patience for getting it right. The whole projects is going great!

You are going to love having a DP, that is certain! If you haven't already, post it on the col old DP thread!

Outlaw, welcome back :) How was your trip?? Yeah, all kinda business getting taken care of.


I'm not certain if I'll be able to paint today. We had a big storm system move in last night and it's still raining. How uncool is that? Don't the clouds know I'm working on this stuff? Where were the clouds those 70 days this summer when it was 100+...hmmm???? Well, I can do a couple things today. I can mark my screw holes on my drawers. Or I can head upstairs to my other shop and crank out a wrench roll or two. Or, the third, that I shouldn't work on yet, is start tearing down the DP to begin on it.
 
OP
G

GirlnAgarage

Well-known member
Joined
Jan 21, 2011
Messages
4,671
Location
Texas
Don't know why my projects take so long :headscrat :lol:
 

Attachments

  • roll template.jpg
    roll template.jpg
    78.5 KB · Views: 281
  • roll suede.jpg
    roll suede.jpg
    58.9 KB · Views: 264

Outlawmws

Well-known member
Joined
Aug 9, 2011
Messages
39,325
Location
The Badlands
Outlaw, welcome back :) How was your trip?? Yeah, all kinda business getting taken care of.

The trip was good. Met up with an old High School buddy, about the only times we get together mostly. Hunting was not so good, as between the near full moon, and clear skys, the deer were bedded down mostly, until we got some rain the last day. That morning we spotted nine does and fawns, and one young spike buck, so nothing legal.

But good times for all that. It's more for the getting out into the mountains and doing things with old friends than it is about the deer. We did have one interesting event. Ray and I are 99% sure we jumped a mountain lion out of its bed on Sunday about noon.

If it was a deer, it was completely silent as it ran, as once deer decide to move it's not exactly quite as they bound. all we saw was a flash of tan/brown, and no crashing of brush of thudding of hooves... Bear are even noisier.
 

smsteve

Well-known member
Joined
Aug 28, 2008
Messages
111
Location
Montrose, Kalifornia
Amazing stuff Girl! I'm so impressed and am learning new things just by reading through your thread.

I'm sure it's been said before, but you have one very lucky DH!

Remember "good enough for government work"

There is also my old favorite too from back in my Recording Engineer days: "Close enough for Rock & Roll" :rocker:
 
OP
G

GirlnAgarage

Well-known member
Joined
Jan 21, 2011
Messages
4,671
Location
Texas
The trip was good. Met up with an old High School buddy, about the only times we get together mostly. Hunting was not so good, as between the near full moon, and clear skys, the deer were bedded down mostly, until we got some rain the last day. That morning we spotted nine does and fawns, and one young spike buck, so nothing legal.

But good times for all that. It's more for the getting out into the mountains and doing things with old friends than it is about the deer. We did have one interesting event. Ray and I are 99% sure we jumped a mountain lion out of its bed on Sunday about noon.

If it was a deer, it was completely silent as it ran, as once deer decide to move it's not exactly quite as they bound. all we saw was a flash of tan/brown, and no crashing of brush of thudding of hooves... Bear are even noisier.


Sounds like a good trip then. Deer would have been good but the getaway is just as nice. It's pretty likely you ran off a big cat. Every deer we've scared out were noisy. But cats are slinky silent. Did you see any prints? Also, keep an eye on them throughout the season. They could start affecting the deer population. Then seeing any is harder.


Today I pulled the vise out after the sun came out. Managed to get the second coat on. I think I've got a little texture but its hard to tell from the cast iron surface. I didn't go too thick on it, I like to see it's a cast iron piece vs real smooth. I'll snap pics after I get it back together in a couple days cure time.
 

JC23

Well-known member
Joined
Dec 31, 2009
Messages
11,718
Location
Northcoast
Girl,

Normally, I'm not one for rolling wrenches but those look KILLER. I may have rethink those for my street rod's road box. It def would keep 'em from rattling and wearing each other down.

Congrats, too, on all other work and posts. You're a good read...
 
OP
G

GirlnAgarage

Well-known member
Joined
Jan 21, 2011
Messages
4,671
Location
Texas
Yup, only 220. I cross crossed the direction of sanding six times for each grit so that helped bring out a nice surface.

Did like this:

-->
<--
-->
<--
-->
<--


Ohh man, I have to correct this. My arrows are all going the same way... :headscrat

What I did was

<-->
^V
<-->
^V
<-->
^V

:thumbup:


Girl,

Normally, I'm not one for rolling wrenches but those look KILLER. I may have rethink those for my street rod's road box. It def would keep 'em from rattling and wearing each other down.

Congrats, too, on all other work and posts. You're a good read...


Thanks :)
 

Red Leader

Well-known member
Joined
May 15, 2011
Messages
2,689
Location
Denver, CO
I'm so glad you pointed out I was smart to wait 48hrs. Right before I read this I was contemplating not waiting :spit: I set the parts back out in the sun to cure a little more.


I polished the metal handles today. Took me long enough anyway :eek: Used 120, 220 then metal polish. Since I left some good dings and dents I wasn't too interested in getting to any kind of show finish. I think next time I do hard-to-handle parts I'll put on a flap wheel to the Dremel and try it that way. Working on small items is extremely tedious with one hand. I guess another idea is a tumbler (which I don't have of course).

The jaws are kinda beat up. Two of the screws are stuck in there from the edge of the hole getting distorted. Would love new jaws but I can probably live without them.

Here's my cart. I put it back together 24hrs ahead of schedule because I'm impatient. No laughing at my NT cheapo hood with flames.

Lookin' good! Sanding is a very viable option to get that nice finish on those smaller tool parts!
 

flybefree

Well-known member
Joined
May 18, 2008
Messages
1,111
Location
Ohio/Kentucky
I have not checked in on your thread in a few months...goodness you are stepping it out, welding, fabbing...subscribed!

Shaun
 
To avoid these ads, REGISTER NOW!
OP
G

GirlnAgarage

Well-known member
Joined
Jan 21, 2011
Messages
4,671
Location
Texas
Amazing stuff Girl! I'm so impressed and am learning new things just by reading through your thread.

I'm sure it's been said before, but you have one very lucky DH!


There is also my old favorite too from back in my Recording Engineer days: "Close enough for Rock & Roll" :rocker:

:) Thanks.


I have not checked in on your thread in a few months...goodness you are stepping it out, welding, fabbing...subscribed!

Shaun

:beer: It was only a matter of time before I went overboard


Lookin' good! Sanding is a very viable option to get that nice finish on those smaller tool parts!

Thank you.
 
OP
G

GirlnAgarage

Well-known member
Joined
Jan 21, 2011
Messages
4,671
Location
Texas
Think this will work?

blacksostd.jpg


I haven't really worked on my drawers. Now you know why.
 
OP
G

GirlnAgarage

Well-known member
Joined
Jan 21, 2011
Messages
4,671
Location
Texas
Thanks Outlaw :)


"Hmm, maybe I need an ignition wrench pouch..."

igpouch1.jpg


igpouch2.jpg


Sorry, got the stitch lines a little uneven :eek:
 

Red Leader

Well-known member
Joined
May 15, 2011
Messages
2,689
Location
Denver, CO
Those are sweet. Do you ever work with the smooth finish leather? Or does that leather above turn into the smooth finish over time?
 
OP
G

GirlnAgarage

Well-known member
Joined
Jan 21, 2011
Messages
4,671
Location
Texas
Girl, I love those ignition wrench pouchs. I will have to send a pm about those.

Hi Steve, I got it. Will send a reply shortly :)


Those are sweet. Do you ever work with the smooth finish leather? Or does that leather above turn into the smooth finish over time?

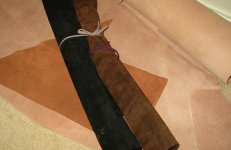
Thanks. I work with smooth leather (veg tan) regularly. Up until these items I only used suede as small accessories and accents. So its fun to work with a new material. The only veg tan I have here is 6/7oz and 7/8oz. It is not the right leather for these projects. I've got a small piece of 2/3oz up there I might give a whirl. Should work without being too heavy for an ig wrench pouch. Smooth leather for a wrench roll though, I'll need to find something different I think. Go to an oiled leather. I've seen rolls done with upholstery leather but it doesn't look good or strong, even cheap. Plus I can't stitch light leathers with my machine (it likes the moderate-heavy stuff). I'm stretching it on 3oz suede.

Did you have a particular item in mind?
 

rickairmedic

Well-known member
Joined
May 31, 2005
Messages
4,165
Location
louisville ,Ky
The suede with use will develop a patina and become smooth as it is handles over the years :D. Most of my work boots are suede and a pair thats a couple years old starts to smooth out and loose the fuzzy suede look.


Rick
 
OP
G

GirlnAgarage

Well-known member
Joined
Jan 21, 2011
Messages
4,671
Location
Texas
Yup, suede will eventually smooth (though it won't ever have a skin) - the fibers burnish with surface contact. Suede is a split off the flesh side of the hide.


I'm gonna take the dog out for a run but I've got an idea for a finger brake. I'll draw up a sketch in a bit and throw it out. I need some brains to help me decide feasibility.

Geez I'm ADD.
 
OP
G

GirlnAgarage

Well-known member
Joined
Jan 21, 2011
Messages
4,671
Location
Texas
[laugh]


Put my Fuller 3.5" vise back together. I left a lot of room for improvement. But it color coordinates better, and that's what's important.

redonefuller.jpg


Look out, it's gettin' real yall
drawerinstalled.jpg
 

Outlawmws

Well-known member
Joined
Aug 9, 2011
Messages
39,325
Location
The Badlands
Girl,

Late suggestion for the workbench; add a 1/4" plywood back on the center section so the bench does not torque out of square in use... You get those drawers full of heavy tools and things might get a bit interesting.
 
OP
G

GirlnAgarage

Well-known member
Joined
Jan 21, 2011
Messages
4,671
Location
Texas
The vice looks great and LOOK you have a drawer mounted :D.


Rick

Thanks. Ohh and I got four drawers done now. I worked slow and methodical so my holes end up aligned right. So far so good! :rocker:

I will be tearing these all down once they're all up so I can prep and paint my drawers. I will be painting the inside too I think. Least I want to even though it'll be a little more work and paint. But it'll look nice once it's done.


Girl,

Late suggestion for the workbench; add a 1/4" plywood back on the center section so the bench does not torque out of square in use... You get those drawers full of heavy tools and things might get a bit interesting.


Outlaw, I'm thinking we're thinking on the same page. I will skin the center back (also will hide any crooked edge drawers) :lol: and I'm debating the sides. What I'm still not certain of is what I want the sides to look like. Initially thinking shelves. Now sorta thinking double cabinet door type on each side. But looking ahead, I do have that 17x34x11"h Lyon 18 drawer bin unit that I'm trying to find a spot for. I'll have a nice big 10' bench top to play with though I don't want to take up good working room. And I'm thinking of putting it on its own shelf on one side, but it'll make the bench look asymmetrical :eek:


I'm envisioning the way the garage will look, sure wish I could draw it like the sketches you see on those home improvement shows. I'm going to move the drill press over on one end of the bench. Could be useful for longer materials that need support.
 

Attachments

  • fourdrawers.jpg
    fourdrawers.jpg
    69.4 KB · Views: 168

rickairmedic

Well-known member
Joined
May 31, 2005
Messages
4,165
Location
louisville ,Ky
I think you should paint the inside and outside as well :D. Then get some rubber shelf liner from wally world to put in the bottome of the drawers after they are painted up :D.They look level and even from my house :D.


Rick
 

Outlawmws

Well-known member
Joined
Aug 9, 2011
Messages
39,325
Location
The Badlands
SNIP
Initially thinking shelves. Now sorta thinking double cabinet door type on each side. But looking ahead, I do have that 17x34x11"h Lyon 18 drawer bin unit that I'm trying to find a spot for. I'll have a nice big 10' bench top to play with though I don't want to take up good working room. And I'm thinking of putting it on its own shelf on one side, but it'll make the bench look asymmetrical :eek:
SNIP.

I like cab doors on my benches and cabinets. It keeps a lot of flying crud and dust off what is stored there. On my workbench I made a couple of "drop in" doors and added a wood turn latch at the top to keep the top from falling out. This was primarily because stuff is habitually shoved against or near the bench and would interfere with a swinging door. The door bottoms got a couple of 1/2" wood pins and I drilled the front edge of the shelf/face boards to take them.

Watch Craig's list free section if you are in a suburban area, as a lot of kitchen cabs or cab doors get given away on remodels. 3 or 4 of my shop cabinets are old kitchen cabinets., and bits and pieces of others are from old cab doors.
 
OP
G

GirlnAgarage

Well-known member
Joined
Jan 21, 2011
Messages
4,671
Location
Texas
Drawers, lots of drawers. What are you going to do with all them? I don't know, but three aren't even installed yet.


drawersinstalled2.jpg


Having clearance issues with the bottom drawer after I adjusted the slide mounts a quarter inch. Bottom of drawer is sliding on the 2x4. Oh well, it was going to be tight for the bottom or the top drawer no matter how I did it so I'll fiddle with individual drawer heights another time. I might just lop off some 2x4 height with the circ saw if I get impatient enough. It's easier than cutting metal. Maybe if I got crazy enough I'll plunge cut a square out of the bottom drawer and weld the smaller drawer to the bottom of it to make a weird big box. But that would be crazy so I probably won't do it. But I could...


My Fuller was looking good in the light so I had to photo it.
redonefuller2.jpg


Ok, I gotta watch football, have some beer and maybe get some steaks going. It is Saturday for heaven's sake.
 
Last edited:
OP
G

GirlnAgarage

Well-known member
Joined
Jan 21, 2011
Messages
4,671
Location
Texas
Duct work sounds not as fun as beer and football :p


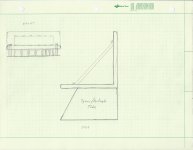
Ok Rick, here is the idea for the finger brake. I have no more details and have hardly explored the pros and cons of such. Just a motivation from the wood block I used and the individual solid fingers I see on professionally manf'd units.

Off the top of my head, wall thickness and height will matter for crush factor and also will it be taller than the sides of any items I may build with this. Also will have more material stuff to store. How will I attach these to the top plate to keep them from moving. Can I put a back plate to keep them from sliding out? My open span max 41" wide and a 3" max depth (size of angle iron leg)

Just the first thoughts that run across my head.
 

Attachments

  • fingerbreakidea1.jpg
    fingerbreakidea1.jpg
    121.1 KB · Views: 181
Status
Not open for further replies.
To avoid these ads, REGISTER NOW!
Top Bottom