To avoid these ads, REGISTER NOW!

My Garage Machine Shop

OP
A

A_Pmech

Well-known member
Joined
May 8, 2007
Messages
8,002
Location
IL
Re: My Garage Shop

No guesses at all? :wtf:

Well, I'll give only this clue: The manufacurer's name is on it and it's a very boring tool to use.

Another new tool arrived today. Let's see if anybody can guess what it is and what it does!

tree.jpg
 
To avoid these ads, REGISTER NOW!

mtnkrake

Well-known member
Joined
Jan 24, 2007
Messages
467
Re: My Garage Shop

You'll have to show us how to bore a tapered hole with it.
 
OP
A

A_Pmech

Well-known member
Joined
May 8, 2007
Messages
8,002
Location
IL
Re: My Garage Shop

You'll have to show us how to bore a tapered hole with it.

Yup, in due time.

:D

For those wondering, it is a Tree Taper Boring Tool. It is used to bore tapered holes where the part is too large or awkward to fit in a lathe.
 
Last edited:

Amitygravel

Well-known member
Joined
Mar 26, 2010
Messages
1,188
Location
Claremont Illinois
Re: My Garage Shop

John ,

As always neat stuff.
When and if you ever have the chance , could you show how things like edge and center locators , and parallels are used ?
I see items like these in catalogs and just don't get how they are used.

Craig
 
OP
A

A_Pmech

Well-known member
Joined
May 8, 2007
Messages
8,002
Location
IL
Re: My Garage Shop

John ,

As always neat stuff.
When and if you ever have the chance , could you show how things like edge and center locators , and parallels are used ?
I see items like these in catalogs and just don't get how they are used.

Craig

Hi Craig,

I could do that.

930dreamer said:
Where's the 5120?

Hiding in a back corner, waiting for me to build the electrical building / compressor plant.
 
OP
A

A_Pmech

Well-known member
Joined
May 8, 2007
Messages
8,002
Location
IL
Re: My Garage Shop

Another addition to the shop today and this one is important! I went out yesterday and bought two Beacon/Morris 75,000 BTU heaters. In my typical style, I picked them up with the Birdcar. The Menards employee said as we walked up to the car "No Way!" I said "Oh, this is nothing."

birdcar1.jpg


I'll pick the other one up in a few days.

Here it is mounted! Yes, it is "upside-down", they can be mounted either direction and I haven't reversed the panels with the stickers on them yet.

birdcar2.jpg


Once I get the second heater mounted I'll drill the necessary holes though the concrete block wall to vent the heaters outside. Then I'll plumb Propane to them and get the electrical installed.

As I don't own a pipe threader I'll be threading the pipe on the lathe. It produces much better threads anyway.
 
OP
A

A_Pmech

Well-known member
Joined
May 8, 2007
Messages
8,002
Location
IL
Re: My Garage Shop

In other news, it's finally time to hang my shingle out front. This pile of 1/4" flat is going to become my signpost:

signsteel.jpg
 

e-tek

Well-known member
Joined
Dec 19, 2007
Messages
10,690
Location
Saskatoon, SK
Re: My Garage Shop

I have a whole bunch of projects stacking up that I need to get in the works starting tomorrow. Finishing the floor in the house, the U.S. Electrical Tool grinder, getting the B&S surface grinder up and running, installing an air lift knee in the Bridgeport, installing a new steel frame door in the shop, and drawing up plans for the new electrical / compressor building are high on the list. This, along with work, should keep me out of trouble until spring.

Oh yes, did I mention a forced air gas heater is also on the list?

Hmmm.....I know the feeling!:wtf::bounce:

John
As usual, your latest shop additions are always interesting.

Do you ever slow down ?
How do you stay motivated and keep the pace that you do ?

Craig

If you have to ask......:headscrat

Just went through the thread and some of your posts again. Thanks for sharing your skills and stuff with us. It's all very enviable - and motivational!

:beer:
 
OP
A

A_Pmech

Well-known member
Joined
May 8, 2007
Messages
8,002
Location
IL
Re: My Garage Shop

Just went through the thread and some of your posts again. Thanks for sharing your skills and stuff with us. It's all very enviable - and motivational!

:beer:

You're welcome, E-tek. Glad I can. :)
 
OP
A

A_Pmech

Well-known member
Joined
May 8, 2007
Messages
8,002
Location
IL
Re: My Garage Shop

I picked up the second heater on Wednesday and got it hung. Yesterday I picked up some 1-1/4" black pipe to re-plumb plumb the trunk line for the house. The 3/4" pipe that was there is too small to support the house and the 150,000 BTU heater load. 1" would have been fine, but 1-1/4" was cheaper as the hardware store had an older stock of the larger size pipe and fittings. :)

Today, I'll re-plumb the gas service entrance to accommodate the new heaters. Then, probably over the weekend, I'll plumb the heaters to the new trunk line.
 

shopnut

Well-known member
Joined
Feb 22, 2006
Messages
4,237
Location
Florida
Re: My Garage Shop

I can't quite make it out in this picture - can you tell me the make of that black/yellow toolbox? Thanks in advance.

I know, I know - all those impressive machine tools and I'm asking about the stinking toolbox. It's just that the color combo would look good in my shop if I ever decide to upgrade from my red Craftsman.

Good luck with the heaters - winter is just around the corner!
 
OP
A

A_Pmech

Well-known member
Joined
May 8, 2007
Messages
8,002
Location
IL
Re: My Garage Shop

I know, I know - all those impressive machine tools and I'm asking about the stinking toolbox. It's just that the color combo would look good in my shop if I ever decide to upgrade from my red Craftsman.

LOL!

It's a General brand from Rural King.
 
OP
A

A_Pmech

Well-known member
Joined
May 8, 2007
Messages
8,002
Location
IL
Re: My Garage Shop

As I explained earlier, the original gas service entrance was not big enough to accommodate the new heaters. On Friday and Saturday I disassembled the old gas system between the second stage regulator and the main trunk line in the house. After measuring each piece of 3/4" pipe, I duplicated all the sections in 1-1/4" pipe.

Threading pipe on a lathe is similar to other threading operations with one quirk: The threads are tapered. To make a tapered thread on the lathe, it is necessary to use the taper attachment. The taper attachment makes it possible to cut tapers up to 5 degrees, but it can also be used for threading, to guide the single-point tool on a tapered path.

To begin, I set the taper attachment on the lathe to a taper of exactly 3/4" per foot on diameter. This is the "NPT taper".

pipe2.jpg


Then, I secured a section of pipe in the lathe chuck and shimmed it to center where it exited the spindle tube. On longer sections this is necessary to prevent the pipe from walking out of the chuck or bending the chuck jaws:

pipe1.jpg


Cutting the threads requires about 10 minutes or 20 passes at 277 RPM using a hand ground HSS toolbit with a high side rake to aid in cutting the soft steel:

pipe3.jpg


The threads are cut until a sample fitting with a known pitch diameter threads on to the proper hand engagement length, 4 3/4 turns in the case of 1-1/4" pipe.

Here's the finished thread. From here it is deburred with a wire wheel and then it is ready for assembly:

pipe4.jpg
 
Last edited:

fatboy99

Well-known member
Joined
Apr 23, 2009
Messages
908
Location
Indiana
Re: My Garage Shop

Is the pipe your using made in china ? The reason I ask is I got some at one of the box stores and when I use my pipe threader the steel seems to tear roughly and not cut as clean as yours. My cutters are Rigid and brand new so its not dull blades.And I use generous amounts of cutting oil.Got some US made pipe from work and it cuts as smooth as your example.
 
OP
A

A_Pmech

Well-known member
Joined
May 8, 2007
Messages
8,002
Location
IL
Re: My Garage Shop

Sure makes me appreciate the speed of the Rigid pipe threaders I used when I was pipe fitting!

Yes, a pipe threader is substantially faster, but the quality of the threads isn't as good as single-pointing.

A faster way to have done it on the lathe involves the use of a laydown threading tool. That would allow me to thread at around 1,000 RPM, but I hate dodging flaming hot chips on the weekend! The threads made by a laydown insert have a mirror finish when all the variables are under control.

With HSS the job is rather relaxing.

fatboy99 said:
some at one of the box stores and when I use my pipe threader the steel seems to tear roughly and not cut as clean as yours. My cutters are Rigid and brand new so its not dull blades.

This stuff cuts well, although I have no idea where it came from. I doubt it is US-made and I'm afraid to look. Despite my pleas nobody around here will stock US pipe just for me and it's too expensive to order just a few sticks due to the exorbitant cost of shipping long items. So, I make do with what I can get locally. But you'd better believe I inspect every inch of the seam weld!

I am happy to report the fittings are almost all NOS Ward, Made In USA. ;)

I just finished pressure and leakdown testing the new trunk line. Everything is good! Tomorrow I'll start installing the piping run back to the new heaters.
 

fatboy99

Well-known member
Joined
Apr 23, 2009
Messages
908
Location
Indiana
Re: My Garage Shop

Yes inspecting the seam is very good point!! Ive heard of Chinese pipe leaking from the seam from the service men at work. Most of them pressure test the long pieces they use to make sure there good before installing them. Looking forward to seeing how your install looks.
 
OP
A

A_Pmech

Well-known member
Joined
May 8, 2007
Messages
8,002
Location
IL
Re: My Garage Shop

I pressure test at 100 PSI to 175 PSI so I figure if it doesn't show up at that pressure it won't show up at 11" of water. :)

There's not a whole lot of the installation to see as it's all buried in the joist spaces. I'll take a few photos when I get the heaters plumbed up though.
 
OP
A

A_Pmech

Well-known member
Joined
May 8, 2007
Messages
8,002
Location
IL
Re: My Garage Shop

I took a closer look at the pipe today and was pleasantly surprised. It is made by Wheatland Tube of Sharon, Pa.
 
To avoid these ads, REGISTER NOW!

fatboy99

Well-known member
Joined
Apr 23, 2009
Messages
908
Location
Indiana
Re: My Garage Shop

Did you get it at one of the big box store's ? Lowes in Fort Wayne has 1 1/4 made in Mexico and Menards pipe is made in China haven't had a chance to see where Home Depot's pipe is made.
 
OP
A

A_Pmech

Well-known member
Joined
May 8, 2007
Messages
8,002
Location
IL
Re: My Garage Shop

Did you get it at one of the big box store's ? Lowes in Fort Wayne has 1 1/4 made in Mexico and Menards pipe is made in China haven't had a chance to see where Home Depot's pipe is made.

No, the local plumbing supply.
 
OP
A

A_Pmech

Well-known member
Joined
May 8, 2007
Messages
8,002
Location
IL
Re: My Garage Shop

Last night I finally got the heaters finished and fired up.

Last Thursday and Friday I pulled in the thermostat and power wire for the heaters and installed twist lock receptacles for each heater. This makes it easy to service one heater without having to turn them both off, an important consideration if one requires maintenance in the depths of winter!

Then, over the weekend I installed the flues, converted the heaters to propane, installed the thermostats and finished up the installation.

Beacon Morris recommends using a section of B vent and using single-wall vent pipe for the rest of the installation, caulking and taping each joint. I didn't like the sound of that, so I ended up buying stainless steel Type 3 vent pipe, which is incredibly expensive but designed specifically for positive pressure venting as it has silicone gaskets in each section. Plus, being stainless it will never rust!

To vent the heaters I needed to drill two 4-1/8" holes though the filled and reinforced concrete block wall of my shop. To do that, I used my Hilti TE-60 which is a bear to hold over my head at 50-odd pounds:

heater1.jpg


After marking the hole location I drilled a 1/2" pilot hole clear though the wall. The purpose of this is locate the center of the hole on the other side. I usually core the inside hole about 1" deep and finish from the outside to reduce the amount of dust that ends up flying around in the shop. Also, coring from both sides prevents spalling the interior wall. When a core drill breaks though after working from only one side it knocks off a massive amount of material around the hole which looks awful. Here's the finished pilot with the interior wall coring finished:

heater2.jpg


I got lucky on the West heater and didn't hit any rebar, but I wasn't so lucky on the East heater as I hit a stick of #4 about dead center in the wall when drilling from the outside. Standard carbide core drills will not drill rebar, so I had to go back to the inside and drill though until I hit the other side of the rebar. After knocking out the core from the inside and doing a little air hammer work around the rebar here's what it looks like:

heater3.jpg


Fixing the problem consisted of torching out the rebar:

heater4.jpg


Here's the finished vent installation. The vent pipe slopes down at about 1/4" per foot to prevent the ingress of rain water. The exterior termination will eventually end in a wall hood when I stucco the exterior of the shop next year.

heater5.jpg


Since the heaters are shipped ready for natural gas, I needed to convert both of them over to propane. This is easily done with the supplied conversion kit which consists of a new regulator spring, main orifice, conversion stickers and instructions.

heater6.jpg


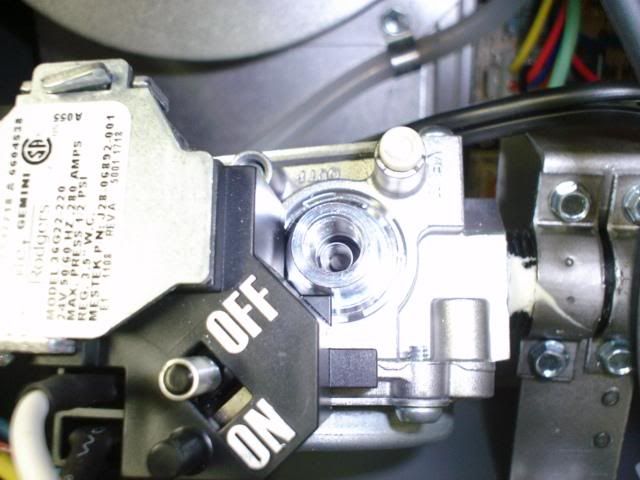
I began by removing the natural gas regulator spring and replacing it with the propane regulator spring. You can see the spring at the bottom of the spring adjusting screw bore in this photo:

heater7.jpg


Next, I installed the new propane orifice, which is about half the size of the natural gas orifice. This is a simple case of unscrewing one and screwing in the other:

heater8.jpg


After installing the new spring and orifice I turned the regulator adjusting screw in about halfway and hooked up my water manometer to the output pressure test port on the regulator:

heater9.jpg


With the heater running I adjusted the manifold pressure to specification, which is 10" of water for altitudes between sea level and 2000' MSL. Initially, I found I could not obtain sufficient manifold pressure even with the regulator screw turned all the way in.

It turns out my second stage delivery regulator pressure was set right at 11" of water, the minimum input pressure specified by Beacon Morris. I adjusted the second stage regulator outside the house up to 12-3/4" of water, which is right in the middle of the input range of 11" to 14" for most LP appliances. The regulator pressure sags down to about 12.5" of water with all the appliances turned on.

With the input pressure problem rectified I had no problem setting the manifold pressure up to 10" using my 2x4 and vinyl tubing manometer:

heater10.jpg


Closing up the heaters and sealing the flues into the wall with hydraulic cement completed the installation!

Hopefully this little post will help others with their Beacon Morris heater installations.
 

fatboy99

Well-known member
Joined
Apr 23, 2009
Messages
908
Location
Indiana
Re: My Garage Shop

Do these heaters only have 1 burner? Just wondered since there was only 1 orifice in your kit. My 45000 btu heater has 3 burners and 3 orifice's when I converted it. Great job on the install.
 
OP
A

A_Pmech

Well-known member
Joined
May 8, 2007
Messages
8,002
Location
IL
Re: My Garage Shop

Do these heaters only have 1 burner? Just wondered since there was only 1 orifice in your kit. My 45000 btu heater has 3 burners and 3 orifice's when I converted it. Great job on the install.

Each heater has just one orifice.
 
OP
A

A_Pmech

Well-known member
Joined
May 8, 2007
Messages
8,002
Location
IL
Re: My Garage Shop

It's been a little while since I posted to this thread.

Here's my current shop project, a Cincinnati 12" Universal Dividing Head with lead attachment. This was purchased by the United States Navy in 1940 and, according to the inventory tags was put into long-term storage in 1957. Needless to say, it is covered in nastiness but appears in good shape.

This will be mostly a clean up and deburr operation, it's been banged around a lot over the years. The dividing head and tailstock bases will need to be stoned and possibly scraped as they have been kicked around on a concrete floor. Otherwise, it is complete except for the picking pin and sector and in good, but gooey condition. Here it is almost completely disassembled:

dividing1.jpg


Some of the parts all cleaned up:

dividing2.jpg


A couple of the USN stamps:

dividing3.jpg


Here's a couple pages from the 1940 brochure:

dividing5.jpg


dividing4.jpg


Once I get it back together I'll have to use it to make one of it's own parts. That should be entertaining. :thumbup:

What does a dividing head do, you ask? It divides a circle into almost any number of equal segments, such as for making gears. However, this dividing head goes a step further. When geared to the mill's table with the gearbox and change gears, it turns as the milling machine table moves in X, generating a helix. This is useful for milling helical gears, milling cutters, roots blower rotors, etc.

Technically, dividing heads are "obsolete". I'd say the majority of machinists under the age of 40 can make a spur gear with one and a few can knock out a helical gear in a timely fashion. A select few could turn out herringbone gear that actually works. But what about something even more complicated, such as a centrifugal compressor rotor like this:

dividing6.jpg


This is the point at which most manual machinists would walk away in disgust and a fair number of cnc machinists would too. The remainder would begin biting their fingernails. Talk of "5 axis cnc" would be discussed along with "CAD" and "solid modeling". The idea of machining such a shape manually would be laughed at and I suspect quite a few would use the word "impossible".

Enter the shops of the National Advisory Committee for Aeronautics (NACA) in 1945. The digital computer was still a theory and a functional computer controlled milling machine was almost 25 years away. Airplanes of the day were powered by large reciprocating piston engines. To reach higher altitudes and higher specific power ratings, more efficient supercharger and turbocharger geometry was necessary and was an area of heavy research. This was one of the tasks of NACA.

Here's how NACA made prototype supercharger rotors in 1945. A Cincinatti Universal Milling Machine with a Bridgeport "M" milling attachment on the overarm, a Cincinatti 12" Universal Dividing Head just like mine on the table and a shop-brew hydraulic tracing attachment keeping everything in time:

dividing7.jpg


So, the next time somebody says the only way something can be made is with a "5-axis cnc", tell them the old guys could do it on that old horizontal mill in the back corner under the frayed tarp, because it's true.

:beer:
 
Last edited:

MD11

Well-known member
Joined
Oct 30, 2009
Messages
1,228
Location
USA
Re: My Garage Shop

One heck of a workshop.... I expected so much from the maker of the finest hand tools made! Nice place.
 

machine_punk

Well-known member
Joined
May 14, 2011
Messages
2,540
Location
Napa Valley, California
Re: My Garage Shop

I don't know how I've missed your main shop thread before...I've seen plenty of your stuff, just not the main shop thread.

Every time I think I'm doing something cool in my shop, I look at what you've got going on and just drop my jaw. I suppose it helps that you do this for a living and I'm just learning as a hobby.

Cool shop. Cool projects. I enjoy seeing the stuff you are working on.
 

Red Leader

Well-known member
Joined
May 15, 2011
Messages
2,689
Location
Denver, CO
Re: My Garage Shop

Man, I don't know how I missed this thread either. Only one word comes to mind your describe your shop: serious.

You are in another league my friend. I'd love to have your setup one day so I can machine some of my own parts for some of the old woodworking tools I restore so I can put them back in use, but it would be hard fitting some of that into my 2-car garage:D

Fantastic thread. Fantastic garage.

Was that you in that picture standing behind the big compressor? You you like you are 25-30 yrs old, am I right? If so, wow...I have a lot of respect for a guy around my own age that is doing the things that you are doing.
 

Tripp P.

Well-known member
Joined
Jan 6, 2011
Messages
117
Location
G.R. Michigan
Re: My Garage Shop

Great shop! That dividing head looks like something the last shop I was at scraped. I managed to save one of them. Its been taking up space in my dads shop. Big upgrade from the cheapie one I use to use. I'd like to find a smaller one.

Your right don't know many younger guys (like us) that know how to use one. Even if they are machinist. I run a 5-axis now so I cheat.

Keep up the good work.
 
OP
A

A_Pmech

Well-known member
Joined
May 8, 2007
Messages
8,002
Location
IL
Re: My Garage Shop

One heck of a workshop.... I expected so much from the maker of the finest hand tools made! Nice place.

Thanks! :)

machine_punk said:
Every time I think I'm doing something cool in my shop, I look at what you've got going on and just drop my jaw. I suppose it helps that you do this for a living and I'm just learning as a hobby.

Yes, being my business, or more specifically my life, has a lot to do with it.

Red Leader said:
Fantastic thread. Fantastic garage.

Was that you in that picture standing behind the big compressor? You you like you are 25-30 yrs old, am I right? If so, wow...I have a lot of respect for a guy around my own age that is doing the things that you are doing.

Thank you.

That was me. I've been watching your 1950's Craftsman Garage thread. You do nice work. Your "ideation" sketches are first rate. :thumbup:

If you ever need any parts made or repaired for your machines, let me know.

Tripp P. said:
Your right don't know many younger guys (like us) that know how to use one. Even if they are machinist. I run a 5-axis now so I cheat.

It's not cheating, just "different". :)
 

mjozefow

Well-known member
Joined
Apr 9, 2009
Messages
2,111
Location
Lafayette, IN
Re: My Garage Shop

That is a great pic for all of the m-head doubters. Making what you have work is the name of the game.

How will the beating the dividing head has received impact the accuracy of the attachment?
 
OP
A

A_Pmech

Well-known member
Joined
May 8, 2007
Messages
8,002
Location
IL
Re: My Garage Shop

That is a great pic for all of the m-head doubters. Making what you have work is the name of the game.

How will the beating the dividing head has received impact the accuracy of the attachment?

For sure. The WWII was won, in part, by M-heads.

You know me... If I have to make parts I will. It will be as accurate as it was when new.

:thumbup:
 
OP
A

A_Pmech

Well-known member
Joined
May 8, 2007
Messages
8,002
Location
IL
In addition to the dividing head, one of my other recent projects has been overhauling my John Ramming / Advance 12" cross-slide rotary table. I purchased this from a man who bought it from a tool company in Detroit, where it spent most of it's life on the shelf. However, everything was gummy and it needed a good cleaning. A perfect excuse to take it apart!

This rotary table is one of the nicest, most carefully built pieces of machinery I have ever laid my hands on. Next to a Moore rotary table I don't think any other brand can compare. I had always heard Advance built a good table and when John Ramming bought out the Advance company they obviously kept building a good table.

Here's the main casting. Note the Moglice "pucks" which reduce the rotary bearing friction:

ramming1.jpg


Here's a photo of the cross slide table flaking, which is some of the best I've seen other than on a Moore tool. The quality of the surface grinding on these parts is exceptional:

ramming2.jpg


I made new rotary bearing wicks from F-3 felt to replace the nasty old wicks. This table is lubricated with #2 way oil, which breaks down into a sewer smelling goo after about 20 years:

ramming3.jpg


Here's the beginnings of reassembly. The remainder was done over two sawhorses to permit installation of the rotor bearing which must be driven in from below with a mild steel punch:

ramming4.jpg
 
OP
A

A_Pmech

Well-known member
Joined
May 8, 2007
Messages
8,002
Location
IL
One of the most-asked-for services at my shop is welding. I have turned away numerous welding jobs due to a lack of proper equipment. I decided recently it was time to capture that line of business as well. I did an informal survey and concluded that SMAW and TIG were the two most common processes requested by my customer base. So, a few weeks ago I decided to purchase the necessary equipment to add SMAW and TIG welding to the line card.

I have a Lincoln AC-225 "buzz box", but being an AC-only machine it is of limited use, especially in vertical up and overhead welding. DC current is so much easier to weld with and getting DC capability means a new welder.

With that in mind, I bought an NOS Miller Dialarc 250P which has spent a few years sitting on a warehouse shelf. It came complete with the original box, pallet and operating manual. It has never been hooked up to power. This will be my stick welder.

The little buzz box with it's replacement:

dialarc.jpg


A new welder requires a proper welding table! I considered building one, but a search of my contacts produced something slightly... Heavier.

After some questionable rigging with two chain hoists, a too-small forklift with a blown mast cylinder and a harrowing drive home I'm too tired to unload it this evening. However, let's just say I'm up a couple more tons of iron tonight. Photos in the AM. :beer:
 
Last edited:

Steve from Socal

Well-known member
Joined
Jan 27, 2009
Messages
3,498
Location
Hutchinson Ks.
John,

Sounds like you may have a contender for welding table mass? My Dynasty 300 is a very good stick welder, I am kinda looking for a monster MIG welder now for heavy aluminum plate work.

Steve
 
Last edited:
OP
A

A_Pmech

Well-known member
Joined
May 8, 2007
Messages
8,002
Location
IL
John,

Sounds like you may have a contender for welding table mass? My Dynasty 300 is a very good stick welder, I am kinda looking for a monster MIG welder now for heavy aluminum plate work.

Steve

Hi Steve,

It's no HBM angle plate, but it doesn't take up quite as much space either. :D

It is a 4' by 6' heavy pattern iron surface plate. In a previous life it was one of the primary reference flats in a shop that built parts for the Gemini and Mercury program. My calculations say it weighs right at 3,500 lbs. The seller had some larger plates, but this was the heaviest of the bunch and is of sufficient size to build motorcycles, which figures highly into the purchase.

Here it is in the back of the shop truck. The old C-20 is rated for 3,300lbs. It was riding a little low in the water driving home:

weldingtable1.jpg


Rigging was accomplished by first lifting one end of the plate with the fork tips and sliding two round slings under the plate:

weldingtable2.jpg


Then, from the side I placed the slings over the forks. Old work jeans or heavy carpet squares work great to protect the slings from sharp edges:

weldingtable3.jpg


Here's the underside of the plate, showing the reinforcing webs. They're around 1-1/2" thick by 9" deep. The table top is a little under 2" thick:

weldingtable4.jpg


Here is where it will stay greased up and covered until I get a rolling stand built for it out of 4x4x3/8" angle iron. When I get some time I'm going to put it under the radial drill to drill and tap a grid pattern of threaded holes, probably 1/2-13, for various clamping arrangements and fixtures.

weldingtable5.jpg
 
Last edited:

Steve from Socal

Well-known member
Joined
Jan 27, 2009
Messages
3,498
Location
Hutchinson Ks.
Hi John,

That is a great find; using the radial to drill and tap it, PRICELESS!

I saw a really neat layout table at the Beech auction in Salina, it was about that size and it had T-slots gridded out in 12" squares. The finish was perfect, in fact I talked to the tool maker who used it, he said it was within .0015. That was on my wish list until it soared to 6800.00.

You must be getting kinda tight on space in there, when is phase II on the shop start?

Steve
 
To avoid these ads, REGISTER NOW!
Top Bottom