To avoid these ads, REGISTER NOW!

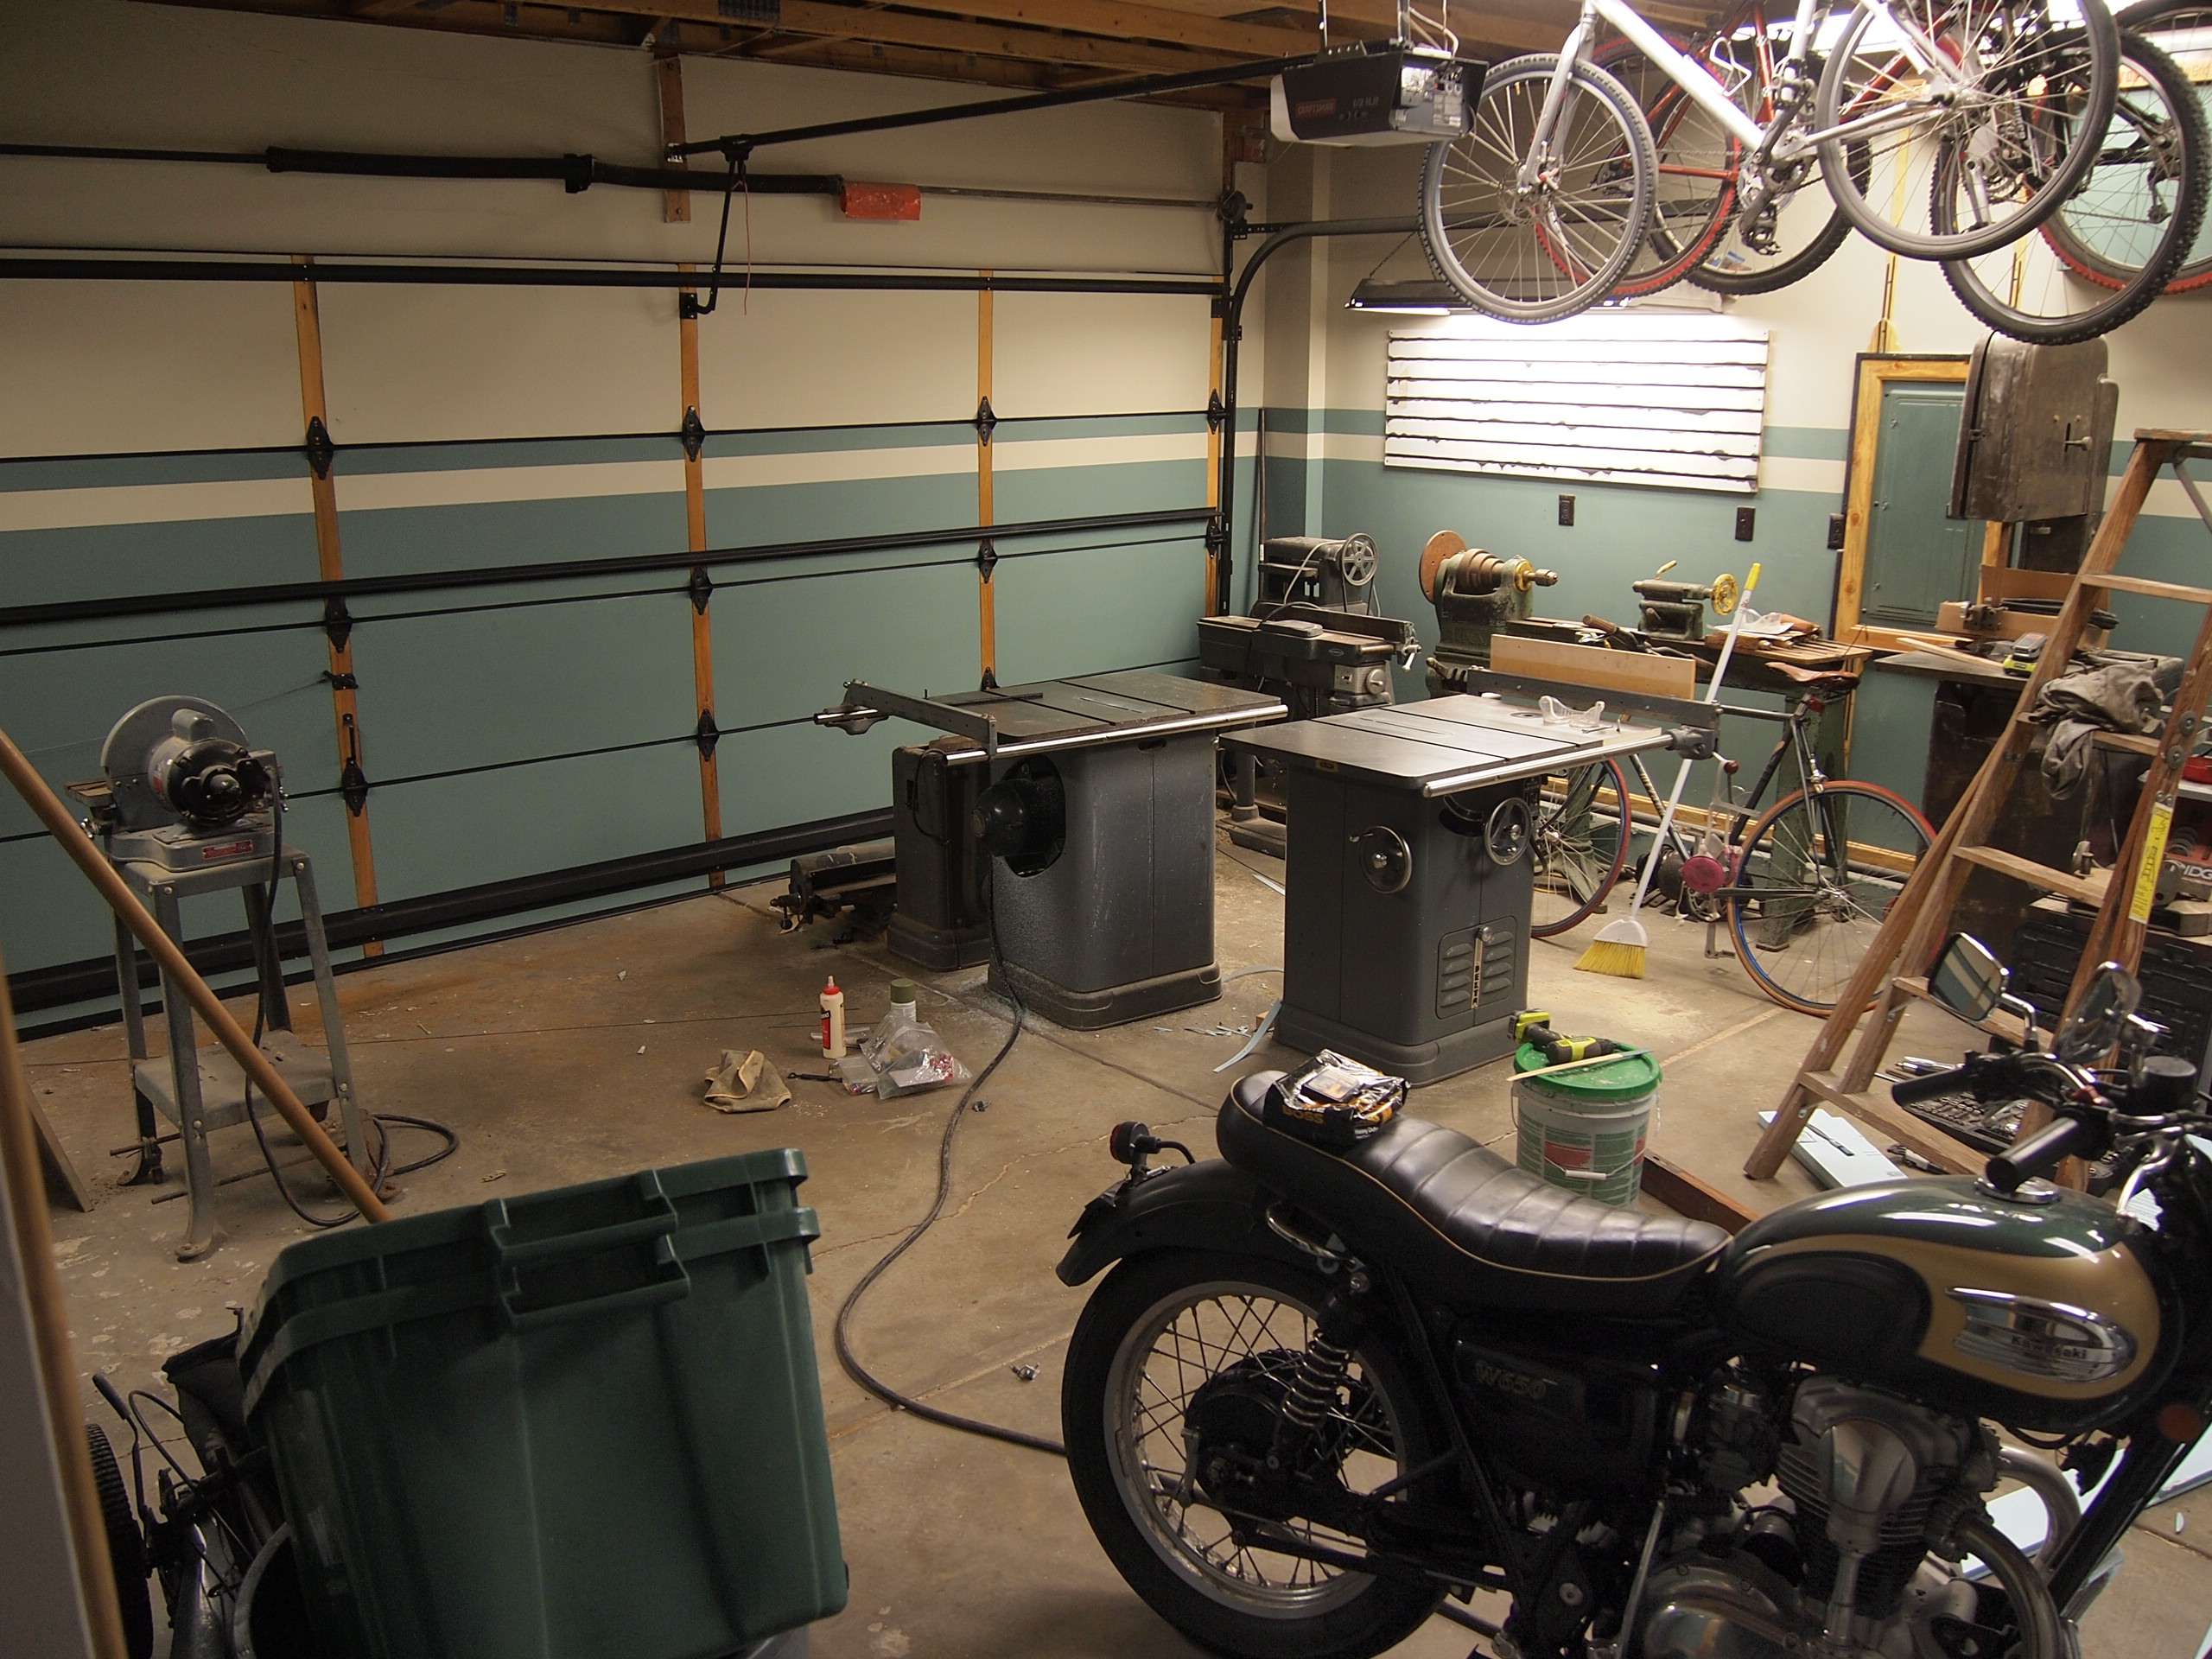
Between 265 & 485 SQ/FT 1950s Craftsman Garage retro remodel

Workspaces sized between 265 and 485 squarefeet.
OP
R

Red Leader

Well-known member
Joined
May 15, 2011
Messages
2,689
Location
Denver, CO
Nice collection of woodworking machinery, especially the Unisaw! I have the same jointer, although mine doesn't have the cool stand.
jh2.jpg

2.jpg

Thanks for your thoughts on the tools. It's funny because I know the garage is already packed with tools, but I've got a whole laundry list of other tools (quest tools) that I'd like to get. Of course, most of them would replace current tools in the garage.

But some would not:D
 
To avoid these ads, REGISTER NOW!
OP
R

Red Leader

Well-known member
Joined
May 15, 2011
Messages
2,689
Location
Denver, CO
FWIW, I will second the look of a "raw cast iron" metallic gray on the undersides. I have done this to saw top undersides and even the webbing on open extension tables. It looks very nice with the right color.

I'd love to see what you are talking about here. Any picture examples?

I wonder if some folks have stripped things down to the cast iron, then just clear coated?

Same effect?
 

Wingnut65

Well-known member
Joined
Apr 21, 2010
Messages
3,170
Location
Tampa Bay, FL
Skip the stripe for now and go with 1/8" SS cable (1,700 lb break strength)

Small bites still get you through the meal... Keep on going!
 

GirlnAgarage

Well-known member
Joined
Jan 21, 2011
Messages
4,669
Location
Texas
Well since we're splitting hairs, I agree with Wingnut, skip the stripe for now until after the turnbuckle is on. That way the hair is split good :thumbup:
 

slickgt1

Well-known member
Joined
Oct 11, 2010
Messages
1,674
I say deff forget about the strip till you get it straight. After that, I say use a laser to get the line on the door, and look at it visually. There are a lot of horizontal lines on the door, and the line will look funny in respect to those lines, IF they all do not line up.
 

Nitsuj

Well-known member
Joined
Nov 8, 2011
Messages
82
Wow. Awesome garage! If you lived closer, I'd have an awesome heater that would look perfect hanging in there! Late 50s Modine.
3a8a5c8e.jpg
 

Firefyter-Emt

Well-known member
Joined
Sep 29, 2005
Messages
171
Location
CT
I'd love to see what you are talking about here. Any picture examples?

I wonder if some folks have stripped things down to the cast iron, then just clear coated?

Same effect?

I will try to grab a photo of my King Seeley era 10" saw wings. That saw has the open webbed extensions and was the only part of the saw that was altered and worked on from how I bought it. The base is "so so" on how I would design it, but it does the job and is quite good for how it captures the dust. Although, I do have one of the OE stands that came with an 8" King Sealey era saw that was parted out. I may decide to mount the saw on that one when I sell it. I really HAVE to get my Unisaw up and going, it just begs me to get her going and toss the Craftsman one out of the shop...

BTW... if you know anyone that has a blade arbor nut for a Uni, I need one for my saw. :thumbup:
 
OP
R

Red Leader

Well-known member
Joined
May 15, 2011
Messages
2,689
Location
Denver, CO
Wow. Awesome garage! If you lived closer, I'd have an awesome heater that would look perfect hanging in there! Late 50s Modine.
3a8a5c8e.jpg

Whoa! That heater is awesome! I hope to soon have a gas line in the garage for a heater. The only thing I haven't figured out yet is the exhaust on one of those big heaters and where to vent it to. I like the radiant gas tube heaters, but if I could figure out how to set one up I'd love a good working vintage unit.
 
OP
R

Red Leader

Well-known member
Joined
May 15, 2011
Messages
2,689
Location
Denver, CO
Skip the stripe for now and go with 1/8" SS cable (1,700 lb break strength)

Small bites still get you through the meal... Keep on going!

Well since we're splitting hairs, I agree with Wingnut, skip the stripe for now until after the turnbuckle is on. That way the hair is split good :thumbup:

I say deff forget about the strip till you get it straight. After that, I say use a laser to get the line on the door, and look at it visually. There are a lot of horizontal lines on the door, and the line will look funny in respect to those lines, IF they all do not line up.

Alright, you guys...you may not like me for this...

but I decided to go ahead and paint them. I know I know:eek:

I actually did it before I saw any of your responses. To be honest, I agree with you all, it would have been better to do it the other way around. However, I'm not sure when I'll be able to go pick up that steel cable or have the budget for it, winter is upon us, etc etc. As they say...

'don't do today what you can put off till tomorrow'........wait wait

That's not quite right:D:lol_hitti:beer:

'do tomorrow what you can put off today'....hmm, still not quite right:bounce:


How about I just go with the good old 'A good plan today is better than a great plan tomorrow'? I really just want to keep moving forward with the build and if I can keep up the motivation and still get something done (and hopefully done well), I am going to try. (for the record...I still agree with you guys!!!:D)

I left a little bit of room on the paint line for settling in anticipation of the garage door leveling out, but ya know? It's a garage door, and I think I'll be okay:) Plus, the paint stripes turned out ultra good and I'm really, really happy with them, so hopefully it will still look great, even if, worst case scenario, it is a little off.

I am going to try to install them tonight and if I do I'll have a grand finale photo for you guys!!!


:fingersx::fingersx::fingersx:Fingers crossed hoping it doesn't look dumb once I get it up there!!!:fingersx::fingersx::fingersx:
 
Last edited:
OP
R

Red Leader

Well-known member
Joined
May 15, 2011
Messages
2,689
Location
Denver, CO
Okay, here is a 'sort-of', 'kindy', maybe update:D

So, I wasn't able to get all the panels in yet. This is because there is a little circular ridge that was premolded into the foam boards (to hook together) and I am using it to create a wedge fit in the rectangle spots. However, some of that area is still visible even when the pieces are put in and it was not painted there. Therefore, I painted that ridge and am letting those pieces dry out before I put them on. However, I did put the top pieces on and things are looking good so far!

By the way, here is the turnbuckle system that snapped. That little 'end' of the metal rod is where it snapped. I think I jumped a little when it did:)

pb100223.jpg


Okay! Here is the blank slate:

pb100224.jpg


And here is where I currently am:

pb100225.jpg


You can see in the pictures where the stripe doesn't meet the wall stripe perfectly, however, that is intentional. The stripe on the wall is an inch too low and that was revealed many pages back when I painted the stripe on the door to link them all together. I am going to repaint the stripe on the wall to bring it up to the correct level and when I do everything will match fine:)

Well, so far so good! I'll have a better update tomorrow (hopefully with it finished) and will also post up pictures of the painting process of the foam boards (don't have access to those pictures right now).

:beer:
 
Last edited:

Wingnut65

Well-known member
Joined
Apr 21, 2010
Messages
3,170
Location
Tampa Bay, FL
Looks good Dave.

Another thought on the turnbuckle idea, if one wire is not strong enough and they are free (you have plenty on hand, that is) double up on them. Or make 3-4 on each side. That way it would be 3-4x stronger than a single strand of wire.
 

Nitsuj

Well-known member
Joined
Nov 8, 2011
Messages
82
Whoa! That heater is awesome! I hope to soon have a gas line in the garage for a heater. The only thing I haven't figured out yet is the exhaust on one of those big heaters and where to vent it to. I like the radiant gas tube heaters, but if I could figure out how to set one up I'd love a good working vintage unit.

Thanks. I just hope I end up getting to use it. It's a little large and venting is going to be problematic.

When I get out to the garage later, I'll snap some pics of some of my old tools, I have a few things that are right up your alley. A late 40's Atlas 12x40 metal lathe, a Large Walker Turner drill press of unknown age, and an old Rockwell bench top table saw.
 

GirlnAgarage

Well-known member
Joined
Jan 21, 2011
Messages
4,669
Location
Texas
RL, I understand that 'keep moving forward'. That'll look neat though. Painting the panels will make the garage look like a room. Looking forward to the paint drying! :)
 

mdbeck1

Well-known member
Joined
Mar 7, 2010
Messages
2,297
Location
Norman, OK
Looks good Dave.

Another thought on the turnbuckle idea, if one wire is not strong enough and they are free (you have plenty on hand, that is) double up on them. Or make 3-4 on each side. That way it would be 3-4x stronger than a single strand of wire.

Try an old farmer's trick. You see it on the corner posts all the time. Run multiple strands of bailing wire (or tie wire) then insert a piece of scrap steel (rebar, 3/8X12 spike...) toward the middle. Then twist the wire. It will pull an AMAZING amount of slack out of stuff. You can even use twine/rope but you'll need a LOT of it.
 
OP
R

Red Leader

Well-known member
Joined
May 15, 2011
Messages
2,689
Location
Denver, CO
Update Time!

Okay! Finally! I finished putting up the panels! Now, mind you, I will have to do some touch up work (on the paint/panels and also the black hardware). But they are finally on!

Here is an in process shot:

pb110250.jpg


And the finale:


(okay here is what I started with just for perspective):

p8073346.jpg

pb100224.jpg


And here is the finished product:

pb110251.jpg


Here is what it looks like next to the other wall to see how it all ties together:

pb110252.jpg


Whew! :D It only took me over 3 months to get here. No sweat:lol_hitti

But yay! I'm super happy! I think it looks pretty good and ties the whole garage together. The 'garage door' wall was the only wall that was incomplete by a long shot and it really goes a long way in giving the garage that 'finished' look.

After the garage door project, the tool boards are up next!
 

rickairmedic

Well-known member
Joined
May 31, 2005
Messages
4,165
Location
louisville ,Ky
Dave the door looks awesome . You almost have me thinking ( stripes ) in my garage . The only thing holding me back is my walls are gloss white and so is my factory insulated door :D . So mine already match :D.

Rick
 
To avoid these ads, REGISTER NOW!

Firefyter-Emt

Well-known member
Joined
Sep 29, 2005
Messages
171
Location
CT
Wow, that does look awesome! I have almost the exact same door, except my hinges are mounted right to the door, and not on the wood strips like yours. That is the only thing keeping me from doing this to mine. Although, I bet I could add the wood strips and it would still hinge the same. I may need to think about this a bit more!

PS, after seeing that lathe in there, you really should keep that one. It fits in there just fine. Move that joiner and planer out of the corner, center the lathe, and make it a focal point. Also, think about some natural wood on that slat board. Maybe framing it out... it will tie in the natural wood from the fuse box and garage door.
 
OP
R

Red Leader

Well-known member
Joined
May 15, 2011
Messages
2,689
Location
Denver, CO
Wow, that does look awesome! I have almost the exact same door, except my hinges are mounted right to the door, and not on the wood strips like yours. That is the only thing keeping me from doing this to mine. Although, I bet I could add the wood strips and it would still hinge the same. I may need to think about this a bit more!

PS, after seeing that lathe in there, you really should keep that one. It fits in there just fine. Move that joiner and planer out of the corner, center the lathe, and make it a focal point. Also, think about some natural wood on that slat board. Maybe framing it out... it will tie in the natural wood from the fuse box and garage door.

Yep, already there! I think the idea of wood for the slats would be a fine idea - I'm going to do polished aluminum flashing, but I did toss around the idea of wood. Beetle kill pine will be framed around it and will look pretty cool I'm hoping!

You know, I guess we'll see how the lathe turns out. I'm not doing any restorations on anything past this table saw I'm working on until I get some more counter space out there. But! Once it is restored, it sure will be a honey. Thanks for your thoughts on it. I'll have to keep it in mind.
 

ChristopherLutz

Well-known member
Joined
Jun 17, 2010
Messages
270
Location
Flower Mound, TX (DFW)
Red Leader - "pretty good" is an understatement. The garage looks fantastic, and...the attention to detail is fantastic.

If I recall correctly...you have a family - getting all this done in 3 months with young children is quite an accomplishment.

I'm very much looking forward to what you're going to do with the floor....I know you have a beetle-kill pine idea for part of it, but - I don't have a good mental image of your finished vision.

Hat's off to you - it really looks fantastic.
 
OP
R

Red Leader

Well-known member
Joined
May 15, 2011
Messages
2,689
Location
Denver, CO
Red Leader - "pretty good" is an understatement. The garage looks fantastic, and...the attention to detail is fantastic.

If I recall correctly...you have a family - getting all this done in 3 months with young children is quite an accomplishment.

I'm very much looking forward to what you're going to do with the floor....I know you have a beetle-kill pine idea for part of it, but - I don't have a good mental image of your finished vision.

Hat's off to you - it really looks fantastic.

Christopher,

Thanks for your kind words! Actually, the garage project 'mostly' got started around May, so I've been into it in the past 6 months. I meant finishing the garage door, which took 3 months:D

The floor - cool story, I was able to win the Epoxy-Coat flooring contest so I will be laying down an epoxy floor come 2012 when the weather picks up again. I will also be ordering a smaller kit in the blue color to do a stripe on the floor.

The beetle kill pine is what I've been using for the trim, around the bottom of the floor and eventually the tool boards.

I love the look of that wood....


which has something to do with my announcement later today:)
 
OP
R

Red Leader

Well-known member
Joined
May 15, 2011
Messages
2,689
Location
Denver, CO
Looks good Dave.

Another thought on the turnbuckle idea, if one wire is not strong enough and they are free (you have plenty on hand, that is) double up on them. Or make 3-4 on each side. That way it would be 3-4x stronger than a single strand of wire.

Jeff,

I'm glad you suggested this, as my simple brain didn't even go there.

A day or two after the rod snapped, I realized that I made an error. 1 rod per panel may well be enough strength to hold the whole thing up, but I had only attached 1 on 1 section of panels before trying to tighten up, in effect trying to pull up the entire weight of the whole garage door with 1 turnbuckle system. If I actually attach all 4 turnbuckles to the panels, that cuts the weight by 4x. On top of that, if I use 2 wires as you suggest, that cuts the weight on each rod by 1/2, meaning that when properly installed, the load on each rod would be 1/8th of the load that broke the single one. 1 rod trying to do the work of 8 of them probably just won't cut it:D

Try an old farmer's trick. You see it on the corner posts all the time. Run multiple strands of bailing wire (or tie wire) then insert a piece of scrap steel (rebar, 3/8X12 spike...) toward the middle. Then twist the wire. It will pull an AMAZING amount of slack out of stuff. You can even use twine/rope but you'll need a LOT of it.


mdbeck,

That is another great solution. Fotunately, I have the turnbuckles to do the cinching work for me.

How they will look on the door is another matter...
 

mdbeck1

Well-known member
Joined
Mar 7, 2010
Messages
2,297
Location
Norman, OK
...
mdbeck,

That is another great solution. Fotunately, I have the turnbuckles to do the cinching work for me.

How they will look on the door is another matter...

Put the wires BEHIND the insulation... :)


You can also use the wires WITH the turnbuckles.
 

KF5LCH

Well-known member
Joined
Nov 10, 2011
Messages
216
Location
S.E. Oklahoma
Red Leader, I read thru the entire thread & wow. Im at a loss. How do you guys do it?

Everything looks great. I don't know how you guys find these old machines up for grabs. & then on top of it you make them look better than new. Old machines like that are non existant around here. Everything was worked into the ground years ago & tossed in the scrap pile. So sad. You & tinbender have sold me on the 3M deburring wheels. Im getting one for sure now.

Congrats on the new addition to your family. Mine is 7 going on 17. lol.

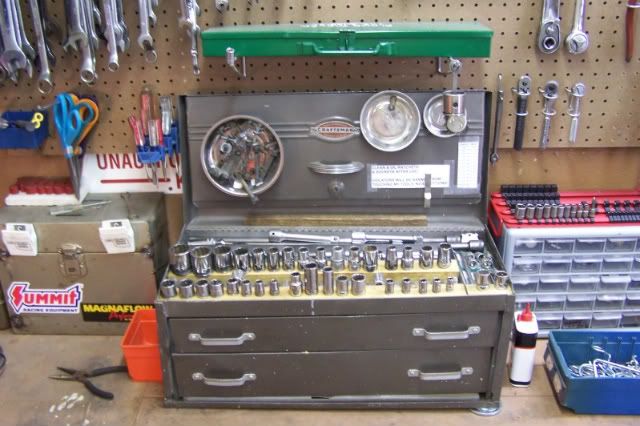
I know it's not much, but I thought you would like to see a pic of my grandpaws old C-man box he gave me. Believe it or not it fell out of his truck going down the highway back in the day. Hence the reason for the shimms on one side. lol. It's plum full of his old circle BE & circle H sockets & a few =V='s thrown in the mix. It's the only tool box I own.

chainsaw077-1.jpg
 
OP
R

Red Leader

Well-known member
Joined
May 15, 2011
Messages
2,689
Location
Denver, CO
Put the wires BEHIND the insulation... :)


You can also use the wires WITH the turnbuckles.

I wish I could but I don't think I'd get the same leverage on the door and then the insulation wouldn't fit because right now it is totally flush with the garage door.

Who knows...maybe it will actually look cool? Haha, I have I high hopes.
 
OP
R

Red Leader

Well-known member
Joined
May 15, 2011
Messages
2,689
Location
Denver, CO
Red Leader, I read thru the entire thread & wow. Im at a loss. How do you guys do it?

Everything looks great. I don't know how you guys find these old machines up for grabs. & then on top of it you make them look better than new. Old machines like that are non existant around here. Everything was worked into the ground years ago & tossed in the scrap pile. So sad. You & tinbender have sold me on the 3M deburring wheels. Im getting one for sure now.

Congrats on the new addition to your family. Mine is 7 going on 17. lol.

I know it's not much, but I thought you would like to see a pic of my grandpaws old C-man box he gave me. Believe it or not it fell out of his truck going down the highway back in the day. Hence the reason for the shimms on one side. lol. It's plum full of his old circle BE & circle H sockets & a few =V='s thrown in the mix. It's the only tool box I own.

chainsaw077-1.jpg

Beautiful Craftsman box there! I can hardly wait to find one for the shop. Out of all the things I look for on Craigslist, nothing goes as fast as Walker Turner tools and the vintage Craftsman tool chests. Sometimes I wish I didn't like them as much as I do:lol:

Regarding the shop and tools, thank you for your kind words. Finding them depends on a few things. No 1, where you live. Fortunately since we live right near Denver, there is a steady supply of old toolage, save for some of the largest industrial machines typically found on the east coast. No 2 - be persistent. Keep looking and looking (some recommends at least 3x a day) and something will eventually pop up.

If you find any cool old tools, feel free to post them up!
 
To avoid these ads, REGISTER NOW!
Top Bottom