
You are using an out of date browser. It may not display this or other websites correctly.
You should upgrade or use an alternative browser.
You should upgrade or use an alternative browser.
New build: Arts & Crafts style garage in historic neighborhood
- Thread starter 993James993
- Start date
OP
993James993
Well-known member
- Joined
- Feb 24, 2008
- Messages
- 524
Hi Bww_mnm,
A month or so ago my local Woodcraft had a sale on 2" thick hard rock maple table tops. They had a top that was the proper size for the bench with the vise. I really prefer a maple top over metal but the idea of getting oil and grease on it is holding me back. This is part of my indecision. The idea of a masonite cover had not occurred to me. Thank you.
Hi EuroVt,
A Mohawk for under $1800? Was this a new unit or used? Mohawk would be my first choice but when I looked at prices they were in the $8K-10K range. The timing is no longer right but when I am back in the market I'll pursue this! Thanks!
OP
993James993
Well-known member
- Joined
- Feb 24, 2008
- Messages
- 524
Pretty much everything related to finishing the garage has been on hold due to the cold temperatures. Then to make matters worse our heat pump died. I know this is a little off topic but here are before and after photos:
This is before. The return air ductwork on the floor ate up 12 square feet of valuable space. The condensate pump was located behind the unit and very hard to reach. Note the bend in the center vent tube so that it could fit into the plenum.

Below is how it looks now from more or less the same angle. The return air ductwork is similar in size but now it's off the floor! The hole in the wall is where the old tin work was removed. I have to get this repaired today as it is an entry point for sub-freezing air that comes in from my nicely vented crawl space. Ideally I could have fixed this before they mounted the new duct work but the original idea was to change out the system in one day so we would not be without heat.

Today's plan is to get this sealed up.
Here is another photo of the new system, complete with recycled ventwork:

This is before. The return air ductwork on the floor ate up 12 square feet of valuable space. The condensate pump was located behind the unit and very hard to reach. Note the bend in the center vent tube so that it could fit into the plenum.
Below is how it looks now from more or less the same angle. The return air ductwork is similar in size but now it's off the floor!
The hole in the wall is where the old tin work was removed. I have to get this repaired today as it is an entry point for sub-freezing air that comes in from my nicely vented crawl space. Ideally I could have fixed this before they mounted the new duct work but the original idea was to change out the system in one day so we would not be without heat.
Today's plan is to get this sealed up.
Here is another photo of the new system, complete with recycled ventwork:
Last edited:
Alkivar
Well-known member
good job recycling looks like you've given yourself a much easier to service configuration too.
OP
993James993
Well-known member
- Joined
- Feb 24, 2008
- Messages
- 524
good job recycling looks like you've given yourself a much easier to service configuration too.
Hi Alkivar,
You got that right! I can reach the condensate pump (at least until I clutter up the space next to it.) and access to change the filter is much better than in the old unit.
OP
993James993
Well-known member
- Joined
- Feb 24, 2008
- Messages
- 524
Hi Andres,
Here is a photo of one of my AC jackstands. They are also available with a curved steel top instead of the rubber.

Here is a photo of one of my AC jackstands. They are also available with a curved steel top instead of the rubber.
MajorLeeGassole
Well-known member
Just went through the pages and it was like reading through a good book. What a setup! Congrats after all that hard work and planning. It's really paid off so far.
abstamaria
Well-known member
James, many thanks. Those seem to be the best stands available. Enjoying the the garage and Porsche, I hope? My best, Andres
OP
993James993
Well-known member
- Joined
- Feb 24, 2008
- Messages
- 524
Hi Sharps,
I'm not sure how I missed your post. Your project came out beautifully!
For anyone who has not seen Sharps' Craftsman Project, brew a pot of coffee and check it out:
http://www.garagejournal.com/forum/showthread.php?t=49785
It's fantastic.
I'm not sure how I missed your post. Your project came out beautifully!
For anyone who has not seen Sharps' Craftsman Project, brew a pot of coffee and check it out:
http://www.garagejournal.com/forum/showthread.php?t=49785
It's fantastic.
OP
993James993
Well-known member
- Joined
- Feb 24, 2008
- Messages
- 524
Chet, thank you! Your comments put a big smile on my face. I appreciate your kind comments!
OP
993James993
Well-known member
- Joined
- Feb 24, 2008
- Messages
- 524
Hi Andres, I don't have a photo of the car on stands but I'll certainly post one when possible. I read in your post that you are considering a MaxJack. There are several threads on a Porsche discussion board that show them off. I can send you a link to the site if you like.
I love that recent photo of your car and garage. For anyone who has not seen it, do your self a favor and take a look at Andres' Modern Garage :
http://www.garagejournal.com/forum/showthread.php?t=71002&page=24
I love that recent photo of your car and garage. For anyone who has not seen it, do your self a favor and take a look at Andres' Modern Garage :
http://www.garagejournal.com/forum/showthread.php?t=71002&page=24
OP
993James993
Well-known member
- Joined
- Feb 24, 2008
- Messages
- 524
As you can imagine, the new HVAC units interrupted my finishing work on the garage. That took up the month of February while I repaired the drywall. I then offered to build some kitchen cabinets as a birthday present for my wife. I thought that would take me a weekend or two at most and building them myself would save considerably over ordering them to spec. So ten weekends later I am still not finished and the materials have cost twice as much as the quote we got on a custom cabinet. The plan is to finish them today. I just need to sand and finish the hard maple countertops and attach them. The cabinets are pretty much tool boxes for the kitchen, and I will likely build some similar units for the garage. I'll post up some photos this evening.
Add to that some DIY plumbing repairs that seem to never end and I have not had any time to work on the garage. Once the cabinets and some tables I am also building are finished, I will dedicate all of my free time to the three remaining garage related jobs.
Add to that some DIY plumbing repairs that seem to never end and I have not had any time to work on the garage. Once the cabinets and some tables I am also building are finished, I will dedicate all of my free time to the three remaining garage related jobs.
Last edited:
has the lintel begun to sag? on one of the pictures, looked liked 3 large beams of wood sandwiched between two long 2x4's. if so, how were these 3 beams secured together to avoid eventual sagging? Also, is it typical to use only 1 horizontal layer bracing on the framing?
jimmie jam
Well-known member
I can't believe that I just found this post. Read the whole thing - WOW, most excellent build!!!!!!!
OP
993James993
Well-known member
- Joined
- Feb 24, 2008
- Messages
- 524
has the lintel begun to sag? on one of the pictures, looked liked 3 large beams of wood sandwiched between two long 2x4's. if so, how were these 3 beams secured together to avoid eventual sagging? Also, is it typical to use only 1 horizontal layer bracing on the framing?
Hi Rntonp,
Thanks for your interest and for reviving this thread.
Are you looking at this photo?:

Those are not three separate beams lined up and held together by the framing underneath. Such an arrangement would have failed immeadiately.
The header is formed by two parallel LVLs. These are "laminated veneer lumber" beams that are sized to handle this span. I would describe them as industrial grade plywood. There has yet to be any deflection.
Thanks again,
Jim
Last edited:
Really great built James!!
I totally love it so much, it's the best one in my list now
It's all come together nicely, the garage, the atmosphere, the color, the surrounding, all of it !!
And you know what, it's totally resemble my soon to be garage. Mine is also about 23' x 20' (7x6 m). Except mine is all concrete and it's half way around the world from yours. Oh and without a Porche
All of my plans were gone post by post going through your thread, and in my head was like "this is it, this is it !!".
Yours and Jack's will be my ultimate dream garage when I finally do mine, and of course the green will absolutely be the color of choice
again, great build and awesome inspiration !!
Attachments
OP
993James993
Well-known member
- Joined
- Feb 24, 2008
- Messages
- 524
I can't believe that I just found this post. Read the whole thing - WOW, most excellent build!!!!!!!
Hi Jimmie,
Thanks! I'm glad that you enjoyed the thread.
I have been distracted by other activities and need to resume work on the last few tasks related to the garage. There are two that are pressing, trim boards around the exterior to keep fine dust from entering and settling on the cars and benches, and a new gate. Actually that reminds me that there is much more to be done.
Once it cools off a bit I plan to take a week's vacation and finish the trim boards. I'll resume posting photos when I get started.
Thanks again for your kind words.
Jim
OP
993James993
Well-known member
- Joined
- Feb 24, 2008
- Messages
- 524
Really great built James!!
I totally love it so much, it's the best one in my list now
It's all come together nicely, the garage, the atmosphere, the color, the surrounding, all of it !!
And you know what, it's totally resemble my soon to be garage. Mine is also about 23' x 20' (7x6 m). Except mine is all concrete and it's half way around the world from yours. Oh and without a Porche
All of my plans were gone post by post going through your thread, and in my head was like "this is it, this is it !!".
Yours and Jack's will be my ultimate dream garage when I finally do mine, and of course the green will absolutely be the color of choice
again, great build and awesome inspiration !!
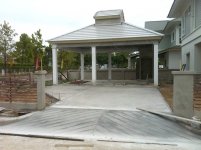
Hi PV2986,
Thats is a great looking structure!
I see that you have already solved two issues that I have yet to deal with: the concrete driveway that leads to the driveway on your property and the fence surrounding your lot. Those details indicate to me that you have thoroughly planed your project. I encourage you to start a build thread so we can follow your progress.
Do you have plans for any type of pergola to allow you to go from the garage to the house without getting wet in a rainstorm?
Thanks for your kind words!
Jim
Yes, That is the photo. I could tell you were knowledgeable about this subject, so I doubted my own question as I asked it. Beautiful job. Beautiful town. Terrific looking pub. Is there a sign on the men's bathroom door stating "Used Beer" ? I saw that in a irish-type pub and thought it was funny.
I can't believe that I just found this post. Read the whole thing - WOW, most excellent build!!!!!!!
That'd be two of us, I didn't read *every* post but did park here for about 3hrs..very nice build!
Red Leader
Well-known member
This is a gorgeous garage. And for whatever reason your door gave me the inspiration for the wood trim in my garage (even though they are not the same color).
Thanks for that
Thanks for that
Hi PV2986,
Thats is a great looking structure!
I see that you have already solved two issues that I have yet to deal with: the concrete driveway that leads to the driveway on your property and the fence surrounding your lot. Those details indicate to me that you have thoroughly planed your project. I encourage you to start a build thread so we can follow your progress.
Do you have plans for any type of pergola to allow you to go from the garage to the house without getting wet in a rainstorm?
Thanks for your kind words!
Jim
Oh sorry for mistaken your name, Jim.
Fence is typical for any properties here, no matter big or small. So it's kind of like a sure thing we will get or have to get.
The plan for driveway surface is stamped concrete but still not design on pattern and color but I'm leaning to grey tone to match with overall house.
I haven't decide on any pergola yet, not a top priority since the roof of main house pretty much almost cover to the garage roof. So I think I can get away with that and it's just 3 m anyway.
Build thread will be coming but it's gonna be a while. The main house is first priority now, gotta finish that first.
Pao
OP
993James993
Well-known member
- Joined
- Feb 24, 2008
- Messages
- 524
That'd be two of us, I didn't read *every* post but did park here for about 3hrs..very nice build!
Thank you Gooned! I appreciate you kind words.
")
OP
993James993
Well-known member
- Joined
- Feb 24, 2008
- Messages
- 524
This is a gorgeous garage. And for whatever reason your door gave me the inspiration for the wood trim in my garage (even though they are not the same color).
Thanks for that
Hey Dave,
Thank you!
For anyone who has not seen Red Leader's 1950s Craftsman Garage retro remodel you should check it out. Plan about 3 hours as there are a lot of cool things to see! It's one of my favorite threads here.
Jim
FRENCHBLUE72
Active member
- Joined
- Sep 18, 2011
- Messages
- 30
I'm a new guy here and spent most of the morning reading through your build thread looks to be very well thought and and executed.
OP
993James993
Well-known member
- Joined
- Feb 24, 2008
- Messages
- 524
Hi Mpire and Frenchblue,
Thanks guys!
With any luck I will have new gates build soon. I have a new design that I like and one of my neighbors has offered to build the steel frames. I'll post up the design and hopefully some photos showing the progress.
On another note I just scored a nice two door metal cabinet that was discarded at work. I don't know if it will fit but it would be great for storing a lot of stuff.
OP
993James993
Well-known member
- Joined
- Feb 24, 2008
- Messages
- 524
I have started to make some progress. After what seems like a year, and two or three designs later I finally have the plan for how to execute the gates.
They are going to be steel frame with vertical wooden planks instead of pickets, topped off with a horizontal cap. The overall look will be arts & crafts but with the durability of steel construction. I think the design goes well with the strong horizontal lines of my house and the siding on the garage. I plan to use clear pine planks finished with the same dark shade as my exterior man door.
Here is a photo of a porch railing in my neighborhood that served as inspiration:

While I plan to cut a design into the planks it will not be as elaborate as this.
What makes this especially good is that a neighbor who is a steel fabricator has offered to build them. With luck he will start on them this week and they will be finished before too long!
They are going to be steel frame with vertical wooden planks instead of pickets, topped off with a horizontal cap. The overall look will be arts & crafts but with the durability of steel construction. I think the design goes well with the strong horizontal lines of my house and the siding on the garage. I plan to use clear pine planks finished with the same dark shade as my exterior man door.
Here is a photo of a porch railing in my neighborhood that served as inspiration:
While I plan to cut a design into the planks it will not be as elaborate as this.
What makes this especially good is that a neighbor who is a steel fabricator has offered to build them. With luck he will start on them this week and they will be finished before too long!
OP
993James993
Well-known member
- Joined
- Feb 24, 2008
- Messages
- 524
Awesome build. is the green you used a stock color or a custom mix? Could you share it with me, I would like to paint my shutters and fence that color.
Thanks B4Z,
The olive green used on the garage door is a Frank LLoyd Wright color that was created for Martin Senour Paints in the 50's. The license has expired so they no longer offer it.
What color is the body of your house? I would recommend going to a Sherwin Williams shop and picking up a handful of olive paint chips. Compare them to the paint on your house and pick the one or two or three that you like. Then back to SW and buy a sample pint of paint of each potential color. Then paint a board (I used cardboard) and put it up on your shutters. This will allow you to see the actual color and how it looks with the rest of your house throughout the day in changing light. You wil know exactly what you are getting.
I used this process to verify the color for the siding and it saved me from some potential disasters.
Good luck!
OP
993James993
Well-known member
- Joined
- Feb 24, 2008
- Messages
- 524
Here are some initial photos of the gates. These are overbuild to say the least!


OP
993James993
Well-known member
- Joined
- Feb 24, 2008
- Messages
- 524
Fantastic build!!
Thanks Saintv90!
Here are some shots of the steel being installed:


The epoxy bolts need to set up 24 hours before the gate frames can be hung. I will be installing the wood panels. There will likely be temporary plywood panels so that I can remove the chain link fence. The existing wooden fence in the foreground of the last photo will be removed once the new gates are finished.
51rider
Well-known member
Nice to see this one back at the front of GJ.
Looking forward to seeing the gates go in.
Looking forward to seeing the gates go in.
OP
993James993
Well-known member
- Joined
- Feb 24, 2008
- Messages
- 524
Hi 51rider,
I'ts nice to see you again. Thanks for taking the time to comment.
Installing the frames is time consuming. The east side "wings" are installed and the concrete and epoxy bolts are curing. With luck my neighbor will install the steel gate today. The west side "wings" are installed and the concrete footing are setting up.
It's hard to photograph this work but here is where we stand today:
OP
993James993
Well-known member
- Joined
- Feb 24, 2008
- Messages
- 524
I want to point out that the quality of the ironwork is over the top. The material and workmanship is commercial/industrial, even military grade. This ironwork would be right at home anywhere. I suspect that Jack Olsen and JaysinSpaceman would would approve of these gates.
Luckily it will all be covered by the wood planks! Speaking of which, I'm the one doing that job. With my real work taking up my time it could be the end of the year before I finish. my current track record is not stellar.
I'm considering a temporary covering that will secure the place and let me get rid of the chain link gate.
It goes without saying that I am very happy with the work my neighbor is doing for me on these gates!
Last edited:
OP
993James993
Well-known member
- Joined
- Feb 24, 2008
- Messages
- 524
Progress photos from yesterday. My friend who built the gates jumped up on the far edge of wide gate and let it swing open with his full weight. Other than swinging open, nothing moved at all. There was no sagging or bending. The gate is 47" wide and balanced so that it swings with no effort. He is going to install a stop/catch with a foot release.


Last edited:
abstamaria
Well-known member
The place is looking really nice, James. The pathway is lovely. Andy
OP
993James993
Well-known member
- Joined
- Feb 24, 2008
- Messages
- 524
Hi Andres! It's nice to see you here. I do like the walkway, partly due to the canopy provided by the mesquite trees. As soon as I put up the wood planks on the new gates I plan to remove the existing fence between the garage and the house. This will make the entire back yard seem much larger. The garage and guesthouse form a barrier that closes in the back yard, turning it into an interior courtyard. I plan to take out the palm tree before it gets any larger and possibly put in a shade pergola in that area.
OP
993James993
Well-known member
- Joined
- Feb 24, 2008
- Messages
- 524
I am getting ready to hang the planks in a week or so. I still have a few details to work out regarding the final design but this should all fall into place. The main vertical elements are set. I will still play around with the horizontal sizes.
The vertical boards will be 7 1/4" wide with a 3/4" gap between each one. This is wider than I would like but the hinges established this spacing. I wanted the boards to **** up to the edge of the steel frame and the heavy duty hinges dictate this gap. This first shot gives an idea of the gap spacing:

The planks will be wider than these. I will eventually block the openings with boards attached to the back of the gate.
There will be a round hole to expose the lockset but I don't want to put a handle on the outside of the gate. Instead I will bevel the inside of the board to form an invisible handle. The bevel will match the steel frame:

The west side presents multiple design issues. The neighbor's wall does not extend back as far as the garage. I will need to install planks to match the gates that will cover about 15" of the side fence. In order to match the height of the gates on both sides the west gate has a much wider gap at the bottom. This results in the gate being higher than the existing fence. This will be evident when I attach the boards. For now I envision putting a piece of sheet metal at the bottom edge of side and spraying it dark brown to match the frames. And if all that is not enough, the block wall is not plumb.

Getting all of this done will be a milestone!
The vertical boards will be 7 1/4" wide with a 3/4" gap between each one. This is wider than I would like but the hinges established this spacing. I wanted the boards to **** up to the edge of the steel frame and the heavy duty hinges dictate this gap. This first shot gives an idea of the gap spacing:
The planks will be wider than these. I will eventually block the openings with boards attached to the back of the gate.
There will be a round hole to expose the lockset but I don't want to put a handle on the outside of the gate. Instead I will bevel the inside of the board to form an invisible handle. The bevel will match the steel frame:
The west side presents multiple design issues. The neighbor's wall does not extend back as far as the garage. I will need to install planks to match the gates that will cover about 15" of the side fence. In order to match the height of the gates on both sides the west gate has a much wider gap at the bottom. This results in the gate being higher than the existing fence. This will be evident when I attach the boards. For now I envision putting a piece of sheet metal at the bottom edge of side and spraying it dark brown to match the frames. And if all that is not enough, the block wall is not plumb.
Getting all of this done will be a milestone!
Last edited: