To avoid these ads, REGISTER NOW!

Craftsman 150 drill press head unit disassembly (pic heavy).

mrbreezeet1

Banned
Joined
Dec 6, 2010
Messages
3,694
Location
Moundsville, WV, 15 miles South Of Wheeling WV
I have a 150 that my grandfather bought new. The on/off switch is just a simple toggle on the lamp cord style power cord. The switch is hard to reach and dangerous, I hate it. Anyone retrofit something better?

This is a great thread! My drill works fine, but it could definitely use a good cleaning. The owners manual is going to be a nice thing to have too.

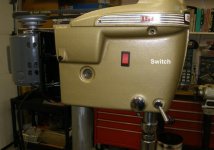
Yeah, evintho might be along with the details, but here is a picture of his, He had the switch in the lamp cord as well.
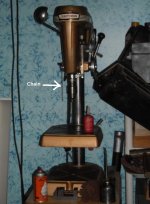
And here is mine, you can see the chain I am pointing too, the PO must have installed it. It's a switch like an old lamp with a pull chain.

I remember too, craftsman made those motors too, that had a switch built right into them . Right around where it would be on a bench grinder.
Tony
 

Attachments
  • evintho switch.jpg
    evintho switch.jpg
    53.8 KB · Views: 585
  • Drill Press chain.jpg
    Drill Press chain.jpg
    78.6 KB · Views: 612
Last edited:
To avoid these ads, REGISTER NOW!
OP
E

evintho

Well-known member
Joined
Apr 6, 2006
Messages
1,358
Location
Santa Rosa, CA.
Yeah, my power cord was toast so I had to replace that too. I picked up a rocker switch from Grainger for $3-$4 then had to bore a hole in the head unit. I picked the area I wanted it in and traced the shape of the switch. Drilled a hole in each of the 4 corners then used a die grinder to open it up. Epoxied the switch in with 2-part epoxy. For wiring I just cut the neutral wire on the new power cord, connected one end to a tang and the other end to the other tang and I was done.

P1010005.jpg
 

rickairmedic

Well-known member
Joined
May 31, 2005
Messages
4,165
Location
louisville ,Ky
Evintho you did a great job on your 150. I am tempted to do a resto on mine but its in such great original shape . I may end up just doung a good cleanup for now and leaving it be . I did get the original owners manual with mine ( which amazed me ) .

Rick
 

mrbreezeet1

Banned
Joined
Dec 6, 2010
Messages
3,694
Location
Moundsville, WV, 15 miles South Of Wheeling WV
Yeah, my power cord was toast so I had to replace that too. I picked up a rocker switch from Grainger for $3-$4 then had to bore a hole in the head unit. I picked the area I wanted it in and traced the shape of the switch. Drilled a hole in each of the 4 corners then used a die grinder to open it up. Epoxied the switch in with 2-part epoxy. For wiring I just cut the neutral wire on the new power cord, connected one end to a tang and the other end to the other tang and I was done.

Why switch the neutral wire?
I thought usually the Hot was broken in a switch?
 
OP
E

evintho

Well-known member
Joined
Apr 6, 2006
Messages
1,358
Location
Santa Rosa, CA.
Evintho you did a great job on your 150. I am tempted to do a resto on mine but its in such great original shape . I may end up just doung a good cleanup for now and leaving it be . I did get the original owners manual with mine ( which amazed me ) .

Rick

Thanks Rick! That's basically all I did on mine was give it a good cleanup. Now it not only works good but looks great too!


Why switch the neutral wire?
I thought usually the Hot was broken in a switch?

I wasn't sure myself so I consulted an electrician with 25 years experience and he said break the neutral wire. He told me why but it's been awhile and I don't remember the explanation!
 

tool_scrounge

Well-known member
Joined
Jul 20, 2010
Messages
4,211
Location
Southern California
I wasn't sure myself so I consulted an electrician with 25 years experience and he said break the neutral wire. He told me why but it's been awhile and I don't remember the explanation!

Wow - that is a new one....

Let me give an example....

A wire inside the motor semi-shorts out to the grounded chassis and starts smoking. If you turn off the power switch (wired for switching the neutral), you have disconnected the circuit downstream of the short, which does nothing. So it continues to burn. So you would have to unplug the drill press to stop the smoking. If this happens when you are not around, it could cause a fire. This is my understanding of why you switch the hot line, as if anything shorts to ground after the switch, turning the switch off kills power to the short.

These are very well built drill presses but the electrical (wiring, motor, etc) is still 50+ years old.
 
Last edited:

BOBSCRAFTSMAN

New member
Joined
Oct 18, 2011
Messages
1
Hi, My drill bit snagged and whipped a clamped piece off the table. I now have a spindle that wobbles. Is there any way to adjust for this? Can I replace anything to fix it? I really liked this old drill press. It's been handed down from my grandfather. Does this mean I just have a big piece of scrap iron? Thanks for this great thread, especially to the pictures of the disassembly. Well done! Life is good, Bob
 

gsapatka

New member
Joined
Nov 25, 2011
Messages
3
Location
Cleveland, Ohio
After seeing what you guys accomplished with the 150's, I now thinking it's time to re-fab mine. I have a bench top with what seems to have a rattling noise when operating the spindle up and down. Could this be a bearing or just a lube issue? The spindle spins without wobble. Any help would be appreciated.

:bowdown:

Jerry
 

mrbreezeet1

Banned
Joined
Dec 6, 2010
Messages
3,694
Location
Moundsville, WV, 15 miles South Of Wheeling WV
After seeing what you guys accomplished with the 150's, I now thinking it's time to re-fab mine. I have a bench top with what seems to have a rattling noise when operating the spindle up and down. Could this be a bearing or just a lube issue? The spindle spins without wobble. Any help would be appreciated.

:bowdown:

Jerry

Not sure, but mine does that a little bit too. Still tight, and true, so I never worried too much about it.
I think you are supposed to grease the spindle somewhere, would have to find my manual. Think I might have lost it when my HD crashed.
 

NoSloCoupes

Well-known member
Joined
Jan 5, 2011
Messages
196
Location
IL
I'm about done with the resto on my 100 benchtop. If you can follow, heres the problem. When i got it, the spindle pulley would go up with the spindle/quill when it would return to rest. Then the next down trip the spindle loses contact with the pulley because it doesn't stay put. I've got it all cleaned up and I can't figure out what holds the pulley assembly in place in the head assembly? Is it just a press fit with the bearings? If i hold the pulley down, everything works as it should when using the handle....but with no pressure on it, the pulley wants to move up with it.

Everything i can see from the pdf's i've found, it all looks to be there. I put new pulley bearings in, the configuration from top to bottom goes: bearing, spacer, bearing, snap ring. Then theres another snap ring that goes into the headstock, from what i can tell, that is just a "stop" from allowing the pulley to bottom out.
 

ckadams00

Well-known member
Joined
Sep 12, 2011
Messages
1,273
Location
Seattle, WA
On my 150 I installed an appliance bulb inside the head mounted on a lamp socket and bolted on with a "L" shaped piece of aluminum. There is plenty of light inside the head unit of this drill and it doesn't require any "modification" - just tapped one small screw hole. I rant the power cord from that light and the power from the motor to a double-switch box mounted on the side of the drill, so I have an on/off switch for the lamp and an on/off switch for the drill. The power cord runs from the switch box to the outlet and the switch box is mounted to the front of the motor mounting plate, just to the left of the drill head.

I will post photos in the next day or so so you can see. I like this set up for a couple of reasons. First, I can easily check to see if the drill is plugges in by flicking the light switch (really safe way to double check before hitting the drill switch). Having a down facing lamp is nice - I am not a big fan of external lamps getting close to the work area. All of my old Craftsman tools have external on/off switches on the motor mounts, so I am switching out this box set up on each tool - I REALLY do not like reaching around the back for an on/off switch I can't see.
 

NoSloCoupes

Well-known member
Joined
Jan 5, 2011
Messages
196
Location
IL
I'd like to see pics of that setup. I'll be adding a switch also, i do not like the placement of the stocker. I also got my ordeal straightened out...needed some lube on the spindle,lol.
 

fordbroncodave

Well-known member
Joined
Sep 15, 2009
Messages
4,555
love these drill presses. this thread inspired me to get one. mine came with the owners manual AND the placement sheet for the reduction pulley. i can scan that later.

i have only owned mine for a week or 2 and i can say it is built tough!
 

CMatt527

New member
Joined
Mar 6, 2012
Messages
1
Location
Ventura, CA
Evintho amazing job on the DP, I have an old 103.23640 that I'm in the process of refurb'ing, when I ran across your thread. Just curious when you were polishing and buffing the chuck did you leave it on the spindle or remove it? And did you use a bench mounted buffer or a dremel type? Thanks much!
 

nehog

Well-known member
Joined
Jan 2, 2010
Messages
7,935
Location
Jaffrey, NH
We use one of these in our production shop... There is an optional variable speed adapter that allows fast selection of any RPM, and a 'table lift' which allows cranking up the table.

What I want is a new longer tube, perhaps the floor model one.
 

SpeedinLemon

Well-known member
Joined
Oct 23, 2011
Messages
307
Location
North Texas
We use one of these in our production shop... There is an optional variable speed adapter that allows fast selection of any RPM, and a 'table lift' which allows cranking up the table.

What I want is a new longer tube, perhaps the floor model one.

Do you have pics you could post of that setup? Or anyone with the variable speed adapter? Thanks....I'm about to start rebuilding my Floor model 150.
 

SpeedinLemon

Well-known member
Joined
Oct 23, 2011
Messages
307
Location
North Texas
Here are two shots of mine. I can try to get some more pics tonight if you want.

Very cool....looks handy!. Thanks for posting that up so quick. I like your tag line.....Another variation:

If you can't fix it with a hammer, then you sir, have an electrical problem!


BTW...Mrbreezeet1.....Very Nice job on the resto! Thanks for all the pics. :thumbup:
 
To avoid these ads, REGISTER NOW!

fordbroncodave

Well-known member
Joined
Sep 15, 2009
Messages
4,555
i have the very rare original papers that came with the middle pulley setup.

i can upload pics tonight if wanted
 

Enkidu

Member
Joined
Apr 13, 2012
Messages
5
Location
Seattle, WA
Because of this thread, I've been compelled to pick up a 150 of my own. We have one at work and I like it quite a bit, so it didn't really take much to push me over. :)

I finally found one last weekend, which is completely functional though its missing a couple of parts (one of the maroon-colored knobs and the quill-lock handle) and its got several coats of old nasty paint on it. I was thinking of taking it in and having it sandblasted, but the place I called suggested just going with a chemical treatment (some kind of acid bath) to remove the old paint. I was able to pull the pulley and bearing out of the head unit so I don't think it will hurt anything, so I'm leaning towards just doing the chemical treatment before painting it and foregoing the sandblasting.

Looking forward to getting some nice new paint on it - I'm compelled to go with the hammered black paint like the previous poster in this thread. Awesome.
 

mrbreezeet1

Banned
Joined
Dec 6, 2010
Messages
3,694
Location
Moundsville, WV, 15 miles South Of Wheeling WV
Not sure, but mine does that a little bit too. Still tight, and true, so I never worried too much about it.
I think you are supposed to grease the spindle somewhere, would have to find my manual. Think I might have lost it when my HD crashed.

I found what it was at least on mine, the depth adjuster rod, the threaded one, was rattling against the casting.
 
OP
E

evintho

Well-known member
Joined
Apr 6, 2006
Messages
1,358
Location
Santa Rosa, CA.
Evintho amazing job on the DP, I have an old 103.23640 that I'm in the process of refurb'ing, when I ran across your thread. Just curious when you were polishing and buffing the chuck did you leave it on the spindle or remove it? And did you use a bench mounted buffer or a dremel type? Thanks much!

Sorry I'm so late, I just saw this now! I left the chuck on the spindle when I polished it and I used a bench mounted buffer that I scored off of CL for like $60 with all the compounds.

P1250030.jpg


Enkidu.............
I blasted mine in the backyard with an HF 90lb blaster. It only took a few minutes and did a great job! I'd recommend blasting instead of paying for a chemical bath!

P6070003.jpg
 

Enkidu

Member
Joined
Apr 13, 2012
Messages
5
Location
Seattle, WA
Enkidu, ENCO sells some knobs that might look ok on a older drill press, if you can't find an OEM one.
ENCO black ball lever knobs.
http://www.use-enco.com/CGI/INPDFF?PMPAGE=689&PMITEM=328-2203
Thanks! I found some of those over at mcmaster too - I think I'll get some as soon as I can find a few more things to order from them (otherwise I'll be paying $10 to ship $5 worth of parts ;) )

One thing I'm scratching my head over is the little tin plate pinned to the pedestal base that has the model# stamped into it. A previous owner just painted over the whole thing so I'm wondering if there is any way I'll be able to rescue the original decal? Seems a difficult task to me - to remove one layer of paint while keeping an older one intact.
 

Enkidu

Member
Joined
Apr 13, 2012
Messages
5
Location
Seattle, WA
evintho - I wish I had a sandblaster, but I'm only beginning my garage accumulation and haven't gotten one yet. I can't find anyone I know with one either! The shop quoted me $60 for the chemical dip so its not too bad, plus I don't have to worry about any additional prep.
 

jtbinvalrico

Well-known member
Joined
Jan 2, 2010
Messages
1,375
Location
Tampa FL
Regarding the data plate on the base, flip it over and use a punch to drive those screws out so you can get the plate off. Consider using a little heat, maybe a hair dryer, to soften that old paint enough so that you can pull it off without damaging the the plate.

$60 ain't bad to get it prepped.....just get that data plate off before you send it in. Post a want ad for your missing parts on OWWM.com........guys are always parting out machines over there.

Start a thread on your resto.....with lots of pics please.
:beer:
 

buening

Well-known member
Joined
Dec 17, 2007
Messages
1,338
Location
Decatur, IL
The pole was covered with rust and gunk. I simply clamped it to a 2x4, used my DA sander and sanded it with 150 grit followed by 240 to remove some of the scratches. Came out great! Here it is half done..............

PC140013.jpg


Finished and covered with a light coat of oil for rust prevention................

PC200001.jpg

Can you clarify how you cleaned up your DP pole? I can't see how a flat 6" DA disc will work well on a curved surface like a pole. I have a Rockwell press I'm about to tear down and was looking for a reasonably quick way of freshening up the pole (I don't have a large lathe)
 
OP
E

evintho

Well-known member
Joined
Apr 6, 2006
Messages
1,358
Location
Santa Rosa, CA.
Can you clarify how you cleaned up your DP pole? I can't see how a flat 6" DA disc will work well on a curved surface like a pole. I have a Rockwell press I'm about to tear down and was looking for a reasonably quick way of freshening up the pole (I don't have a large lathe)

The D/A worked fine. It'd be nice if there was some type of sander that conformed to the pole but I'm not aware of one, and if there is, I don't have it! I make due with what I have available. It didn't take very long to sand the pole down. After removing all rust with the D/A, you can smooth the scratches out by just sanding up and down with a piece of handheld sandpaper. It works quite well.
 

picah

Active member
Joined
Aug 2, 2009
Messages
41
I also have a craftsman 150 that I just picked up for $150. I have completely torn it down for a full restore but I have a few questions.
How can I tell if the two large pulley bearings are good or should be replaced?
In removing the spindle pulley (one piece) I see that there is room between the top bearing which is still on the spindle pulley assemble and the snap ring to allow the pulley spindle sleeve to move up and down about 1/4 inch. Is this correct or should the bearing being lower on the spindle so the snap ring captures the sleeve between the snap ring and the bearing without vertical movement?
I have some concern here as when I drove the pulley spindle out of the top of the head the bearing came with it. I guess if it moved on the spindle it would have moved close to the snap ring, not further away.
Finally, when I drove out the pulley spindle, the lower large bearing moved out of the bearing housing and is now free but trapped between the upper and lower bearing housings machined into the cast iron head. What is the proper method and sequence to put the pulley spindle back into the head whether I change out the bearings or not?

Really appreciate any help that you can offer. I am looking forward to having this great old DP restored and ready to go.
Regards
 

jtbinvalrico

Well-known member
Joined
Jan 2, 2010
Messages
1,375
Location
Tampa FL
Two options here.....re-seat the bearing that is stuck in there, or finish removing it.

To re-seat the bearing: It's important to not whack on the wrong part of the bearing. Any force you exert on it needs to be focused on the outer rim. Start by lining up the bearing over the hole it will go into. You need to press this bearing back into the hole it came out of. You can rig up an assembly of some sort using some round metal plate and a threaded rod to pull it back into position......You can get a dowel the same diameter as the bearing and gently tap it back into position.......Or you can re-engage the pulley shaft to the bearing that is stuck in there and carefully tap the whole thing back into place using a mallet. Be really careful here, it's important to drive the bearing(s) back in squarely.

To remove the bearing: Use a dowel the same diameter as the bearing to carefully and squarely tap it up through the first hole and out of the head.

I think I understand where you are at on this. Some pics would give us a clearer picture.
 

picah

Active member
Joined
Aug 2, 2009
Messages
41
Thanks jtb - I will take a picture and get it up here later today

What's confusing to me is that the pulley shaft must obviously go in from the top of the head. THe lower pulley shaft bearing is held in place by the large snap ring below it ( and the 2 screws above). So the pulley shaft must get pressed into the inner bearing race of the lower bearing from the top. But ... is the top bearing (identical to the lower one - pp205) already on the pulley shaft when the pulley shaft goes in or is the upper bearing installed in the head and then the pulley shaft pressed through both inner races in the same step. If the upper bearing is one the shaft already, what keeps it from sliding too far up the shaft and contacting the underside of the pulley? If the top bearing is in the head already, what keeps it from being driven out to the bottom as there is no lower snap ring for that upper bearing?

All a learning experience - right? :eek:)
many thanks for our willingness to help
Ron
 

Big-Foot

Well-known member
Joined
Jan 30, 2005
Messages
1,951
Location
Midlothian, TX
Subscribing...

I have this exact same drill press that I inherited from my Dad and was my grandfathers before that. No need to restore mine as it is in excellent condition and always maintained!
Just a bit dusty now since I have been a bit slow at cleaning out that part of my old shop..
 

picah

Active member
Joined
Aug 2, 2009
Messages
41
here's what I started with:
rhr3iq.jpg

First time trying to load a pic here so I hope it works !
 

picah

Active member
Joined
Aug 2, 2009
Messages
41
so here are some pics to show where I am.
here is the pic of the pulley spindle - you can see that the bearing came out of the head and is still on the shaft of the pulley spindle. You can also see that the sleeve is free to move up and down about 3/8" below the bearing and the groove that holds the snap ring (removed in this photo). Is this normal?
IMG_2589.jpg


Here are two pics of the lower bearing for the spindle pulley. You can see it is free in the head but trapped between the lower race where it belongs and the upper race which holds the upper bearing.

IMG_2590.jpg

IMG_2592.jpg


I need help to determine:
how do I check to see if the bearings are good
how do I put it all back together

many thanks for your assistance
I will keep you all posted on the restoration process
besdt
Ron
 

jtbinvalrico

Well-known member
Joined
Jan 2, 2010
Messages
1,375
Location
Tampa FL
Have a look at the diagram below. The spindle pulley assembly is part 1. You'll notice a pulley, a shaft extending below it, and a bearing already on it.....that's part 1. Next is the spindle pulley sleeve, part 2; and just below that is your second bearing.

The spindle pulley sleeve is what maintains the distance between the lower pulley and the upper pulley, and therefore maintains the height at which the pulley extends from the top of the drill press head. I removed mine as an entire assembly - I tapped the whole thing out and up through the head after removing the two retaining screws on the sides of the head. Where yours may have separated, it really doesn't matter if it goes back in as one whole unit or in parts, as long as its all there as the diagram indicates.

Note the functions of the two retaining rings: The small one locks the sleeve onto the pulley spindle, and the large one is the lower stop for the lower bearing.

ed93ed62.jpg


Here's the OWWM link to the full diagram and parts list for that DP.....it's what I based my rebuild on:

http://vintagemachinery.org/pubs/detail.aspx?id=4779
 
To avoid these ads, REGISTER NOW!
Top Bottom