To avoid these ads, REGISTER NOW!

The Skunkworks Build begins

boiler7904

Well-known member
Joined
Apr 4, 2006
Messages
3,414
Location
NW IN
While cost per "horse" may be prohibitive, there are several VERY nice features:

1) can be adjusted to the perfect height so one person can load/unload a pickup quickly.

2) can be adjusted for perfect height to work...

3) can be raised WAY up so you can work UNDER the material for more space.

4) easy to clean under.

5) no more crawling around reaching for stuff you dropped under the table.

6) can be raised WAY up to easier load material onto high ladder/scaffolding.

7) you will NEVER overload them.

8) if you load your trailer right, you can just kick the arms under it and take it directly off the trailer!!!

:beer::lol_hitti

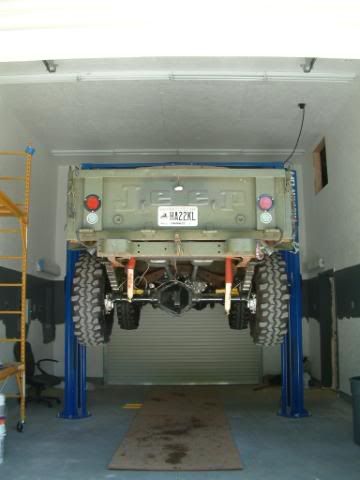
All very valid points. If my ceiling was higher, I'd considering getting a pair of those too.
 
To avoid these ads, REGISTER NOW!
OP
B

bluesman2a

Well-known member
Joined
Aug 16, 2005
Messages
1,312
Location
Atlanta, Ga.
Ruminations on OSB.

OK, so I've been slowly toiling away with insulation and OSB on the walls. I have a couple of thoughts here based on my experience:

1) OSB is cheap and getting cheaper. When I started the project, it was running a bit over $5 per sheet, as of the last purchase I made, it was down to $4.30 a sheet.

2) I had a LOT of cut-ins to do with my outlets (20-30 per bay). It really helped to make the panels with the outlets as small as possible. See earlier pics, I made a belt-line about 30" wide in the center of the wall. My outlets are about 52" off the floor, so not only was it easier to make these panels, if I ever need to get at the wiring, I can take these off and easily get to the wiring troughs without taking the whole wall apart.

3) Tools:
  • Light-weight cordless drill -- I used a smaller Makita lithium 18v, you will put up a LOT of screws and it pays to have something easy to handle for extended periods. Also something easy to work one-handed.
  • Deck-screw-driver -- This is the type with the magnetic tip and slip-down collar. Again, you will be putting in a LOT of screws, so something you can use one-handed is a must.
  • Chalk line -- unless you are lucky enough to have 100% straight/square building, you'll need to snap some off-angles for appropriate cutting.
  • Screws -- I just bit the bullet and bought the BIG bucket of 2" course drywall screws, they are cheaper by the bucket and you can always find uses for them.
  • Circular saw with rip-fence -- I'm sure there are better ways to do this, but I did all my cutting with a chalk-line and circular saw.
  • Jig-saw -- a MUST for cutting in boxes.
  • 1/2" Spade drill bit -- Used to make holes at corner of box cut-outs.
  • Sample box for tracing outline of cutouts.
  • Framing square -- lots of uses.
  • Caulk-gun -- get the good/drip-less one, you will be using it a LOT.
  • Caulk scraper -- I got a plastic triangle-shaped tool, with a rubber tip, this is one of the most useful tools I found for this project. See more on this later.

4) Process -- This is pretty straight forward. But some pointers:
  • Try for the best/closest seams possible.
  • There are two distinct sides of OSB, a smooth side where the labels are printed on, and you can feel the glue/laminate, and a very rough side, where they typically print lines to help you find the studs. I kept the rough side out. I'm not sure there is a difference, but I say this only to point out that you want to be consistent, as they will look/feel different when painting later.
  • Make sure every edge is supported. If you need to, screw in some 2X2 stock, so every edge can be secured.
  • I found about every 18-20" was good spacing for screws. A good way to tell if it's secure enough is to hit the panel and see if it has a solid thud or if the panel bounces/rattles. If it bounces, put in another screw.
  • If you can't get a good/straight seam, caulk will hide a multitude of sins.

5) Finishing -- AKA Caulk-it-up!!!
  • I used a little over a case of caulk for both my bays and ceiling on one side. I just got the fast-dry, latex caulk in brilliant white.
  • Caulk in this project plays the same role as joint-compond does for drywall. No matter how good a joint is, a little caulk smoothed over it will make it look better especially with some paint.
  • Put a liberal bead of caulk down each joint, making sure to fill all the crevices/gaps at least level with the boards to either side.
  • Scrape the excess smooth with a rubber edged caulk-scraper. This WILL generate a LOT of wasted caulk, but it's OK, you can just wipe it off with a paper-towel. I tried early on to re-use some of it in trowel like application, but that was WAY too painful, so I just trashed most of the excess.

6) Painting --
  • Based on what I've seen here, I chose to prime with Kilz2 latex primer. It worked well, covered well, in one coat, and I would recommend it for easier clean-up than the oil-based kilz.
  • For the ceiling down to the area where my outlets are, I just went with a cheap Olympic exterior latex semigloss from Lowes.
  • For the working area around the outlets, I went with an interior latex semi-gloss tinted to about 50% gray so it would hide the dirt.
  • Rollers -- VERY important here: I stared out with a 3/4" nap roller, and it brought the ****. On a recommendation from a friend, I changed over to a 1.25" nap roller and rolled it out of a bucket with a screen. MUCH easier to do. It easily fills all the nooks/crannies in the OSB without killing yourself.
  • On recommendation from the same friend, I picked up a roll of tar-paper to serve as a floor covering near the walls. It worked GREAT, it's cheap too.
  • I've gotten about 90% of one side done, and about 25% of the other side done, I'll post some pics when I can.

7) Outlets/Boxes -- I have some very definitive feelings about how plugs "feel". I HATE it when they feel loose/flimsy.
  • I originally wanted metal boxes for my stuff, but they were prohibitively expensive for the number I wanted to put in.
  • Boxes -- As a compromise I went with the Carlon Super-Blue series plastic boxes they seemed to be a bit more rigid than normal boxes.
  • On some of the later boxes and larger welder plugs (which take a LOT of pulling) I put a couple of drywall screws through the side of the box, into the stud. This stiffens them up very nicely.
  • Receptacles -- On the outlets themselves, I used pro-grade gray Leviton back-feed 20A receptacles, mounted upside-down like hospitals. I always liked the idea of having the ground on TOP in case a plug pulls partially out.
  • Plates -- I originally was going to do stainless plates, but they were too expensive. I bought and put up the nylon plates and they were VERY flimsy. I then found some galvanized plates from HD for $0.94 each theses are super stiff and will look good with the galvanized/corrugated that I will be putting on the lower 4' of wall as "wainscoting".
 
Last edited:
OP
B

bluesman2a

Well-known member
Joined
Aug 16, 2005
Messages
1,312
Location
Atlanta, Ga.
Here are some pic updates:

Galvanized outlet covers for Non-GFI boxes:
DSCF0503.jpg


Setup for GFI boxes:
DSCF0504.jpg


New bay with caulked seams:
DSCF0499.jpg


DSCF0498.jpg


New bay primed, lower:
DSCF0501.jpg


DSCF0500.jpg


Old bay nearing completion:
DSCF0496.jpg


DSCF0497.jpg


Note: in pics above, I will be adding galvanized aluminum up to the 4' mark, topped by chair railing, so the lower edge isn't very clean. On the upper edge I tried to tape it off, but it bleeds under the tape, so I'll be adding some mill-work above to maintain a clean line there too.
 
Last edited:

Bevis

Well-known member
Joined
Jan 10, 2006
Messages
808
Location
Moore Haven, Florida
1) Electrical rough identified that I did NOT have a ground loop tied into my foundation. This requirement was news to me, and if you are pouring a slab for HEAVEN's SAKE make sure they leave you something to tie into. I had to have my concrete people come back out, crack into my foundation, then I welded a rod onto the rebar and we encased it all in concrete per the code. Pic:
DSCF0448.jpg
What type of rod did you have to weld in?? Inspector is coming today to look at my prep work for concrete, and I want to ask if we need to have a ground loop on my foundation here in Florida.
 
OP
B

bluesman2a

Well-known member
Joined
Aug 16, 2005
Messages
1,312
Location
Atlanta, Ga.
What type of rod did you have to weld in?? Inspector is coming today to look at my prep work for concrete, and I want to ask if we need to have a ground loop on my foundation here in Florida.

It was just a piece of 5/8" rebar welded to the rebar in the footers. Once you have it welded in, and inspected it will need to be completely covered by at least 2" of concrete. The copper is #4 solid connected by a clamp to the rebar.

And I can tell you that you WILL need a ground-loop, they are super simple especially if you get them done BEFORE the pour. Make sure the inspector is clear on what he needs BEFORE you pour, after is a BEYOTCH.
 

78fj40

Well-known member
Joined
Nov 21, 2006
Messages
458
Location
Arlington, VA
And I can tell you that you WILL need a ground-loop, they are super simple especially if you get them done BEFORE the pour. Make sure the inspector is clear on what he needs BEFORE you pour, after is a BEYOTCH.


Well I guess it's a good thing that I don't have one.....all I have are the two 8' grounding spikes driven into the ground about 6' apart from one another next to the foundation......

:dunno:
 
OP
B

bluesman2a

Well-known member
Joined
Aug 16, 2005
Messages
1,312
Location
Atlanta, Ga.
Well I guess it's a good thing that I don't have one.....all I have are the two 8' grounding spikes driven into the ground about 6' apart from one another next to the foundation......

:dunno:

I was with you Norm, that is until the inspector came out and told me I needed to crack into my new foundation. I cannot see needing more than this anywhere in the South/East where our ground is commonly pretty moist and grounding rods work well.

My impression is that this is part of the newer/national code and more critical out West, like Las Vegas and such. The idea is that since the concrete will always wick moisture out of the soil, that you get a better ground my using the rebar in the foundation footers, BELOW the vapor barrier. When I talked to my dad about it, he told me they've always done this when building out West (PRK, and Nevada).
 
OP
B

bluesman2a

Well-known member
Joined
Aug 16, 2005
Messages
1,312
Location
Atlanta, Ga.
BTW, I also have a few updates I need to get pics of and post. Over the last couple of weeks, I've nearly finished painting and have all my lighting up now.
 

Bevis

Well-known member
Joined
Jan 10, 2006
Messages
808
Location
Moore Haven, Florida
Just met with the inspector. He told me he's not a big fan of the ground loop, and to just go with the double grounding rods into the ground. Thanks for the info anyways bluesman2a.
 

adams77

Well-known member
Joined
Jan 30, 2007
Messages
55
Location
Statham GA
Herb, we need to talk. I am starting a nuther 2 car with a loft very soon and I have a ton of questions.
 
OP
B

bluesman2a

Well-known member
Joined
Aug 16, 2005
Messages
1,312
Location
Atlanta, Ga.
I've been thinking about the OSB route for covering my interior walls as well. What thickness OSB did you use?

I went with standard/cheap, 7/16 was only about $4.33 last I checked, everything else was a LOT more.

Hey Herb,
Did you locate a good source for the corrogated tin for the walls?
Mike

Mike,
I found a place over in Grayson called Back Home Exterior Products I THINK I'm going to use. As I check them out and learn more, I'll let folks know. Are you looking for something on yours, or do you have a source you could recommend?
 

elvee

Well-known member
Joined
Nov 1, 2006
Messages
309
Location
Atlanta, GA
Mike,
I found a place over in Grayson called Back Home Exterior Products I THINK I'm going to use. As I check them out and learn more, I'll let folks know. Are you looking for something on yours, or do you have a source you could recommend?

What widths are they offering? I have been talking to MBCI about corrugated, but the widest panel I can find is only 32". It's better than the 24" panels at Home Depot, but still going to be a lot of seams.
 
To avoid these ads, REGISTER NOW!

d110pickup

Well-known member
Joined
Feb 4, 2005
Messages
265
Location
Canton, Ga.
Mike,
I found a place over in Grayson called Back Home Exterior Products I THINK I'm going to use. As I check them out and learn more, I'll let folks know. Are you looking for something on yours, or do you have a source you could recommend?


Herb,
If it's affordable I'd like to do the ceilings with corrogated. I'm having a hard time finding it.
Please let me know what you find.
Thanks,
Mike
 
OP
B

bluesman2a

Well-known member
Joined
Aug 16, 2005
Messages
1,312
Location
Atlanta, Ga.
What widths are they offering? I have been talking to MBCI about corrugated, but the widest panel I can find is only 32". It's better than the 24" panels at Home Depot, but still going to be a lot of seams.

Elvee, I think it's only 3' so I think we're in the same boat. What is the deal with MBCI? Could you PM me contact/pricing from them?

Oh also, the guys I listed would cut the panels to fit for you as well.
 

PurdueSD

Well-known member
Joined
Mar 25, 2006
Messages
1,577
Location
Indiana
why dont you use ribbed steel siding for the ceiling. Thats what i am in the process of using. You can buy #2 stock, which has a less expensive paintand is cheaper since it will be indoors anyways. Check out my build thread.
 
OP
B

bluesman2a

Well-known member
Joined
Aug 16, 2005
Messages
1,312
Location
Atlanta, Ga.
DF: I really haven't done ANYthing with the loft. It's been too darned HOT to be working out there this summer, and I didn't want to put in stairs I would have to tear out later. My original plan still stands in that I want to put in a 10' bump-out accross the entire rear. If I put stairs in now, that will cause problems later. I don't NEED the space yet, so I'm willing to just wait a bit. Plus, I'm letting my finances rebuild a bit as well.

Purdue: I really like your ceilings, where would one look for that type of material? Is that a HD/Lowes thing, or a specialty siding thing?
 

PurdueSD

Well-known member
Joined
Mar 25, 2006
Messages
1,577
Location
Indiana
ask any building supply house... or find you some pole barn builders and ask where they get their siding from. Menards/lowes/homedepot usually stock white. But you can order it cut to the lengths you want if you get it from the metal supplier. Just make sure you tell them you want it for indoor and that you dont need the more expensive paint. I got mine from McElroy metal through a local Co-op, hope that helps! I ordered it when i ordered my exterior siding. You put it up with J-channel around the edges. Ive got my large bay done now and will post up some more pictures tomorrow on my build thread in case you want to check them out.
http://www.mcelroymetal.com/
 

Mossberg

Member
Joined
Jun 14, 2008
Messages
13
Nice thread!

I'm not too far from you. I'm in Lawrenceville (Hwy 20 and Old Peachtree area south of the new stadium they're building). I am looking to make some upgrades to my home as well. I might have to pick your brain for advise and for local vendors/contractors/ to use when the time comes.:D
 
OP
B

bluesman2a

Well-known member
Joined
Aug 16, 2005
Messages
1,312
Location
Atlanta, Ga.
No problem Mossberg... You're not far at all. I'm not far off 124 and Old Peachtree, North of where they are building the stadium.

As you may be able to tell, I can give you both positive AND negative references...
 
OP
B

bluesman2a

Well-known member
Joined
Aug 16, 2005
Messages
1,312
Location
Atlanta, Ga.
Well, things are starting to warm up a bit around here. We've had a couple of days so far where we're approaching 70's... So I decided to pull the trigger on a couple of projects around the old shop.

It's been a while since I updated, since then mainly been working IN the shop, rather than ON the shop, so other than it getting dirtier, not a whole lot to talk about there. But I HAVE been enjoying having a place to park my daily driver inside too. Nice to have on those cooler mornings and no scraping ice.

The new projects:
1) When I built my great-big-freakin-wall, I got tired of buying dirt, so there's a section where I left the grade lower along the wall than I would like. This project will finish out the area along the wall and cover it with crush-n-run so I have a better parking area, no grass to cut, and just dress it out a little nicer. It will also help remove some drainage/erosion issues I've been having as well.

2) The original plan way-back when was to add a 10' bump-out to the entire back of the shop. This is the area where I'll have a bathroom (one day), and put the machine-area. I'm not ready to start laying out cash to pour the foundation yet, so I'm having it built as an open lean-to area. I'll have 6X6 posts on piers to support it, then come back later (over the next couple of years) and pour the slab. Once the slab is complete, then I can just frame it all in.

As many have asked, you will all be happy to know I'm also making arrangements to better situate the stairs/entry-way up to the second story as part of this.

Pictures from day 1 to come when I get home this evening.
 
OP
B

bluesman2a

Well-known member
Joined
Aug 16, 2005
Messages
1,312
Location
Atlanta, Ga.
Haha, sorry guys, the weather turned nasty and my crew had a funeral for a co-worker today. They got all the site-prep and concrete done, but they'll be starting on framing again tomorrow.

One thing I will say about the new crew though: I was absolutely SHOCKED to see every one of them was an middle-age+ caucasian American-by-birth-male. Now I have absolutely no issues with any person regardless of race, religion, or creed who is willing to work. What I DO have issues with is entire crews who I cannot speak to and who do not understand directions/questions. This was just a very pleasant surprise. Although this is a scary time to be spending money for things like this, the price was right and it's nice to know that I'm putting American working men back on the job.
 
OP
B

bluesman2a

Well-known member
Joined
Aug 16, 2005
Messages
1,312
Location
Atlanta, Ga.
Sorry for the delays guys, got some nice weather today and things are rolling once again.... Pics from lunch today:

Before:
DSCF0415.jpg


More Before:
DSCF0432.jpg


DSCF0604.jpg


DSCF0605.jpg


DSCF0606.jpg


DSCF0607.jpg


DSCF0608.jpg


DSCF0609.jpg
 
Last edited:
To avoid these ads, REGISTER NOW!
Top Bottom