To avoid these ads, REGISTER NOW!

Between 265 & 485 SQ/FT 1950s Craftsman Garage retro remodel

Workspaces sized between 265 and 485 squarefeet.

Wingnut65

Well-known member
Joined
Apr 21, 2010
Messages
3,170
Location
Tampa Bay, FL
The trim on #2 looks great and the edge banding on the shelves is coming along.

For tool panel #1, which Weldwood did you use? They offer many varieties. My first thought would be for the contact adhesive, coat both sides and wait till dry to the touch and the two pieces should not come apart. I don't know how wood glue or other adhesives would work for that condition.

As a remedy, try a hair dryer to heat up the aluminum and the glue below and then run a hand roller over it. Or, I like M_P's suggestion... load it with tools.

EDIT: Forgot to mention an alternative material... P.Lam. Plastic laminate counter material that is aluminum. Both Wilsonart and Formica offer it for countertops and cabinets. Since it is made in a factory, it is stable and won't have attitudes like yours does. P.Lam is easy to cut, trim, finish and mount. HD's, Lowes or other big box stores either sell it or can get it. Just a thought. It would work great for big flat surfaces like you have.
 
Last edited:
To avoid these ads, REGISTER NOW!

carbons4

Well-known member
Joined
Jan 19, 2012
Messages
92
I worked for a company once that did vacu forming. I made a lot of proto type and short run molds. They were all MDF and bondo. Big run stuff was all aluminum.
 

american3.14guy

Active member
Joined
Nov 18, 2011
Messages
44
Location
Southwest Kansas
Where did you find the beetle kill lumber? I would like some myself. Ide also like to find a workable saw like that for that cheap. I haven't seen one that worked or was complete for anything close to that cheap. As for the aluminum, got with something thicker.

I found some beetle-kill pine at my local lumber yard (I live in a town of 1200 people) in pre-cut studs. I could see from the end of studs, thanks to RedLeader, that it was beetle kill. Here is a shot of the top I made for an old workbench I had. I used 7/16 dowels (had a bunch from my great-uncle) to line up the boards while I glued them together. I ran them through a drum sander, finished the top, and added some support underneath to keep them from warping.
 

Attachments

  • user102697_pic17184_1330918076_thumb.jpg
    user102697_pic17184_1330918076_thumb.jpg
    4.8 KB · Views: 1,500

jeepnut24

Well-known member
Joined
Aug 23, 2006
Messages
797
Location
Morrison CO
Found it at Home Depot - a big shipment of the 1x2 furring strips came in and they were all beetle kill. I went back several months later and none of it was beetle kill.

When you have time to kill, just stop by your local HD and go to where they keep their furring strips. You can usually tell by looking at a few pieces what kind of load it is. It is also worth looking through other type of lumber to see if any is beetle kill.

I prioritized the look over everything else, so I'm paying for it on the other end with rough, twisted and crooked boards. But ya know, no pain no gain:D

I found some beetle-kill pine at my local lumber yard (I live in a town of 1200 people) in pre-cut studs. I could see from the end of studs, thanks to RedLeader, that it was beetle kill. Here is a shot of the top I made for an old workbench I had. I used 7/16 dowels (had a bunch from my great-uncle) to line up the boards while I glued them together. I ran them through a drum sander, finished the top, and added some support underneath to keep them from warping.

Thanks, I know there are some specialty shops here in town, Denver, that have it, I just hadn't seen it at HD or Lowes. Ill take a stroll and look a little closer next time Im there.
 

ckadams00

Well-known member
Joined
Sep 12, 2011
Messages
1,273
Location
Seattle, WA
Red Leader, your work keeps me going on my own project. I was originally inspred by you and Jack, and I have to repeat my thank yous: I keep finding creative solutions to my own space by following your build.

Incidentally, you and I have a CMan cabinet saw companionship going here. I spent the last few weeks tearing down and rebuilding the insides - this past weekend I kept working on the cabinet:

Broken down, cabinet needs some work. The feet in particular were completely rusted. Lots of surface rust as well.
DSC00308.jpg


Stripped to bare metal. I didn't have the funds for the XL disk yet, but I do have a pretty good selection of flap disks - used a 120 grit followed by 220 on a RO sander. Soaked the feet overnight in pans of Evaporust. Patched a couple of bad spots with auto filler and sanded.
DSC00336.jpg


Priming! Man Rustoleum self-etching primer is awesome! (if expensive). Followed up by more 220 sanding and a coat of regular Rustoleum primer.
DSC00356.jpg


Here is the rebuilt interior parts being attached to the table. I have heard (and paid attention) that this is the way to go - attach, then get help attaching the table! I still need to clean up the table, but that's going to happen after the top is attached to the cabinet.
DSC00376.jpg


Still lots of little imperfections . . .but this is going to be a working saw, not a museum piece. It looks great from 10 feet. I tried about 4 colors of blue to start; I wanted something deep and dark but not Navy. First one looked like a neon crayon. Then I tried Rustoleum "Metalic" (sounded like a good idea). It's more like Rustoleum "Glitter" which didn't look very dignified for a table saw. The other tools would point and laugh. My 11 year old daughter loved it: she said "Dad, glitter makes everything better".

Finally settled on Rustoleum black "Hammered". I really like how this paint covers small imperfections. At this point it needs one more coat and possibly a clear coat. I dodn't realize we settled on the same colors (no intentional!). Is your the "Hammered" paint as well? I added little acorn nuts to the faceplate.

DSC00378.jpg


PS I don't have a cool retro starter. Something to add down the road. I do have a Powr Panl from another saw, and may end up using that since it is from the same period, but it is not what is shown in the catalog.
 
OP
R

Red Leader

Well-known member
Joined
May 15, 2011
Messages
2,689
Location
Denver, CO
Okay, little teeny tiny update.

I was out in the garage doing a project for the wifey and while I was letting some paint dry I though I'd have a gander at the band saw. I pretty much just need to rewire the thing and get it back together. A full restore will come later, but for now I'd like to use it. It will need new bearings, but the bearings aren't too bad, at least not yet.

I decided on mounting the electrical starter switch on the 'neck' of the saw which required drilling a hole (gasp!) in the virgin, 50 year old Craftsman-y sheet metal. So I did:D

Here is where it is at:

p3192538-vi.jpg

p3192541-vi.jpg

p3192540-vi.jpg


In other news, I received a special package from our very own Bob Heine. He had sent me a message telling me that in his process of sorting through some stuff in his garage he had found some 'Craftsman catalog' items that he wanted to send my way. Well, me not being one to object to such offers, was happy to oblige. I thought it was going to be something in a small, 10"x10" box.

Nope. This sucker weighed 18lbs!

p3192545-vi.jpg


I opened it up and here was the treasure:

p3192546-vi.jpg

p3192549-vi.jpg


And then this beauty:

p3192550-vi.jpg

p3192551-vi.jpg

p3192553-vi.jpg

p3192552-vi.jpg


As you can see, he sent me a Craftsman corded drill and a 1/3 sheet sander! From June of 1954! The tag reminds me of another that I have:

p3192554-vi.jpg


This is from my mini jigsaw, dated October of 1954.

And the sander even comes from one of my favorite Craftsman sub-contractors to boot (Syncro)!

Syncro, designated by the 110 manufacturer's code, produced many small electric tools for Craftsman, notably their sanders and smaller jig saws. Unlike conventional tools that use motors with windings and brushes, Syncro used a high frequency magnetic vibration technology that allowed their tools to have no real moving parts and oscillate at an extremely high rpm (think 11,000rpm).

Syncro must have been doing something right for these basic tools to survive for 58 years and still work just fine when pulled out. I'm a fan:thumbup:

A HUGE thanks goes out to Bob Heine. Bob, you never asked for any recognition, but I think everyone else should take notice of what a stand up guy you are and how someone I've never even met could do something so kind. I am humbled and honored and I really appreciate your generous gift. Thank you very much:)
 
OP
R

Red Leader

Well-known member
Joined
May 15, 2011
Messages
2,689
Location
Denver, CO
Then I tried Rustoleum "Metalic" (sounded like a good idea). It's more like Rustoleum "Glitter" which didn't look very dignified for a table saw. The other tools would point and laugh. My 11 year old daughter loved it: she said "Dad, glitter makes everything better".

Finally settled on Rustoleum black "Hammered". I really like how this paint covers small imperfections. At this point it needs one more coat and possibly a clear coat. I dodn't realize we settled on the same colors (no intentional!). Is your the "Hammered" paint as well?

On the Atlas cabinet, I used Rustoleum metallic.


hee hee:D


I'm glad the hammered is working out for you, though. I'd be more inclined to use the Rustoleum stuff on more tools but I'm not sure how durable it is. I am getting way more paint chips in my Atlas drill press which was done up in Verde Green. At least way more than I think I should. Then again, I used a crappy non-self-etching rustoleum primer. I definitely am a fan of the self etching primer and I like the Duplicolor stuff for that.

When I get a chance to tear down and restore the Craftsman cabinet saw and also the Parks/Craftsman band saw for that matter, I want to do them in a seafoam green. I once saw a picture of a Craftsman grinder in a similar color and it struck me. To me it perfectly represents the 50s and looks nice and classy. The trouble has been finding a spray paint that will do it. Duplicolor used to have one but it was discontinued. Rustoleum had (has?) one but last time I checked their website it didn't pull up.

If they still make it I'll order a case and start with my 1949 grinder.

By the way you're table saw, as anyone can see, is looking absolutely fabulous. Keep up the great work:thumbup:
 
Last edited:
OP
R

Red Leader

Well-known member
Joined
May 15, 2011
Messages
2,689
Location
Denver, CO
I found some beetle-kill pine at my local lumber yard (I live in a town of 1200 people) in pre-cut studs. I could see from the end of studs, thanks to RedLeader, that it was beetle kill. Here is a shot of the top I made for an old workbench I had. I used 7/16 dowels (had a bunch from my great-uncle) to line up the boards while I glued them together. I ran them through a drum sander, finished the top, and added some support underneath to keep them from warping.

Isn't that stuff just awesome? I'm glad you found it! I love the character of that wood.
 
OP
R

Red Leader

Well-known member
Joined
May 15, 2011
Messages
2,689
Location
Denver, CO
I've had reasonable success making vacuum table molds out of sheets of aluminium on MDF using thickened WestSystems marine epoxy or 3M contact adhesive after sanding the aluminium with something like 40-80grit.

Can you glue the whole aluminium sheet in one go and use the existing grooves in the toolboard as guides for a router. Alternatively clamp a fence/guide and router/skillsaw the grooves open. May just have to sand/debur the edges after.


The trim on #2 looks great and the edge banding on the shelves is coming along.

For tool panel #1, which Weldwood did you use? They offer many varieties. My first thought would be for the contact adhesive, coat both sides and wait till dry to the touch and the two pieces should not come apart. I don't know how wood glue or other adhesives would work for that condition.

As a remedy, try a hair dryer to heat up the aluminum and the glue below and then run a hand roller over it. Or, I like M_P's suggestion... load it with tools.

EDIT: Forgot to mention an alternative material... P.Lam. Plastic laminate counter material that is aluminum. Both Wilsonart and Formica offer it for countertops and cabinets. Since it is made in a factory, it is stable and won't have attitudes like yours does. P.Lam is easy to cut, trim, finish and mount. HD's, Lowes or other big box stores either sell it or can get it. Just a thought. It would work great for big flat surfaces like you have.

Great ideas all around.

For all intents and purposes, I used the 'general' kind, I think? I'll have to jump on their website to see what different iterations there are. I'll have to look into the epoxy stuff and also the P lam...sounds like they both could be winners.
 

Alpthusiast

New member
Joined
Feb 15, 2012
Messages
4
I wonder if regular old caulking tube silicone sealer would work?It's strong and flexible. (o: Alpthusiast
 

Guster

Well-known member
Joined
Mar 11, 2012
Messages
1,543
Location
Auckland, New Zealand
I wonder if regular old caulking tube silicone sealer would work?It's strong and flexible. (o: Alpthusiast

Yes, used builders glue, sikaflex and the harder setting wet area sealant too. Sikaflex marine sealant/glue is used to attach sail track on composite masts of many large race yachts and we're talking tons of load. as long as the substrate is good it ain't coming off in a hurry.

West systems is just a common 2 part laminating and gluing epoxy. There are many other brands out there.
 

Wingnut65

Well-known member
Joined
Apr 21, 2010
Messages
3,170
Location
Tampa Bay, FL
So it seems that more antiques are migrating from the Sunshine State up to higher ground! Congrats! Way to go Bob Heine! :thumbup:

Glad to hear you are keeping Mrs. RL pleased with projects of her own.

I'm sure you will find plenty of uses for the band saw when it gets running.
 

carbons4

Well-known member
Joined
Jan 19, 2012
Messages
92
I have one of those sanders,without the cool case. They work GREAT on fine work. The High Frequency magnetics work like a charm. Make my old 1/3 sheet sander I bought new back in 70's sound like a threshing machine,even when it was new.
 

american3.14guy

Active member
Joined
Nov 18, 2011
Messages
44
Location
Southwest Kansas
Curse you RedLeader! :evil:(And I mean that in a good way.) Because of seeing your awesome restored old woodworking tools, it has inspired me to look for the "jewels" that other are passing over. I found a King Seeley jointer/bench saw combo mounted on an original base for $15. If not sold, it was going to the scrapper. I did a quick restification on it, and the Painter's Touch brand of gloss gray paint was identical to the paint on the inside of the base and underside of the jointer. I added a set of locking casters to the base from Rockler for ease of moving it around.
I loved the art deco lines of the "switch" plate (they were old circuit breakers) and decided to keep them. They quit working after about a dozen times, and while on their way out they weren't carrying the amperage they needed to and burned out the starting capacitor on my motors.
Since the gear that tilts my saw was stripped out from someone trying to "crank" on it with sawdust in the trunnions and mechanism, I decided that this saw would only be used in a 90 degree vertical fashion. I dropped the motor with adjustable pivoting plate down to below and now I can use one motor for both machines. Just slide it over and hook up the other belt. What is not shown is I replaced the circuit breakers with one switch, still using the cool art deco panel and fabbing up a filler plate from a metal switch cover to center a 20 amp light switch in the old cover. I also mounted the table saw on wood to help keep it in place and so it wont scratch the metal by sitting in the "channel." I made the motor removable, that is what one set of plugs is for. The other plug coming out of the box is always "hot" and allows for something else to be plugged into it, like a miter saw or sander.
My workbench that I made the top for out of "beetle kill" pine is 1/4 inch lower than the saw and makes a great outfeed table. I also painted the workbench with the same colors and made it mobile, too. Throw a new coat of paint on the wood vise, and a little paint pen for lettering, and it makes a nice Craftsman unit. Since I use the bench as an outfeed table, I can put my miter saw on it and have everything in one place.
And of course, a vintage toolbox never hurts!:rocker:
I will be looking for another saw like this with working tilt and connecting it to what I have with the entension (after replicating the mobile base part) so I have both tilting and "non-tilting" blades I can use for different purposes. I would also have a larger table for larger pieces!
 

Attachments

  • user102697_pic17180_1330918076_thumb.jpg
    user102697_pic17180_1330918076_thumb.jpg
    4.7 KB · Views: 1,632
  • user102697_pic17181_1330918076_thumb.jpg
    user102697_pic17181_1330918076_thumb.jpg
    5.9 KB · Views: 1,626
  • user102697_pic17187_1330918165_thumb.jpg
    user102697_pic17187_1330918165_thumb.jpg
    4.2 KB · Views: 1,628
  • user102697_pic17186_1330918076_thumb.jpg
    user102697_pic17186_1330918076_thumb.jpg
    4.4 KB · Views: 1,620
  • user102697_pic17188_1330919689_thumb.jpg
    user102697_pic17188_1330919689_thumb.jpg
    4.8 KB · Views: 1,628
OP
R

Red Leader

Well-known member
Joined
May 15, 2011
Messages
2,689
Location
Denver, CO
I have one of those sanders,without the cool case. They work GREAT on fine work. The High Frequency magnetics work like a charm. Make my old 1/3 sheet sander I bought new back in 70's sound like a threshing machine,even when it was new.

I'll definitely be excited to try it out! And now I owe bluebolt a crown logo sander:D
 
OP
R

Red Leader

Well-known member
Joined
May 15, 2011
Messages
2,689
Location
Denver, CO
So it seems that more antiques are migrating from the Sunshine State up to higher ground! Congrats! Way to go Bob Heine! :thumbup:

Glad to hear you are keeping Mrs. RL pleased with projects of her own.

I'm sure you will find plenty of uses for the band saw when it gets running.

Doing projects for her makes me happy because, well, I like doing things for her, and it means that she can then benefit from the work I do out there as well.


Married men already know the wisdom - you want the wife on your side:D
 
OP
R

Red Leader

Well-known member
Joined
May 15, 2011
Messages
2,689
Location
Denver, CO
I wonder if regular old caulking tube silicone sealer would work?It's strong and flexible. (o: Alpthusiast

Yes, used builders glue, sikaflex and the harder setting wet area sealant too. Sikaflex marine sealant/glue is used to attach sail track on composite masts of many large race yachts and we're talking tons of load. as long as the substrate is good it ain't coming off in a hurry.

West systems is just a common 2 part laminating and gluing epoxy. There are many other brands out there.

Hmmm...I'll have to look into that too!
 
OP
R

Red Leader

Well-known member
Joined
May 15, 2011
Messages
2,689
Location
Denver, CO
Curse you RedLeader! :evil:(And I mean that in a good way.) Because of seeing your awesome restored old woodworking tools, it has inspired me to look for the "jewels" that other are passing over. I found a King Seeley jointer/bench saw combo mounted on an original base for $15. If not sold, it was going to the scrapper. I did a quick restification on it, and the Painter's Touch brand of gloss gray paint was identical to the paint on the inside of the base and underside of the jointer. I added a set of locking casters to the base from Rockler for ease of moving it around.
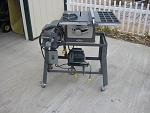
I loved the art deco lines of the "switch" plate (they were old circuit breakers) and decided to keep them. They quit working after about a dozen times, and while on their way out they weren't carrying the amperage they needed to and burned out the starting capacitor on my motors.
Since the gear that tilts my saw was stripped out from someone trying to "crank" on it with sawdust in the trunnions and mechanism, I decided that this saw would only be used in a 90 degree vertical fashion. I dropped the motor with adjustable pivoting plate down to below and now I can use one motor for both machines. Just slide it over and hook up the other belt. What is not shown is I replaced the circuit breakers with one switch, still using the cool art deco panel and fabbing up a filler plate from a metal switch cover to center a 20 amp light switch in the old cover. I also mounted the table saw on wood to help keep it in place and so it wont scratch the metal by sitting in the "channel." I made the motor removable, that is what one set of plugs is for. The other plug coming out of the box is always "hot" and allows for something else to be plugged into it, like a miter saw or sander.
My workbench that I made the top for out of "beetle kill" pine is 1/4 inch lower than the saw and makes a great outfeed table. I also painted the workbench with the same colors and made it mobile, too. Throw a new coat of paint on the wood vise, and a little paint pen for lettering, and it makes a nice Craftsman unit. Since I use the bench as an outfeed table, I can put my miter saw on it and have everything in one place.
And of course, a vintage toolbox never hurts!:rocker:
I will be looking for another saw like this with working tilt and connecting it to what I have with the entension (after replicating the mobile base part) so I have both tilting and "non-tilting" blades I can use for different purposes. I would also have a larger table for larger pieces!

GREAT tools! I'm glad you were able to save them. That really means a lot. If you think about it, the amount of vintage tools from the 30s-40s-50s has already been set. They will not make more of them. Their numbers can only continue to drop. It is wonderful to see some of them saved.

Keep up the great work!
 
OP
R

Red Leader

Well-known member
Joined
May 15, 2011
Messages
2,689
Location
Denver, CO
The rarest Craftsman vise

cmanvise-vi.jpg


...was a 4" vise found only in the 1942 Craftsman Power Tools catalog. It appeared for 1 year and then disappeared completely and was never seen again.


If you know of where one is or ever come across one, remember that the 1950's Craftsman Garage can make for a loving, welcoming home to such oft forgotten tools:D
 
To avoid these ads, REGISTER NOW!

Bear

Well-known member
Joined
Feb 12, 2007
Messages
557
Location
Salem, Oregon
You guys are killing me. I thought I had done a good thing finding some tool board at the Restore just the other day. Now I'm going to have to frame it when I put it up. Where will it end?

Love your work and inspiration.
 

ckadams00

Well-known member
Joined
Sep 12, 2011
Messages
1,273
Location
Seattle, WA
The rarest Craftsman vise

...was a 4" vise found only in the 1942 Craftsman Power Tools catalog. It appeared for 1 year and then disappeared completely and was never seen again.

First it was the White Unicorn and now you're talking about a CMan vise like it is a Yeti.

I love your passion man, it fires me up every time I am on here. I also start looking for things I never knew I needed: "Damn, gotta get one of those! . . .":lol_hitti
 

carbons4

Well-known member
Joined
Jan 19, 2012
Messages
92
It's like I tell my wife. "How many tools do you need?" Answer.......Just one more.......
 

tinbender 66

Well-known member
Joined
Mar 23, 2011
Messages
2,294
Location
Western Washington State
The rarest Craftsman vise

cmanvise-vi.jpg


...was a 4" vise found only in the 1942 Craftsman Power Tools catalog. It appeared for 1 year and then disappeared completely and was never seen again.


If you know of where one is or ever come across one, remember that the 1950's Craftsman Garage can make for a loving, welcoming home to such oft forgotten tools:D


That vise is just about the coolest one I've seen. $9.95hahaha!! If I stumble upon two I'll send ya one. If there's only one I'm keepin' it (sorry).

Still searching for the right RAS and a vintage C'man table saw. Patience.
 

Bob Heine

ALLIANCE MEMBER
Joined
Oct 24, 2009
Messages
10,708
Location
Boca Raton, Florida
...
A HUGE thanks goes out to Bob Heine. Bob, you never asked for any recognition, but I think everyone else should take notice of what a stand up guy you are and how someone I've never even met could do something so kind. I am humbled and honored and I really appreciate your generous gift. Thank you very much:)
Dave,

You are very welcome. I can supply a bit of history to go with the Craftsman Drill and Sander.

My parents purchased their first new home in 1952 in North Babylon, New York. The basement was originally dedicated to an HO train layout with paper mache mountains, a farm, and a small town. In 1954 my father decided to ‘finish’ the basement. We did not have a single power tool and the first installation of the wall framing was held in position with cut nails into the concrete floor. My uncle was an architect and suggested a minor change. The first set of walls followed the poured concrete foundation, which was far from straight. My uncle suggested we pull the cut nails and straighten the walls by aligning the baseplates to chalk lines. He also suggested my father buy an electric drill with a new-fangled concrete drill bit so the baseplate could be attached with lead anchors. When he learned that the walls had to come down, my father hired me (at $0.25 an hour) to dismantle the wall, drill the holes and re-assemble the wall. That was my introduction to that Craftsman drill. I actually only dismantled a small section of the wall, realizing I could just move it out of the way, drill the holes and slide the wall back in place -- some of the time I was working on my bicycle got charged to the basement do-over.

The walls in the finished room were to be knotty pine planks with the colonial moulded edge. Installing the tongue-and-groove with finish nails was tedious but nothing compared to the finishing step. The planks got a fair amount of dirty handprints and small dings during the installation process. To remove the blemishes, my father introduced me to the Craftsman sander. I have no idea how many hours I spent holding that sander up on those walls but I clearly remember finishing the basement in the spring of 1956. Actually, that year is a bit hazy because the year started with refinishing the oak floors on the first floor with Fabulon. It looked so good my father decided to coat the basement walls with Fabulon as well. Not sure how many brain cells I lost but that basement was pretty toxic with one small window venting the fumes. The floor was blue and white asphalt/asbestos tiles with a 12-foot long shuffleboard inlay (hey, it was the 1950s).

One of the reasons I did a bit more work on the basement than my father was because of his side-project. Edward R. Kolevzon and my father, John A. Heine, spent five years writing Our World and Its Peoples, a geography textbook, first published in 1955. Royalties from that book allowed us to travel across North America, including summers in Alaska and Mexico. By the time I was 14 I had traveled through all but three states (Florida, Georgia and Hawaii) and most of the Canadian provinces. The book royalties were spent on memories rather than things. We had one car and my mother walked to the school where she taught until after I graduated high school.

Here’s a picture of my grandparents celebrating their 50th wedding anniversary down in the playroom in 1960. My parents sent them on a two-month vacation to Scandinavia – a month in my grandmother’s native Sweden and a month in my grandfather’s native Denmark, where my parents met them for their summer break.
FredEmma1960GoldenAnniversary-small.jpg


Eight years later my father died at 55. It made me realize how little time we may have so my wife and I traveled and saw the world while I was working and we lived well but frugally so I could retire at 50. So far I've had 17 years to intimately annoy my wife and putter on things that make me happy.

I sent you the drill and sander because it will have meaning for you beyond just my memories. Oh, and because my wife and I are celebrating our 50th Anniversary this Saturday. My children both live in Florida and neither has a basement. We sent ourselves on a Scandinavian cruise 14 years ago so this one is going to be a quiet celebration, taking some friends out to dinner. Here's how we looked at the beginning...
LianeBob1962small.jpg


If I can get our friends to take a picture Saturday evening, I might be able to post a picture detailing the ravages of 50 years -- my wife hasn't changed a bit (can't say the same for her portrait in the attic).
 
OP
R

Red Leader

Well-known member
Joined
May 15, 2011
Messages
2,689
Location
Denver, CO
Bob,

That is an amazing story! Looks like we have a few things in common - the appreciation of Craftsman tools, and beautiful wives!:)

I love the history and the stories behind things, probably more than the things themselves. It means that when I use that sander and drill, I'll also carry those memories with me. I'll tell you right now that I'll use both of them to finish our basement, which will be an ongoing project.

I could go on and on about the sander and drill, but that is not where the real accolades need to be placed.

Congratulations on 50 years of marriage.

In our day an age, that right there needs to be truly celebrated. When I married my wife, we agreed that divorce was never going to be an option. And it never will be. Whatever happens, we'll work it out. Hearing your story is an encouragement to younger couples like myself and my wife. You have my respect, sir:thumbup:

I am hopeful that when I get to that stage in life, I will be passing down the tools I will have used in life as well along with all their stories, including this drill and sander.

How neat the things started from just a couple of small tools.

This is what the 1950s Craftsman Garage is all about.
 
Last edited:
OP
R

Red Leader

Well-known member
Joined
May 15, 2011
Messages
2,689
Location
Denver, CO
You guys are killing me. I thought I had done a good thing finding some tool board at the Restore just the other day. Now I'm going to have to frame it when I put it up. Where will it end?

Love your work and inspiration.


Where will it end? If you find out, make sure and tell me, K? :D It's the whole crutch of this forum. There are so many awesome ideas, you'll want to implement them all and never get any work done in the garage because you are always too busy working on the garage! But it is all so fun I hardly notice.


Thank you for your kind thoughts. I was thinking about getting out there at some point but it won't be tonight as I have little man watching duties. Which is just fine with me:)
 
OP
R

Red Leader

Well-known member
Joined
May 15, 2011
Messages
2,689
Location
Denver, CO
It's like I tell my wife. "How many tools do you need?" Answer.......Just one more.......

The great thing is when you actually need to get a new tool for a project that is for her.

It is a win-win situation:D


In my first big tool purchase in the summer of 2010, I ended up with a lot of tools that either I didn't need at the time or didn't even know what they were. It was really easy at first glance to just look and see all the unnecessary tools. However, there has been more than 1 time where in the middle of a project I've needed a very specific tool and a lightbulb goes off..."Wait a sec, I actually have one of those!!!" - I dig through a few drawers and find that it was one of those tools I picked up a year ago thinking it just might come in handy. That has happened with levels, tin snips, odd sized drill bits, files and a host of other things.

Regarding the older Craftsman tools, there is always something new to find or discover. A while back there was a post in the 'Tools' section of the forum asking about a chainsaw attachment to a Craftsman circular saw. The poster was wondering if the attachment was indeed official. Well, I didn't think so. Then, upon looking through some of the old catalogs, I find the exact same attachment (it was in either the 1960 or 61 catalog)...so it was legitimate (as legitimate as you can get...for a chainsaw circular saw:D). I find that there is always something new to discover and I am always learning. I have learned a lot about what tools Craftsman offered when. I still don't know a lot about color options, production numbers and some of the finer, more intimate details know to others. I'm getting there but that kind of built up knowledge can take years. Its easy to forget that I've only been doing this 'thing' for about a year and a half.
 
OP
R

Red Leader

Well-known member
Joined
May 15, 2011
Messages
2,689
Location
Denver, CO
Hey Dave! How about an opinion of this RAS since I don't know anything about such things. Just curious. He had it listed @250 for 2 weeks then came back at this price. I laughed when it was 250 but at 125 I'm not sure.


http://seattle.craigslist.org/see/tls/2914163828.html

Hmmm...interesting! It does have some cool attachments, like the manual brake on the other side of the motor and the jig saw attachment laying on the table. Overall looks like it is in nice condition and comes with the original paperwork. That is nice. I'm not sure where they are getting the '605' code from...maybe the jigsaw attachment?

On the other hand, sometimes you see those saws go for free as well. Though most/all not in that same condition.

I haven't had a chance to really use mine yet, but you might also bug smschriefer since he has restored his and might have already been using it.

Another thing to consider is that saw, with those accessories, cost $2057 back in 1959.

It is amazing how some things, like a Gibson Les Paul Standard that cost about the same back then (maybe less) can be worth a quarter of a million dollars and a saw like this, goes down to about 1/20th its original value.

While it is somewhat sad with such deflationary prices, it means that I can afford all the cool old tools that I would never have even been able to touch if I lived back in the 1950s:)

I'd say if you have some money to play with...couldn't hurt to check it out! Those saws are pretty common so if you decided to pass and regretted it somewhat, I guarantee you there will be others.

You could always wait another week or two and if it is still available, make an offer.

Right now I am in a similar situation. That Red Star that I was oogling over has come down significantly in price and by the time our tax refund comes back I'm going to check in and see if he still has it and if so I might just make him an offer:)
 
Last edited:

-Brent-

Well-known member
Joined
Dec 23, 2009
Messages
4,709
Location
Utah
Another thing to consider is that saw, with those accessories, cost $2057 back in 1959.

Wow, so interesting. $2,057.00 in 1959 had the same buying power as $16,062.54 in 2012. Crazy, right? I can't think of a RAS that is equivalently priced.
 

oldschool59

Active member
Joined
Oct 26, 2011
Messages
31
Location
Niagara Falls Ontario Canada
For my first post on the Journal I would like to thank Bob for his inspiational post.My wife and I are coming up on 20yrs with many more ahead.
Congratulations on 50 yrs Bob, many more for the 2 of you. Your post made my day !!!

Regards
Mike
 
Last edited:

fredlangva

Active member
Joined
Sep 10, 2011
Messages
34
Location
Jacksonville, FL
Great story Bob and really nice that the tools will get to be loving used again. I miss Long Island a bit every so often. I took my Mom and Dad to Norway for their 50th and we got to see the 'ole country'.

Dave's place is reminding me of the Island of Misfit Tools - tools that need a second life arrive and are fixed by Dave to go to deserving boys and girls :) (Always did like that that Rudolph story - still a favorite after all the years)

Always look forward to the latest updates....
 
OP
R

Red Leader

Well-known member
Joined
May 15, 2011
Messages
2,689
Location
Denver, CO
Wow, so interesting. $2,057.00 in 1959 had the same buying power as $16,062.54 in 2012. Crazy, right? I can't think of a RAS that is equivalently priced.

Whoops, you caught my error, I totally wrote that the wrong way.

The saw with those accessories was around $260 back then, which would be the equivalent of going out today and just dropping $2000 on a RAS.


My bad! I couldn't imagine spending that much for a RAS, in 1959 or in 2012.
 

Wingnut65

Well-known member
Joined
Apr 21, 2010
Messages
3,170
Location
Tampa Bay, FL
... Oh, and because my wife and I are celebrating our 50th Anniversary this Saturday.

If I can get our friends to take a picture Saturday evening, I might be able to post a picture detailing the ravages of 50 years -- my wife hasn't changed a bit (can't say the same for her portrait in the attic).

Congratulations Bob and Mrs. Heine! Celebrating 50 wonderful years together today is a wonderful accomplishment. Skål :beer:

That is a great story with a few glimpses as to what experiences in your life made you who you are. (Glad the manual labor didn't turn you against Craftsman!) Investing in memories instead of stuff is a great lesson to teach.

Thanks for sharing and we all look forward to a follow-up photo.
 
To avoid these ads, REGISTER NOW!
Top Bottom