I don't particularly care for pegboard, but I wanted reconfigurable storage on my walls. While I like to have reconfigurable storage, I also enjoy making custom items. I prefer to have my tools in view and ready to grab, instead of tucked away into drawers. Since there isn't anything out there commercially which meets that need (NOT pegboard, custom, reconfigurable), I decided to make my own.
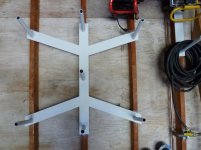
I started with a large frame, made of 1.5"x1.5"x3/8" aluminum angle, which I got at the scrap yard, for scrap prices ($1.50/pound). I riveted that frame together with solid rivets (because solid rivets are 'what I do')...
View media item 13837
Then I added some 'rack rails' to that rack, which are the same 'pre-tapped for 10-32' rail which is commonly used in the railroad, computer, and and music industries for holding equipment which may need to change position some day. You usually see it in 'deeper' racks. I have it in a very shallow rack. I call this rack the 'Reconfigurable Tool Rack...'
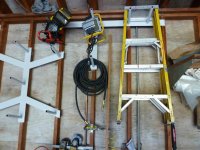
Then I mounted that frame on the wall with strut...
Then I built some Custom Tool Boards for the RTR. So far, I've only had time to make a couple of Custom Tool Boards. One of them is a commercial power strip mounted behind an aluminum faceplate. The other holds the rivet sets for my pneumatic rivet squeezers...
While the RTR looks pretty lonely right now, I plan to fill that up with new CTB's, including boards to hold my commonly-used hand tools, pneumatic tools, and tooling, along with a couple of brackets to hold my dental lights above the bench...
M_P


")


 will scare the **** outta you!


