To avoid these ads, REGISTER NOW!

My own 'Mahal

JakeKohl

Well-known member
Joined
Feb 23, 2012
Messages
1,365
Location
Greenville, SC
After A) seeing how popular the name "Garage Mahal" is and B) how ridiculously gorgeous many of the garages on here are, I feel like I need a new name for my project. Alas, that would take a good bit of work on the website to remake history...and everyone involved already knows the project as such so I'll stick with it and start another Garage Mahal thread.

I've been working on this project for about a year and a half and have a good bit of it documented on my website (www.teamseacats.com). I've found so much good inspiration on this site hanging around for a few months. I'm too late to employ a few of those ideas (like the solar water heat in the slab to take the edge off the slab heat loss...with no continuing costs). I figured I should probably jump in the fun and post some things about my project in the hopes of finding some more great ideas and thoughts before I get too much further. I'll bring a few of the updates from my website here every few days. Thanks for looking! Here's where it all started:


Garage Mahal!
by Jake on Aug.02, 2010, under Garage Mahal

I believe it’s time. Though it’s certainly time for another post on here, that’s not what I was referring to. It’s time for a new project space for Bonnie and I. Lord knows I like to build stuff and I have in mind a new 4′ x 4′ winged R/C trimaran but I’ve already had to put tools and equipment on “extended loan” to friends so I would have space to build the projects I’ve built thus far. There’s no way I can build (or store) a trimaran with an 96″ wing. That’s also not to mention trying to work on a real boat in the winter time can be tricky with picking weather windows. Bonnie also runs a graphics business that is bulging it’s in-home space as well and is in need of more room….so I believe it’s time for GARAGE MAHAL! {insert evil laughter}

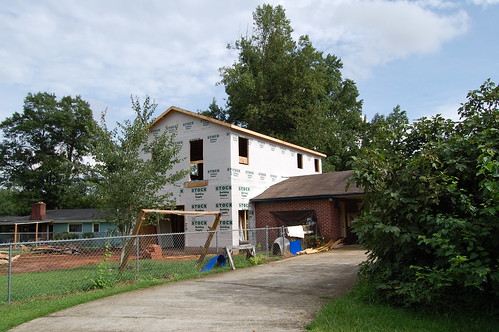
We’re just breaking ground today on what will be a 24×36′ two story garage with an upstairs studio. I would really enjoy building the structure myself but I do have to work and there’s just not enough time in the day for me to build it in under 5 years. So, I did the next best thing and with the input of experienced friends (Tim, Mark, and Ted), I’ve designed and drawn up my dream garage – which is a pretty simple, but roomy, structure. I’ve been through five bids and selected a contractor, Vicars Construction (www.discountgaragesc.com), who is tasked with getting the structure in the dry with a finished exterior. I’ll take over at that point and work as my time allows and contract out finishing tasks that I can’t afford the time to complete . The bid process was long and wrought with tough decisions – but I feel very good about the value and the contractor we’ve selected. I’ll chronicle the experience of building this sucker here to share with you and to function as my own personal scrap book (as I’ve always done).

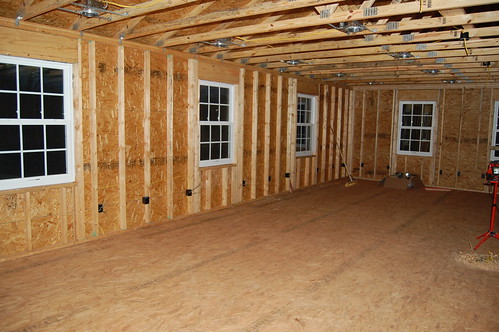
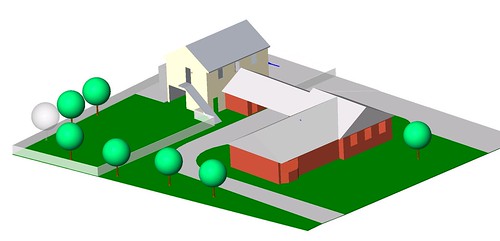
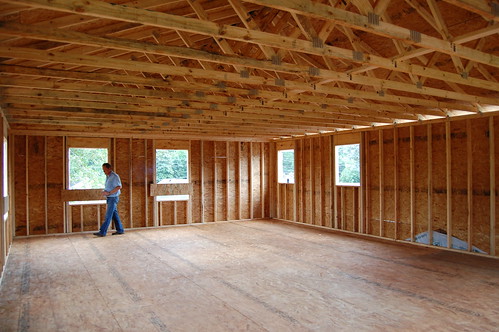
First, a few basics about the structure. I want it to be large enough that I can roll in a Nacra20 catamaran (or my A-cat), on the trailer with the 32′ mast horizontal, and close the doors. The doors have to be 8′ tall which then means the lower level ceiling must have 10′ clearance (for garage door / opener clearance). Because the garage will be situated close to the side of my property, I’m putting in a garage door on each gable end. One 12′ door will open into the backyard and one 18′ door will open to the side of the property. A considerable amount of concrete will go in to and will provide ample parking space for one or two boats (one may or may not live in the garage) and my RV. I can’t wait to be able to cut the grass unimpeded by trailers! Eventually (if not immediately) the downstairs will be heated and cooled so things like insulated garage doors and the like are a must now. The structure will connect to my existing shop so the existing shop can become a compressor tool room – a place to keep things out of the dust of creation. There is a bathroom already in that shop so it will be very handy downstairs and provide the plumbing tie in for an upstairs bathroom. The upstairs is to be a full 8′ wall / ceiling and both upstairs and downstairs areas will be unimpeded by posts or columns. The staircase to the upstairs will be external – that was a bit of a compromise to make but, if they were internal, it would eat up a good bit of real estate. Besides, with the current small shop (12×19) attached to the house only by an open carport, I figured you would have to go outside to gain access to the upstairs anyway. The yellow part of the structure below (which is NOT it’s final color BTW), is the new building.

4854663694_13ec7d9c1f.jpg


4854043847_f3ba4d4a13.jpg


So in an effort to get things caught up here, I had a jungle in that corner of my yard. There were two significant sweet gum trees (70+ feet tall) and one large Maple (50 feet) that needed to come down among some other smaller trees. “Lupe” with Trim All Tree Service made short work of them on one of the hottest days of the year and they were all gone and ground up in a day.

4775729014_3e57f9306b.jpg

The Jungle

4779897516_d5f2fede88.jpg

Jungle Removed

Currently, there is a subcontractor working to remove the large remaining stumps (four feet of the trunk was left so they could grab it with a backhoe) and dig the footers. In my rather inexperienced opinion, I think these guys are a little outgunned by these stumps with their small track hoe – but…I’m no expert. The worked for about 2.5 hours on site today. They made pretty short work of an old telephone pole and spent most of the time digging around the maple tree stump. They disappeared around 2pm or so and the hood on the backhoe was open as if something happened to it. They should be able to dislodge these stumps from the ground with that equipment – but it’s going to take some time and I’m not sure it will be able to lift the stumps – so I’m wondering how they’ll remove them from the site (and glad I’m paying by the job and not by the hour). I don’t want to sound like I’m second guessing these folks though. I don’t have much experience with this other than some mild research and some moderate intern experience as a residential gas service installation supervisor a couple of decades ago.


I think I can!

4854421214_8af1cafbfb.jpg

No worky.
 
To avoid these ads, REGISTER NOW!
OP
J

JakeKohl

Well-known member
Joined
Feb 23, 2012
Messages
1,365
Location
Greenville, SC
Awwww ****.
by Jake on Aug.06, 2010, under Garage Mahal

I don’t swear much, if at all, on this site but it’s appropriate for this post. Our house is tied into city provided sewer lines but, to my surprise – and that of the heavy lift truck driver – my bathroom in my shop is not. This afternoon, a fork lift driving two pallets of cinder block into the back yard crashed through the lid of an active septic tank that I never knew was there. Fortunately, the driver is perfect fine – though he was pretty concerned about roll-over (I’m not sure how possible that was) and he engaged immediate C.Y.A. maneuvers by somehow blaming my wife, Bonnie, for the problem (?!). Anyway, all is well – nobody is hurt and it’s really not as bad as it sounds. I’ll need to clean out the septic tank, repair the discharge tubing, and put a new lid on it. The tank appears quite large and should be able to support both the existing and new bathroom…hopefully the drainfield is of reasonable size. If it’s not adequate for the new bathroom, it won’t cost me any more later than it would now to run a new sewer line to the street – so I can wait and see. While it’s not a great thing to figure this out in such a manner, there are some fortunate things to it; A) the tank is under a natural / grassy area I had planned and not under future pavement B) it appears to have plenty of overcapacity and C) the drain field, amazingly, isn’t under where the footers for the new building are going.

4867143601_0f5551b67d.jpg
 
OP
J

JakeKohl

Well-known member
Joined
Feb 23, 2012
Messages
1,365
Location
Greenville, SC
An Open Opportunity
by Jake on Aug.08, 2010, under Garage Mahal

With a lot of hard working help from Mark Hale, the walk-through opening that will eventually open into the new garage is made in the block/brick wall. Man, this stuff takes some heavy work! I purchased a three blade diamond wheel set for my side grinder figuring I could make several plunge cuts in the brick and block with it and then connect the dots to make an opening. Honestly, I didn’t expect that blade to last all that long cutting so much material in a dry state. It turns out that it was an animal and it easily digested all the block, brick, and mortar we could throw at it and I never had to change to one of the other two blades. In hindsight, I probably should have purchased a big 10″ blade that I could put into my circular saw to make a large single big deep cut up the wall – I didn’t because I thought they were usually intended to operate wet and wouldn’t make it all the way through the job – and they’re rather expensive. Anyway, we got most of the opening completed and opened it up one course below the shop floor level. Later, we’ll form up and pour a little concrete pad once I understand where the floor levels are going to be relative to each other.

I still have some overhead work to do to increase the height of the opening and I’m a little unsure how to reinforce the walls once I open that up. It turns out that the joists in the ceiling are running the wrong way over that shop – they run parallel to the ridge line in the roof – but the adjoining carport that shares the same roof line sees the joist run perpendicular to the ridge line, as they should. We’ll have to open up the gable and see how everything is put together to come up with an adequate plan to reinforce the wall and install a proper header for the opening (which may eventually get a door). Thanks goes to Mark for all his help - I couldn’t have achieved that opening in a day otherwise.

4869846184_25c04d3cbe.jpg

Cuttin' like Buttah'


4869262165_76c527ce2d.jpg

Bye bye window


4869266569_39174c132f.jpg

There once was a Window


4872847293_d0c0c593eb.jpg

Almost finished boarding it up - must protect the tools!
 

Thedoc14

Well-known member
Joined
Mar 4, 2012
Messages
259
Location
Melb, Australia
Looks like you having a great time, keep us posted.

You wouldn't know if the driver crapped his daks or it was the smell from the septic. lol
 
OP
J

JakeKohl

Well-known member
Joined
Feb 23, 2012
Messages
1,365
Location
Greenville, SC
Block and Roll
by Jake on Aug.10, 2010, under Garage Mahal

After a small delay due to the late arrival of some cull brick, the masons got started today and made great progress. The block foundation is in around the entire perimeter and it will be time for the concrete slab soon.

4880678852_7f724915fd.jpg


4880684338_640355bf2c.jpg


4880682098_dd63c2b397.jpg
 
OP
J

JakeKohl

Well-known member
Joined
Feb 23, 2012
Messages
1,365
Location
Greenville, SC
Stinky’s Septic
by Jake on Aug.10, 2010, under Garage Mahal

I almost forgot! I had a company look at repairing the septic tank and they said about $300 to clean it out, repair the discharge piping, and install a new reinforced lid as long as I excavate the top of the tank (should be pretty easy even with a shovel). Stinky’s Septic. That’s right – that’s their name. I contacted two other companies and they never called me back. My builder apparently has a call in with someone too so I’ll see what he’s come up with in the morning but I’m leaning toward giving Stinky the go-ahead so I can patch up that hole in the ground before someone gets hurt.
 
OP
J

JakeKohl

Well-known member
Joined
Feb 23, 2012
Messages
1,365
Location
Greenville, SC
Flying High
by Jake on Aug.14, 2010, under Garage Mahal

I shouldn’t say anything lest I risk opening the door for Mr. Murphy and his law, but I can’t believe how quickly this project is going. I signed the contract for this building 16 days ago and the ground was broken 12 days ago. There’s a chance the structure will have a roof with felt on it tonight! It feels pretty neat to set foot in a building that came from my head (with valued input from friends), my pen, and mouse.

4891373886_46698514f1.jpg


4891383442_f8b4d10c2a.jpg


4890788047_2531b5cb44.jpg


4890790609_968f74f729.jpg
 

automobiliben

Well-known member
Joined
Jan 9, 2012
Messages
181
Location
Greenville, SC
Jake, Looking great!

My wife and our are moving to the Greenville area, Simpsonville in specific in a couple of weeks! We just went under contract on a 2 acre place with a detached 780sf shop, I am pretty excited! I am interested in your HVAC solutions as the shop is currently uninsulated, practically a blank canvas.
 
OP
J

JakeKohl

Well-known member
Joined
Feb 23, 2012
Messages
1,365
Location
Greenville, SC
Jake, Looking great!

My wife and our are moving to the Greenville area, Simpsonville in specific in a couple of weeks! We just went under contract on a 2 acre place with a detached 780sf shop, I am pretty excited! I am interested in your HVAC solutions as the shop is currently uninsulated, practically a blank canvas.

I'll get the posts caught up here over the next few days (I've got 14 more months to get caught up here!). I'm almost to the point of insulation and dry wall...probably about 4 to 6 weeks out.

Greenville is great! I've lived in Cleveland, Chattanooga, Atlanta...I really enjoy where I'm at now. 45 minutes from the mountains and 3 hours from the coast. There's plenty to do and the downtown nightlife has been really resurrected in the last 10 years.
 

automobiliben

Well-known member
Joined
Jan 9, 2012
Messages
181
Location
Greenville, SC
I'll get the posts caught up here over the next few days (I've got 14 more months to get caught up here!). I'm almost to the point of insulation and dry wall...probably about 4 to 6 weeks out.

Greenville is great! I've lived in Cleveland, Chattanooga, Atlanta...I really enjoy where I'm at now. 45 minutes from the mountains and 3 hours from the coast. There's plenty to do and the downtown nightlife has been really resurrected in the last 10 years.

Yeah, I am sort of a wandering soul too (and am only 27) Peoria, St. Louis, Toronto, Miami, back to St. Louis area, back to Peoria, Chicago and now to Greenville. I get the feeling when I am around Greenville that I could lay down some roots there! Perhaps finally having my own detached shop helps too!

Yeah, we spent 2 nights in Simpsonville and 2 nights in Downtown at the Hyatt. Greenville is no Chicago, but for a small town it is pretty happening! My wife and I are beer geeks, and spent some time at Chicora Alley and the Trappe Door, both really nice places! Friday night we ate at the Mellow Mushroom and that was pretty good too (and having a Chicagoan like your pizza is a good thing)!
 
OP
J

JakeKohl

Well-known member
Joined
Feb 23, 2012
Messages
1,365
Location
Greenville, SC
Another post to get caught up a little....

The Shape
by Jake on Aug.18, 2010, under Garage Mahal

The shape of the new building is definitely observable now…and it’s big! I’m really happy with window and door placement and size. We’ve made our final decisions on the siding color and the roof. The GC has a couple of things to fix in the meantime but he promises to get on that. There’s quite a bit of work to do before moving in takes place. I plan to take care of framing, plumbing, and installing an upstairs bathroom myself. I’ll also take care of the electrical and plumbing of water and compressed air. Hopefully the budget will allow enough so I can contract out the insulating and drywall installation instead of doing it myself. Because we picked a special roofing material, it will be a week before the shingles arrive. I suspect they will get started on the siding soon. We’re waiting for the concrete paving to happen before they can construct the external staircase to the second floor.

4906251452_95477a762b.jpg


4905662693_230abb1c5f.jpg

I noticed a great side benefit of having a garage door on each gable end - I did this initially so I could pull straight through given that the garage was positioned pretty close to the side property line (so I could pull a boat straight through). I also like hanging out with my dog and having the smaller door opening to the back yard lets him come and go while I'm working. However, I just discovered that an incredible breeze flows through the opposing garage openings and is quite nice (and will be when sanding or working with stinky stuff). I'm pretty stoked about the way that is turning out.

4906253184_b1673d0ebd.jpg

My buddy, and primary idea bouncer, Mark surveying the 2nd story views. It's actually quite nice as none of my neighbors have 2 story houses and while sitting at a desk, all you will see are tall green trees for the full 360 degrees. This will be a nice place to work. However, I'm a little uncomfortable with my new "look down" view of my neighbor's pool...I swear, I thought he was wearing a black sweater while swimming...big window shades will be going on that side of the building! ;-)

4905666061_c6e617a72c.jpg
 
Last edited:
OP
J

JakeKohl

Well-known member
Joined
Feb 23, 2012
Messages
1,365
Location
Greenville, SC
Yeah, I am sort of a wandering soul too (and am only 27) Peoria, St. Louis, Toronto, Miami, back to St. Louis area, back to Peoria, Chicago and now to Greenville. I get the feeling when I am around Greenville that I could lay down some roots there! Perhaps finally having my own detached shop helps too!

Yeah, we spent 2 nights in Simpsonville and 2 nights in Downtown at the Hyatt. Greenville is no Chicago, but for a small town it is pretty happening! My wife and I are beer geeks, and spent some time at Chicora Alley and the Trappe Door, both really nice places! Friday night we ate at the Mellow Mushroom and that was pretty good too (and having a Chicagoan like your pizza is a good thing)!

Ahhh...we are kindred spirits. I deal in used case packing equipment by day and do a lot of work with small craft breweries..mmmm...beeer.

You must go to Barley's downtown. No more explanation needed.
 

ODIS

Well-known member
Joined
Apr 30, 2012
Messages
2,110
Location
Pacific Northwest
Kind of fun to relive the build, right? Looks like a wonderful project and your planning appears to be very nice. Congratulations on your project and I'm looking forward to the progression of your thread.

Ody.
 
OP
J

JakeKohl

Well-known member
Joined
Feb 23, 2012
Messages
1,365
Location
Greenville, SC
It is definitely fun reliving the build. Although I'm almost a year behind where I thought I should be when I started this project, I'm in the final push toward completion and this review is giving me some additional motivation! Here's one of my favorite parts of the project - the work was hard and I'm sure I kept some neighbors up late a few nights with the stone work, backhoe, and halogen lights - but the result was very good.

It Ain’t China, but Wow.
by Jake on Sep.09, 2010, under Garage Mahal

It’s been a little while since my last update – I spent a week working in Missouri and I finally began a plan of action to better the elevation difference in the corner of the yard. There wasn’t much time as the grading people would soon be waiting for me to complete my plan to mitigate the low elevation of the corner of the yard. After measuring everything I determined that I had a 37″ difference between the floor of my new garage and the corner of the yard over a 25 foot distance. That’s just too much slope and would not only look funny, but would make it extremely difficult to pull a boat and trailer up manually (1,000 lb combined). I decided to make the difference about 10″ to 12″ for adequate water drainage and started evaluating methods. My builder showed very little interest in participating in the wall or sharing an opinion on the topic (I’m not sure if it was liability, the lack of a comfort zone, or that he was afraid the price might scare me). I could have poured a concrete wall but that would take a lot of forms and supports (which I don’t have..not to mention the knowledge/experience for that) so I would have to hire that out and would be expensive and cause delay. I could have used some of the extra foundation block but that would have required an advanced footer and would have been pretty ugly. I settled on stackable 16″ foundation wall blocks that key into each other and got to work on the wall. I rented a mini excavator and again with the priceless help of several great friends (Tim, David, Mark, and Chris), we got to work. I ended up with a wall with 5 courses at it’s deepest spot (30″), 47 feet long, and weighing 8,000 lbs with 1,600 lbs of concrete under it. It took a few loads to the hardware store to transport all the block but I was smart and used the trailer that the excavator came on to transport two 2,400lb pallets at a time (hoping that the same box store that rented me the trailer and excavator wouldn’t notice!). We knocked it out (including purchasing and unloading material) in one full day and two long evenings.

I’ll share with you my plans for the privacy fence there a little later – I had to do some real inventing to sort out a way to support the wall that would be sturdy, live long, and handsome while not taking away from my real estate any more than absolutely necessary.

4968829603_3137ddf753.jpg

I was a little surprised that this mini excavator wasn't able to pull that pole straight up with a little concrete on the bottom of it...no wonder those guys struggled with that stump! It digs a trench and manages small roots just fine though.

4972918724_a93a379af1.jpg

There was a lot of sweat dripped on that wall. Here, I talk through the physics with David about how his height and mass is important and why he needs to continue being the person driving the remaining posts! ;-)

4972917230_73f6cdaaa1.jpg

Practically done with the wall - just a little cleanup and a bunch of cap stones to go. My foundation/concrete contractor was so impressed with the levelness, finish, and timeliness on the wall, he donated half a load of crush and run that I had asked to pay for to go behind it to prevent any water drainage pressure for hurting it (apparently he gets stuck behind these kinds of "owner projects" often). The stone went in with some landscaping fabric under/behind it to filter out any dirt and keep the soil immediately behind the wall draining freely.
 
Last edited:

Mmfh

MEMBER EMERITUS
Joined
Oct 8, 2011
Messages
1,423
Location
Portland Oregon
That's quite the shop your building there! I really like it!!

Now that I found it, I'll be watching to see how you finish it up.


Does sweater man next door have a wife or daughter? :)
 

ericburns4

Well-known member
Joined
Sep 9, 2011
Messages
47
Hey JakeKohl, you have done a great job of updating the forum from time to time despite of having such work load.
 
To avoid these ads, REGISTER NOW!
OP
J

JakeKohl

Well-known member
Joined
Feb 23, 2012
Messages
1,365
Location
Greenville, SC
Hey Jake what size cat is in your avitar "A class"?

That particular cat is a Nacra 20 that we sailed for several 500 mile distance races. I've owned three different Nacra 20s over the last 10 years...it's an awesome boat but the class is mostly dead now. I have an A-cat that I use when I don't have crew but I normally sail F18 now.

Are you a cat sailor?
 
Last edited:
OP
J

JakeKohl

Well-known member
Joined
Feb 23, 2012
Messages
1,365
Location
Greenville, SC
The Mahal Starts to Shine
by Jake on Sep.09, 2010, under Garage Mahal

OH! and the structure is pretty much complete now. All they lack are gutters. This picture is from a few days ago just before they finished the siding. I’m loving my Overhead Door Co. garage doors. Tri-layer construction with an R12.7 insulation value. The garage will be pretty easy to keep warm in the winter.

For the time being, that first step out of the upstairs is a doozy! They can’t build the stairs until the concrete pad is poured next to the driveway so they can establish the bottom elevation. They couldn’t start the grading for concrete until I finished the retaining wall…so we’re moving forward soon for completion of the exterior of the structure and property.

4968846681_4592ffece6.jpg


4969427660_fe86db03aa.jpg
 
OP
J

JakeKohl

Well-known member
Joined
Feb 23, 2012
Messages
1,365
Location
Greenville, SC
Cheap as Dirt!
by Jake on Sep.20, 2010, under Garage Mahal

I don’t know who coined that phrase…but it was probably a guy with a lot of land he already owned…with a lot of dirt…that he didn’t have to buy...and he probably didn't even need it. I’ll have you know that dirt is NOT cheap! I’m up to $1,200 just in two loads of fill dirt, one load of crush and run, and one load of top soil and I think I need one more load of top soil! Dirt is not cheap unless you happen to already own a bunch. The next time anyone hears me use that phrase, it will be oozing with sarcasm and used in reference to something expensive and probably made from carbon fiber.

I’ve been working my tail off between work, 2nd work (neglected whilst building the Great Retaining Wall of Greenville), and the garage project. I actually snuck in a weekend sailing in there too – but that was needed for my sanity. I’ve finally found a few minutes to edit the website – but I’ve got to get back to designing some t-shirts and proofs.

I’ve been working out the design of the fence in the back yard. I’m not impressed with the quality of the prebuilt fence panels from the box stores but they’re considerably less expensive than just the lumber would cost to build something similar myself. I’m also reinforcing them substantially with more treated lumber so hopefully they’ll stand up for a while. This fence is 6 feet tall and about 52 feet long. It took me some figuring to sort out setting the EMT conduit on the backside of the wall before they poured concrete but I’m really happy with the result. Even though I did the neighborly thing of facing the good looking side of the fence toward my neighbor it still looks pretty good from my side. This will keep the traffic from a busy street from looking through my neighbor’s front yard at my boats and into my garage should the door be open….and shield my neighbors from all the boats and some of the RV. If I wanted to get really special, I could screw pickets to this side too making both sides attractive – but that’s not in the budget for the time being (or necessary…with the RV and the boats, the lack of beauty on this side of the fence won’t be very noticeable).

I received some occasional help from my neighbor’s niece and nephews between them making fun of their “English” neighbor for not speaking much Spanish and jokingly trying to convince me I just said a “bad word”. I can pick out enough Spanish to keep the conversation honest…but I do appreciate how effortlessly they can switch languages and find myself a little jealous! How they interact and explain concepts (and my construction methods) to each other is really interesting. Their Dads and Uncle (Simon – my neighbor) are all exceptionally detail oriented handy people and we appreciate each other thoroughly. Part of my fence plan is to install a gate so I can more effortlessly join them for their incredible Saturday night friend and family gatherings around their backyard grill.

The driveway, pad, and apron ended up being 340 square feet more than I had anticipated (or so they say – I haven’t measured yet)…but I’m really happy with the result and really glad I built that retaining wall and leveled up that corner of the yard…even though it was as “cheap as dirt” {spoken with excessive sarcasm}.

5010276074_b0798251c4.jpg


5009674405_a9ac85a439.jpg


5009673541_3f5c6d801d.jpg


5009677495_8d901c3c41.jpg

The day after the drive was poured, a delivery truck drove out on my fresh concrete (while I wasn't home) and delivered a bunch of wood - no damage done, but I don't need that stress again...concrete blocks should give the next guy an idea.
 
Last edited:
OP
J

JakeKohl

Well-known member
Joined
Feb 23, 2012
Messages
1,365
Location
Greenville, SC
One more before bed....

That Which I Cannot Do
by Jake on Oct.20, 2010, under Garage Mahal

“I am always doing that which I cannot do, in order that I may learn how to do it.” – Pablo Picasso

The lesson for the last couple of weeks is welding. I’ve dabbled with it periodically in the past – I once took two wrecked $300 cars (one in the front, one in the back) and made one good one out of them…but that was a long time ago and the welding, though it held up well, probably would not have achieved a passing grade in any welding school. From time to time I’ve needed to weld something (usually on a trailer) and always wanted a little wire-feed unit. I found a reason to buy one after the driveway “Plan A” was changed because a concrete truck crushed a large portion of my existing drive and the resulting repair and new drive ended up 16 feet wide instead of the 12 feet I had planned on. I had already purchased gates for a 12′ wide driveway. Since it would be silly to put a post in the driveway for the gate creating 1/3 of a driveway “to nowhere”, I decided to sell the gates I bought and buy or create something to fit. After looking around it quickly became apparent that I could buy a welder, a nice auto-darkening helmet, and all the steel and wood I needed to make the gates for less than 25% of the cost of paying someone to build them. I set out to learn to weld and spent several days reading and practicing. I quickly drew up two 8′ gates and had the steel the next day and started fabricating and welding. At current state, both gates and gussets are assembled but I still need to weld in the hinge blocks and mounting plates to attach the latching/locking hardware. I really hope to have that finished this weekend so I can send it out to be galvanized next week. It should cost me around $100 for the hot-dip galvanizing which is much easier, though slightly more expensive, than me painting them and they should maintain a great cosmetic appearance for at least 18 years. Gunther (pictured below after he crammed himself in my recliner with me and I fell asleep … he’s feeling a bit neglected lately) is desperate to have a yard in which he can be let loose and expend energy during the day and these gates are all that we lack. I’m going as fast as I can!

5101283900_4a64ca4a82.jpg

I'm really digging the new boat parking - putting things away after a regatta weekend is so much easier now.

5101284714_ed3849f641.jpg

welding in a tight spot

5100689715_35229e214a.jpg

I love the smell of burning metal!

5100690581_0d66e0ae26.jpg
My boy Gunther - he never figured out that he wasn't a lap dog. I rescued him from a rough home 12 years ago but I had to put him down this spring due to bone cancer.
 
Last edited:

Kevin54

MEMBER EMERITUS
Joined
Jan 12, 2005
Messages
29,341
Location
Urbana, Ohio
I don’t know who coined that phrase…but it was probably a guy with a lot of land he already owned…with a lot of dirt…that he didn’t have to buy...and he probably didn't even need it. I’ll have you know that dirt is NOT cheap! I’m up to $1,200 just in two loads of fill dirt, one load of crush and run, and one load of top soil and I think I need one more load of top soil! Dirt is not cheap unless you happen to already own a bunch. The next time anyone hears me use that phrase, it will be oozing with sarcasm and used in reference to something expensive and probably made from carbon fiber.

The three largest commodities on earth are dirt, water, and stone. And where I live all three cost a small fortune :lol: I had a 3/4 acre hole in my back yard that I had to fill in that was full of water. Some people want ponds and some people want dirt. I couldn't find one person to do an even up swap with.:(
 
OP
J

JakeKohl

Well-known member
Joined
Feb 23, 2012
Messages
1,365
Location
Greenville, SC
Curve Ball
by Jake on Nov.09, 2010, under Garage Mahal

Yes, I’m STILL working on fencing. In my defense, I’ve had a lot of other work get in the way and slow progress…and I’ve gone sailing a time or two in the last several weeks. However, I’m still making steady progress on the fencing and resisting the urge to start working on other areas of the garage until the exterior is complete. Once I get the fencing done, it’s on to wiring the new structure and once the county inspections are done things should start flying as I contract out much of the finishing work. I did absorb and evening distraction by installing a new touch screen navigation and stereo Kenwood unit in my truck that I found at a great deal. I decided to pull the truck into the garage for the first time and do the installation work there. I was, and am still, shocked at how much space is in the garage! My Chevy truck is the 2nd longest version Silverado they make – note that the garage door is closed behind the truck in the picture below! I’m going to have a lot of fun in this space when it’s done.

5162555039_9f371771b0.jpg


OK, onto the projects accomplished in the last couple of weeks… I am still welding on the gates periodically but they’re almost complete. With some help from my buddy Mark, we machined the blocks from 1.5″ square steel bar. One gate now has both hinge blocks welded in place. I finally feel like I’m getting the hang of this welding stuff and am starting to get a feel for the right temperature and wire feed speed – I’m pretty proud of the last several beads I’ve laid on these blocks and the reinforcing plates and am now rarely needing to hit them with a grinder to hide the metallic bubblegum.

5163164844_aec66762b9.jpg


5163164090_f0c4b7d76f.jpg

The underside corner still looks a little splatchy but I would have good faith that the side weld is strong.

5163165604_fba551c80a.jpg


One last thing I need to sort out on the gates is the posts. They’ll have the hinge pins mounted on all-thread going through the posts for adjustment and they’ll have plates to attach the wood fence to. The gates will be angled to the driveway slightly to create a better, more organic, look. Now looking at the curve of the new driveway, I decided a curved fence would look really cool. I didn't exactly need another complex project - but this one peaked my incurable problem solving interest...added to which, I was told it couldn't reasonably be done by a fence builder friend. It did take some experimenting to figure out how to build it but I had to have this sorted out so I could weld the attachment plates on the end posts at the correct angles prior to galvanizing. This past Sunday, I hammered in and concreted three galvanized posts for the curved fencing and purchased some 7/16″ pressure treated marine plywood and ripped it into 4″ strips x 8′ long. I had initially thought these would be flexible enough to bend to the radius to match the drive, stack them three wide, and glue and screw them together to make two solid horizontal arms to attach pickets to - but that would have been too easy. I immediately broke the first strip of plywood before it got all the way to the needed radius and decided I needed a plan B. I washed down a beer, or perhaps three, while staring at the problem came up with a plan B, a plan C, and a plan D. Plan B was to wet the plywood and see if it gets more flexible. Plan C would be to kerf cut the plywood – or kerf cut some 1×4″ pressure treated planks and find a way to make that curve. Plan D involved composite decking and some sort of make-shift oven to heat it to set it in the needed bend. Fortunately, plan B worked like a charm (because Plan D would have kicked my ****). I took one strip of the plywood and hosed it down before covering it with wet towels. It sat like that overnight. I got home Monday night and started clamping the wet plywood to the posts – it worked but the wood was still pretty stressed and I decided to let it sit for a day and dry a little to get an idea for how much it would relax in that position. Meanwhile, I stacked the other strips of ply and wetted them down in a similar fashion since this looked promising. Tonight I removed the clamps and the wood took to the curve pretty well holding pretty close to it’s shape. So I started building the first of two horizontal wood braces by stacking the plywood three strips wide, staggering the joints, and putting in 2 to 4 screws every 8″. Because I broke the first piece, I’m a little short on finishing it with plywood. Since the ends are straight, I’ll scarf in some pressure treated 2×4′s to complete the horizontal braces. It looks like it’s going to work great. Tomorrow I hope to get started on the 2nd one after this one dries a little so it can be removed from the rebar "forms" driven into the ground at the edge of the drive.

5162558899_b79358b9fd.jpg


5163167988_e9b8c23e9d.jpg


5163168632_759580a01d.jpg
 

Thedoc14

Well-known member
Joined
Mar 4, 2012
Messages
259
Location
Melb, Australia
Dont worry about your hinge welds ther is plenty of bevel on your block.
What thickness steel is your gate made from that will be the decider on flex and cracking.

I dont sail but love too, we have a Hydra i think 20ft its a scaled down Tornado I beleive.
My daugter is slowing going through sailing school.

Nick.
 
OP
J

JakeKohl

Well-known member
Joined
Feb 23, 2012
Messages
1,365
Location
Greenville, SC
Dont worry about your hinge welds ther is plenty of bevel on your block.
What thickness steel is your gate made from that will be the decider on flex and cracking.

I dont sail but love too, we have a Hydra i think 20ft its a scaled down Tornado I beleive.
My daugter is slowing going through sailing school.

Nick.

The tubing is 16 gauge. I took measures to prevent peak stress points by adding a bulkhead in the center of the tubing where the hinge blocks connect (mostly for compression at the bottom) and tied in all the members to the hinge block with a plate. At this point, it's been up now for over a year with all the weight and wood mounted to them. They seem to be holding up well. Automatic openers just arrived for them and I can't wait to install those! (more on that once I get caught up with the posts here). Here's a shot showing the bulkhead/web.

5265450272_4fc41cf3ac.jpg
 
Last edited:
OP
J

JakeKohl

Well-known member
Joined
Feb 23, 2012
Messages
1,365
Location
Greenville, SC
***note: this is a replay of a previously aired program to catch up to the current status***

Bit by Bit
by Jake on Dec.06, 2010, under Garage Mahal

Progress was feeling really slow there for a while – the construction of the gates and gaining some welding ability took some time. While the steel items were at the galvanizers, I started knocking out a couple of smaller jobs and it seems like things are starting to cook along. It feels like I’ve been working on fencing forever and it was nice to move onto some other tasks. The steel came from the galvanizers today though and it’s time get back working on fencing! They have a really thick layer of zinc on them….more than I expected. The galvanizing did cost considerably more than I had anticipated….in fact, I could have constructed the gates from stainless steel for less than the cost of the mild steel plus galvanizing. When I first inquired about the cost, they neglected to mention the $250 minimum fee they have in place. They’re done, though, and they look great. It should be a couple of decades before they start to show any signs of age (provided someone doesn’t run into them first)! I hope to start digging the post holes and pouring concrete this week. However, the weather has turned very cold (well…for South Carolina anyway) and it’s near freezing by the time I get home at night. Hopefully we’ll get a warm spell soon and I can open up some earth and pour some concrete.

5240205084_93bdd7bf6d.jpg

each post is over 40 lbs of steel!

5240206934_8c14f64d9a.jpg


5240207930_0c1053c7e7.jpg


While waiting on the fencing to come back from the galvanizers, I ran a reinforcing spine in the upstairs floor system to increase the stiffness of the floor. I was a little disappointed with how springy the floor was when the builder handed everything off to me. I have a truss floor system and it was designed with two parallel vertical members separated by about 18 inches in the center. I used that to install a series of 15″ tall vertical OSB panels to form a continuous box spine down the entire length of the building. It significantly increased the floor stiffness and I’m satisfied with it now. I neglected to take any pictures of that yet but will do so sometime in the next couple of days. I also installed the electrical boxes in the garage for the light switches, door openers, and outlets downstairs and started the framing for the upstairs interior structures.

The bathroom and the dumbwaiter closet are now also framed. I have some hesitation about framing the matching downstairs dumbwaiter closet because I’m still learning about the code requirements for such a system and I don’t necessarily want to open up a can of worms with the electrical code inspector…though I don’t intend to skip any codes I would just like to skip over any major inquiry. I am a mechanical/electrical engineer and have a background with machinery safety and have performed my share of safety system risk assessments in the past. This system will be safe and inoperable from the interior (so you cannot use it solo like an elevator) – however, we will be able to wheel in a handtruck loaded with boxes (space large enough for a person) so there are a lot of things to consider. I have to finish up some of the dumbwaiter upper closet details that are waiting on some particulars about the design of the car…but I should have that done soon enough to finish the framing there and move on to the upstairs electrical wiring (and inspections). The bathroom framing is complete and is designed slightly larger than the smallest bathroom I could build to code – it is an office space first and foremost! However, I did intentionally space the interior windows so that if someone wanted to turn this into an apartment, either bathroom wall could be moved out to easily accommodate a tub and/or shower without requiring a major exterior overhaul. The plumbing will also take this into accord.

5239607367_3fbccb22a1.jpg


5239612403_4af786ea2b.jpg

the dumb waiter and the bathroom
 
OP
J

JakeKohl

Well-known member
Joined
Feb 23, 2012
Messages
1,365
Location
Greenville, SC
***note: this is a replay of a previously aired program to catch up to the current status***

Weighted Average
by Jake on Dec.09, 2010, under Garage Mahal

I took a day off work today to burn up some remaining vacation time and made more progress on the gates. Boy, I’ll be glad when I’m done mixing and setting concrete by hand! The gate posts are in and curing…hopefully the cold tonight (in the 20′s) won’t hurt the concrete set. These 8 foot Schedule 40 steel 3″ pipe (3.5″ o.d.) are now set three feet into the ground and surrounded by 240 lbs of concrete (on each one!). Oy…my back! Keeps me young – right? I was pretty worried about the frustration of trying to set these posts in the ground within a reasonably accurate distance from each other given the odd angles, the weight of these posts, and me doing it single handed. But, first shot, nailed the levelness between the two and the distance between them within 1/16"! I was surprised to luck out and set them so close on the first try. I put some insulation ontop of the concrete in the ground to keep the surface from freezing tonight and hopefully the post in the center won’t act too much like a heat sink cooling the entire depth of concrete. I hope to fabricate some hinge pins tomorrow but it will be a week or so before the concrete is hard enough to start setting the gates.

5248062476_50b8878c7f.jpg


5248063956_cf0a8d0f8e.jpg


5248064540_dc49b5b8f6.jpg


Oh, and the picture I promised about the central “spine” I added in the upstairs floor structure…here it is. This acts like bridging between the floor joists (that probably should have been put in place by my builder to begin with). This additional vertical OSB is glued and screwed to each truss. It made a huge difference in the floor stiffness. Now, however, I can notice more bounce about 1/4 the way to each side wall with the center being stiffer. I've decided to make two more similar runs down each side on the other vertical upright provided by the truss structure. It won’t hurt, it will cost less than $20 (and a couple of evenings) and it would be impossible to do later. I’ll probably work on that some this weekend.

5248073456_d7307ed2ac.jpg
 
Last edited:
OP
J

JakeKohl

Well-known member
Joined
Feb 23, 2012
Messages
1,365
Location
Greenville, SC
***note: this is a replay of a previously aired program to catch up to the current status***

Coming Hinged
by Jake on Dec.15, 2010, under Garage Mahal

Finally…the gates are up and the hardware in place. They came together amazingly well and I got lucky in a couple of areas considering all the possible variables from fabrication, welding, galvanizing, unproven hardware, a last minute hinge pin design, and setting the rather heavy posts (and filling them with concrete). I admit that filling the posts with concrete was considerable over-kill but concrete is cheap...until you need to remove it. To prevent my threaded stainless steel hinge pins from being bound too severely to the concrete, I wrapped the threads with several layers of vinyl electrical tape. This way I should be able to forcibly adjust them later if I need to for some reason. I know it was overkill to install zerk fittings in the hinge blocks, but I had them laying around and it only took a minute to drill and tap the holes in the hinge blocks. With just a shot of grease on the zerk fittings the gates are completely silent and I paid enough attention to getting the posts plum that the gates stay at whatever open angle you leave them (until the wind moves them). Overall, I ran well beyond my $250 budget with the gates but I upgraded substantially from the original plan for a couple of simple chain link gates (that I already bought but wouldn’t fit due the contractor pouring the drive wider than drawn). I’m now at around $1,000 including the welder, galvanizing, and the wood soon to be mounted but the result is much much nicer and it would have been in the five of thousands to have had someone else custom fabricate and install them – so I’m still quite pleased about the arrangement especially considering that it justified adding a wire-feed MIG welder (with gas pack) to my arsenal.

The weather has turned pretty sour again (rain/sleet/snow) so I’m probably back on inside projects this weekend. Hopefully I can finish framing the upstairs dumbwaiter shaft as well as the bottom shaft and build an entry platform to the garage from the side access door (making it a level transition through the door into the dumbwaiter for a hand truck). I just bought a forced air propane heater that should make it bearable to work inside while our temps are in the 20′s. I really want to start working to weatherize the curved fence stringers but the garage isn’t insulated yet and it will probably be just too cold for working with fiberglass even with the propane heater in action. Still plenty to keep busy with until we get the next warm snap so no rush.


Showing the stainless steel hinge pins prior to installation. This also shows the zerk fitting on the hinge block.
 
Last edited:
OP
J

JakeKohl

Well-known member
Joined
Feb 23, 2012
Messages
1,365
Location
Greenville, SC
***note: this is a collection of a previously aired program to catch up to the current status***

Red Right Returning
by Jake on Dec.21, 2010, under Garage Mahal

While it may appear to be festive, the motivation is tainted….the lights keep the concrete in the post 4 degrees above ambient temperature to hopefully keep the concrete from freezing in the freshly filled posts. My neighbors thought it was a decent festive display but the port and starboard reference was completely lost on all of them. It does, however, make me really wish I had run some conduit under the concrete to have discrete electrical options to the far gate post...I scored myself 5 big "face palms" over that lack of foresight. :sad:

5282123004_b83df6b471.jpg


Pickets are up! The steel held up marvelously…them are some nice gates. I will be cutting some architectural shape to the top of the gates once they’ve dried out enough (and it’s warm enough) for staining.


OP
J

JakeKohl

Well-known member
Joined
Feb 23, 2012
Messages
1,365
Location
Greenville, SC
***note: this is a collection of a previously aired program to catch up to the current status***

Fencing Complete!
by Jake on Mar.06, 2011, under Garage Mahal

Sorry it’s been a while since the last post…It seems like I get fewer and fewer breaks anymore and I’m not making the progress on the garage that I had hoped by this point. However, the things that are coming along are coming along quite well so it’s still gratifying. I have been working on several different projects in and out of the garage and I hope to put up several posts in the next week or so updating the status on things.

During a warm snap several weeks ago I was finally able to complete the complex curved fencing that I had been scheming about ever since the garage project began. It was as difficult as I anticipated but the result was better than I could have imagined. This curved fence section is roughly 30 linear feet of fencing and ties into brackets I had previously welded on the primary hinged fence posts. As I did on the back fencing, I used 2″ galvanized EMT conduit for the fence posts because it has a thicker wall, was available in 10′ sections, and was cheaper than the 6′ 2″+ thin wall fencing posts available at the big box hardware stores. Standard 2″ EMT conduit fittings were used to mount the fencing braces – although this time I installed stainless steel plates between the wood and the EMT clamp out of concern that the wood may compress overtime and allow the clamp to lose pressure and slide. The long braces are constructed from multiple layers of 1/2″ pressure treated plywood that were soaked for a few days and then braced around the curve of the driveway and screwed together. After drying for several weeks and waiting for a warm enough day to stain, everything was put together. I was concerned about the open grain of the plywood so I applied about 8 coats of stain to the braces to hopefully extend their life (I don’t want to have to make those again any time soon!). Should they fail in the future, I’ll probably try to heat some plastic decking boards and use them to form the curve.


still had a couple of pickets to mount here...but it's clear that it matches the curve of the driveway perfectly.
 

Thedoc14

Well-known member
Joined
Mar 4, 2012
Messages
259
Location
Melb, Australia
I like it looks great.....
can you tell me why " for my own curiosity" why yo have the gate brace from top corner to bottom.

There are 2 thoughts in this I have heard and both make sense.

1. That in your case it helps keep the bottom cnr from dragging on the ground, But it is at the top of the pivot point and post, which can flex.

or

2. That you go from Bottom hinged corner to top cnr. This is at the base of the post which should be more stable to help keep the bottom from sagging and dragging.

What where your thoughts when you made the gates?

Just to add another thought or reason to the mix. Anybody else know of the pro's and con's of gate bracing.
 
OP
J

JakeKohl

Well-known member
Joined
Feb 23, 2012
Messages
1,365
Location
Greenville, SC
I like it looks great.....
can you tell me why " for my own curiosity" why yo have the gate brace from top corner to bottom.

There are 2 thoughts in this I have heard and both make sense.

1. That in your case it helps keep the bottom cnr from dragging on the ground, But it is at the top of the pivot point and post, which can flex.

or

2. That you go from Bottom hinged corner to top cnr. This is at the base of the post which should be more stable to help keep the bottom from sagging and dragging.

What where your thoughts when you made the gates?

Just to add another thought or reason to the mix. Anybody else know of the pro's and con's of gate bracing.

that's a great question - I see gates made the other way all the time and I never realized that it's because the thought is that the bracing might tie in the load to the bottom of the post. This is actually a flawed concept. First, my background - I'm a mechanical engineer by degree, an electrical engineer trade, and now in sales.

Nothing in this system (other than the hinges, obviously) is designed to move...the box frame of the gate is intended to not rack and the post is steady. You have two stationary systems connected at the hinge points. With the post holding the gate in any normal position, regardless of what the bracing in the gate looks like, the gate weighs the same and is extended out the same distance from the post. Because of this simple fact, the vertical endpost has to support the total weight of the cantilevered gate at the two same hinge points and nothing you change with respect to the angle of the bracing inside that box frame will change the loading on these points or the load / angle /moment / leverage loading that the post has to carry. The bracing can be from bottom to top, or top to bottom - but the post will see no difference as long as the gate remains the same weight and doesn't droop to the ground. So, in short, the gate weighs what the gate weighs and the post has to hold it up.

With this in mind, the only consideration for the design of that bracing inside the box frame of the gate should pertain to the stresses inside the box frame of the gate itself. Steel and wood structural members can support higher loads with less dimensional distortion when the member is in tension instead of compression. The cross brace in the gate carries the highest amount of load and is the critical member. With this cross brace inside the gate box frame angled from top at the post to the bottom of the extreme edge of the gate, it places this member with all of it's loading in tension where it can support much more weight. With it in the opposite direction, it is in compression and more susceptible to buckling or bending.

In summary, having the cross brace running for the top of the gate frame at the post to the bottom of the extended end of the gate is a stronger, more structurally sound, design.
 
Last edited:
OP
J

JakeKohl

Well-known member
Joined
Feb 23, 2012
Messages
1,365
Location
Greenville, SC
Wire, Wire, and More Wire
by Jake on Mar.27, 2011, under Garage Mahal

I’ve been doing nothing but wiring for the last month or so. Every time I move on to a new task in the garage, I’m reminded at how poor my time estimating skills are with these kinds of jobs I’ve never done before. Though I thought that I should be done with the electrical work by now, thanks to three solid days (or more) of help from David Strickland and Tim Owens, the wiring is nearly completed for both the upstairs and downstairs. 23 recessed can lights are in place switched on 4 different banks upstairs and I’ve gone nuts with the number of outlets. There are three circuits of outlets (I think 28 in total) and eleven network outlets – some of which will double as telephone connections. I couldn’t resist putting in so many outlets – the space is so modular I thought it best to simply have a plug wherever we might want to put equipment because it’s easier now before the insulation . Downstairs, there are six eight foot double tube florescent strips forming two runs down the length of the garage and specific workbench lighting. There aren’t as many outlets downstairs but there are plenty with several mounted above “benchtop level” on the wall where there will be a long work table. There are four exterior outlets – one of them 30Amp to power the RV. I will have to be judicious with simultaneous power consumption and though it’s going to be a rare occasion that we are using much more than a computer and one or two lighting circuits, the 100Amp service will not power everything at once. I hope I don’t regret not installing a 200 amp service (that would have required extensive rework on my house’s main electrical service and circuitry).

To finish things, I have some work to do with the HVAC. I need to determine if my 25′ lineset for the upstair unit will allow me to install the two outdoor units side by side or if they need to be mounted one above the other (they’ll mount on brackets on the existing exterior wall). Once that is determined, I can mount the disconnect boxes and run the wiring for those units. All that is left after that is to run the 100Amp power feed from the main electrical box and then to schedule a rough-in electrical inspection so I can move on to hiring insulation and drywall contractors.


Every pair of electrical outlets have a network outlet between them a few of the network outlets also carry phone and coax just to have options...for some reason I felt like I needed to avoid putting outlets directly under windows.


Electrical Panel before tying into the breakers


It took me two entire evenings to tidy up the panel


Need to address leaky doors. I've leak checked all the siding and can't find any problems there...I think it's because I haven't yet caulked and painted the door moldings. It only leaks when the wind drives the rain in a particular direction. Later, I'll add awnings to both entry doors to give them a little more protection.
 

Thedoc14

Well-known member
Joined
Mar 4, 2012
Messages
259
Location
Melb, Australia
With this in mind, the only consideration for the design of that bracing inside the box frame of the gate should pertain to the stresses inside the box frame of the gate itself. Steel and wood structural members can support higher loads with less dimensional distortion when the member is in tension instead of compression. The cross brace in the gate carries the highest amount of load and is the critical member. With this cross brace inside the gate box frame angled from top at the post to the bottom of the extreme edge of the gate, it places this member with all of it's loading in tension where it can support much more weight. With it in the opposite direction, it is in compression and more susceptible to buckling or bending.

That was my thought exactly I have a Mechanical Eng background, But when I was helping a friend build gates for his picket fence business he insisted that I do it from the bottom up..

I just plain simple like the look of the way you have done it, it just looks right.

Nick.
 
To avoid these ads, REGISTER NOW!
Top Bottom