I had to run out this morning before I had time to answer your question. I was going to say,
'I don't know what color the saw is. It looks kind of mint colored in the photo. Must be grey.'
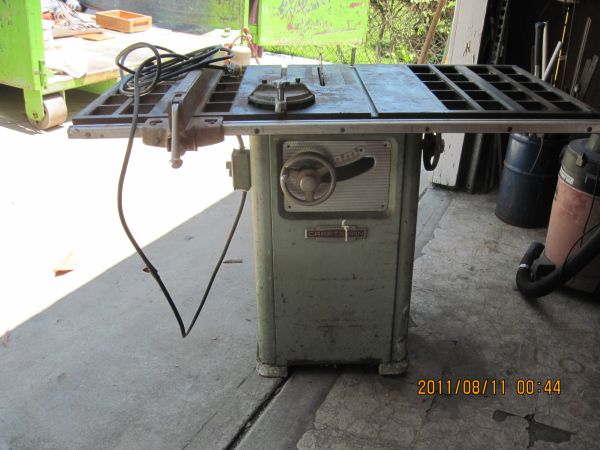
Having now seen the saw, I must ask why it was calling out to me and not to you. The original color was bronze but someone repainted it a lighter version of Red Leader's Famous 50's Blue|Green. So I'm sitting here looking at your cabinet thinking that's the color I want, while you are looking at it and imagining a future where it looks a lot more like mine (at least mine at some earlier age). Visually the cabinet is pretty rough. It's rusty but doesn't appear pitted, the feet seem ok. It has been dragged around a bit. There is paint flaking off all around the base and it is covered in some sort of (chemical?) residue.
I hope you can direct me in the process of restoring all the chrome. It almost looks like an earlier owner lived somewhere near the ocean. I am concerned it may be too pitted. I will post some pictures after I figure out how to get it out of my truck. I am also hopeful that someone can help me with some pictures of the fence's rear guide. This one has been modified and I don't know why or what might be missing. I literally had to cut it apart to remove the extensions. The saw is a number 103.22420, hopefully I can locate a manual and maybe figure it out. What number is yours?
Now I am taking you at your word that this is a good saw. I had wanted a UniSaw but if you sold yours in favor of this, that speaks well for it. In any case, I don't think I could have touched a UniSaw for the price.
So here's the ad:
Heavy Craftsman Tablesaw 8" with assorted blades
1 horsepower capacitor motor
Asking $200 OBO
Call: 000-000-0000 for more details
And the picture:
Note the date in the picture. It would appear they have been planning to sell this for a while. It's been listed on CL for at least 2 weeks. And yes I believe that it is really a 10 inch, not 8 as listed. So returning to your earlier formula, my final price:
Home Depot Table Saw - 30
That picture really drives home the value of the older tools.
Came with four original standard sized extensions bolted together, original wheel set (only someone replaced the wheels with smaller ones which required drilling new holes

), original switch, and of course the motor (also painted to match

). Not included: splitter / blade guard. Does anyone actually have one?
Completely missing the point that I have no space, I also came home with an absolutely pristine 1950's 9x30 CM lathe 103.23070 (no motor) and an unmarked cast iron saw vise.
More later . . .

 ...but mostly