To avoid these ads, REGISTER NOW!

my journey: Epoxy-Coat + Primer

miken123

Well-known member
Joined
Jun 13, 2012
Messages
67
Hey everyone. Alright, after a lot of discussion about Epoxy-Coat and primers and whether or not to do it and if so what brand. etc etc (thanks to FamilyOf8Kids for being so kind as to allow the partial hijacking of his thread for that) I finally took the plunge myself.

First let me discuss what I did to prep the surface:
It was only a few years old of a concrete floor in my garage (previous owners had built the garage a few years back). No known sealant / etc on the floor. Wasn't very dirty.

I used Zep citrus degreaser to brush it down and then rinsed it down with my garden hose. Waited several days for it to dry (let's say 2 weeks. it just took me that long to get to the next part...)

I rented the Home Depot floor maintainer (what the everyman would call a floor buffer) for about $30 bucks. Also at HD I rented their Diamabrush "Concrete Prep" wheel for the maintainer for about $40 bucks. These are 4 hour rental times.. I kept it for longer so it wound up costing me ~$110 total.

That Concrete Prep wheel and floor maintainer sent me or a hell of a ride. I didn't know how to hold it right. The HD instructions said hold it at arms length - WRONG - hold it down and tight up against your waist / below your belly button.
Pull up to go one direction, push down to go the other direction. Do yourself a big safety favor and read the official producte guide. For the one I rented it was here:
http://www.clarkeus.com/~/media/Pro...shers/ClarkeUS/PDF/FM/OperatorsManual-FM.ashx

I ran the machine up and down the floor dry. It wasn't terribly dusty but I bought a $30 3M filter breather (yes it's way more expensive than the silly doctor's mask lookalike.. but these are my lungs I'm talking about here!!! comon!)

Dust didn't fly in the air too much but there was a lot of it on the ground when I was done. I took my time and just went up and down in sections until I got through all of it. If I did it again, I'd go even slower and grind down longer.

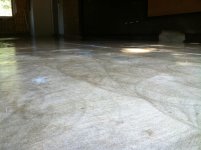
In the end I was left with a surface that felt like 100-120 grit sand paper. Nothing terribly rough but certainly not smooth.


I vacuumed it up with my shop vac (cleaned off the filter a few times when I felt suction power was being lost). I used a flat floor attachment (no brushes on it) and it worked OK. I ended up vacuuming it about 4 or 5 times total over the course of a few weeks when I got bored.

If I did it over again I think I would just use a garden hose and flood it out -- but when this thought dawned on me I had already vacuued it several times and was determined not to use water on it. I swept / vacuumed a few times/ even mopped it once. After all that I even wet vac'ed it once.

I was happy with it once i got it to the point that when I passed my hand over the floor I barely had any white powder visible on my hand.

I did the vapor test (taped a clear plastic sheet (from a newspaper bag.. eh) down for 72 hours). No sign of darkened concrete or moisture. I also made sure during the wet vaccing and mopping steps where I would put water on the concrete that it would soak right in. It sure did and I didn't notice any spots that rejected the water.


Finally I was getting tired of this project not moving so I told myself "that's enough prep."


At this point the floor looked good and clean but I decided to put some Sika Flex material on two thin cracks in the floor.
Additionally I decided to put Sika Flex along the perimeter of the floor [\B] Why would I do something so crazy? Well the expansion material (the fibrous material that looks like 600 sheets of construction paper matted together) was clearly exposed along most of the perimeter wherever the floor met the foundation wall. I was worried that the fibrous expansion material would soak up water much more easily than the finished epoxy floor and that soaked up water would end up being absorbed by the concrete beneath the epoxy and that that would ultimately cause the epoxy to become detached all along the wall.

Well that was my thinking -- i'm sure many will argue against it and say I'm crazy or dumb for doing it but hey - whatever helps you sleep at night!


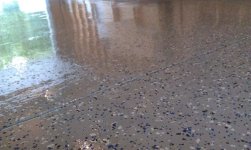
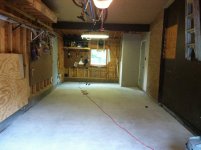
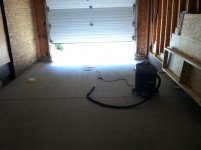
So after all that the picture below shows my prepped concrete ready to accept a coating of something.
 

Attachments

  • Photo14.jpg
    Photo14.jpg
    118.6 KB · Views: 266
  • Photo12.jpg
    Photo12.jpg
    92.9 KB · Views: 252
  • Photo9.jpg
    Photo9.jpg
    92.3 KB · Views: 238
To avoid these ads, REGISTER NOW!
OP
M

miken123

Well-known member
Joined
Jun 13, 2012
Messages
67
Ok! So after that a few weeks went by. I had already received my Premium Full kit of Epoxy-Coat. But bad weather always lurked (although it never did rain any weekend that I decided to hold off due to weather forecasts).

Then I stated reading
http://www.garagejournal.com/forum/showthread.php?p=2553861#post2553861
where another guy decided to do his Epoxy-Coat WITH A PRIMER! The reasoning seemed sound: Every other known quality epoxy brand recommends a primer.. so why not?!

The person in that thread went with PPG Aquapon 35. It sounded good, but my nearby paint stores only carried Benjamin Moore products. I did a few searches and didn't find any complaints about Benjamin Moore epoxies, in fact the few i could find were all positive!

But I didn't need a Benjamin Moore epoxy kit or top coat.. I needed a primer. So I saw what Ben Moore recommended as a primer for their current line of epoxies and it was the Benjamin Moore PF 41. It is part of their Super Spec HP line of epoxies.

It is a polyamide 31% solids epoxy. It is clear and ends up looking like a glaze. Its technical data sheet specifically said that it is to be used as either a clear top coat or as a penetrating sealer that provides the proper foundation for high performance floor systems.

The guy at the store said he used it on his garage floor epoxy as his primer and thus vouched for it (it's worth something I guess).

It was a little expensive. $190 for enough to cover 670 sq ft (I only needed 375 but 1 kit covers 335 so i had to buy 2.. oh well if I can't afford $90 bucks for the right amount of stuff I shouldn't be doing it).


Why go with a primer? Well two reasons:
One - I felt like it couldn't hurt assuming I bought a quality primer that was meant to be used under epoxy coatings.
Two - I thought at the least this could be a 'practice round' for epoxy application in my garage. I'd figure out how to get around and get a feel for spreading out / applying the epoxy. This should be useful for the ensuing step which would be applying the Epoxy-Coat base coat!

Any minor mistakes with the primer would be forgivable because it would get covered up (to some degree) by the Epoxy-Coat.

So on to the application!
 

Attachments

  • Photo13.jpg
    Photo13.jpg
    145.3 KB · Views: 147
Last edited:
OP
M

miken123

Well-known member
Joined
Jun 13, 2012
Messages
67
The technical data sheet (TDS) claims a pot life of 1 hour for the PF41 ben moore stuff. This was comforting since I'm a beginner at this stuff and have never worked with epoxy as a floor covering in my life.

I decided I would calculate how much each section of my garage floor needed (split into approximately four 10' x 12' sections) and mix up each batch one at a time. I calculated how much volume each section would require and I bought small 1 quart pale destined to hold my necessary amounts of Part B and a 2 quart pale to hold the necessary amounts of Part A.

For part A (the red bucket with lines in the picture) I measured out the exact amount of volume (using water for measuring's sake) and put it in the bucket. I'd then mark with a sharpee on the outside a line indicating that height of volume and the corresponding section of my garage that amount was for (sections were named I, II, III, IV. but sections II and III were the same size).

I used the control joint grooves to split up my garage sections out of convenience.

I repeated this with the clear 1 quart bucket for the measurements of Part B needed for each section of the garage.


I thought this would be easy! I could just go one section at a time and mix up only the amount needed for that section and then i'd know exactly how much to use in that section.

It wound up being a little harder than that...
 

Attachments

  • Photo11.jpg
    Photo11.jpg
    123.4 KB · Views: 88
OP
M

miken123

Well-known member
Joined
Jun 13, 2012
Messages
67
So into the garage I went with all my equipment (see picture below).

I mixed up my first batch of epoxy for the first section of garage. I didn't bother cutting in thinking I could just squeegee stuff into the corners as necessary. WRONG. I highly recommend cutting in with this stuff! I ended up having to go back in there and cut in later in the application. not a huge deal but just some advice.

When I mixed parts A and B together what was once two clear fluids become milky looking! I got scared thinking maybe I was introducing a whole bunch of air and was making a frothy milkshake! There was no way to disprove or prove that fear so I just went with it...

I applied two ribbons in the long direction of my rectangular section.
Got out my telescoping pole with squeegee and went back and forth perpendicular to the ribbons. I really needed to get my spike shoes on (these came with the Epoxy-Coat kit) but as soon as I tightened a strap the plastic part of the strap broke! I was like $#@!**!!

I did what I could and then I went and backrolled everything using the made-for-epoxy roller. That roller was only $5 but it really did well. It seemed to resist absorbing the epoxy.


When laying down the Benjamin Moore PF41 although it was milky in the mixing bucket it would squeegee out clear when spread thin enough. Otherwise it would retain its milky yellow look when it would puddle / spread too thick.

I wasn't too worried about what it would look like but I was still worried about the overmixing / foaming that I couldn't prove/disprove.. but again, at this point I could only keep going.

For Section II and the rest I decided to just mix the rest of Part A and B together. Still worried about foaming I figured if I had a deeper container to work with I could be more sure that I wasn't mixing in air ((note: I specifically bought mixing buckets that were just large enough to hold the quantity to be mixed so I always planned so that I wouldn't mix air, but again I wasn't sure what had made the mix look milky. In the end I would find out that that is the correct color afterall!)

So I mixed all of my first two cans of Parts A and B together and just poured out of that bucket for the 2nd and third sections of my garage.
By the time I was finishing section 3, I could tell that the epoxy was getting thicker during spreading. I knew that by buying enough for 670 sq ft and only having 375 square feet that I could afford to give up on what was left of my first kit of Parts A and B and use a brand new mix (my second kit of Parts A and B) to do the last section of my garage.

So I did that. In hindsight I think I would have been OK using the rest of my first kit but I was getting paranoid and had no reason to save my second kit since I'd have to use some of it even if I had trusted all of my first kit since one kit (which covers 335 sq ft) wasn't big enough for my 375 sq ft garage.


The last section was easy enough. I knew to cut in my edges and had gotton comfortable spreading this stuff. Also, I decided to Gorilla Tape my spike shoes on so I could walk around and work comfortably.

I also knew that with my spike shoes on I would be able to go back and touch up the edges that I hadn't cut in in the first section of my garage.
 

Attachments

  • Photo10.jpg
    Photo10.jpg
    100.5 KB · Views: 154
OP
M

miken123

Well-known member
Joined
Jun 13, 2012
Messages
67
Alright now the results of the primer application. See pictures below.

The hazy parts of the Benjamin Moore PF41 clear up as they dry. I didn't see any outgassing or air bubbles but I haven't walked into the deep end to see what's going on there.

If any do show up I'll consider sanding them or leaving them. Not too worried about it. This isn't picasso :)


I did end up leaving a few small pools of the stuff along the edges on top of the sika flex where I was cutting in. Will it be a big deal?? who knows!! only time will tell.

The data sheet says wait no more than 72 hours to recoat or else you'll have to abrade the surface. I plan to apply my base coat of Epoxy-Coat tomorrow.

For now it just looks like the surface is wet and it brings out the swirls from the grinding. I don't mind. It will all be covered by the epoxy-coat grey tomorrow!
Updates will come then!
 

Attachments

  • Photo4.jpg
    Photo4.jpg
    97.6 KB · Views: 200
  • Photo3.jpg
    Photo3.jpg
    112.3 KB · Views: 212
  • Photo2.jpg
    Photo2.jpg
    121.7 KB · Views: 216
  • Photo1.jpg
    Photo1.jpg
    124.2 KB · Views: 254

FleaDog

Well-known member
Joined
Dec 12, 2011
Messages
123
your second post notes you were going to use the p35 but then you ended up using the p41?
 
OP
M

miken123

Well-known member
Joined
Jun 13, 2012
Messages
67
your second post notes you were going to use the p35 but then you ended up using the p41?

Good point! While I was typing that whole thing I thought I had typoed that. I"ll fix it now. To be clear: I only used P41.
 

FleaDog

Well-known member
Joined
Dec 12, 2011
Messages
123
did you mean to use the p41, and why vs. the p35? I am in the same boat and was going to buy the p35 tomorrow and apply. all this primer hype ive been sucked in.

the pdf's - MSDS - make it sound like the p35 would be the best? adheres tenasciously, self priming, deep penetrating, compatible with a variety of topcoats the p41 dries quick and can tolerate some moisture. the p35 is avail clear, white, light/dark grey..
 
Last edited:
OP
M

miken123

Well-known member
Joined
Jun 13, 2012
Messages
67
did you mean to use the p41, and why vs. the p35? I am in the same boat and was going to buy the p35 tomorrow and apply. all this primer hype ive been sucked in.

I was honestly torn between the two: P35 or P41. I liked the P35 because it was 100% solids epoxy and because it claimed in its TDS to have "tenacious bite" to the surface.

I liked the P41 because it was cited as the primer to use for P35! And then it won me over when the guy at the Benjamin Moore store (this guy has been great with helping me before on home projects so he had some credibility) recomended it as the primer.

But other than that I sadly can't point you more to one than the other. They did seem to have a true Benjamin Moore rep at the store too (not sure if maybe all stores have this.. but he wore a different shirt hehe and seemed to be a source of knowledge for the various employees). He also said that's what I should use.
 
OP
M

miken123

Well-known member
Joined
Jun 13, 2012
Messages
67
did you mean to use the p41, and why vs. the p35? I am in the same boat and was going to buy the p35 tomorrow and apply. all this primer hype ive been sucked in.

the pdf's - MSDS - make it sound like the p35 would be the best? adheres tenasciously, self priming, deep penetrating, compatible with a variety of topcoats the p41 dries quick and can tolerate some moisture. the p35 is avail clear, white, light/dark grey..

Yup very good point. I was quite tempted to use it as well! I felt compelled to go with what the guy at the store recommended.. but who knows, maybe its not the best option, maybe the clerk next to him would have recommended something else.. maybe all this priming stuff is a mistake with Epoxy-Coat systems to begin with?

I will say it'd be great to see how the P35 works out if you tried it. I am willing to bet money (heck you can argue I already have bet money :-D) that the P41 will work. But I'd be willing to bet that P35 would work too.


My belief is that if the concrete is prepped right then it's just a matter of epoxies bonding to epoxies (barring any unforeseen incompatibility chemically?) and assuming you put the two together while the first is still curing or abrade the first one if its past curing.. should hopefully be ok?

Best of luck and keep me and all posted though!
 

c7fx

Well-known member
Joined
Oct 24, 2008
Messages
175
Location
ohio
I suggest you filter the epoxy. I found small debris in mine. I first thought I has a gas issue again but they were solid. Second section I filtered and found this in the epoxy before mixing.
IMG_2138.jpg
 
OP
M

miken123

Well-known member
Joined
Jun 13, 2012
Messages
67
Sounds no good. Your picture didn't come through though. Would love to see what you found!
 
OP
M

miken123

Well-known member
Joined
Jun 13, 2012
Messages
67
The squeegee they included in my full kit (well 2 of the same squeegees) are really really really bad.

Not only are they tiny (expected) and have quite a good bit of curvature on them but these can't even be attached to a pole.

They did include a note on it that said "due to manufacturing issues" they can't include the regular squeegees and to tape that squeegee onto your pole to use it.

I'll reserve all final judgement until I see the product at work! That's what really counts -- the rest are details!
 

Attachments

  • Photo1.jpg
    Photo1.jpg
    144.4 KB · Views: 113
OP
M

miken123

Well-known member
Joined
Jun 13, 2012
Messages
67
can't tell what's in the picture there - obviously filter fabric but i can't tell what's solid and what's not in the picture.

I'll make sure and feel for anything major while mixing Part A individually!

Mike
 

c7fx

Well-known member
Joined
Oct 24, 2008
Messages
175
Location
ohio
It's a net over the five gallon bucket. The screen filtered out a bunch of small pieces of epoxy. I screened it when I poured part A and B together. This batch went down nicely. I'm sure if I would have used flake I wouldn't have noticed these small bits on the floor.
 

FleaDog

Well-known member
Joined
Dec 12, 2011
Messages
123
theres a number of BM stores around me none carry the super spec hd garage floor epoxy coating systems. special order: 2-3 day wait.
 
OP
M

miken123

Well-known member
Joined
Jun 13, 2012
Messages
67
Put down the base coat of Epoxy-Coat today. Grey with blue/white/black chip blend.

This is my only time putting down Epoxy-Coat and only my second time putting down any kind of epoxy (the first time was yesterday when I put down the PF41 Ben Moore epoxy primer).

But I can say that this stuff went down nice and smooth. I consider it a very successful application but I guess no one can tell that until we see how well it holds up over time.. seasons.. years.. etc.

So here's it all went down (literally!) :-D

Having done the primer yesterday I had a sort of procedure already for how to do each section of garage and how to best pour out the epoxy for cutting in at each section.. I can't overstate the positive side effects from having the practice round from the primer.

Ok so by this morning the primer from yesterday was no longer tacky. I even walked on it this morning to get something out of the garage.
In total the Ben Moore PF41 primer had been down for 24 hours at the time of starting my Epoxy-Coat application.[\B]

I planned how much volume of each Part (a and b) I needed for each section of my garage. My garage is really just one deep rectangle with the exception of a drywall intrusion from a closet in the house.

I wanted to maximize the thickness of my Epoxy-Coat by using all of it that I could (accounting for the possibility of having been given an imperfect ratio of each of course).

I SHOULD have been shipped 2 gal of Part A and 1 gal of Part B. My garage was just under 400 sq ft.

I planned on doing 100 sq ft at a time doing a total of 4 batches.

I bough a bunch of clear graduated buckets (i.e. with measuring lines) for quarts and ounces from Lowes.

Converting gal to oz: 3 (total) gal = 12 quarts.
So all I need was to use a total of 3 quarts of total epoxy for every one of my 4 sections.

This made it very easy for mixing:
Each 100 sq ft, put 2 quarts of Part A and 1 quart of Part B. Very easy!

I wanted to work from the back of the garage towards the garage door. So I marked off with a pen on the wall where every incremental 100 sq ft ended.


Ok! Now I'm ready!

I pre-mixed part A just as the instructions said. did it for about 3 minutes. no biggy!
I used the same mixer for the A/B mixes as I did for the part A mixing - wasn't an issue.

Mixed it in the clear marked bucket as planned: fill to the 2 qt line with A, and add B until the total was at the 3 qt line. Mixed counting to 180 (sec) at medium / high speed.


(contd on next post)
 
Last edited:
OP
M

miken123

Well-known member
Joined
Jun 13, 2012
Messages
67
arrgh.. the forum logged me out as I posted my next post.. here goes again:

I used a big square cardboard box in the garage to lay my squeegee, paint brush, and roller on. At the start they were clean (of course) but I would use this throughout the process to not have to walk all the way outside to lay down my tools.

I poured down my first ribbons (i distributed my epoxy batches as two ribbons or so).
I immediately grabbed my edge brush (incl with kit) and drew from the ribbons to cut the edges with the brush. I didn't care about putting too much down. The stuff self levels and I'd have a chance to squeegee close to the edges and roller over it in the ensuing steps.

Ok time to draw the ribbons with the squeegee. Man this stuff spread like ... warm natural creamy peanut butter! (?) It was a nice encouraging viscosity. I liked it!
Way smoother than my primer from the other day --- this is probably for many reasons: the product itself, the fact that it had the nice primer underneath to slide on, etc.

Ok so I poured ribbons from left to right, Squeegeed from top to bottom.
I tried to pull it up/down most of the time but didn't hesitate to pull it at angles in order to get more epoxy where it needed it /etc.

I also didn't hesitate to push it forward when necessary. The trick to pushing forward with the squeegee is to hold the handle very low close to the ground when pushing it forward.

After squeegeeing it everywhere I got my roller and backrolled.
My backrolling method was to stand in the middle of the section and roll left/right one half at a time. First the left half, then the right half.

Ok first section was done!

Went back to the driveway and made up a second batch. Same as the first.
I did reuse the clear measuring bucket from the first batch. I only had 3 and figured i'd do the first two sections with the same one and the last two with new ones each.

I reused the squeegee and roller for all sections. No problems with it.

Ok, here's a tip!
If you pour out the ribbon(s) of area 2 (or subsequent ones) right on top the bottom part of the previous area then it's easier. You won't have to 'push' with the squeegee to get that area between the ribbon and the previous area!

I did area 2 just like area 1 (cut, squeegee, backroll).

When done backrolling area 2, I went right to re-backrolling area 1.
After re-backrolling (i backrolled in the same directions all the time) I was ready for chip application.

I just threw them up to the ceiling just like the video shoes. I had fun with it! If you feel you have a spot with too many chips - just thrown on some more in the area surrounding it to get it to blend in.. No worries just have fun!

Repeated the process for area 3:
mix, pour ribbons, cut in, squeegee, backroll.
Then go right to backrolling area 2.
Then apply chips to area 2.


Here's a question I came across: They say only to apply chips to the area you are chipping but how is it possible to not inadvertently get some on say.. on area 2 when you are applying chips to area 1??

I tried not to but some made there way onto area 1 -- NO worries! You'll backroll that area in a few minutes before you apply the chips there and the backrolling will make the chips disappear.

I'm not seing dont be careful but if you get some chips on the wrong section - no sweat. Not the end of the world!

I repeated the process onto area 4.
Area 4 had the garage door track to deal with. I just cut in underneath it with the cut in brush while I was cutting in the edges. No big deal!


I laid down tape right where the garage door closes down on. I did this too with the primer epoxy yesterday. I know - the best way is to cut a groove. I figured this would be fine. And I'll probably cover it with threshold or with a little sika flex just to eliminate the epoxed edge later.


I only noticed bubbles that looked like outgassing or from air in the mix on the last two sections. There were only about 4 of them total and they were smaller than dimes. But in both cases they happened prior to the final backroll. Backrolling got rid of them and I didn't see them come back. I guess I'll do a thorough check tomorrow -- either way I'll live :-D
Besides there's a clear coat going over it tomorrow (Epoxy-Coat's own clearcoat in their permium kit) so a bubble today won't give me a heart attack.

Beyond that I'm doing shark grip which will induce texture for slip-- so a bubble among the shark grip texture wouldn't be a big deal either -- i guess more on all that when it happens tomorrow! pics to follow:
 
To avoid these ads, REGISTER NOW!
OP
M

miken123

Well-known member
Joined
Jun 13, 2012
Messages
67
Oh and a note on how much chips I used.

The premium kit came with 6 bags of chips totaling 10 lbs.

I didn't know how many i wanted I just knew I wanted a lot of em. (but not 'to rejection').

So I didn't bother splitting up the chips ahead of time.

I grabbed a bag and threw em evenly until I was happy with coverage. Turned out I only liked using about 3/4 of a bag per 100ft area. So I just went with that.

Each new section I got a new one of the 6 chip bags and distributed eyeballing. I knew I should be at about the right coverage when my bag for the area was approaching 3/4 empty.

I'm happy with the results on coverage!
 

Attachments

  • IMAG0048.jpg
    IMAG0048.jpg
    105.5 KB · Views: 319
  • IMAG0043.jpg
    IMAG0043.jpg
    67.1 KB · Views: 290
  • IMAG0042.jpg
    IMAG0042.jpg
    61.4 KB · Views: 305
  • IMAG0041.jpg
    IMAG0041.jpg
    125.5 KB · Views: 330
  • IMAG0040.jpg
    IMAG0040.jpg
    114.4 KB · Views: 300
OP
M

miken123

Well-known member
Joined
Jun 13, 2012
Messages
67
Thanks!
Yes I think it looks great and the wife agrees which is always a good thing given how long the planning / prep for this has taken :-D

I went out today. it was stiff enough to walk on and I looked over the floor.

I saw one nickel sized bubble that was hardening, I popped it. It's hardly noticeable and I'll just clear over it today.

I saw two tiny (about 1 cm in diameter each) bubbles that i didn't notice till I stepped on and they went 'pop pop!'


I don't know what caused them but they were both in the last third of the application areas (end of area #3 and start of area #4).

I'm not worried at all about them and am still happy with the base coat application.


It rained overnight (cannot believe the weather forecasts.. after weeks of false predictions of bad weather on weekends that help me off of doing the project it actually rains overnight yesterday into today!).

I have pretty good eaves on my house and I also taped up one of those painter's cover-sheet (plastic) to the garage door which I had left open about 1.5 ft off the ground. I'm certain no water has gotten in but I'll check humidity levels etc today in the garage and may bring in the dehumidifier for laying down the clear coat today.

It rained lightly from 3 am - 8 am today. Should be sunny all day.

I plan to start the clear coat somewhere around 18-24 hours after I finished yesterday's coat. Given the high humidity of the rain overnight I'm not too worried about it having over-cured.
 

rugerlady

Well-known member
Joined
Aug 15, 2008
Messages
1,378
Location
Michigan
The floor looks great so far, also very good write up! I may want to steal some of your pictures if you don't mind.
 
OP
M

miken123

Well-known member
Joined
Jun 13, 2012
Messages
67
The floor looks great so far, also very good write up! I may want to steal some of your pictures if you don't mind.

Sure! I could send you the higher resolution shots as well, just let me know which you want :)


Also, while I have you on the line here, do you have any recommendations for how to 'adjust' the 18-24 hour cure time prior to applying the clear coat when the humidity went from 0% during install (done at 6pm) and then overnight it climbed up to 100% during rainfall for several hours.

I can walk on it right now without leaving prints.. maybe that's enough to indicate that it's fine to cover with clear??

**Also -- I assume I will need to walk around with spike shoes to apply / backroll etc the Epoxy-Coat clear coat -- i'm guessing it's safe to walk on the base coat with spike shoes while doing this? I don't see any other way we'd be expected to install the clear?

Thx!
 

rugerlady

Well-known member
Joined
Aug 15, 2008
Messages
1,378
Location
Michigan
NO on the spikes! do not wear them to apply the clear. Call me at the office, I am concerned about the humidity during application and cure of the clear. 800-841-5580
 
OP
M

miken123

Well-known member
Joined
Jun 13, 2012
Messages
67
I spoke with Christine after her post indicating I should call her.
It was nice of her to actively try to help. It's much appreciated!

She basically was concerned with the high humidity going on overnight during the curing of yesterday's base coat application of Epoxy-Coat.

She said at such extreme humidities (i reported an overnight humidity of 100% outside) it's possible for the epoxy to cure with a hazy look on it.
She recommended I run the dehumidifier in the garage to make sure the humidity wasn't high.

I appreciated the advice!

I put in the dehumidifier and let it run for an hour while I went to the store to get a few new buckets and such. But for the record the epoxy-coat looked just as great when I put the dehumidifier in the room as it did last night and this morning when I checked it out :-D


I don't think the outside humidity had gotten into the garage as the humidity was still low in there. But it was cheap insurance to run the dehumidifier for a while before proceeding to the clear coat.


I'll add that I did notice a few more bubbles that had shown up. I popped them and sanded them lightly to try to make sure they didn't protrude anymore so that they would be muted by the clear coat.

I did notice one fisheye too! It happened in the final area of my application of the base coat. Don't know what caused it. Might have been a sweat drop.. Didn't look too bad and was fairly small. I didn't do anything to it and figured it would hardly be noticeable - even less with the clear coat.

Here are a few pics of the floor before clear coat (basically the same as yesterday's pics but a few pics of the defects shown).

How do the joints look? Looks like in the pictures that you choose not to fill/seal them.

See pics for joints. They actually got a good amount of epoxy in them while I was dragging around with the squeegee. I don't know if that's a good or bad thing. I'm guessing it's not advisable but I had no way to avoid it at the time.
 

Attachments

  • Photo9.jpg
    Photo9.jpg
    146.9 KB · Views: 155
  • Photo10.jpg
    Photo10.jpg
    136.9 KB · Views: 155
  • Photo11.jpg
    Photo11.jpg
    145.9 KB · Views: 135
  • Photo12.jpg
    Photo12.jpg
    148 KB · Views: 158
  • Photo13.jpg
    Photo13.jpg
    104.9 KB · Views: 141
  • Photo14.jpg
    Photo14.jpg
    128.6 KB · Views: 130
  • Photo15.jpg
    Photo15.jpg
    144.5 KB · Views: 130
OP
M

miken123

Well-known member
Joined
Jun 13, 2012
Messages
67
Ok on to the clear coat!


For anti slip I used Shark-Grip and not the Al Oxide. I had read great talk on shark grip from another user in a previous thread where they highly recommended it. They said that their contractor had mixed it in with the clear coat mix prior to application.

So I followed suit. I bought it at sherwin williams and it cost ~12. I later saw it for sale at lowes for $4 for the same size container! :-\ Oh well.


I planned to use the same area- splitup separation that I did yesterday in applying the base coat. (see previous posts above).

Tip:
When mixing in shark grip, add it last to the container. I only suggest this because the shark grip will take up volume and might tend to throw your measurements off if you're doing my style plan of "fill bucket to 2 qt line with Part A and fill to 3 qt line with Part B". For example, i filled to 2 qt line with A and then added shark grip and then added B but it dawned on me that I really had to fill up past the 3qt line with B because the shark grip was taking up a small volume that couldn't be ignored... Not a big deal but just a tip. I just added a little more B but in the other batches I added shark grip last.

with all 3 things in it I mixed for 3 minutes.
NOTE: The shark grip is a very fine powder and it will inherently carry some air with it (i.e. you'll be introducing shark grip + air into your mix). It caused there to be considerable more tiny bubbles than I saw yesterday. Well - nothing I could do about it then.. In any event I didn't see any more bubbles when I poured the ribbons of it-- so this is not enough for me to advise against shark grip in any way!


Rugerlady greatly advised against me using the spike shoes to apply the clear coat because I would scratch the base coat.
Makes sense but I thought it would make for a very different time backrolling and spreading with the squeegee too. But - oh well. I figured I'd make sure and backroll well to make sure I hit all the spots well. Not worth ruining my base coat!


Apart from the lack of spike shoes in applying the clear coat , the only other major difference is that I did not backroll a second time. If you recall the Epoxy-Coat instructions they say to squeegee, backroll, go to next section and do the same, then go back to the first section and re-backroll and apply chips.
Well I obviously didn't apply chips on the clear coat and due to lack of spike shoes I had no way to reach all the way back to say area #1 when I was done backrolling area 2.

We'll see if that has any effects on the results - haven't noticed any so far.

Also - it was VERY tough to see the clear coat while applying. This had a lot to do with the fact that i had a lot of glare going on from the sun outside and it was hitting the garage in a way that made it hard to focus on the darker areas where I was first applying the clear coat. Next lifetime I might plan on timing it so that the clear coat goes down at an hour when there isn't sun glare. Again no biggy but just a word of advice!

Other than that the whole thing went pretty smoothly.

Here are the pics:
 

Attachments

  • Photo1.jpg
    Photo1.jpg
    65.7 KB · Views: 146
  • Photo2.jpg
    Photo2.jpg
    94.7 KB · Views: 134
  • Photo4.jpg
    Photo4.jpg
    80.3 KB · Views: 139
  • Photo3.jpg
    Photo3.jpg
    69.7 KB · Views: 139
  • Photo5.jpg
    Photo5.jpg
    71.5 KB · Views: 137
OP
M

miken123

Well-known member
Joined
Jun 13, 2012
Messages
67
Let's talk Shark-Grip quantity.

The bottle was 16 oz of shark grip ( by weight no doubt) and meant to treat 5 gal.

I was working with a total of (advertised) 3 gal. I've heard people use half the amount of shark grip and be happy with the results. But i'd hate to have myself or the wife slip and get hurt so I did closer to the recommended concentration:
I needed 3/5 the bottle to do my 3 gals. But I didn't have a scale.

I poured the contents into a measured container (which measures volume not weight) and figured how much volume it took up. And I used roughly 3/5 of it.
I know it's not super accurate as the volume of the shark grip varries because it can trap so much air in it: This is like your cereal box: They all have the same weight, but if you shook it up a little you'd probably end up filling more of the bag vs. a box that's been sitting for weeks.
You could summarize my assumption to be "assuming the shark grip has uniform volume" which I'm certain is valid enough for these purposes.

But the tip here is: have a small scale to split up your shark grip!

I ended up using 150 ml of volume of shark grip powder per 100 sq ft (which in my case equaled 3 qts of mixed Epoxy-Coat clear coat).

Please ask questions if you don't understand my method and want more info I'd be glad to help.


It's still curing now but it looks like it will finish with a pronounced dusty finish. It's more or less what I expected - I'm hoping it won't feel sharp as I've read others have experienced. But As long as it doesn't slip too bad I'll be happy.

Overall from a standing-height view it looks very glossy. Not really less glossy than the base-coat with paint chips looked (the paint chips disturbed the gloss more than the shark grip, although in a different way. The chips 'broke up the gloss' more obviously, but the shark grip is everywhere ubiquitously so it doesn't 'break up the gloss' so much as cause an overall different looking (but evenly distributed) gloss.

Pictures tell it better than i do :-D

Will keep you all posted- thanks for all the support from this group on this long journey!
 
Last edited:

Jabella

Member
Joined
Sep 10, 2012
Messages
6
Great write-up, thank you very much and keep the updates coming. If I decide to go the epoxy route I hope I can remain as calm and easy going as you seemed to. ;)
 
OP
M

miken123

Well-known member
Joined
Jun 13, 2012
Messages
67
Great write-up, thank you very much and keep the updates coming. If I decide to go the epoxy route I hope I can remain as calm and easy going as you seemed to. ;)


Thanks! Well I'll be honest and say that I was anything but relaxed about it for the weeks leading up to it. I couldn't help but pour over old posts about what others used and the techniques others employed in application.

Buy yeah when it's go time just know you've done all you could to prepare yourself so you should take it easy!


ALSO: I did call Christine during the clear coat application. The clear coat felt a little bit thinner than the base coat and was a little harder to spread as a result. I called her to double check how it goes down (ie just as the base coat).
It helped to know she was just a call away!
 
OP
M

miken123

Well-known member
Joined
Jun 13, 2012
Messages
67
To post another update:
The clear coat is dry now and i can walk on it / etc. It's been dry since about yesterday morning or so.

I haven't seen any bubbles or fish eyes from the clear coat (not that I was expecting any). The only issue I can see is that a few spots don't have the same shark grip grip as others. This seems to be areas that could have benefited from a second backroll while they were drying. That backroll would have spread out any thicker puddles that might have been forming there and would have 'refreshed' the surface of the clear coat with shark grip that was likely slowly sinking away from the surface.

Not a huge deal - I'll see if it ends up being an issue with wet traction over the fall and winter. I doubt it will be an issue -- but If it is I'll temporarily deal with it until spring and then I'll touch up a few areas with more clear coat / shark grip and I"ll make sure to backroll / etc better so that it dries with sharkgrip traction up top.

Otherwise still very happy with the whole thing all in all.

Will keep you posted with any updates! :-D thanks for listening.
 

regancc

Well-known member
Joined
Sep 28, 2012
Messages
157
Location
Florida
Floor looks awesome...nice job and great write up. The detail you provided was really informative.

I have some questions for you or anyone else who can answer...

I have a 3 car garage that will be undergoing a major reno come this winter (promised the wife I would wait until after Christmas so as to not spend Xmas $$ on my garage reno...OK, that's fair).

Previously, I painted the floor with the cheap HD epoxy (big mistake because now I hate the color and want to redo it but have to strip it all off...it held up pretty well in all but a small spot...not sure why that area failed).

So, I am torn about using VCT Tiles or going with an expensive epoxy like Wolverine or another great product used and recommended here.

The main reason is I am lazy and not sure I want to strip all that paint! LOL

So, here is my question: Will the paint come off with the same grinder you used? If so, how do I get the corners and the cracks and expansion joints (I plan to fill my expansion joints because I love that smooth look)? What about sanding any vertical surfaces I painted, like the cinder block edge around my floor?

I know this is going to be a major project so I am hoping to go with the best floor I can (within reason...race deck, etc., is out of my budget as I have about 800 sf to cover).

Not trying to hijack your great thread...hope that doesn't happen!

Thanks...and again, great write-up!

Chip
 
OP
M

miken123

Well-known member
Joined
Jun 13, 2012
Messages
67
It's been about 7 years since I did the epoxy-coat application in my garage and a family member asked about my floor and so I dug up this old post.

I figured I'd post an update for those who care to hear it.

The floor has held up well and I'm overall very happy with it. After all these years these are the main grievances I have with the floor:
1. It's more delicate than I thought it would be. Rarely I'll find a chipped section and will patch it up immediately to prevent water/contamination into the exposed concrete. It's only been about 5 in the last 7 years so it's not very often and it's always for a reason -- For example, the points of contact for the ramps that I drive onto to get a vehicle on my 4-post lift. Or when a garage door repair guy dropped a large steel cylinder from about 8ft onto the floor and it chipped a piece fo the floor with its fall..
But possibly the least expected is that I can't be sure that jacking a car with a typical hydraulic floor jack won't damage the floor. I've done it many times without a problem but a few times where it left scratches/small chip damage. I just make it a habit to only jack on top of some scrap cardboard or mat.

2) - Slippery spots. I used SharkGrip and would use it again next time as well, to provide grip on the clear coat. This worked great but there were a few areas of the floor that needed a little more 'bankrolling' during the curing process to ensure the SharkBite dust didn't sink (and those loose effect to grip after drying).
I did **** it up and put down three long strips of traction tape (3M sells some for application to steps or wherever you want more traction) right by the driver's side of where we park. Shortly after I put down the floor we had kids and I didn't want to take any chances with a pregnant wife slipping on the floor. Wasn't a big deal to me - I even got the 'clear' variety fo the grip tape, though it's noticeable as it stained with dirt over time.

Not a grievance but worth mentioning - the front section closest to the door does have some yellowing due to sunlight. No one would ever notice it but me and I don't even think of it often. It's subtle and very light, but it's worth mentioning as I know people worry about that. Again it's so hard to notice.

That may be a lot of text but in general I'm very happy with the floor. The garage looks great, cleans up so easily every spring when snow/salt season is finally over. You just could never keep concrete floor (untreated) that clean.
If I did it all over again I would do more research on some of the tile solutions that I had heard such good things about but honestly we've been so satisfied with this floor that I've never regretted it even for a second.

Cheers!
 

SPECTREAGENT

New member
Joined
Dec 15, 2012
Messages
1
Looks great! When I did my 2-car garage flooring, I just used a normal paint roller which worked well. I also filled in the cracks with caulking that allowed movement and created a seamless look.
 
To avoid these ads, REGISTER NOW!
Top Bottom