
You are using an out of date browser. It may not display this or other websites correctly.
You should upgrade or use an alternative browser.
You should upgrade or use an alternative browser.
Above 1200 Sq/FT New Member and a 36 X 46
- Thread starter blairjw
- Start date
Wokspaces above 1200 squarefeet.


mwbailey
Well-known member
I like barn workshops!! Anticipating more photos. . . .
SwampHouse Kustoms
Member
- Joined
- Nov 8, 2009
- Messages
- 9
Awesome, great size too
Corvette Joe
Well-known member
Cant wait to see more pictures.
I rented a machine and an operator for the site work. A operator friend of mine was out of work, so I hired him. I could have done it myself, but it would have taken 5 to 10 times longer and the excavator was rented by the day. So I figured it would be cheaper to have experience in this case.

This was a pretty big cut... if you eyeball the boulder on the right, you can get a sense of how far we had to cut in order to have the material to level the lot.

See the rock above, with the moss line.. that's the cut that was needed. The trench is for the 48" frost wall required up here by code. You can also see the cool retaining wall he built in the time it took me to run down to the hardware store.

Above are the footings prior to the frost walls.

Above are the frost walls, with the formboards on them. Below are the frostwalls with insulation on them.

This is the site after the frost walls have been backfilled and the floor brought up to subgrade.
At this time, I am pretty much done with the excavator and outside contractors. I did hire a foundation company to do the concrete work and had them back to pour the floor. Framing will comence with the next update.
Anyone have some tips on loading jpgs? I am trying to keep them under 175K as per the upload dialog box and they show up as thumbnails, I'd like to show big inline images...
Blair
Blair
This was a pretty big cut... if you eyeball the boulder on the right, you can get a sense of how far we had to cut in order to have the material to level the lot.
See the rock above, with the moss line.. that's the cut that was needed. The trench is for the 48" frost wall required up here by code. You can also see the cool retaining wall he built in the time it took me to run down to the hardware store.
Above are the footings prior to the frost walls.
Above are the frost walls, with the formboards on them. Below are the frostwalls with insulation on them.
This is the site after the frost walls have been backfilled and the floor brought up to subgrade.
At this time, I am pretty much done with the excavator and outside contractors. I did hire a foundation company to do the concrete work and had them back to pour the floor. Framing will comence with the next update.
Anyone have some tips on loading jpgs? I am trying to keep them under 175K as per the upload dialog box and they show up as thumbnails, I'd like to show big inline images...
Blair
Blair
Attachments

goneflyin2002
Well-known member
Anyone have some tips on loading jpgs? I am trying to keep them under 175K as per the upload dialog box and they show up as thumbnails, I'd like to show big inline images...
Blair
Great looking place Blair, nice work!
To attach images, use photobucket to upload your pics, then copy that URL to your post using the yellow 'insert image' button above in the toolbar. This way, the forum doesn't actually store your pics on the site, just the URL.
Don
coljar
Well-known member
It looks really nice. What are you primarly planning on doing in it?
I90wrench
Member
Subscribed! Planning something similar (in a couple years) living quarters in one lean to, main shop in middle and combination parking, paint, etc in opposite lean. Great looking build!
To answer the questions...
This is going to be used to restore cars... specifically MGs. I was planning a 6 bay garage specifically to restore cars, one bay for each type of work, welding, mechanical, interior, paint, etc... but in discussions with my girlfreind at the time, she thought I would never be open to moving out of my place. I comprimised with a 3 stall garage instead..
So after the foundation was backfilled, we started framing about the middle of october of last year, the first weekend went like this. I should saw the front and back walls are framed in 2x8s and the side walls are 2x6s.

The following weekend was Holloween weekend, and if you are from the NE and happen to remember the 24" of snow we got, it stalled the construction that weekend as we plowed our way out...
We scurried to get the lumber under cover, the weather report said a couple of inches, but it seemed to be coming down too fast...

The following weekend we got up the back and front walls.. Here is 2/3rds of the back wall.

The center wall is 19' wide and 17' tall... 4 of us tried to lift it on a saturday afternoon and it didn't go so well, we got it up to our shoulders and couldn't go up and couldn't get it back down. I sent a message out on Facebook, looking for help for the next morning and about 10 people showed up.
Here it is, with the center wall up.

Some of that crew came back in the afternoon to help put up the front walls, (well, they look more like arches, they are just 5 studs holding each end of LVLs. )

However, because the front wall is a shear wall and it couldn't be done by building code, because of the height of the doors, I needed to have it redesigned by a PE. These are the Simpson Strong Tie brackets he spec'd out to hold the king studs in the door frames, there are 21 screws in each one of them and they are anchored by a 24" anchor bolt.

Sheathed the walls before attempting to get the girders in place. The girders are held up by 5"x7" PSLs.
I know this was the weekend after Thanksgiving, because I rented the Lull for that long weekend and the starter went on it... so I didn't get to set the girders until the following weekend.

Here it is with the lower trusses installed.

Here we are with the upper trusses and roof sheathing installed.

Here is my Fiance nailing down the roof top guard.

Another of Leslie on the roof...

This is how the front of the barn goes together, notice the additional studs between the bays and the cripple wall under the center LVL. In addition, because the front wall was designed by a PE, the inside is sheathed in CDX also to prevent racking or shearing... I insulated that wall. The building permit is for a non-heated building which skates me from being energy code compliant, but I will want to heat it someday and I don't want to waste energy, hence the foundation insulation shown earlier.
I think this was around New Years 2012... it was about 40 deg. F. luckily we had a VERY mild NH winter last year.

Early February, the doors were installed by a company, I didn't do that myself.

I spent a month or so working on all the bracing inside the structure. There is lateral bracing for the trusses, plus diag. bracing for the lateral bracing. Then the gabel end bracing and the bracing for the high heal trusses (center section)... I had conflicting bracing plans between the truss company and the PE, so I opted to do both schemes... needless to say "nothing is going anywhere". You can see horiz and vert stiff backs on the gable end and multiple braces to the roof trusses...

Well, that's a pretty good post, need to take the doggies for a walk.
Blair
This is going to be used to restore cars... specifically MGs. I was planning a 6 bay garage specifically to restore cars, one bay for each type of work, welding, mechanical, interior, paint, etc... but in discussions with my girlfreind at the time, she thought I would never be open to moving out of my place. I comprimised with a 3 stall garage instead..
So after the foundation was backfilled, we started framing about the middle of october of last year, the first weekend went like this. I should saw the front and back walls are framed in 2x8s and the side walls are 2x6s.
The following weekend was Holloween weekend, and if you are from the NE and happen to remember the 24" of snow we got, it stalled the construction that weekend as we plowed our way out...
We scurried to get the lumber under cover, the weather report said a couple of inches, but it seemed to be coming down too fast...
The following weekend we got up the back and front walls.. Here is 2/3rds of the back wall.
The center wall is 19' wide and 17' tall... 4 of us tried to lift it on a saturday afternoon and it didn't go so well, we got it up to our shoulders and couldn't go up and couldn't get it back down. I sent a message out on Facebook, looking for help for the next morning and about 10 people showed up.
Here it is, with the center wall up.
Some of that crew came back in the afternoon to help put up the front walls, (well, they look more like arches, they are just 5 studs holding each end of LVLs. )
However, because the front wall is a shear wall and it couldn't be done by building code, because of the height of the doors, I needed to have it redesigned by a PE. These are the Simpson Strong Tie brackets he spec'd out to hold the king studs in the door frames, there are 21 screws in each one of them and they are anchored by a 24" anchor bolt.
Sheathed the walls before attempting to get the girders in place. The girders are held up by 5"x7" PSLs.
I know this was the weekend after Thanksgiving, because I rented the Lull for that long weekend and the starter went on it... so I didn't get to set the girders until the following weekend.
Here it is with the lower trusses installed.
Here we are with the upper trusses and roof sheathing installed.
Here is my Fiance nailing down the roof top guard.
Another of Leslie on the roof...
This is how the front of the barn goes together, notice the additional studs between the bays and the cripple wall under the center LVL. In addition, because the front wall was designed by a PE, the inside is sheathed in CDX also to prevent racking or shearing... I insulated that wall. The building permit is for a non-heated building which skates me from being energy code compliant, but I will want to heat it someday and I don't want to waste energy, hence the foundation insulation shown earlier.
I think this was around New Years 2012... it was about 40 deg. F. luckily we had a VERY mild NH winter last year.
Early February, the doors were installed by a company, I didn't do that myself.
I spent a month or so working on all the bracing inside the structure. There is lateral bracing for the trusses, plus diag. bracing for the lateral bracing. Then the gabel end bracing and the bracing for the high heal trusses (center section)... I had conflicting bracing plans between the truss company and the PE, so I opted to do both schemes... needless to say "nothing is going anywhere". You can see horiz and vert stiff backs on the gable end and multiple braces to the roof trusses...
Well, that's a pretty good post, need to take the doggies for a walk.
Blair
MacTexas
Well-known member
The question I am sure some are wondering. Does your fiance have a sister who is single?
The question I am sure some are wondering. Does your fiance have a sister who is single?
Nope... they broke the mold... Haven't met too many woman before that would jump on a roof...

When I say "We" built this barn, I mean "we" she cut almost every stick of lumber for the frame, while I built the walls.

Omphaloskeptic
Well-known member
Everyday - and I mean everyday give that wonderful woman a bear-hug and a kiss! Whatever hobbies or passions she may pursue, you had best be at her side to assist (if she wants you in her way that is - lol). Keep us posted on your progress please. Oh, and by the way, whatever she wants for Christmas - buy her two!
P.S. - What kind of car is that peeking around the corner in your first pic; Fiat???
P.S. - What kind of car is that peeking around the corner in your first pic; Fiat???
Last edited:
The backstory is the name of the building is "The Chicken Coup". When I was younger... my father had a good friend that would restore MGs out of a barn on his property that was a converted chicken coup. My father passed away about 13 years ago and I inherited his car, a 1953 MG TD. I did restore the car myself and then became re-aquainted with his friend who worked out of a chicken coup. We became good friends, he taught me alot about the cars... he eventually passed. In his honor, I started calling this building the chicken coup.
Sometime in the spring, I got into it one night with a neighbor. She was a "new wife" and didn't exactly know where her property line was... she figured that it must be about half way between the two driveways. What she didn't know was that her driveway was on my property due to an easement that was put in place many years before her.
She complained that I had "ruined her view" (of my property mind you).
The following day, I was a little upset about getting into it with a neighbor. I was out walking with the dogs, when I thought to myself, I can't let what they think influence my decisions, but then a little devil popped onto my shoulder and said "your decisions can influence what they think of you"... I got it, I'll get some roosters and put them by the property line.")
So before the chicken coup was completed, using left over scraps of lumber, I built another chicken coup... a scale replica.


And here are the "girls" in their house... I say "girls" because I thought they were hens, but turned out to be 4 roosters...

So the chickens didn't go out by the property line, they are by the main house and it's much easier to take care of them there... Which still leaves the problem of what to put out by the neighbors house... donkey? pigs?
Sometime in the spring, I got into it one night with a neighbor. She was a "new wife" and didn't exactly know where her property line was... she figured that it must be about half way between the two driveways. What she didn't know was that her driveway was on my property due to an easement that was put in place many years before her.
She complained that I had "ruined her view" (of my property mind you).
The following day, I was a little upset about getting into it with a neighbor. I was out walking with the dogs, when I thought to myself, I can't let what they think influence my decisions, but then a little devil popped onto my shoulder and said "your decisions can influence what they think of you"... I got it, I'll get some roosters and put them by the property line.
So before the chicken coup was completed, using left over scraps of lumber, I built another chicken coup... a scale replica.
And here are the "girls" in their house... I say "girls" because I thought they were hens, but turned out to be 4 roosters...
So the chickens didn't go out by the property line, they are by the main house and it's much easier to take care of them there... Which still leaves the problem of what to put out by the neighbors house... donkey? pigs?
tinbender 66
Well-known member
Beautiful place. I doubt I'll ever build another one, but if I do, that's the style I would want. Kudos for doing it yourselves!
440-6 Shaker
Well-known member
I've got the same plan, scale replica chicken coop... Love it, nice build.
Omphaloskeptic
Well-known member
Just to give your neighbor something to jack her jaws, may I suggest a few peacocks. I understand they are territorial and make great early warning alarms. They might get into a 'caw fest' with the roosters, but I'm sure the neighbor lady would get used to it....eventually. 
How's about some car pics when you have the chance? Love that Brit Iron(oxide)! lol
How's about some car pics when you have the chance? Love that Brit Iron(oxide)! lol
Just to give your neighbor something to jack her jaws, may I suggest a few peacocks. I understand they are territorial and make great early warning alarms. They might get into a 'caw fest' with the roosters, but I'm sure the neighbor lady would get used to it....eventually.
How's about some car pics when you have the chance? Love that Brit Iron(oxide)! lol
Omphaloskeptic -
The peacock suggestion has been put forth before... I think it's too cold up here for them during the winter...
This is the TD... far from Iron Oxide... taken in Hulls Harbor NS

This is Leslie in her 57 MGA

And this is my summertime daily driver.

So that's what the barn / garage is for...
Omphaloskeptic
Well-known member
Nice stable of British Iron your have there! I've always loved the lines of the MGA, how has it treated Leslie? Did you do the resto on it?
Omphaloskeptic -
This is actually the day we picked it up... It's 100% original, never been restored. First time she took it out, we lost the brakes about 1/2mile into the ride. Which gave me an oppertunity to teach her about fly away handbrakes. We rebuilt the rear brake cylinders and painted the drums black. It's been fine all summer. She may want to drive it again next summer, then tear it apart in the fall.
This is actually the day we picked it up... It's 100% original, never been restored. First time she took it out, we lost the brakes about 1/2mile into the ride. Which gave me an oppertunity to teach her about fly away handbrakes. We rebuilt the rear brake cylinders and painted the drums black. It's been fine all summer. She may want to drive it again next summer, then tear it apart in the fall.
M-technik-3
Well-known member
Sweet Structure, I see a CT tage on the Jag. You appear out in the boonies of CT. Never mind I see you mentioned NH. Everywhere in NH except Nashua and Portsmouth is boonies.
Last edited:
timbitca
Well-known member
Nice MG's! What year is your MGB? I've been discouraging myself from buying one for as long as I can remember, but I always end up checking the classifieds for one. I'm sure, being only 26, that I'll cave in at one point
How about some interior shots of your barn? It looks great!
How about some interior shots of your barn? It looks great!
Omphaloskeptic
Well-known member
Omphaloskeptic -
This is actually the day we picked it up... It's 100% original, never been restored. First time she took it out, we lost the brakes about 1/2mile into the ride. Which gave me an oppertunity to teach her about fly away handbrakes. We rebuilt the rear brake cylinders and painted the drums black. It's been fine all summer. She may want to drive it again next summer, then tear it apart in the fall.
100% original? Wow, that's unreal! A 55 year-old MGA in drivable condition is rare, one that looks that good is certainly one well-loved car. Have you been able to trace ownership back to the day it left the dealership?
Looking forward to many more pics of the barn, and detail shots of all your cars.
Sweet Structure, I see a CT tage on the Jag. You appear out in the boonies of CT. Never mind I see you mentioned NH. Everywhere in NH except Nashua and Portsmouth is boonies.
M-technik -
I am in NH, about halfway between Nashua and Keene... mighty good eyes, I know what plate is on it and I still can't make it out. The car is from CT, I am storing it over the winter.
Blair
Jus so you know, and not to be combative, but when I took the guy to court who had invaded my 'quiet pleasure' it cost him $2000 base AND $500 per animal and took the judge about 10 seconds of listeneing to the tape I provided. He had 10 animals. All of the money went to the animal shelter DIRECTLY. $7000 plus court costs and I didn't even have a written plan [like you just provided].
I would probably erase from this thread any hint of your plan or there will be MAJOR settlement issues.
Ducksface -
Thanks for the advice... I provided the initial plan... the final plan is they are by my house... much easier to take care of. I walk my dogs by their house in the morning, just to judge what they could or could not hear (~1000ft) from rooster to them and it doesn't sound like anything other than a mumble.
Blair
Nice MG's! What year is your MGB? I've been discouraging myself from buying one for as long as I can remember, but I always end up checking the classifieds for one. I'm sure, being only 26, that I'll cave in at one point
How about some interior shots of your barn? It looks great!
timbitca -
The B is a 78... when I restored it, I went all new metal... I was thinking a 4L rover V8 someday... but that will probably never happen.
I am posting photos in order, so we will get to the inside towards the end... but it's not completed... just sticks so far.
Blair
Nice barn there blairjw, although I'm sort of partial to that style . My parents have a '52 TD (actually it was my mom's first car) so I have an appreciation for the old MG's too.
I can only offer one bit of advice, but it is an important one though - marry that girl now!
. My parents have a '52 TD (actually it was my mom's first car) so I have an appreciation for the old MG's too.I can only offer one bit of advice, but it is an important one though - marry that girl now!
mwbailey
Well-known member
Blairjw, my wife of approximately 1 1/2 years was a BIG help about 2 1/2 years ago when I was replacing the boards on the top of my deck. And, summertime in SC is not the most pleasant weather to be on top of a deck. About a year after the deck, all that sort of help sort of dried up!?!? Seriously, she's been chair of a volunteer medical clinic this past year and has been pretty busy, but she's moved many boxes of stuff and helped clean up the mess in the yard AND in the workshop. I won't complain too much, but just a note that things can change, shopnut!
Cobra4B
Well-known member
Awesome looking space... The idea of 6 bays for separate restoration tasks is neat though.
As soon as the weather was decent in march, we started on the eaves and gabel trim. Along with the doors and windows. The other side wall is a mirror image, but reversed, so the door is on the back. You also will notice, the electrical service pipe in the front right side. Still no power, we have been running the compressor and saw off a generator. Also had building wrapped for the winter, except for the front wall. The building inspector hadn't seen the nailing schedule on the sheathing. He wasn't too concerned with the other 3 walls, but the front wall was 3oc on the edges and 6oc in the middle. So I left the building wrap off the front until I could get him back.

With the roof completed or mostly completed. The roof is ABC Metal roofing, completely hidden fastener. I did make a mistake and came up about 4" short in the length of the roof and had to go back and buy 4 more sections and rip them down to 4"... that too a couple of extra weeks to wait for the material to show up.

I actually don't have any photos of us staining the boards, but siding is 1X10 shiplap pine, with a rougher head plane on the outside. We pre-stained the siding in the barn, in batches during the week and hung them on weekends. Each board had one coat on the backside and two coats on the front side. If you look really close, the siding looked a little light random flooring, not a complete match, so what we decided to do for the front wall was to only give it one coat on the ground and one coat once we got it all up, so it would be more uniform. We also started at the back, figuring the learning curve would be on the back and the best job would be on the front.

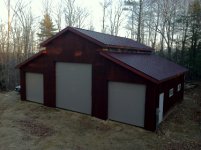
This is the front completed, with only one coat of stain.

This was the first time, I brought the Super Duty into the barn. While it fits just fine, it was the first time, I wished I made the barn deeper.

With the roof completed or mostly completed. The roof is ABC Metal roofing, completely hidden fastener. I did make a mistake and came up about 4" short in the length of the roof and had to go back and buy 4 more sections and rip them down to 4"... that too a couple of extra weeks to wait for the material to show up.
I actually don't have any photos of us staining the boards, but siding is 1X10 shiplap pine, with a rougher head plane on the outside. We pre-stained the siding in the barn, in batches during the week and hung them on weekends. Each board had one coat on the backside and two coats on the front side. If you look really close, the siding looked a little light random flooring, not a complete match, so what we decided to do for the front wall was to only give it one coat on the ground and one coat once we got it all up, so it would be more uniform. We also started at the back, figuring the learning curve would be on the back and the best job would be on the front.
This is the front completed, with only one coat of stain.
This was the first time, I brought the Super Duty into the barn. While it fits just fine, it was the first time, I wished I made the barn deeper.
matouse3
Well-known member
Very nice build. Especially like the siding choice- really fits with the surroundings. Nicely done.
M-technik-3
Well-known member
M-technik -
I am in NH, about halfway between Nashua and Keene... mighty good eyes, I know what plate is on it and I still can't make it out. The car is from CT, I am storing it over the winter.
Blair
Just drove that way on the way from Westfield up to NHIS for the Halloween Hooptiefest. Thinking Peterbough area. 101 is a great drive.
I used to live in Manch-Vegas.
Just drove that way on the way from Westfield up to NHIS for the Halloween Hooptiefest. Thinking Peterbough area. 101 is a great drive.
I used to live in Manch-Vegas.
Ding - ding - ding we have a winner...
That's Crotchet and Pack Monadnock in the background depending on the photo
Blair
Bib Overalls
Well-known member
Don't worry to much about your neighbor lady. As a land owner you have the right to utilize your property. If your buildings are consistent with general development in the area and properly permitted she does not have much of an argument. In situations like this it is best to take the high road.