It seems that Kreg is many peoples goto for pocket hole jigs, but has anyone tried out the Porter Cable 560 quickjig? I like that it looks to be easy to use and has a few features that I like. It's able to be put on it's back for longer pieces, and the base is the same height as a 2x4 to easily support longer pieces. That was one complaint I've heard about the Kreg. However, I think the Kreg defiantly has a few advantages. Just wondering if anyone has experience with either, and any input. or maybe you have a different pocket jig setup. Either way I' like to hear your input.


You are using an out of date browser. It may not display this or other websites correctly.
You should upgrade or use an alternative browser.
You should upgrade or use an alternative browser.
Pocket Hole Jigs
- Thread starter joshdc91
- Start date
darkk
Well-known member
I have the Kreg jig setup, it's a bit, pricey but very cool. I watched the Porter Cable video and it looks a little sloppy and complicated to set up. The drill stop also moved around quite a bit during drilling and bit removal. It also looks pretty bulky. I'm extremely happy with my Kreg. I wouldn't waste the money buying the Kreg screws when the supply I got runs out either. I tried regular drywall screws, just needed to set the collar length for the screws. I also tried some Spax screws, the spax screws are probably what I'll use for my projects because they have a flat shoulder. Plenty of sizes and good availability at all the box stores.
robe5000
Well-known member
Ive got the kreg master set, i took a look at the porter cable but being a slave to main stream media i went the one on the T.V. and the attractive box, but i must say i love my kreg jig, i built my 12'x8' built in entertainment cabinet with it, the "clamp on jig" comes in handy for the larger panels so i had no issues there
As for the screws, Kreg masks a very high quality screw, but you do pay for em
if you do use drywall screws make sure you use them with glue as drywall screws are quite brittle, i find "particle board screws" to be a good alternative
As for the screws, Kreg masks a very high quality screw, but you do pay for em
if you do use drywall screws make sure you use them with glue as drywall screws are quite brittle, i find "particle board screws" to be a good alternative
2manytoyz
Well-known member
Haven't tried anything other than the Kreg Jig. Got one at work, and one at home. Excellent tool. Lot of clever engineering went into their product. Obviously designed by someone who intended to actually use it!
As for the Kreg screws, you get what you pay for. They're not overly expensive if purchased in bulk.
Kreg screws are different. They have a large head, which improves clamping power. Drywall screws have a bugle head, meant to bury itself into the drywall paper. NOT intended for clamping power.
The Kreg system also only makes holes in the first board. It does not drill into the other board. The screw must self tap into the second board. For pine, that's not a problem. Not likely to split. If you build projects from hard woods, such as oak, you're very likely to split the board.

The Kreg screw is self tapping. Drills its way through the second board without splitting it.
As for cost, I get 1000 of them for $24.87 delivered: http://www.amazon.com/Kreg-SML-C125-4-Inch-Coarse-1000-Pack/dp/B00002240N/ref=wl_it_dp_o_pdT1_nS_nC?ie=UTF8&colid=IY3521422ALE&coliid=I2US1D26B3Y7L5
As for the Kreg screws, you get what you pay for. They're not overly expensive if purchased in bulk.
Kreg screws are different. They have a large head, which improves clamping power. Drywall screws have a bugle head, meant to bury itself into the drywall paper. NOT intended for clamping power.
The Kreg system also only makes holes in the first board. It does not drill into the other board. The screw must self tap into the second board. For pine, that's not a problem. Not likely to split. If you build projects from hard woods, such as oak, you're very likely to split the board.
The Kreg screw is self tapping. Drills its way through the second board without splitting it.
As for cost, I get 1000 of them for $24.87 delivered: http://www.amazon.com/Kreg-SML-C125-4-Inch-Coarse-1000-Pack/dp/B00002240N/ref=wl_it_dp_o_pdT1_nS_nC?ie=UTF8&colid=IY3521422ALE&coliid=I2US1D26B3Y7L5
lilscorpion
Well-known member
When Porter Cable came out with this, I got one of the first ones off of the truck at a local woodworking place. I've had a couple of different pocket-hole jigs over the years but none of them were top of the line so keep that in mind while reading.

When looking at the jig itself, it truly is a marvel. A lot of thought was put into how to make something that usually requires a bit of setup, to require nearly no setup at all.

They really tried to think of everything. The jig itself can be attached to a variety of surfaces by either screw or clamp using the base or the back of the vise (see the thru-holes in the pic above) depending on the material, orientation, and where the jig is used. Given all of the different mounting methods, just about any size board can be inserted and drilled quickly. The only time I find mounting it difficult is when you need to mount the fixture to the board (meaning you don't have a work-surface).

The fixture comes with a long pocket hole drill with an attached stop collar. The stop collar is what sets the depth for the holes. The stop plate is riding on those pins (seen above) that sets the height of the plate which is determined by the magic of the fixture. All you do is drop the board in there and it's correct assuming you can set the height of the stop-collar correct...and that's all there is to setup.

Setting the stop-collar on the bit is stupid-proof too. Built into the fixture is an auto-locating fixture that puts the collar where it needs to be on the shank for all setups. You loosen the collar on the bit, drop the bit into the fixture (the flat on the blade buts up against a surface within the fixture to ensure correct location), slide the collar into place, and tighten the set-screw. Subtle adjustments are obviously necessary but I've not had to move the location of the collar yet.

You can drill either one or two pocket holes at a time. The drill collar stop plate has quick references so you can set the offset of the two holes quickly. As seen in the pic above, you can run a max hole spacing of 1-3/8" o.c..

The adjustment of the offset is done using a threaded assembly that pulls or pushes the second guide away from the primary. Plastic secondary guide has a threaded metal sleeve in it and the primary a bushing of some type so the "bolt" just spins in it. Adjustment of the width only takes a second.
When looking at the jig itself, it truly is a marvel. A lot of thought was put into how to make something that usually requires a bit of setup, to require nearly no setup at all.
They really tried to think of everything. The jig itself can be attached to a variety of surfaces by either screw or clamp using the base or the back of the vise (see the thru-holes in the pic above) depending on the material, orientation, and where the jig is used. Given all of the different mounting methods, just about any size board can be inserted and drilled quickly. The only time I find mounting it difficult is when you need to mount the fixture to the board (meaning you don't have a work-surface).
The fixture comes with a long pocket hole drill with an attached stop collar. The stop collar is what sets the depth for the holes. The stop plate is riding on those pins (seen above) that sets the height of the plate which is determined by the magic of the fixture. All you do is drop the board in there and it's correct assuming you can set the height of the stop-collar correct...and that's all there is to setup.
Setting the stop-collar on the bit is stupid-proof too. Built into the fixture is an auto-locating fixture that puts the collar where it needs to be on the shank for all setups. You loosen the collar on the bit, drop the bit into the fixture (the flat on the blade buts up against a surface within the fixture to ensure correct location), slide the collar into place, and tighten the set-screw. Subtle adjustments are obviously necessary but I've not had to move the location of the collar yet.
You can drill either one or two pocket holes at a time. The drill collar stop plate has quick references so you can set the offset of the two holes quickly. As seen in the pic above, you can run a max hole spacing of 1-3/8" o.c..
The adjustment of the offset is done using a threaded assembly that pulls or pushes the second guide away from the primary. Plastic secondary guide has a threaded metal sleeve in it and the primary a bushing of some type so the "bolt" just spins in it. Adjustment of the width only takes a second.
Last edited:
lilscorpion
Well-known member
The fixture has a small stop incorporated into the base that allows you to drop a series of boards into it and drill them the same each time.

Once the board is in place, you pull the quick-lock down and into place. This lock allows you to release a board without changing the setup for multiple boards. We're locking it into place to do the initial setup.

To set the rest of the offsets and depths, you push down then twist the rear handle. In one event this sets the material thickness, the height of the stop, and tightens the assembly. That's it, you're ready to drill.
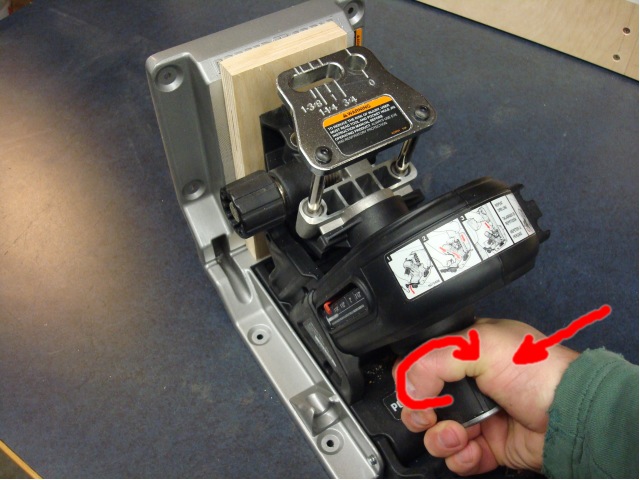
The drill order doesn't matter but I always do the primary first because I have a mild (wife says strong) case of OCD. When the collar on the bit hits the stop plate, the stop plate will move about 3/8" until it stops. When it stops moving, you're done. Then drill the secondary (if you're doing two) the same way.

This board is complete. To release the stop, all you need to do is pull up on the clamp to the rear. This moves the assembly back about an 1/4" so you can get the board out however the setting knob remains in place so you won't have setup the fixture again on board change. If your board thickness changes, you will have to reset the knob.

The fixture does have a dust port on the back which allows you to attach a dust collection system (or shop vac) to it. There's a nice trough in the bottom of the fixture where the shavings naturally want to go which aids in their removal. When using dust collection the fixture doesn't require cleaning between boards. Without dust collection you'll have to blow the shavings out before replacing the next board.

The end result is the same every time. I hammered down so the hole edges don't look as great as they could and my bit could probably use a re-sharpen. Though the system is expensive, it really does take the setup out of pocket-holes. When I build a face-frame, the pocket holes are the part of the process I don't think about because it goes so quickly. I never have used the Kreg top-end kit so I can't compare apples to apples however this is the easiest to use fixture I've used so far.

Once the board is in place, you pull the quick-lock down and into place. This lock allows you to release a board without changing the setup for multiple boards. We're locking it into place to do the initial setup.
To set the rest of the offsets and depths, you push down then twist the rear handle. In one event this sets the material thickness, the height of the stop, and tightens the assembly. That's it, you're ready to drill.
The drill order doesn't matter but I always do the primary first because I have a mild (wife says strong) case of OCD. When the collar on the bit hits the stop plate, the stop plate will move about 3/8" until it stops. When it stops moving, you're done. Then drill the secondary (if you're doing two) the same way.
This board is complete. To release the stop, all you need to do is pull up on the clamp to the rear. This moves the assembly back about an 1/4" so you can get the board out however the setting knob remains in place so you won't have setup the fixture again on board change. If your board thickness changes, you will have to reset the knob.
The fixture does have a dust port on the back which allows you to attach a dust collection system (or shop vac) to it. There's a nice trough in the bottom of the fixture where the shavings naturally want to go which aids in their removal. When using dust collection the fixture doesn't require cleaning between boards. Without dust collection you'll have to blow the shavings out before replacing the next board.
The end result is the same every time. I hammered down so the hole edges don't look as great as they could and my bit could probably use a re-sharpen. Though the system is expensive, it really does take the setup out of pocket-holes. When I build a face-frame, the pocket holes are the part of the process I don't think about because it goes so quickly. I never have used the Kreg top-end kit so I can't compare apples to apples however this is the easiest to use fixture I've used so far.
Stuey
Well-known member
PC QuickJig is EXCELLENT. But you might still want the small Kreg jig (the $40 set) for use on larger boards or sheets.
crewchief888
Well-known member
i just picked up the kreg jr kit the other day, havent had to time to mess with it yet.
wife wants me to build her farmhouse table for the dining room. probably get started on it after the holidays.

wife wants me to build her farmhouse table for the dining room. probably get started on it after the holidays.
Excellent commentary on the PC Jig. One thing that turns me off of Kreg, is the inability to vary the thickness of wood without changing out your drill guide. Unless you spend an extra $40 you can't do 2x4s. What is the maximum depth the PC allows?
TerryH
Well-known member
PC QuickJig is EXCELLENT. But you might still want the small Kreg jig (the $40 set) for use on larger boards or sheets.
+1 on this. I have the Kreg and the PC. The PC is just super for production type stuff, face frame pieces and the like but having the small Kreg is super handy if you are working on larger pieces.
Steevo
Well-known member
My wife had the same project for me to do.i just picked up the kreg jr kit the other day, havent had to time to mess with it yet.
wife wants me to build her farmhouse table for the dining room. probably get started on it after the holidays.
I used all biscuit joints between the (Elm) planks, and pocket screws on the aprons where they screw into the legs.

TerryH
Well-known member
My wife had the same project for me to do.
I used all biscuit joints between the (Elm) planks, and pocket screws on the aprons where they screw into the legs.
That is beautiful!!!
GarageWrench
Well-known member
- Joined
- Sep 28, 2011
- Messages
- 53
Wow I agree, that is a beautiful table Steevo
darkk
Well-known member
Wow I agree, that is a beautiful table Steevo
X2, but a little on the brown side...
beerdog
Well-known member
The Kreg system also only makes holes in the first board. It does not drill into the other board. The screw must self tap into the second board. For pine, that's not a problem. Not likely to split. If you build projects from hard woods, such as oak, you're very likely to split the board.
The Kreg screws will not split hard wood if used correctly. One of the primary and most common uses for pocket holes is to build hardwood face frames for cabinets. For hardwoods you should use the fine threaded screws. Plywoods require the coarse screws. I have used them many times with hardwoods without issue. pocket holes have their place and are great for people who do not have many clamps, built-ins, face frames, quick builds, etc. Most professional cabinet makers use them sparingly and mostly just use glue and clamps. Good wood glue is all you really need.
Givl Reggin
Banned
If you're doing 2x4's you'll want the Kreg HD version... http://www.amazon.com/exec/obidos/ASIN/B008CQ59GY/awh
The Kreg system also only makes holes in the first board. It does not drill into the other board. The screw must self tap into the second board. For pine, that's not a problem. Not likely to split. If you build projects from hard woods, such as oak, you're very likely to split the board.
The Kreg screws will not split hard wood if used correctly. One of the primary and most common uses for pocket holes is to build hardwood face frames for cabinets. For hardwoods you should use the fine threaded screws. Plywoods require the coarse screws. I have used them many times with hardwoods without issue. pocket holes have their place and are great for people who do not have many clamps, built-ins, face frames, quick builds, etc. Most professional cabinet makers use them sparingly and mostly just use glue and clamps. Good wood glue is all you really need.
I believe the comment you are quoting was made in the context of using drywall screws. 2manytoyz went on to make the same observation you did regarding the self-tapping Kregs screws and hardwoods.
camarotoolman
Banned

Outlander
Well-known member
Bought the Wolfcraft last year for a Christmas project for my wife. http://www.wolfcraft.com/en/products/p/screwing_tools/1_undercover_jig_set/s/p/index.html
Probably not the best (ie. not a Kreg) but it got the job done, and she liked the lamp I made!
Probably not the best (ie. not a Kreg) but it got the job done, and she liked the lamp I made!
dogmir
Well-known member
I have the kreg master system and to me the PC just looks like a bit more of a production to use. The kreg is really well thought out and simplistic. Not as bulky.
TerryH
Well-known member
It seems that whichever people purchase, they are happy with. Are there any complaints or critiques that you have about the jig that you own?
I research tool purchases throughly. I enjoy the hunt. That research hopefully ends in me buying the best tool for the job. With that being said, I have had the larger Kreg system for many years. I recently bought the PC and use it almost exclusively now because the PC is so easier to use, especially if you work on more than 1 thickness. The Kreg requires some things to be taken apart and changing setups to do different thicknesses. The PC adjust automatically.