To avoid these ads, REGISTER NOW!

30X40X12 - After Fire Rebuild

OP
S

SpeedinLemon

Well-known member
Joined
Oct 23, 2011
Messages
307
Location
North Texas
Man, that whole place is gorgeous!! I could spend a lot of time in that room.:thumbup:

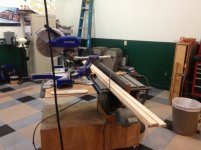
Thanks TB....Good to hear from you! It lacks some of the character of your great wood walls, but hopefully with time it will develop some more personality and become a work and play space (it's doing ok on the play side so far!).

Re: your fridge's color (or lack of it)

I was going to suggest you give it a 'flame job' or do as millions of Americans do, cover it with pictures and the kids' artwork! lol

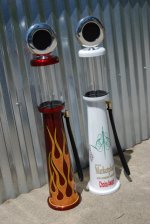
Then I saw all the Petroliana you have and thought you might just cover it with more signage in that vein. To provide the 'proper background' for your reefer signage, I found this site to give you a snazzier finish to the fridge -

http://www.decalfx.com/

Maybe you'll find something there that blends with all the beautiful woodwork in the room and still has that automotive vibe to it, and then add some fun signage over top of it. Just my $0.02!


P.S. - I personally like this one (24" width x whatever length) -
http://www.decalfx.com/carbon_2_sheets.html

Good idea's Ompha....Your $.02 is always worth much more! Cool decal site...I really like that carbon fiber...not really the look I was thinking...but very cool none the less.

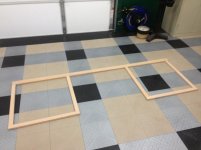
I think matching the wainscoting from the walls onto the fridge might look good.

Thanks Nutts...I've got several pieces left over...good idea...I'll mull it over some more.
 
To avoid these ads, REGISTER NOW!
OP
S

SpeedinLemon

Well-known member
Joined
Oct 23, 2011
Messages
307
Location
North Texas
Well...It's time to get some things done. I've got lots of things that need finished up. I've still got an ugly open space above the garage door, I need to put some trim on both sides of the red wall stripe to finish off and cover my paint fiasco and I need to make doors for the two upper "attic" storage area access points. But I think I'll start at the work bench area. I need face frames and doors on the upper cabinets and working on plans for the door for the storage cabinet to the left of the bench.

Table saw is doing double duty as a mitre saw stand. And my poor man's dust collection system was hard at work. It helped quite a bit as that saw really throws the chips out the dust port. Got the upper cabinet face frame cut and laid out. Fire up the Kreg jig next and tie it together.

And a beauty shot of the Shop King vice...Some crazy shadows, but I liked it enough to make it my new avatar pic!
 

Attachments

  • IMG_0579.jpg
    IMG_0579.jpg
    48.9 KB · Views: 226
  • IMG_0580.jpg
    IMG_0580.jpg
    54.8 KB · Views: 206
  • IMG_0582.jpg
    IMG_0582.jpg
    58 KB · Views: 222
  • IMG_0583.jpg
    IMG_0583.jpg
    42.7 KB · Views: 185
  • IMG_0599.JPG
    IMG_0599.JPG
    107.2 KB · Views: 187

JC23

Well-known member
Joined
Dec 31, 2009
Messages
11,718
Location
Northcoast
Looks gret! One other idea for the fridge is to have it painted up like a safe. It would go with yer rustic and REA theme.

And great recovery!
 

cincinnati_kid

Well-known member
Joined
Dec 26, 2011
Messages
218
Well, the weekend got off to a rough start. Mom and Dad were in town to celebrate birthdays for my two kids with December birthdays...we push them back a month to separate them from all the Christmas celebration. Anyway, when getting back on I-35 after dinner a driver apparently ran off the road in the left lane, over corrected and hit us in the driver side rear door. He got underneath us and flipped us up on the passenger side and we slid down the highway 75-100 yards. Thanks to God, seat belts and side curtain air bags, we all walked away (or rather crawled out the sunroof!) and no one has anything more than a few sore muscles. Some dark cell-phone pics:

View media item 16188
View media item 16189
View media item 16187
View media item 16190
But, despite the wild ride, and probably looking like a circus clown car with 8 of us crawling out the sunroof, everyone is fine and weekend celebrations went on as planned. I even got several hours in the shop this afternoon....progress pics next....

I read thru a few pages of your build and then I jumped to the end. Great work I love the pool and the rec area in the barn to entertain in. That way you dont have as big of a mess in the house I like it.

I had a question about the picture here. Is that someone in a kilt standing on the right side of this pic? haha
 
OP
S

SpeedinLemon

Well-known member
Joined
Oct 23, 2011
Messages
307
Location
North Texas
I had a question about the picture here. Is that someone in a kilt standing on the right side of this pic? haha

Good eye CK! Yes in fact it is. He's a fire fighter and their banquet was that evening. I believe he said he plays the bagpipes. He was a few cars behind us and was one of the first on scene. He helped us all crawl out the sunroof and gave a good descripition of the incident to the police officers writing up the accident. It was good to have his account when the guy who hit us tried to invent a third vehicle that was involved.

Seems many of us have dreams of becoming fire fighters when we grow up...Thank God for those who actually do! :bowdown:
 

Jettback50

Well-known member
Joined
Feb 28, 2010
Messages
55
Location
Olympia, WA
Looks really great. I read the whole thing but forgive me if I missed it but I was wondering about the ceiling and the walls. Did you frame everything out for insulation value or was only to create the finished walls and have a cool looking ceiling?

Also how was the insulation over the summer? Did you notice a difference from before? I will be working on a steel 40x30x12 as well and read that you would go with the spary insulation the first time if you had to do it again. Got me thinking. Do you know what the price range was?

Thanks.
 

Red Leader

Well-known member
Joined
May 15, 2011
Messages
2,689
Location
Denver, CO
Wow, sorry to hear about the roll accident but VERY glad everyone was safe and walked away! That is the most important thing.


Oh, and very nice shop king! Craftsman made a similar art deco vise in 1942, but I've never seen one in person. Good stuff!
 
OP
S

SpeedinLemon

Well-known member
Joined
Oct 23, 2011
Messages
307
Location
North Texas
Looks gret! One other idea for the fridge is to have it painted up like a safe. It would go with yer rustic and REA theme.

And great recovery!

Good idea JC...I'm a bit leary of doing too much to that fridge. It's old enough (going on 20 years) to make me worry about how long it will be around, but not old enough to be cool (looking....no pun intended!) on it's own. I 'd really like to replace it with a 40's-50's era fridge with newer internals. I'll do something with it though. There's a cool "Show Me Your Fridge" thread on here somewhere I need to go find again.

Thanks for stopping by!
 
OP
S

SpeedinLemon

Well-known member
Joined
Oct 23, 2011
Messages
307
Location
North Texas
Wow, sorry to hear about the roll accident but VERY glad everyone was safe and walked away! That is the most important thing.


Oh, and very nice shop king! Craftsman made a similar art deco vise in 1942, but I've never seen one in person. Good stuff!

Thanks Red Leader...Good to hear from you again. Hard to believe that acciedent has been a year ago now! You're right...the biggest blessing was that everyone was safe.

As much advice and tool info as you pass along, you may not remember, but I spotted a similar Shop King vice on Taumac's thread:

http://www.garagejournal.com/forum/showthread.php?t=142100

And you gave some background on it and I found this one on ebay shortly after that. Is there a brand/line of spray paint you'd recommend for repainting it? I think I'm going to go back with red on the cast parts and keep the machined parts shiny. Rustoleum has a line of "industrial" spray paints I can pick up at HD and there is a good red in that line....thoughts anyone?
 
OP
S

SpeedinLemon

Well-known member
Joined
Oct 23, 2011
Messages
307
Location
North Texas
Looks really great. I read the whole thing but forgive me if I missed it but I was wondering about the ceiling and the walls. Did you frame everything out for insulation value or was only to create the finished walls and have a cool looking ceiling?

Also how was the insulation over the summer? Did you notice a difference from before? I will be working on a steel 40x30x12 as well and read that you would go with the spary insulation the first time if you had to do it again. Got me thinking. Do you know what the price range was?

Thanks.

Hi JettBack...Thanks for stopping by. We originally built this shop with an apartment inside and lived in it for about a year and a half while our house was built. So much of the framing was there. I wanted to keep solid walls so I'd have a place to mount cabinets, shelves (signs and lights!), etc... Also, I've been in shops that left the walls open after using the spray insulation and even though it gets fairly hard and looks good when painted, it's not a smooth surface and catches a lot of dust and debris and can get pretty grungy. I wanted the shop to look nice since it's dual purpose and having finished walls and ceilings makes the clean up process easier. And having 3/4" plywood walls makes it to where I can mount just about anything, just about anywhere I want!

It cost me $2000 to have the the ceiling and upper part of the walls sprayed. It was $1.15 or $1.25 psf. And it has made a big difference. Of course, I now have CH/A, but even when very hot or cold, it doesn't have to run much to keep if comfortable. I definitely recommend the spray...it really tightened up the metal building and cut down on wind noise and has made a big difference in keeping the temps regulated.

Keep us updated when you get yours going!

Chris
 

Shoottx

Well-known member
Joined
Jan 30, 2011
Messages
314
Location
Plano Tx
When you said you were out by the pool, my first reaction was "You really aren't from around here". Then I realized your comments cover from August until now.

Ok the answer to the fridge color is either a custom paint job, or look into a local place that does car wraps. You can do some really cool graphix in a wrap.

Oh and Happy New Year
 

Jettback50

Well-known member
Joined
Feb 28, 2010
Messages
55
Location
Olympia, WA
Thanks for this info.

As for the Fridge, I agree with the wrap idea. Have it wrapped to look like a gas pump or lube station! Way cheaper than finding and restoring an original.
 

Attachments

  • gaspumps.jpg
    gaspumps.jpg
    68.2 KB · Views: 89
  • LA20s23 Gas Chug.jpg
    LA20s23 Gas Chug.jpg
    98.5 KB · Views: 115

3pedal

Well-known member
Joined
Dec 29, 2009
Messages
190
Location
Brighton, CO
The progress has been great, but I bet your are happy to be working on the shop part again.

Was there any prep needed before they spayed in the foam? Did it make much of a mess? I need to insulate and foam (if I can afford it) seems more and more like the way to go.
 
OP
S

SpeedinLemon

Well-known member
Joined
Oct 23, 2011
Messages
307
Location
North Texas
Thanks for this info.

As for the Fridge, I agree with the wrap idea. Have it wrapped to look like a gas pump or lube station! Way cheaper than finding and restoring an original.

I think the theme will definitely be "petroliana" of some kind. Not for sure exactly how I'll get there, but I'm thinking wrap or at least decals may be the way to go. Cool pics of the old gas pumps....Thanks for posting those.
 
Last edited:
OP
S

SpeedinLemon

Well-known member
Joined
Oct 23, 2011
Messages
307
Location
North Texas
The progress has been great, but I bet your are happy to be working on the shop part again.

Was there any prep needed before they spayed in the foam? Did it make much of a mess? I need to insulate and foam (if I can afford it) seems more and more like the way to go.

Hi 3Pedal....Yes, I am glad to be back to work on the shop. Since I was cleaning up from the fire, I did quite a bit of prep for the spray insulation. I had to pull the bats of fiberglass insulation away from the metal roof and ended up going over almost all of it with my shop vac to clean it up as much as possible. I did the same over all the exposed metal beams. I'm not sure it needed to be as clean as I got (and I didn't get it perfect by any stretch!), but I think it gave it a better surface to stick to. If you're starting with new, or fairly new construction, I don't think much, if any, surface prep is required.

There is some overspray involved, but since I had been doing a lot of cutting of 2X4's and framing in there, I had a pretty good layer of sawdust. I was going to clean it all up, but the insulation contractor said to just leave it and spread it all around. Once they were done, most of the overspray swept up and what didn't could be easily removed with a floor scraper. If you're planning on staining your concrete, or want to keep your floors really clean for an epoxy coat or something, I'd recommend putting a layer of painters plastic down to make the cleanup easier.

I'm very happy with it and would go that route again if I was starting over.

Chris
 
OP
S

SpeedinLemon

Well-known member
Joined
Oct 23, 2011
Messages
307
Location
North Texas
When you said you were out by the pool, my first reaction was "You really aren't from around here". Then I realized your comments cover from August until now.

Ok the answer to the fridge color is either a custom paint job, or look into a local place that does car wraps. You can do some really cool graphix in a wrap.

Oh and Happy New Year

Hey Mike....Yeah it has been SEVERAL months since there was any sitting around the pool! Any idea what a place would charge for a wrap that was "Fridge size" ? I like the idea, but wondering how costly it might be....anyone done it?
 
To avoid these ads, REGISTER NOW!

3pedal

Well-known member
Joined
Dec 29, 2009
Messages
190
Location
Brighton, CO
Thanks for the info. I have not decided on flooring yet (or much for that matter.)

While the pole barn is new to me, it is close to 10 years old. Part of it was used for horses and hay storage. I have done a bulk cleanup, but still need to do a lot more. I guess I will have to start a thread of my own soon.
 
OP
S

SpeedinLemon

Well-known member
Joined
Oct 23, 2011
Messages
307
Location
North Texas
Thanks for the info. I have not decided on flooring yet (or much for that matter.)

While the pole barn is new to me, it is close to 10 years old. Part of it was used for horses and hay storage. I have done a bulk cleanup, but still need to do a lot more. I guess I will have to start a thread of my own soon.

Definitely post it up...especially if you're looking for ideas....plenty to go around here!
 

don long

Well-known member
Joined
Mar 31, 2012
Messages
8,845
Location
southern california
Just jumped on board.
Seems that fire gave you a wind fall opertunity
the place looks great. and the twotone color gives the garage a warm feel

I looked for your thread the other day but didn't find it so when I spotted it tonite I had to say hi.

the yard and pool sure look inviting
enjoy
Don
 
OP
S

SpeedinLemon

Well-known member
Joined
Oct 23, 2011
Messages
307
Location
North Texas
Just jumped on board.
Seems that fire gave you a wind fall opertunity
the place looks great. and the twotone color gives the garage a warm feel

I looked for your thread the other day but didn't find it so when I spotted it tonite I had to say hi.

the yard and pool sure look inviting
enjoy
Don

Thanks Don...I appreciate you stopping by and the kind comments.

Chris
 
OP
S

SpeedinLemon

Well-known member
Joined
Oct 23, 2011
Messages
307
Location
North Texas
Quick garage project....My daily driver is a 2004 Suburban pushing 200k miles. It's been a great truck and after a recent detour through the pasture to check on a calf, I found myself without fog lights...Busted lenses and no lights:
IMG_0610-001.JPG

I got an email from RockAuto last week listing items they were closing out for my model vehicle and the fog lights were on the list! $19/each and a few dollars shipping and I was in business.
IMG_0611.JPG

First problem comes up when I realize the nuts that hold the bracket on are unreachable with the bumper, grill, etc.. in place. So as I'm about to Google "replacing 2004 Suburban fog lights"....it hits me! Disassemble the light from the bracket, use existing bracket and reassemble in place.

IMG_0612.jpg

Worked like a champ and pretty soon, I was all lit up (just the fog lights...it was a one beer project! :beer:).

IMG_0613-001.JPG

So does that make me a cheater, lazy or engenious?? And if I'm considering keeping all the brand new brackets....packrat or smart planner for future needs??

IMG_0614.jpg

More to come.....Chris
 
OP
S

SpeedinLemon

Well-known member
Joined
Oct 23, 2011
Messages
307
Location
North Texas
OP
S

SpeedinLemon

Well-known member
Joined
Oct 23, 2011
Messages
307
Location
North Texas
The workbench is currently awaiting the metal top...a small delay, but should be this week sometime. I had some good shop time this weekend and with the workbench on hold, I decided to tackle another of the remaining eyesores :eyecrazy: :

View media item 27914
It's time to cover that access hole to the upper storage area. I debated over several different mounting / hinge methods and ended up deciding to create sort of a sliding barn door. First on the list is framing the opening:

View media item 28965
A little matching stain:

View media item 28966
I painted the track with Rustoleum hammer finish paint and the brackets a flat black:

View media item 28967
Next up...building the door frame and mounting the rolling supports:

View media item 28968
View media item 28969
Then a quick test fit to verify measurements:

View media item 28970
Next I added cedar planks to fill in the oak frame. Normal closed position:

View media item 28971
And open for access:

View media item 28972
I still need to sand and stain the door and then install the safety stop bolts at each end of the track. I'd hate to see that new door shooting out the end of that track. And it rolls so smooth on those delrin wheels, it definitely could :scared:

All for now...hopefully completed workbench pics to follow later this week.
 

sfd524

Well-known member
Joined
Oct 26, 2012
Messages
123
Location
Clay, NY
Chris,

Just read through your thread. Being I see the devastation fire can do quite frequently I feel for ya. You have done a great job rebuilding. i am envious of you size, shop size that is. 30x40 would be a huge step up from my 11x22! Good luck and keep the pictures coming.

Lee
 
OP
S

SpeedinLemon

Well-known member
Joined
Oct 23, 2011
Messages
307
Location
North Texas
Chris,

Just read through your thread. Being I see the devastation fire can do quite frequently I feel for ya. You have done a great job rebuilding. i am envious of you size, shop size that is. 30x40 would be a huge step up from my 11x22! Good luck and keep the pictures coming.

Lee

Thanks Lee....It's been quite a journey since the fire. A lot of work, but beginning to reap some rewards....and enjoying the ride to boot. I just noticed the pic in your avatar is a house on fire....I'll have to go back a little deeper in your thread for the story on that?
 
To avoid these ads, REGISTER NOW!
Top Bottom