To avoid these ads, REGISTER NOW!

Scale Model Dozer Ride On For My Son

IndyGarage

Well-known member
Joined
Apr 29, 2010
Messages
9,669
Location
Indy
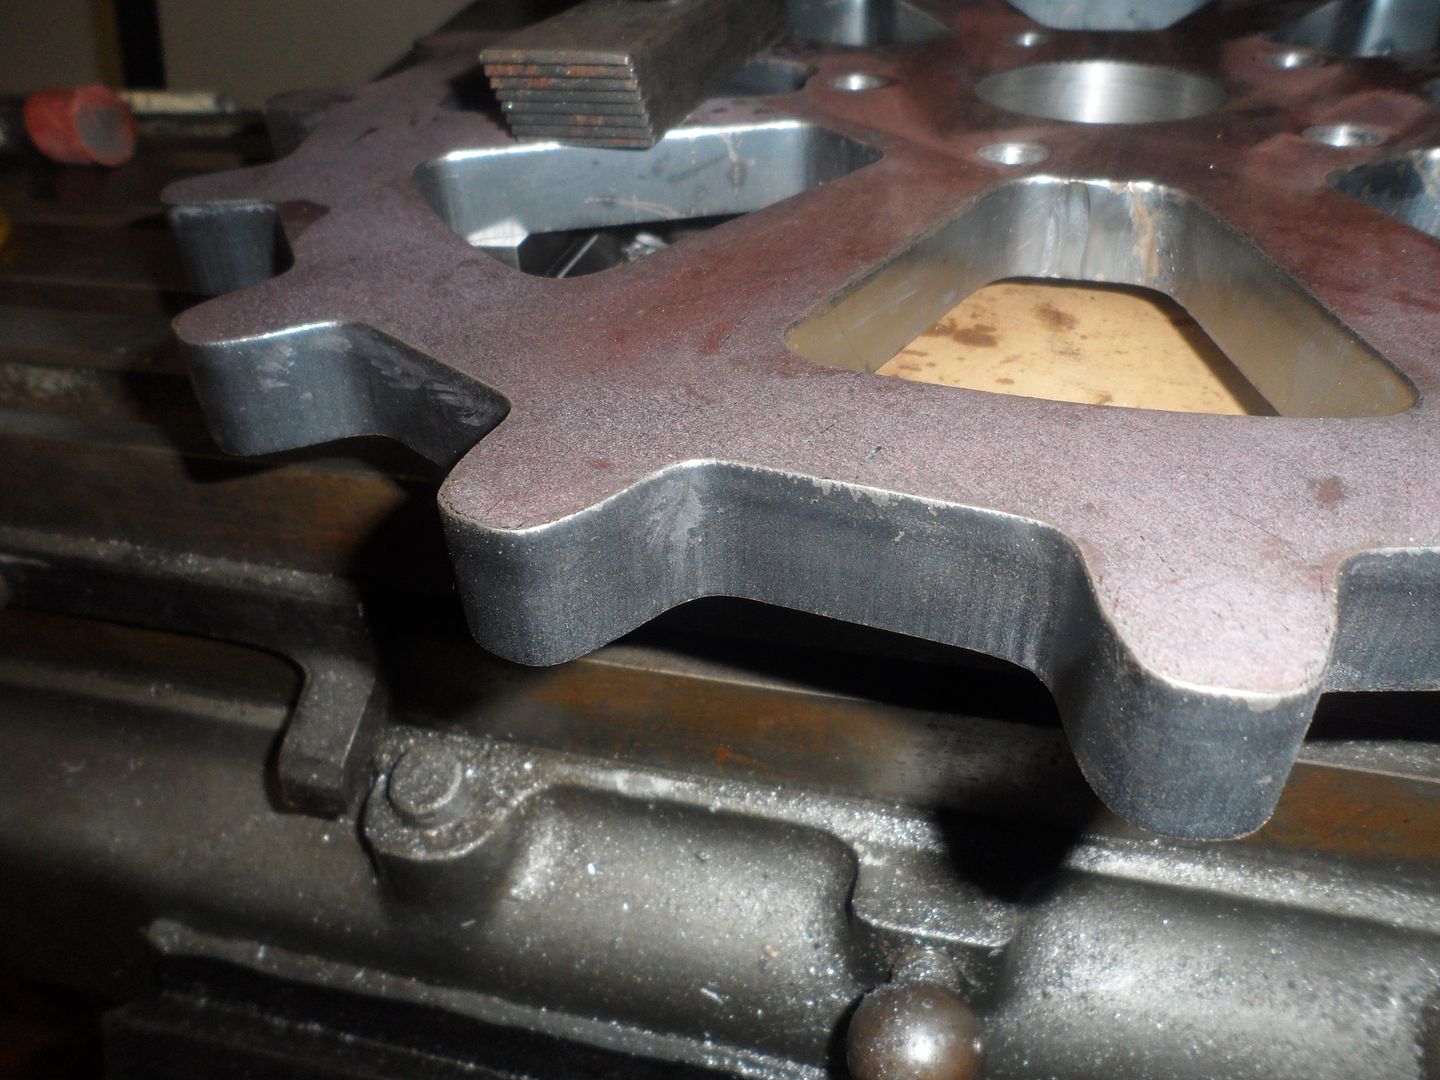
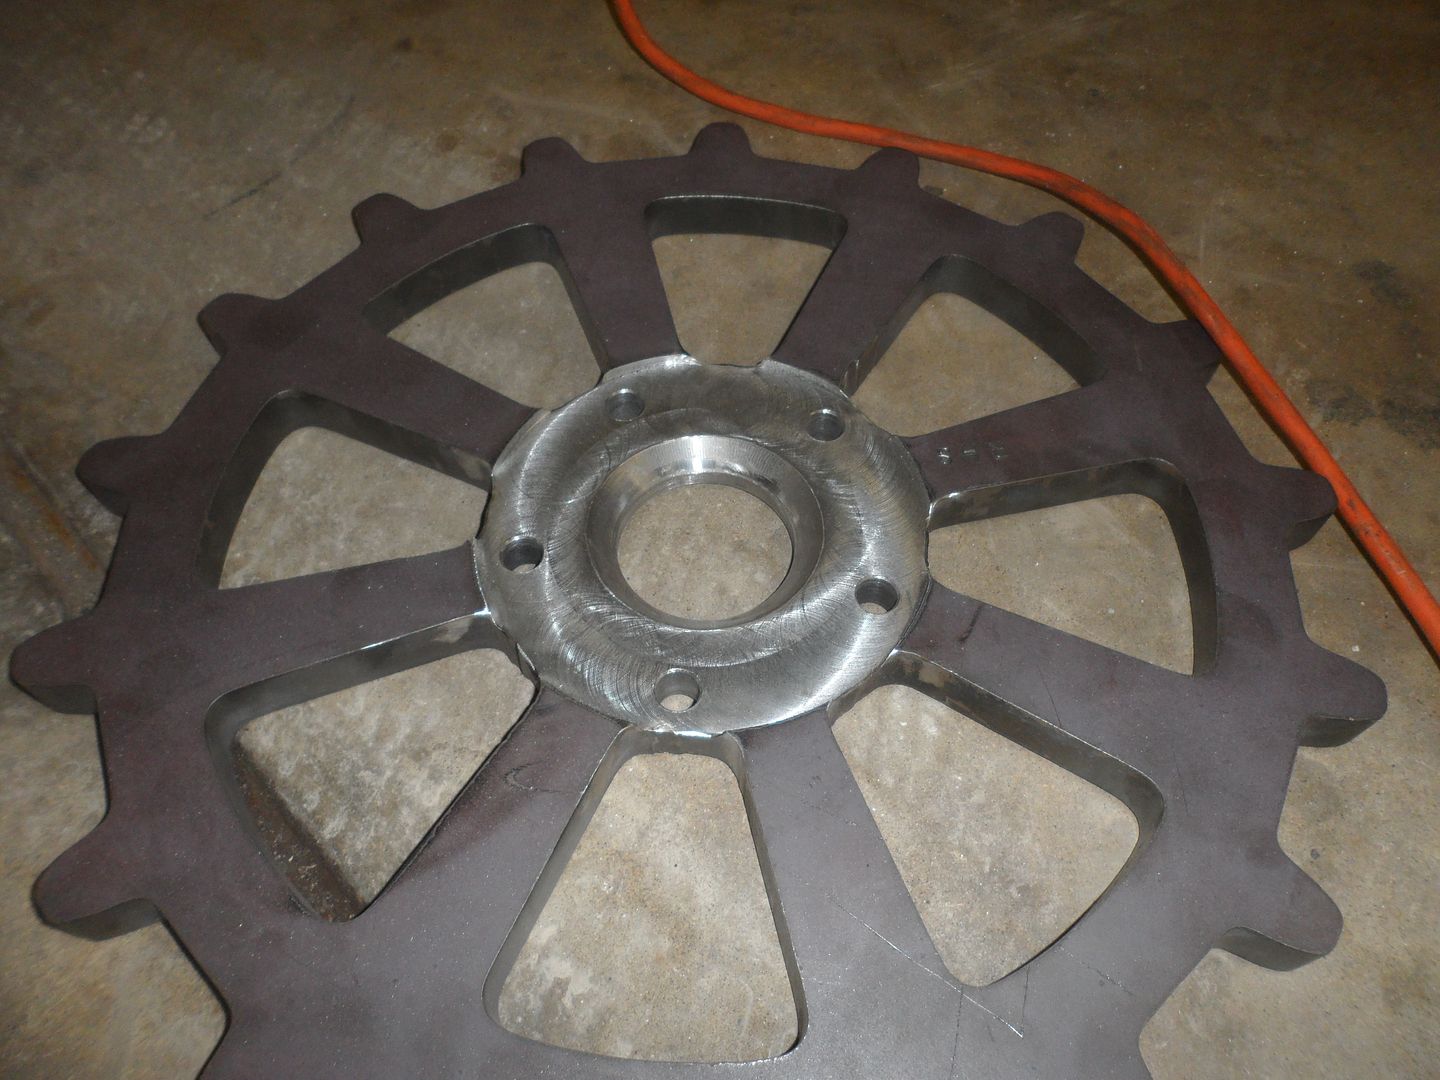
A grinder? No way. A plasma cutter? Maybe but until a few days ago, I didn't have one. And I wouldn't be learning anything new if I just used a grinder or plasma. I don't do this for a living. So the set up and mounting the part to the table is a challenge.

It's not about the time I spend making a part if it's how I expected it to turn out. I wanted it to be a perfect arc because otherwise it would look cheap to me. I don't have a steady hand so I make jigs and fixtures for as much as I can to make things look consistent. I want it to look professionally built.

With that being said, you may not like my next post.

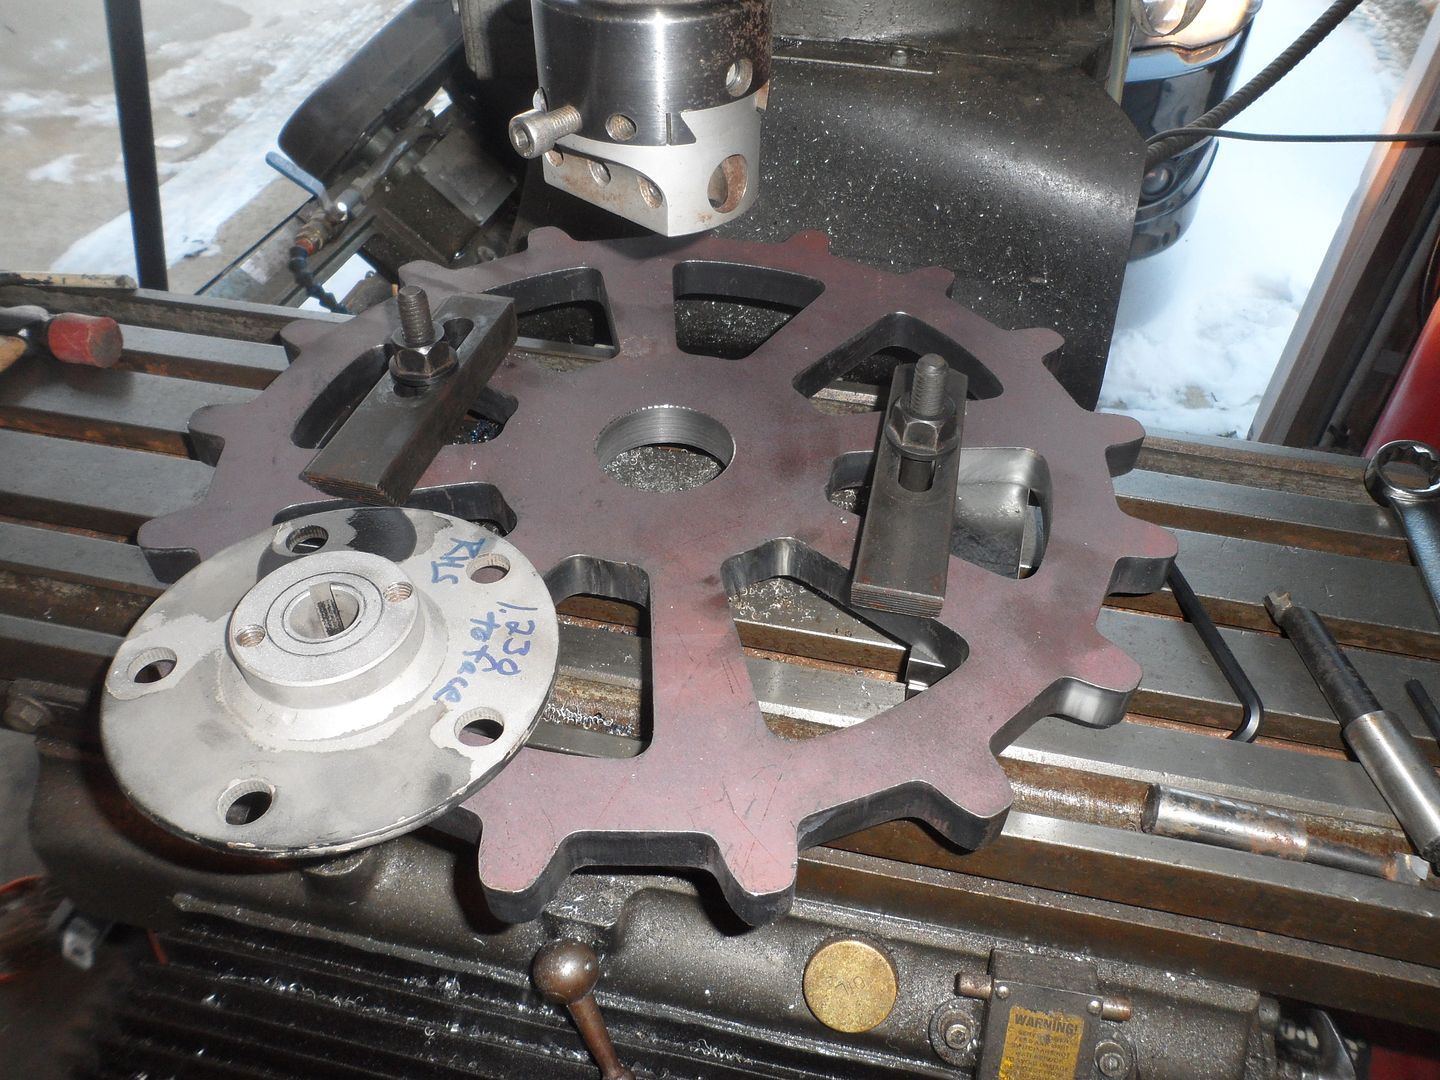
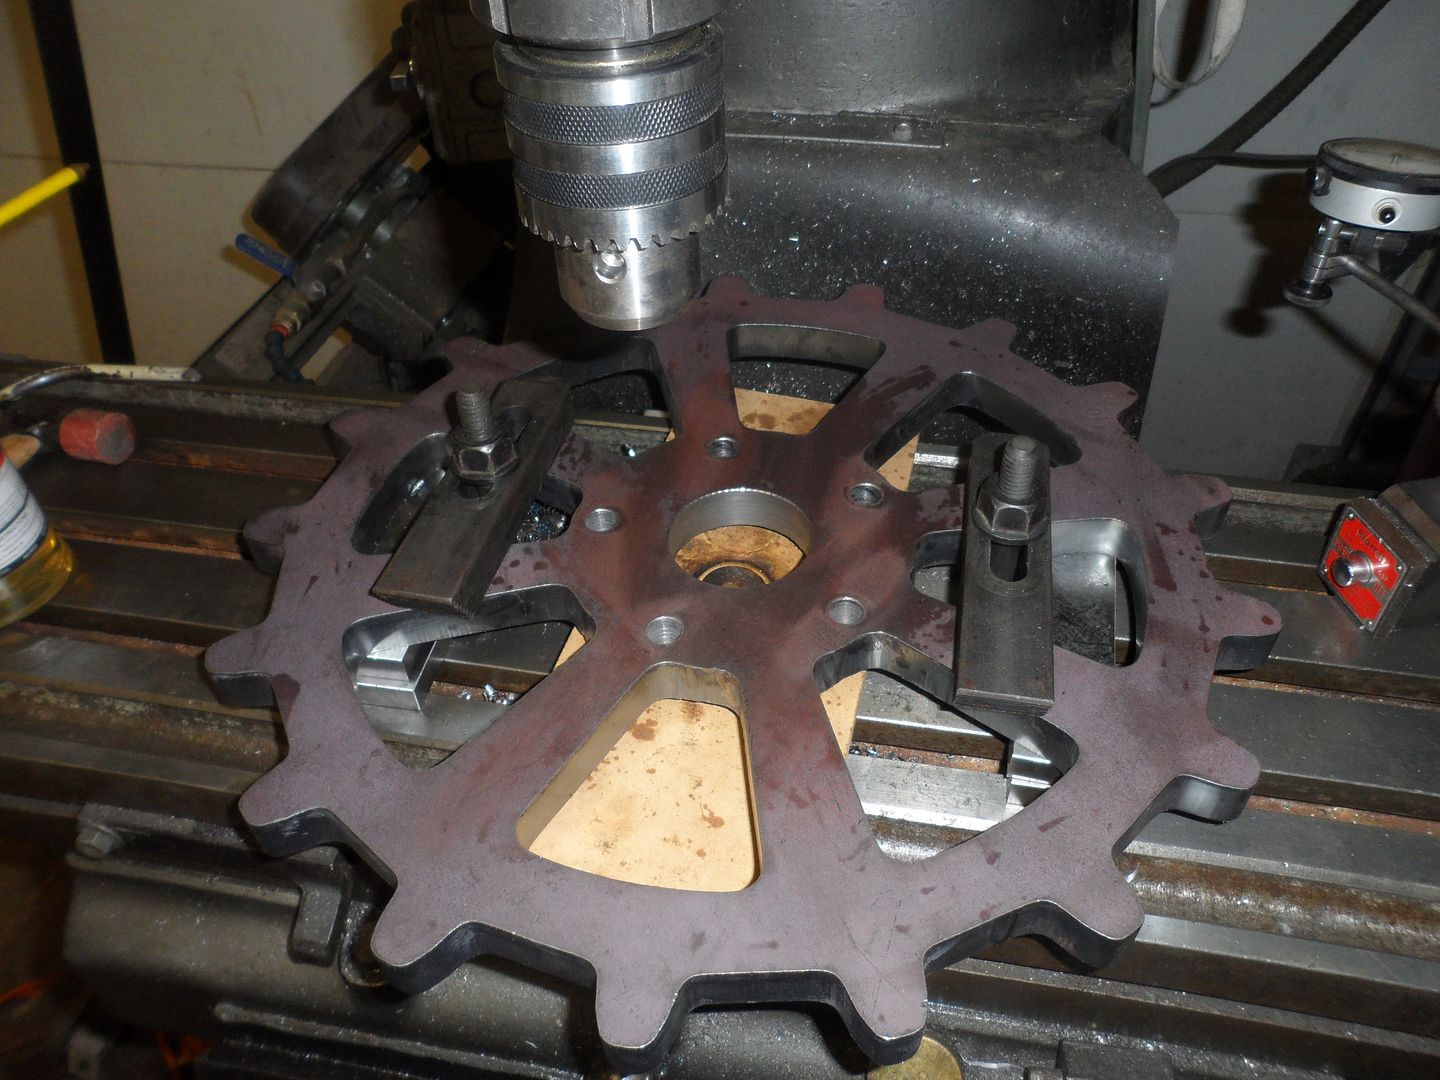
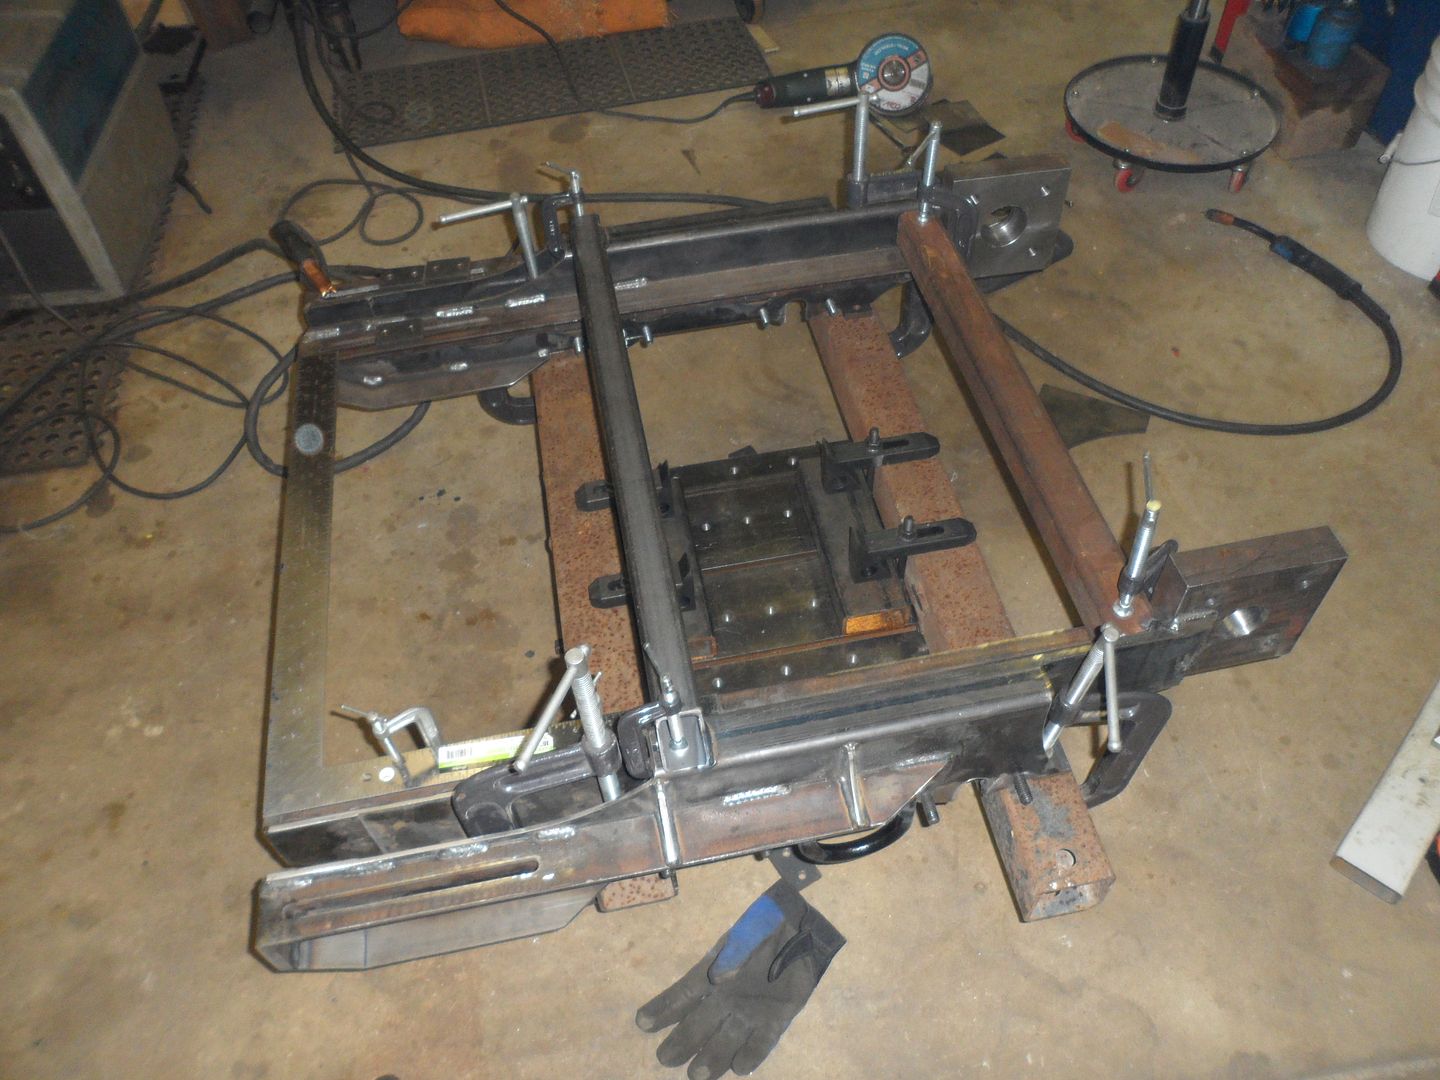
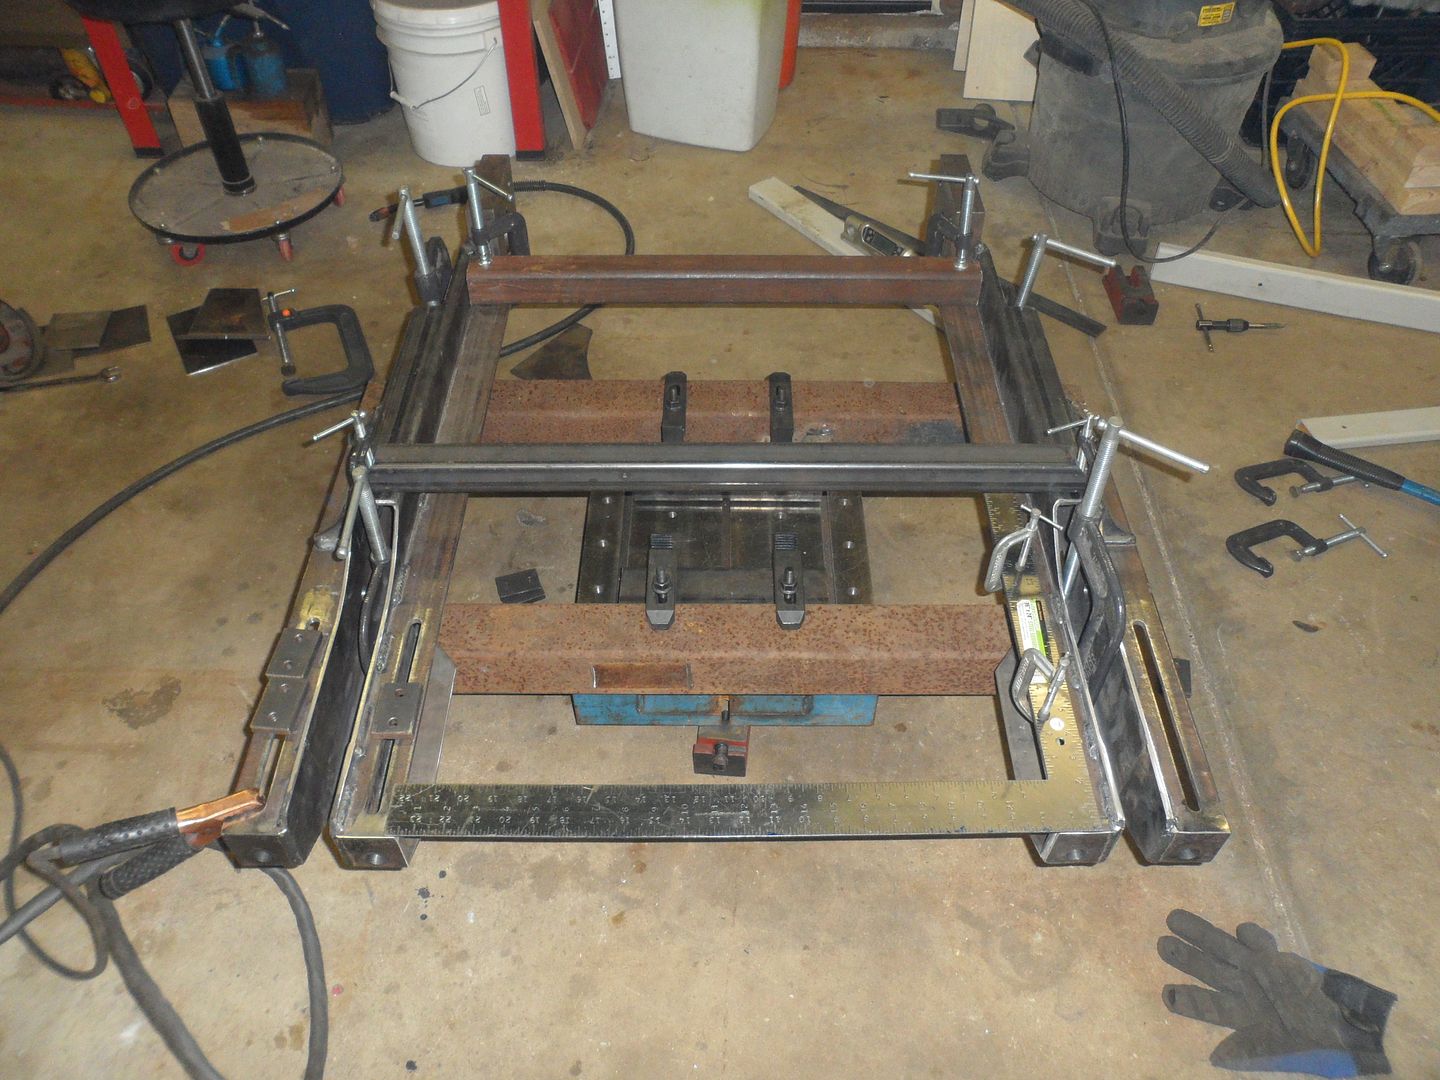
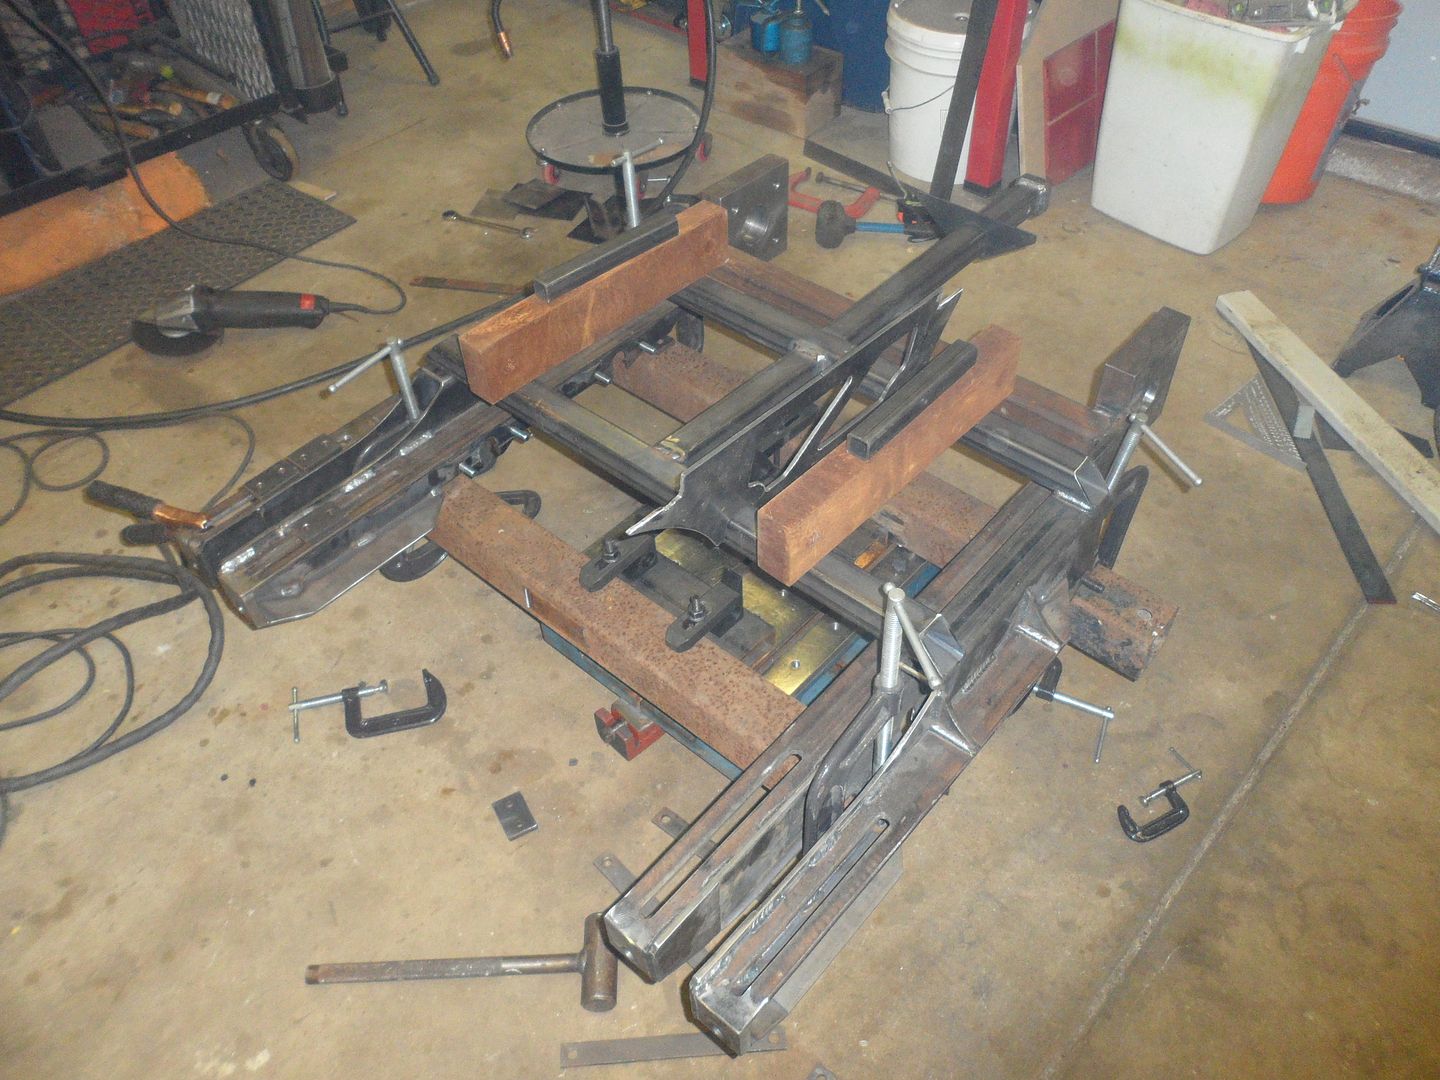
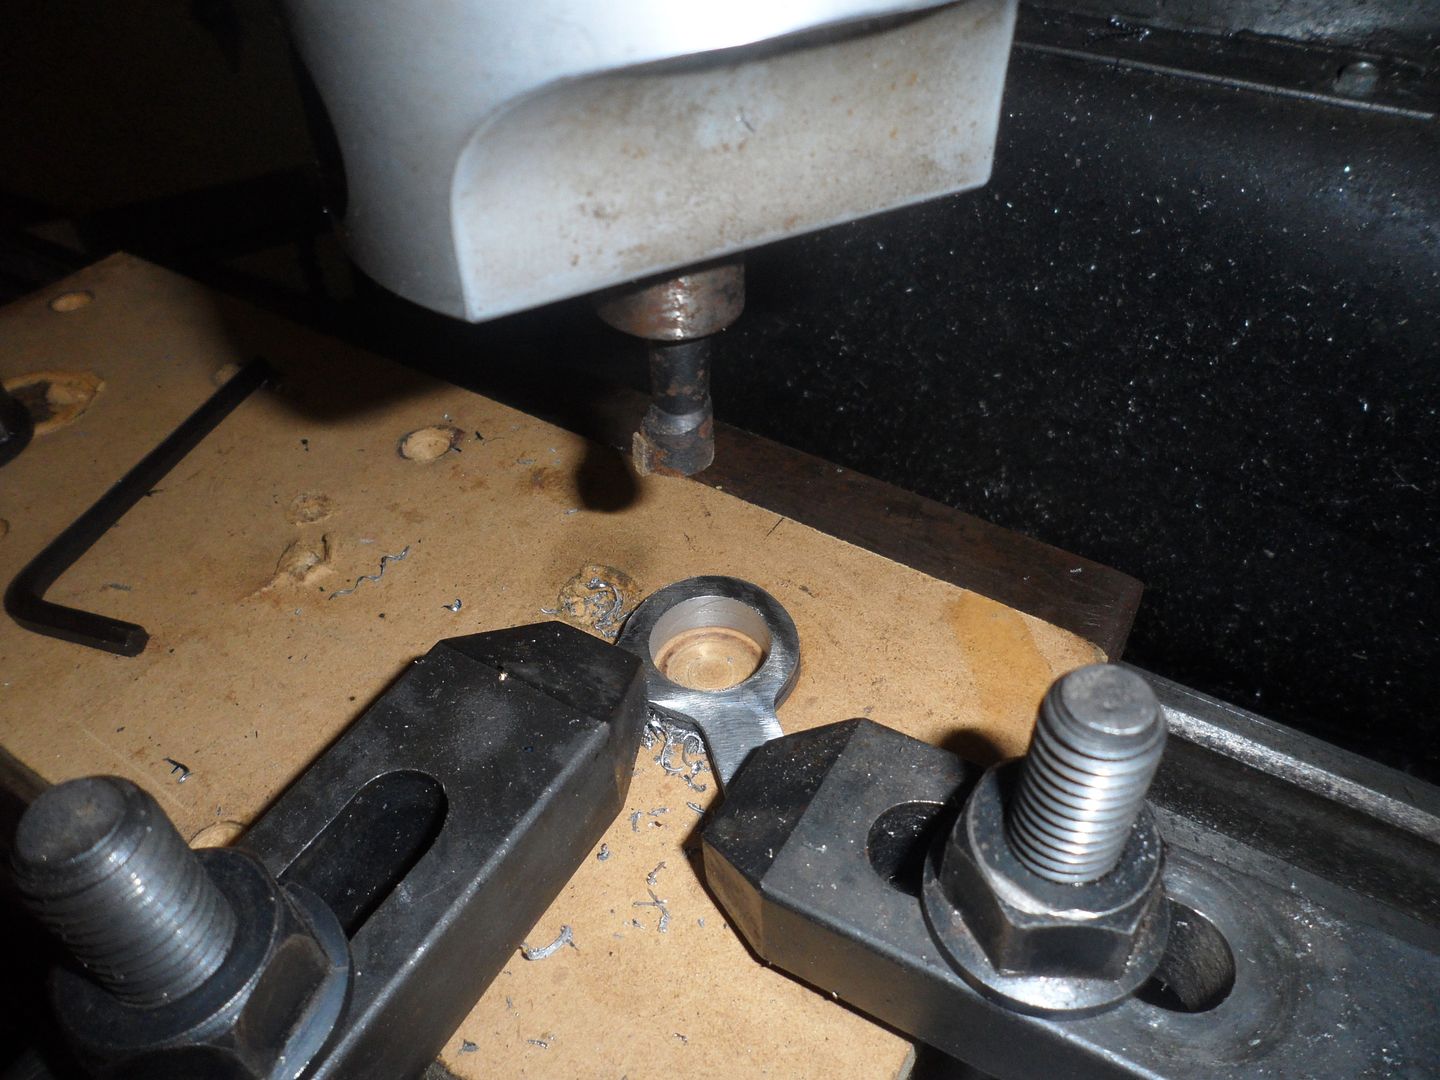
I've acquired an old t slot table. It's about 14" x 14". I found it under a pile of parts in a surplus store by my inlaws. I got it for real cheap. I don't have t slots that small so I drilled and tapped 20 3/8-16 holes to use my clamping set. I may eventually open up the slots if I can get a cutter. It's all two tiered so I can use clamps near the edge too.

Reason I did this is because my welding table isn't flat. It's one of the first things I ever made and I didn't have the tools at the time to get the bow out all the way. And now it annoys me. So I've always wanted something flat that I could clamp to so I don't warp parts and to hold things still. Overkill? Probably. But I like it that way.

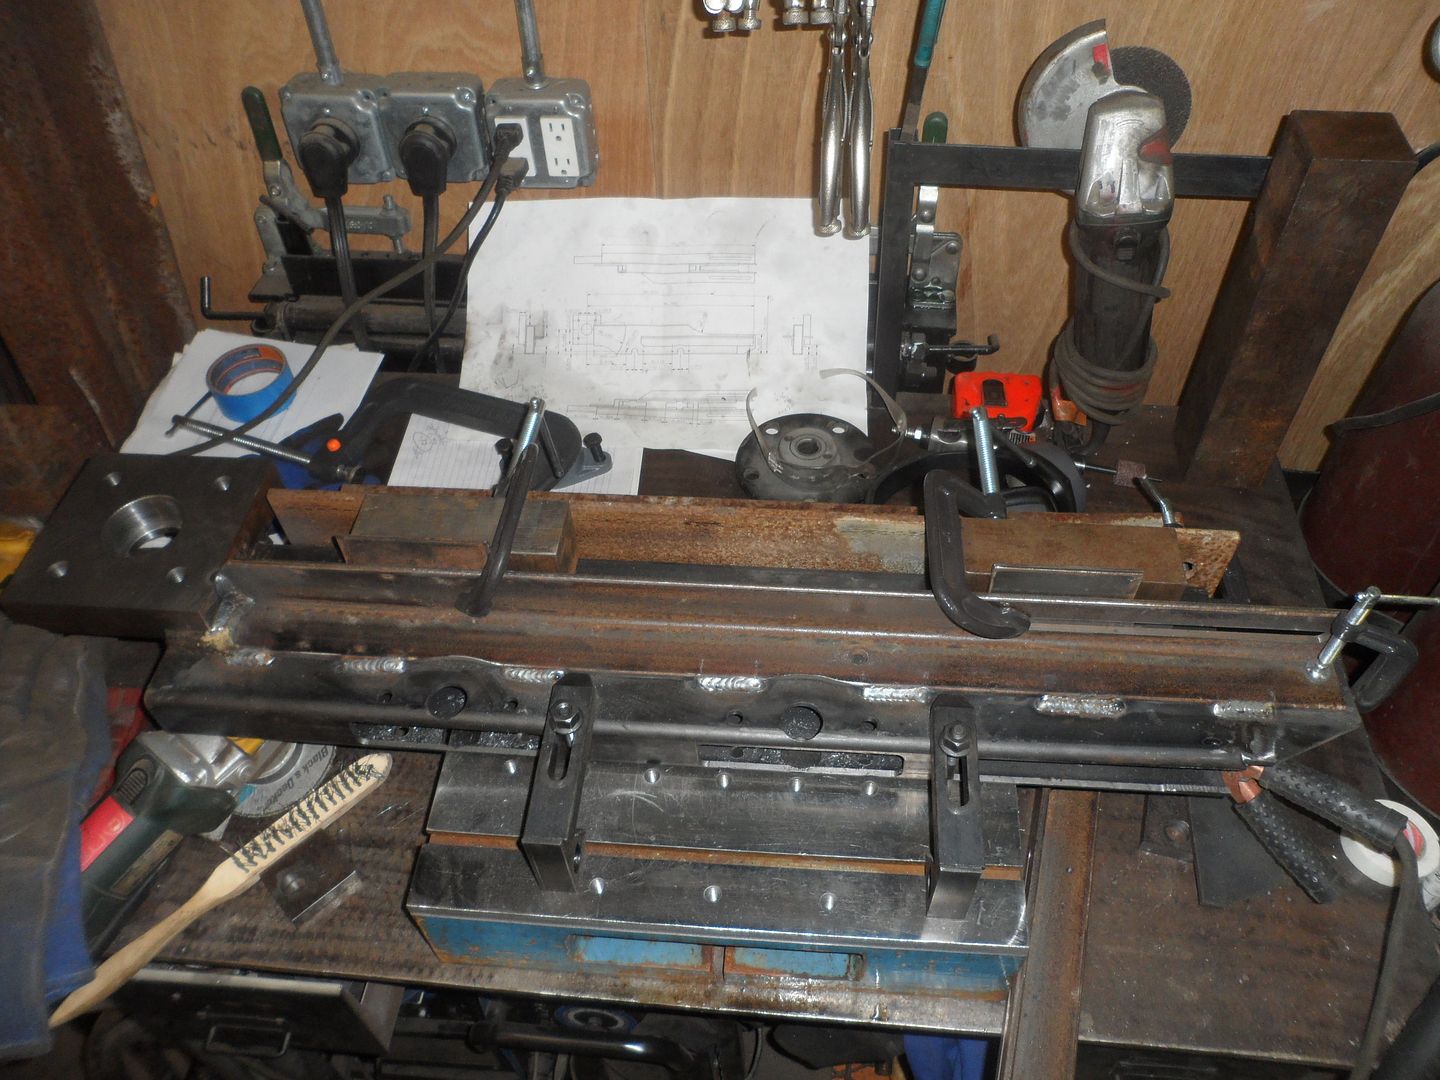
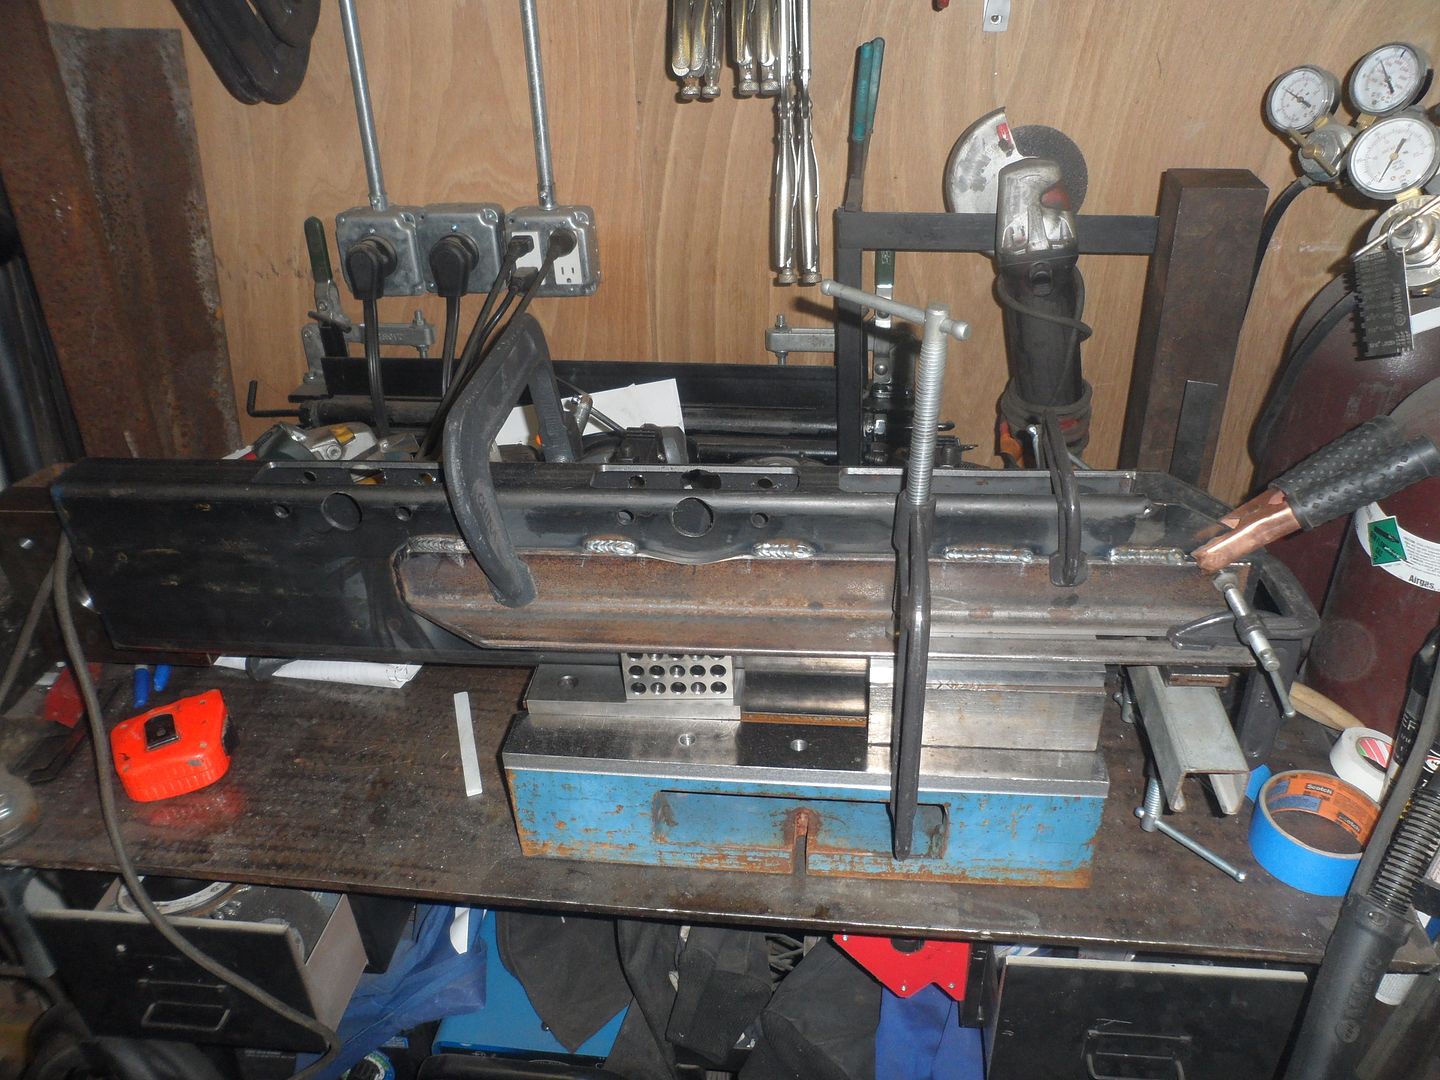
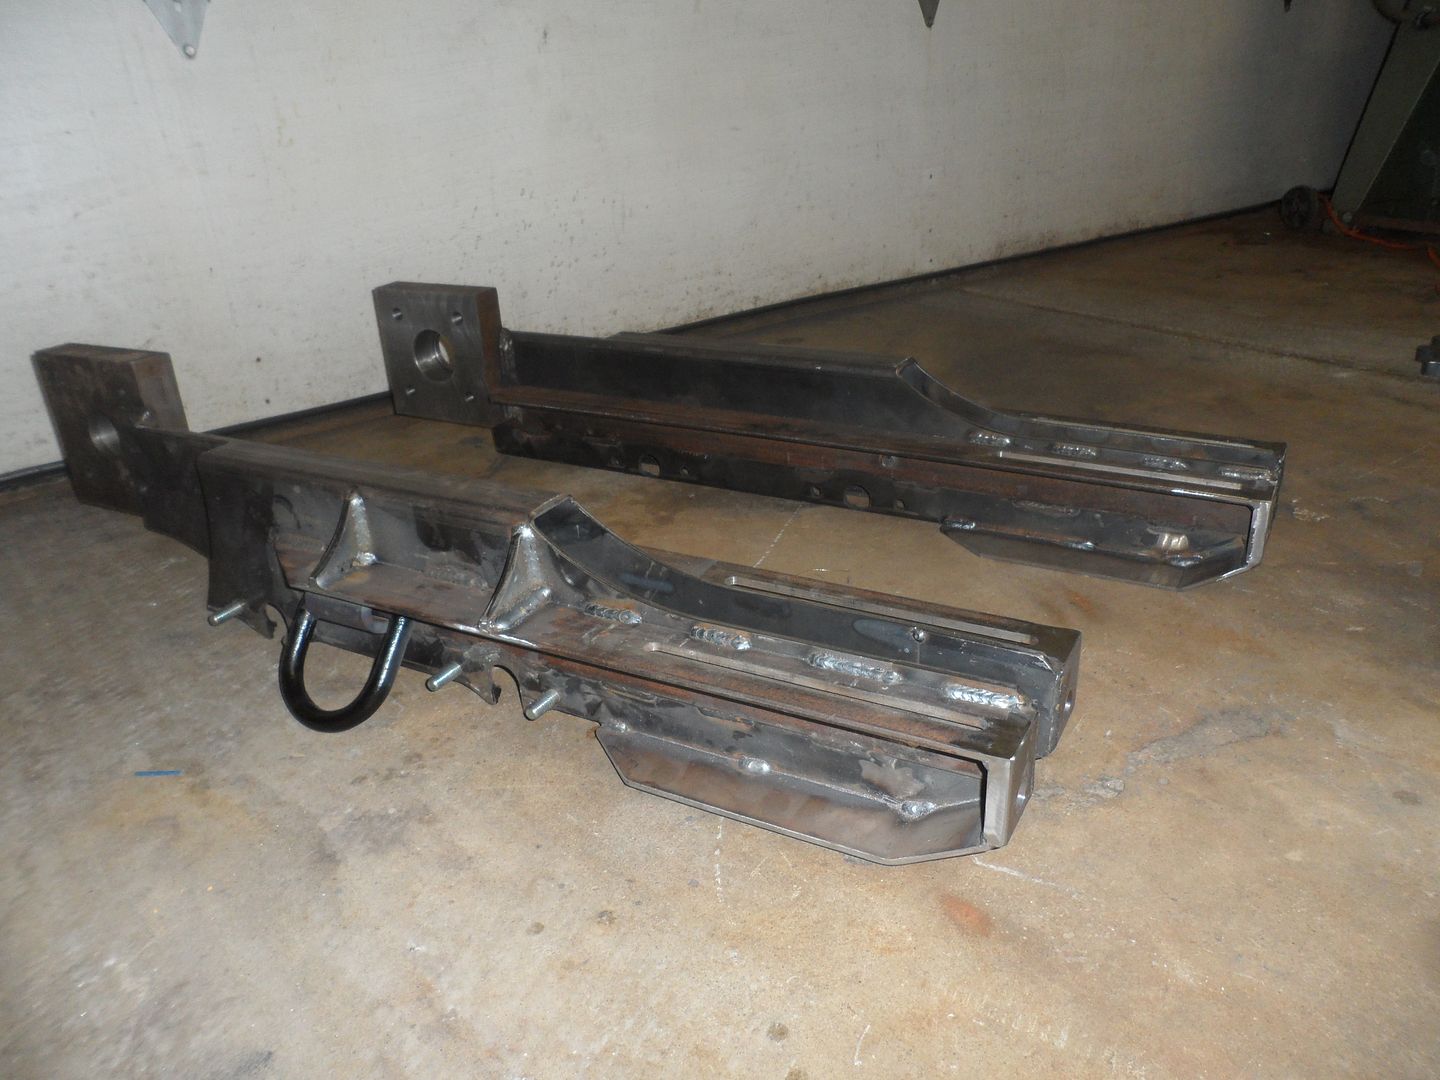
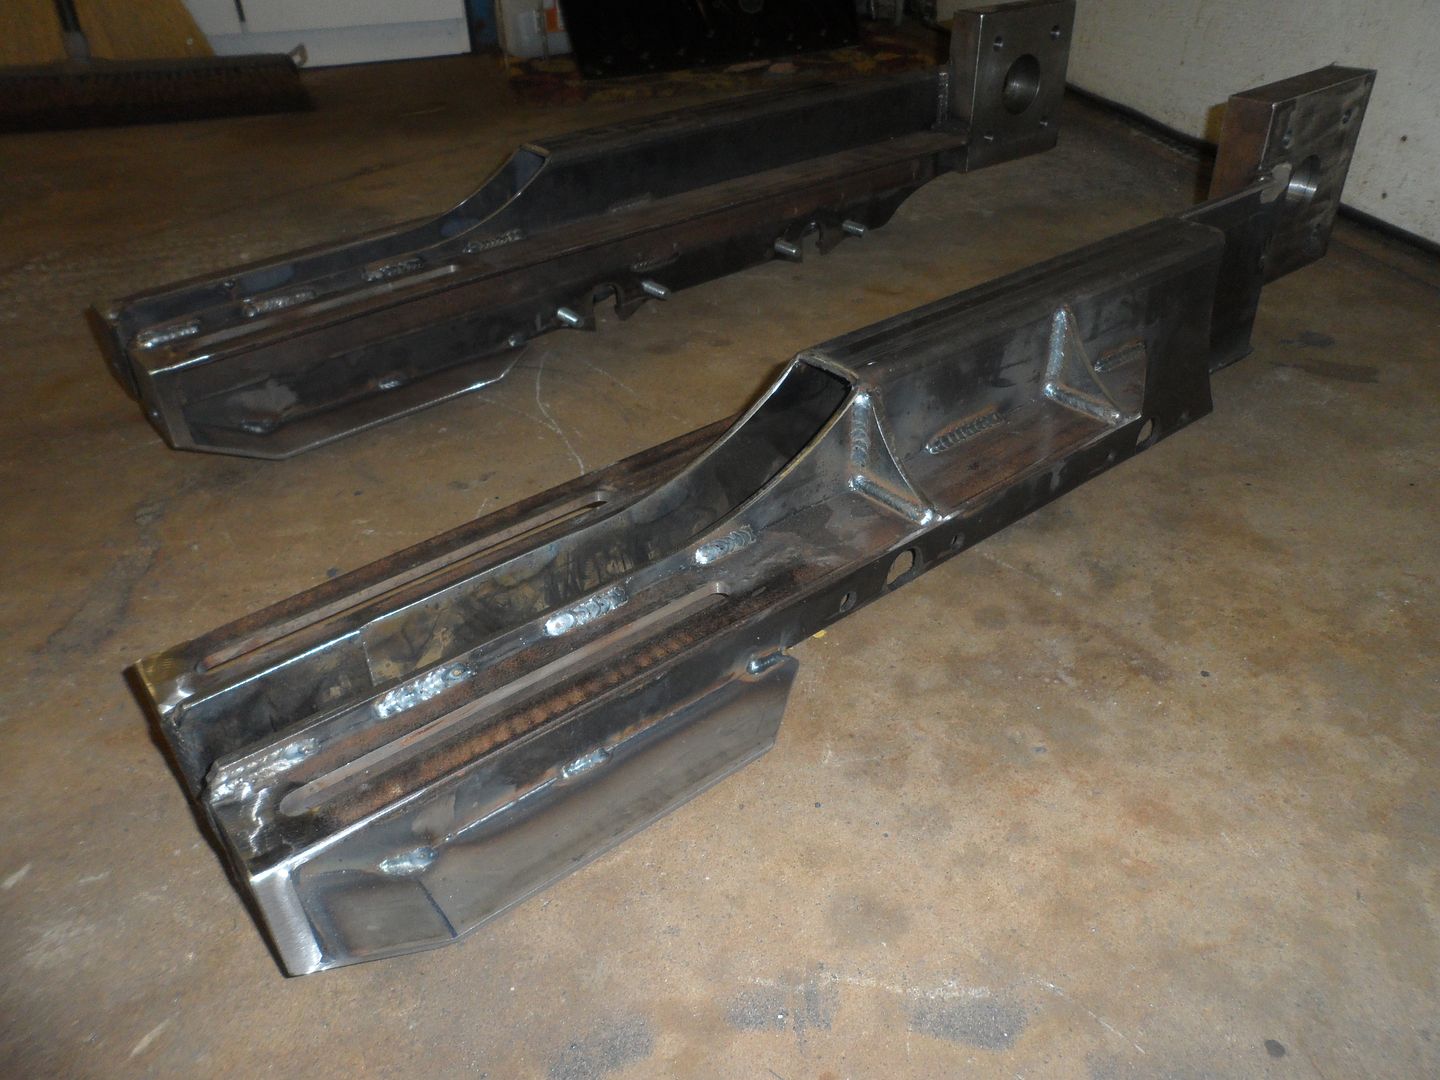
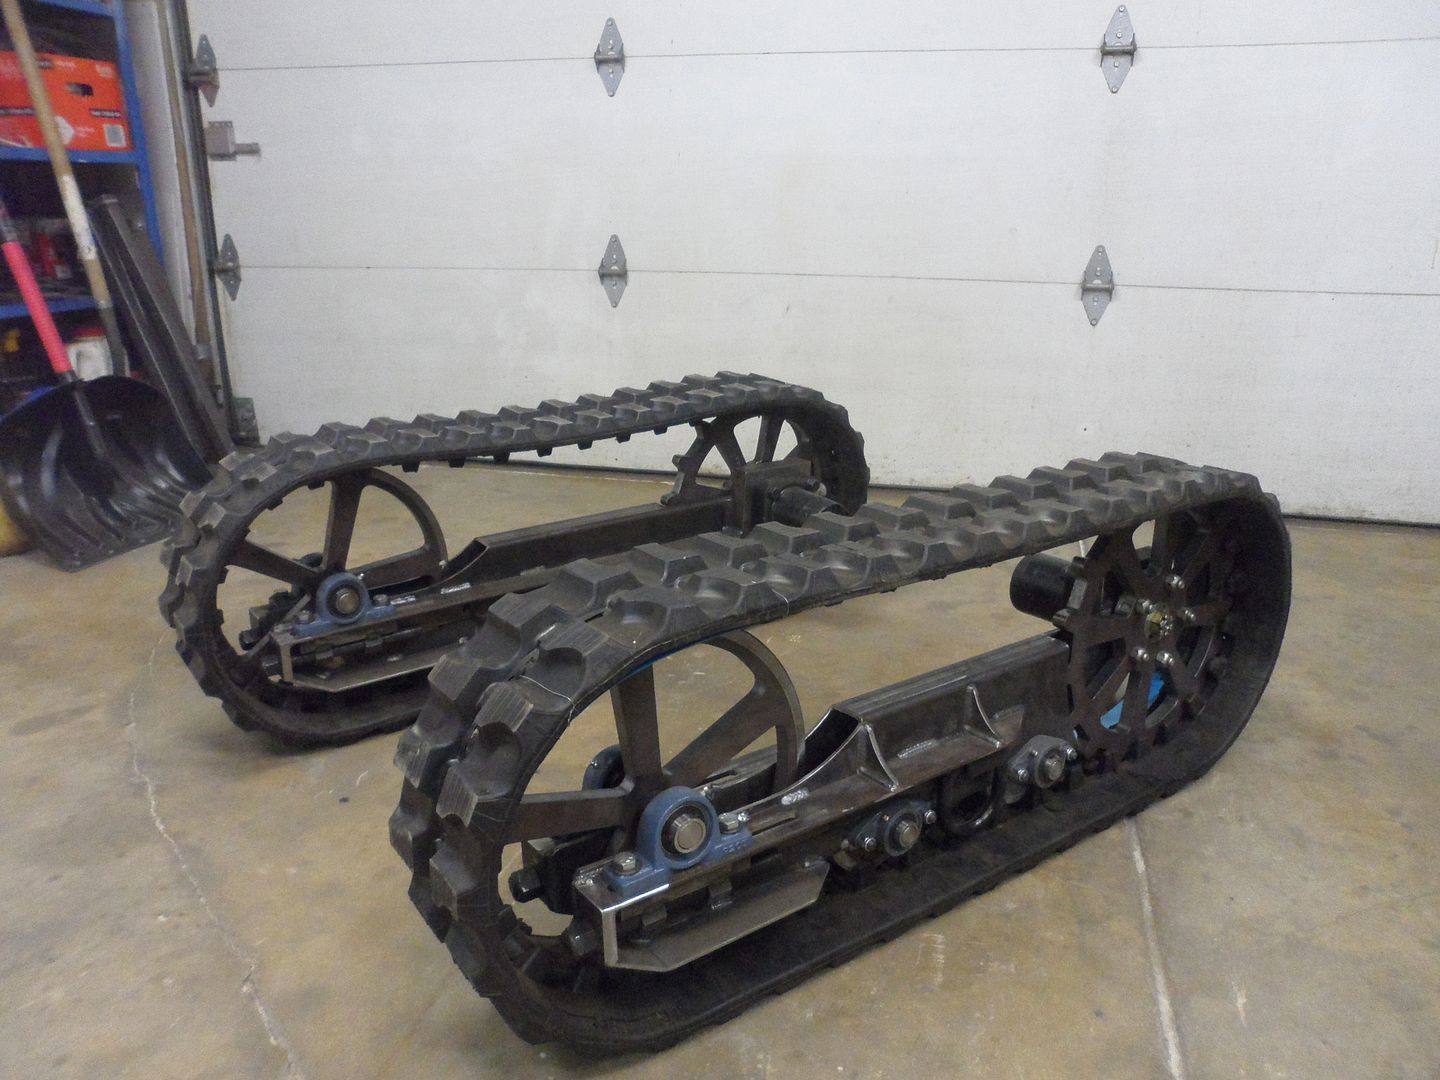
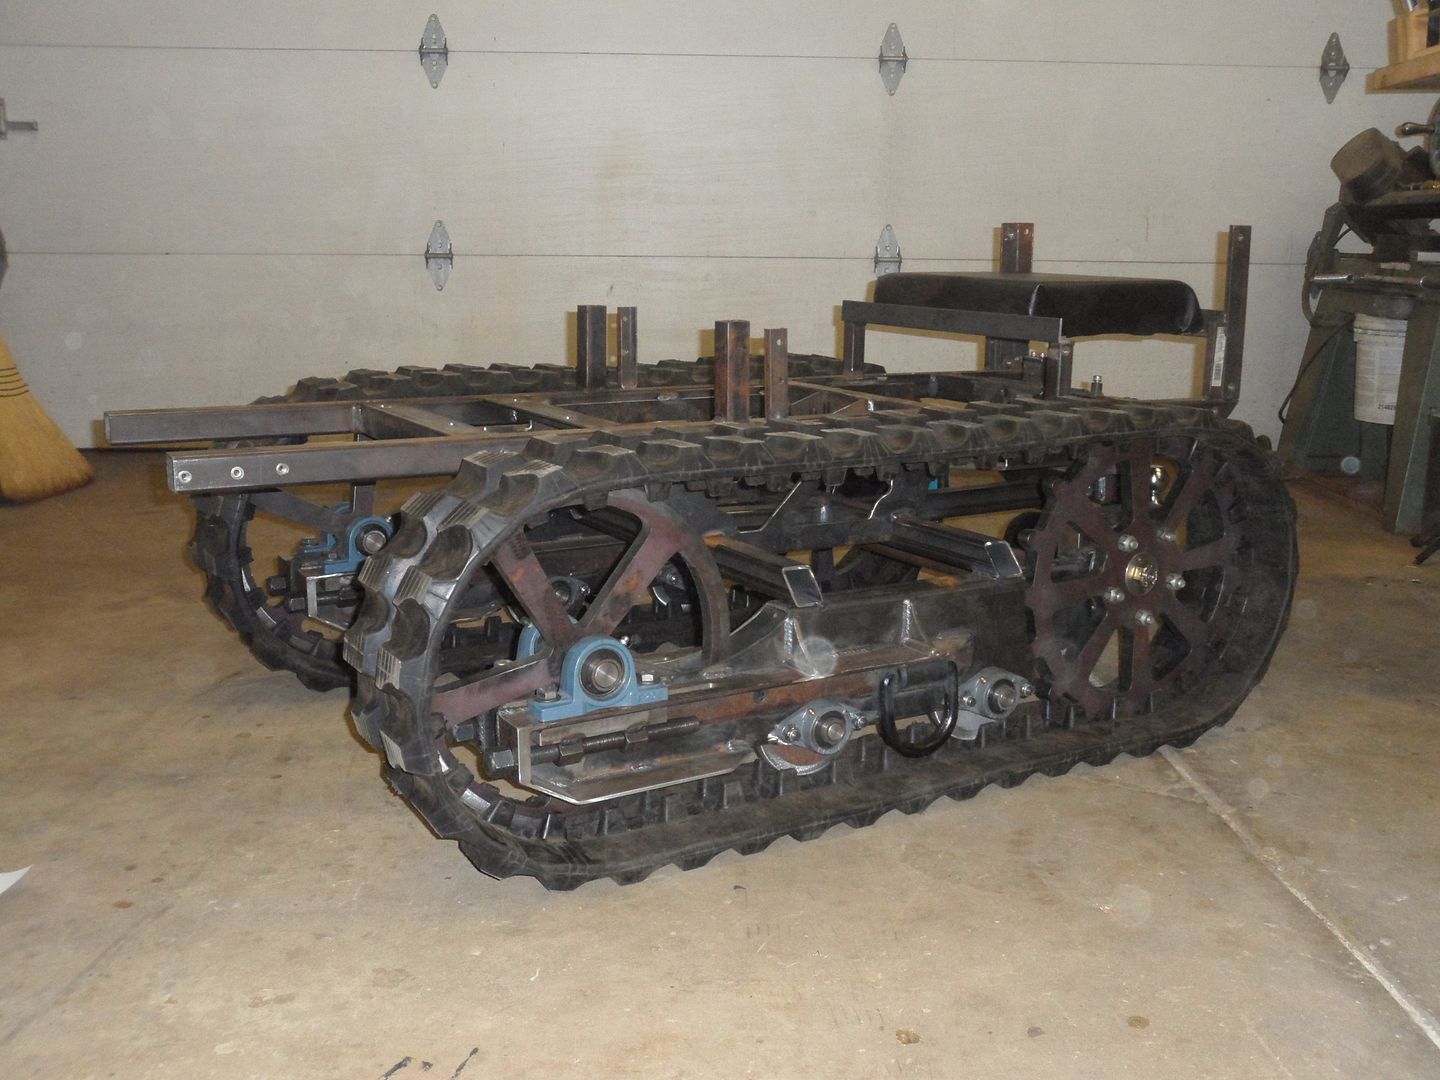
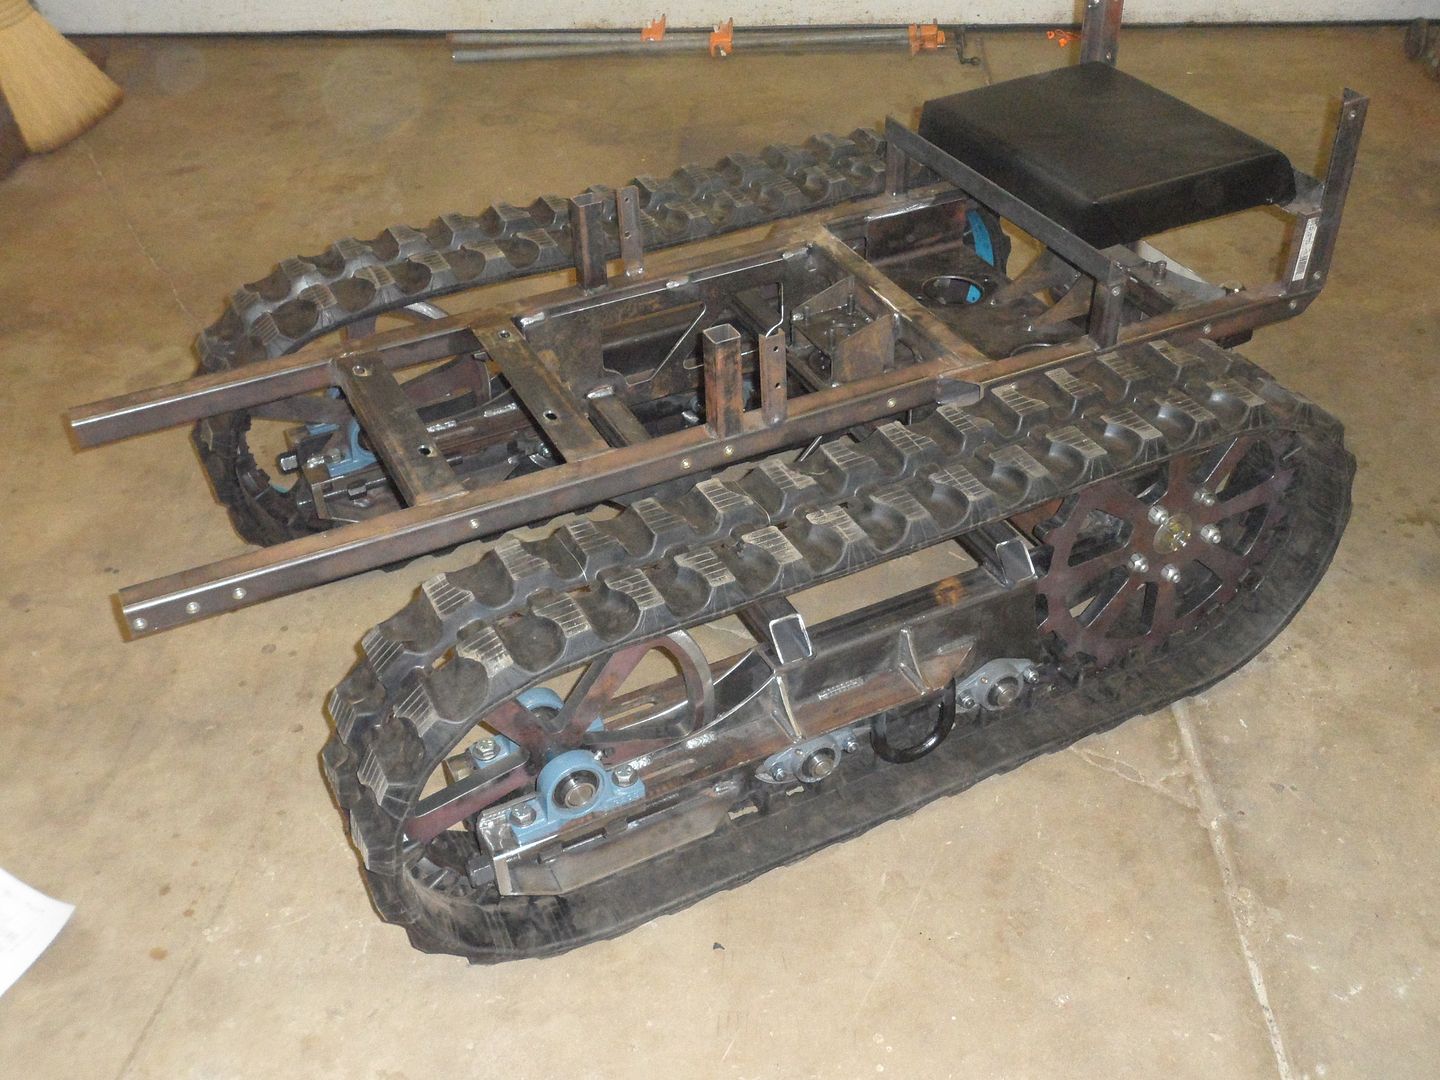
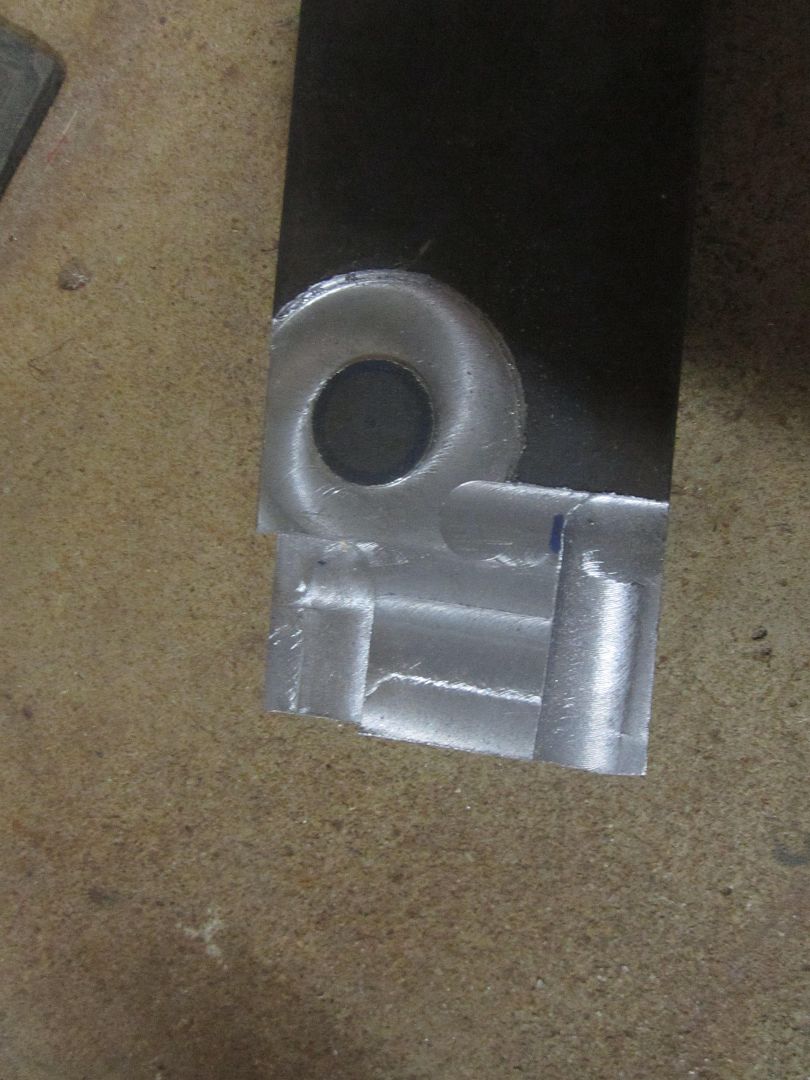
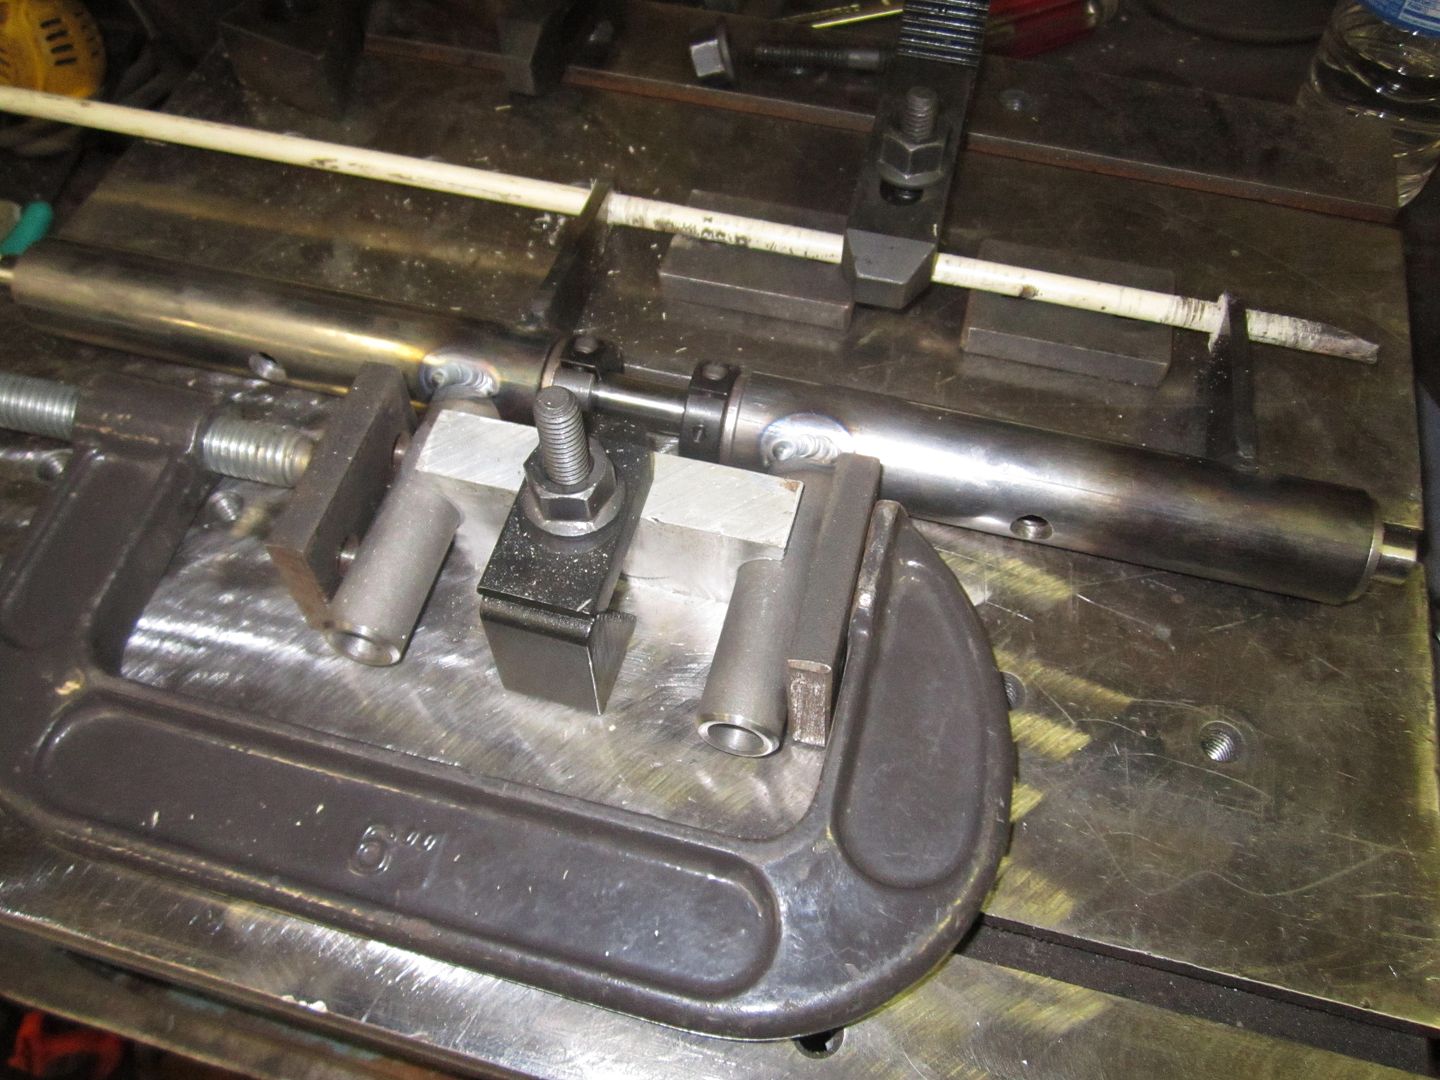
So the next several posts will be a little repetitive because I'm just building the other side of the track frame. But starting off, it was a lot easier to weld the motor mount block to the tube.

I wasn't criticizing, I thought it was interesting. You certainly don't mind putting in the time to get it the way you want it.

I've seen people do amazing stuff with hand tools, a file and a grinder.
 
To avoid these ads, REGISTER NOW!

neonnblack

Well-known member
Joined
Jun 7, 2010
Messages
4,913
Location
Reno, NV
Were gonna have to start up a donation to keep you doing this at least 10 hours a day, so you can still pay bills.
 
OP
D

dozerbuilder01

Well-known member
Joined
Jun 20, 2011
Messages
180
Location
Far Northwest Burbs of Chicago
I don't think the dozer is for your son- who's probably 40! I think it's just for you!:D

Ha! He's only 20 months. So I have some time. He does know what it is now. Surprisingly. I've shown him the little diecast toy and he looks at the real one in the garage (even without sheet metal) and says "bull doz do"

But yes, I will ride it too.

Can't wait for the first video of it driving.

I'm guessing summer. Once I get the other track frame done, the rest of the undercarriage should go together pretty quickly since all the plates and tubes are already cut out.

But I still have to do linkage, temporarily hook up hoses and finished the drive belts for the pumps before I can ride it.

I wasn't criticizing, I thought it was interesting. You certainly don't mind putting in the time to get it the way you want it.

I've seen people do amazing stuff with hand tools, a file and a grinder.

No worries. I wasn't taking it as that. I agree that people can do some amazing stuff free handed. I can't. I can't even drill a row of bolts straight with a straight edge and a center punch. That's also probably due to dull bits but either way, I just can't do it. My dad tried teaching me bodywork in highschool. He'd say "you feel that slight ripple?". I'd say hell no. I can't see it or feel it. But he'd put some paint on it and show me and sure enough it was there.

I also can't believe the work some people can do with english wheels and tools like that. To make a contoured fender out of a flat sheet is crazy.

So fixtures and jigs and patterns it is.

Were gonna have to start up a donation to keep you doing this at least 10 hours a day, so you can still pay bills.

I do wish I had more time. But it's OK. I work the normal 8 hours a day, go home and see my boy and then work in the garage a bit after he goes to bed. When I have a day all to myself, I can really knock some things off the list. But I would probably get burned out. I don't want to do that and not finish this. So I take breaks here and there.

So I just got good news. My new sprockets are done. I have to go pick them up. Hopefully they work and I didn't screw anything else up.
 
OP
D

dozerbuilder01

Well-known member
Joined
Jun 20, 2011
Messages
180
Location
Far Northwest Burbs of Chicago
Welded on the tensioner rails. I need to clean off my welding table.

SAM_1078_zps9ade9643.jpg


SAM_1080_zps14c5f09d.jpg
 

Omphaloskeptic

Well-known member
Joined
Oct 11, 2008
Messages
2,346
Location
Ultima Ratio, Wa.
Looks like you're making good use of your recent antique store acquisition! Nothing like getting a deal on a really useful piece of equipment.


"I need to clean off my welding table."

Naah, not when there is real work in progress. Wait till the job is done and then post a pic of the clean welding station, and please show us pics of the gear in the drawers that you use for your welding work. It gives us neophytes a chance to 'window shop' for stuff we might need to acquire for our future weld work.

P.S. - Any thought about throwing a sheet metal barrier in front of the wood paneling behind your welding station?
 
OP
D

dozerbuilder01

Well-known member
Joined
Jun 20, 2011
Messages
180
Location
Far Northwest Burbs of Chicago
P.S. - Any thought about throwing a sheet metal barrier in front of the wood paneling behind your welding station?

Yes. That is probably a good idea. I used to have it out in the middle, away from the wall but I rearranged to try and make some more space. I do have a few fire extinguishers on hand just in case.

So I'm not wasting anytime on the new sprockets.

Had to finish machine the bore. The sprocket will rest on that instead of relying on the bolts. This will keep it centered and transfer the weight directly to the spindle of the motor.

BD0426_zps8f776f94.jpg


Then drilled the 5 bolt pattern

BD0428_zpsaa23a22a.jpg


Now I have to mount the rotary table and machine a 1/8" recess to clear the hub flange. Need to do this because of stack up issues. Hard to explain. Remember, I got these hubs from the old transmission. So I had to work with what I got. And I also need to cut a chamfer to clear the weld between the hub and the hub flange.

Here is a close up of the cut.

BD0429_zps0bc5e0a3.jpg


That's from a plasma cutter.
 

Oggy

Well-known member
Joined
Jan 2, 2011
Messages
1,295
Location
Central New York
Looks great, Your fab skills are amazing. Keep the posts coming. I'm subscribing, the check's in the mail, but do me a favor and cash it on Feb 30th please?
 

A_Pmech

Well-known member
Joined
May 8, 2007
Messages
8,002
Location
IL
Those sprockets look great, I'm glad to see this project still chugging away.
 

CNGsaves

Well-known member
Joined
Sep 26, 2012
Messages
13,233
Location
KS and OK
Hello DozerBuilder01 . . . . think I've found the perfect attachment for the front of your Dozer when you have the blade off . . . or course assuming you have some heavy snowfall winters in Chi town:


It's different style dozer but he's modded up a loader on front that has hydraulic driven snowblower . . . . Too Cool . . . !!

Super dangerous of course (since it's a snowblower), but improvements could be made in that department as well. ;)
 

Attachments

  • Struck_Magnatrac_snowblower_dozer_front_loader.JPG
    Struck_Magnatrac_snowblower_dozer_front_loader.JPG
    33.5 KB · Views: 304
Last edited:
OP
D

dozerbuilder01

Well-known member
Joined
Jun 20, 2011
Messages
180
Location
Far Northwest Burbs of Chicago
Those sprockets look great, I'm glad to see this project still chugging away.

I found out he put in a new set of tips for me before he cut these. Getting sprockets that fit properly gave me new motivation.

Hello DozerBuilder01 . . . . think I've found the perfect attachment for the front of your Dozer when you have the blade off . . . or course assuming you have some heavy snowfall winters in Chi town:


It's different style dozer but he's modded up a loader on front that has hydraulic driven snowblower . . . . Too Cool . . . !!

Super dangerous of course (since it's a snowblower), but improvements could be made in that department as well. ;)

We've gotten a few decent snowfalls the past few weeks. That would be pretty cool. 2 years ago we got about 20" but that's rare.

Haven't taken many pictures. Just been going to town on different parts.

Had to machine the sprocket for the hub. It sets in by about an 1/8" (because of stack up issues). And had to cut a chamfer for the weld.

SAM_1097_zps641c5b97.jpg


Almost finished the second frame rail. Just a few small things to do.

SAM_1093_zpsd241905e.jpg


SAM_1095_zpsef4cca61.jpg


It should be sitting on tracks by early April.

That is all.
 
OP
D

dozerbuilder01

Well-known member
Joined
Jun 20, 2011
Messages
180
Location
Far Northwest Burbs of Chicago
Don't have many pictures. I haven't had much time so when I'm in the garage, I've been working instead of taking pictures.
BD0440_zps433ad581.jpg


All the cross tubes and plate gussets are cut. I have a friend coming over next weekend to help me tie everything together.
 

Daveo

Well-known member
Joined
Nov 24, 2012
Messages
146
GOOD GOD! What an awesome job!!! I wished I can find some motivation to tackle some projects.
 

Steevo

Well-known member
Joined
Aug 18, 2009
Messages
8,738
Location
43.49600, -112.04300
This is an incredible project.
You are a very skilled and talented individual and your son will have a blast with this.
I bet his son, and his son's son will, too!
 

Omphaloskeptic

Well-known member
Joined
Oct 11, 2008
Messages
2,346
Location
Ultima Ratio, Wa.
It's looking close to completion; can't wait!

Since your son is so young, what I'm wondering is if (and when) you are going to create his 'training wheels', so to speak; I'm thinking a pedal car version of the dozer.... kinda like a Tonka toy on steroids! lol
 
To avoid these ads, REGISTER NOW!

scab

Well-known member
Joined
Sep 20, 2012
Messages
462
Can you stop posting progress pictures? You're making us all feel like unskilled, lazy assholes.


Just kidding, of course. Your work is nothing short of amazing.
 
OP
D

dozerbuilder01

Well-known member
Joined
Jun 20, 2011
Messages
180
Location
Far Northwest Burbs of Chicago
April is not far away, looking good.

Only 6 days late. I was close. I'm kind of surprised about that.

It's looking close to completion; can't wait!

Since your son is so young, what I'm wondering is if (and when) you are going to create his 'training wheels', so to speak; I'm thinking a pedal car version of the dozer.... kinda like a Tonka toy on steroids! lol

Not sure. I've been focusing so much on this. I should come up with something a little smaller. I do remember seeing an old pedal car that was in the shape of a cat dozer. They are very rare from what I've seen.

Are you already close to the end of your track tension adjustment slots?

Yes but I have a little bit left. I have no idea how much the track is going to stretch. There aren't any good answers on the internet. And I couldn't give anymore length because otherwise, I couldn't get the track guide teeth past the front edge of the frame rail. I looked at it a lot in the model. I know there is always a better way to do something but this is what I went with. If I do eventually bottom out, I have a backup plan. It will be a nice little machining project.

Can you stop posting progress pictures? You're making us all feel like unskilled, lazy assholes.

I can't help it. I'm having too much fun.

Thanks everyone for looking. Glad you enjoy.

So I had a friend of mine come over last night to help out. I didn't take a lot of pictures because most of the time was spent squaring things up and getting everything held together. It was quite a challenge. I ended up within a 32nd and about 0.3 degrees across different areas. Good enough. I'm not building a spaceship.

BD0444_zps2f568edd.jpg


BD0445_zps97e6acb0.jpg


BD0446_zps25d5f114.jpg


BD0452_zpse9556847.jpg


BD0453_zps349ef869.jpg


That is all for now.
 

7th Kahuna

Well-known member
Joined
Aug 4, 2012
Messages
1,704
Location
Los Angeles, CA
Six days late. Come on now. What have you been doing?

This is just amazing. Your skills are amazing and getting better I'm sure. Keep the pictures coming.
 

pepi

Well-known member
Joined
Mar 27, 2013
Messages
2,883
Location
Woodstock, GA
Very nicely done glad I saw this, I love all thing with tracks..... Looks like you have the right tools going for ya, even if it stayed as raw metal it is supper cool, I am sure it will not but it could. Thanks for the pictures...
 

CNGsaves

Well-known member
Joined
Sep 26, 2012
Messages
13,233
Location
KS and OK
That right there is . . . . . bulldozer GJ **** . . . . . . NICE !!

Excellent work and keep the pics and inspiration coming!! :thumbup:
 
OP
D

dozerbuilder01

Well-known member
Joined
Jun 20, 2011
Messages
180
Location
Far Northwest Burbs of Chicago
Six days late. Come on now. What have you been doing?

This is just amazing. Your skills are amazing and getting better I'm sure. Keep the pictures coming.

Ha! Lets see....regular full time job, remodeling a townhouse with my dad at night and on the weekends, spending time with my wife and son, CNC router projects for the wife, taking an FEA class....I think that's it. If I only had one solid week off to do nothing but work on the dozer, I'd get so much done. But I don't really need to. I'm in no rush to get it done since my son is still young. Thanks for the compliment.

I couldn't help but get the sheet metal out of the shed and bolt it on.
IMG_0484copy_zps2de65193.jpg


Now I must attach the pumps, pulleys, belts, figure out the linkage, route hoses, mount oil tank and basically make sure everything fits before I finish the underframe. Then, hopefully a test drive by summer. And still have to finish up the sheet metal (minor details), figure out the footwell area (only sheet metal I haven't done) and figure out the plow.
 

pepi

Well-known member
Joined
Mar 27, 2013
Messages
2,883
Location
Woodstock, GA
Oh no doubt the next logical step, with all that work behind you this was a must and man that's a beauty just neat as hell. Certainly one of a kind and a true treasure.
 

82_454_shorty

Well-known member
Joined
May 13, 2008
Messages
852
Location
Eastern Ontario
I've been following this thread from the get go, and that thing looks amazing. Don't let anybody give you any flak about the build time, you've done amazing work here. Well done sir!
 
OP
D

dozerbuilder01

Well-known member
Joined
Jun 20, 2011
Messages
180
Location
Far Northwest Burbs of Chicago
One thing wrong. It should have a Diesel engine :lol_hitti 
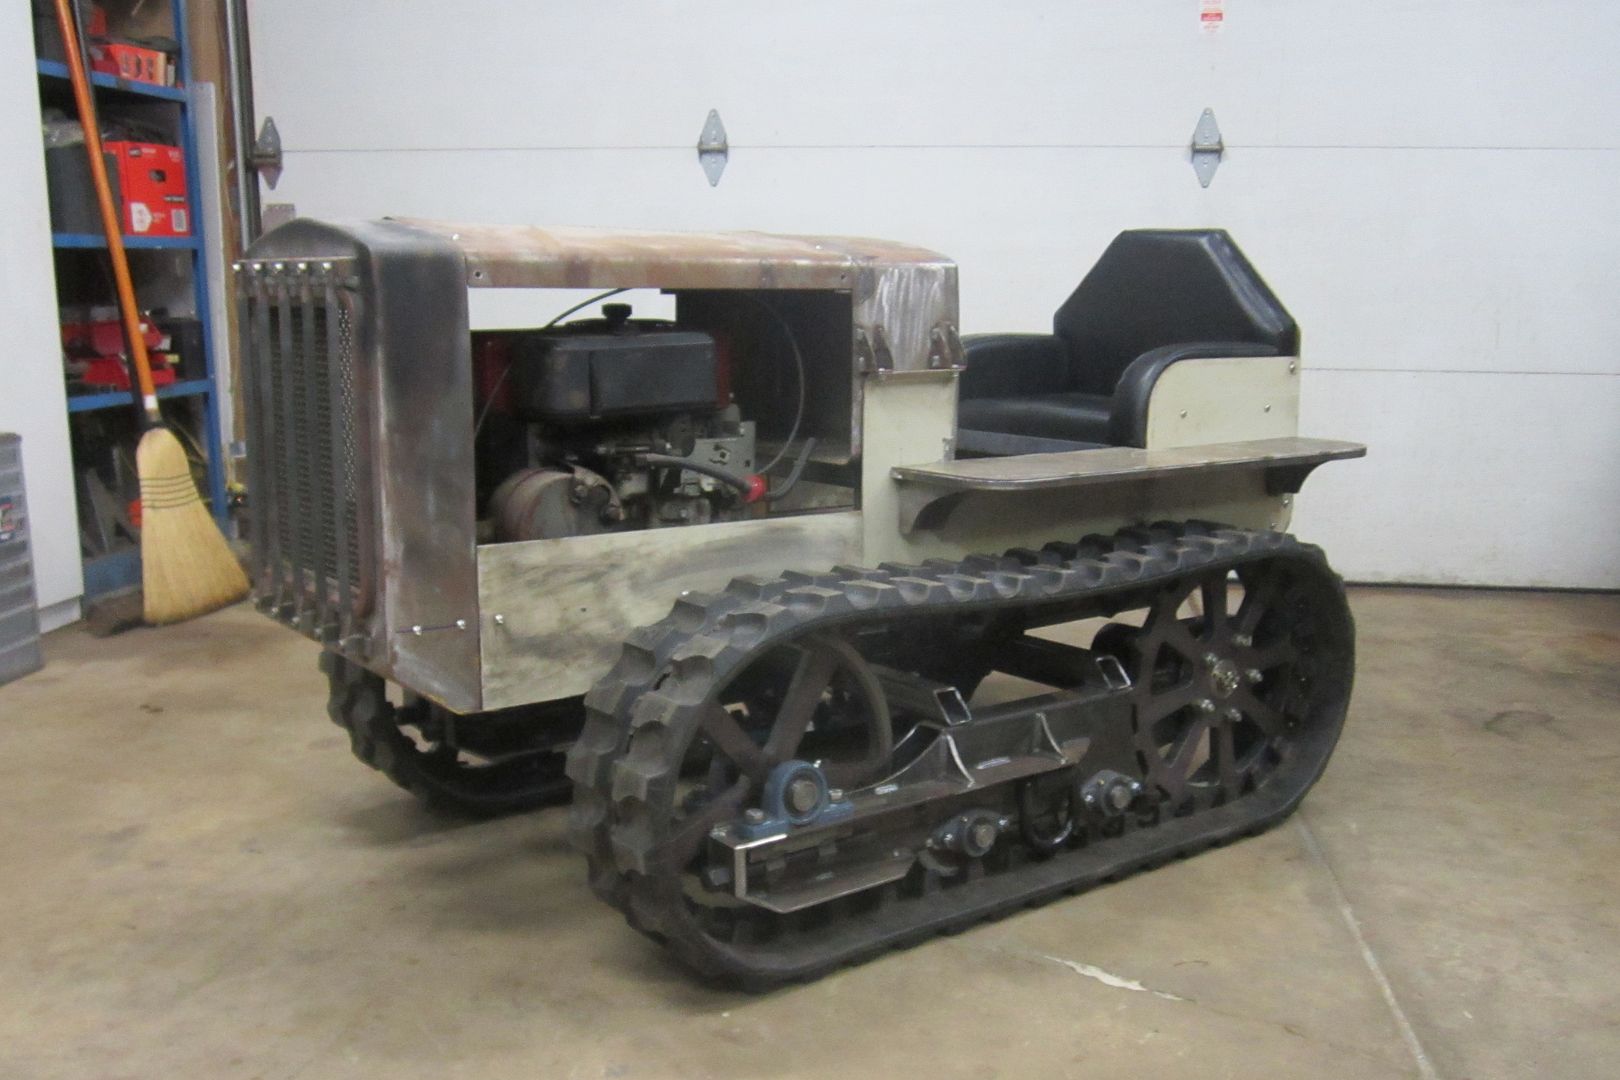
even a Yanmar would fit. Seriously looking good.
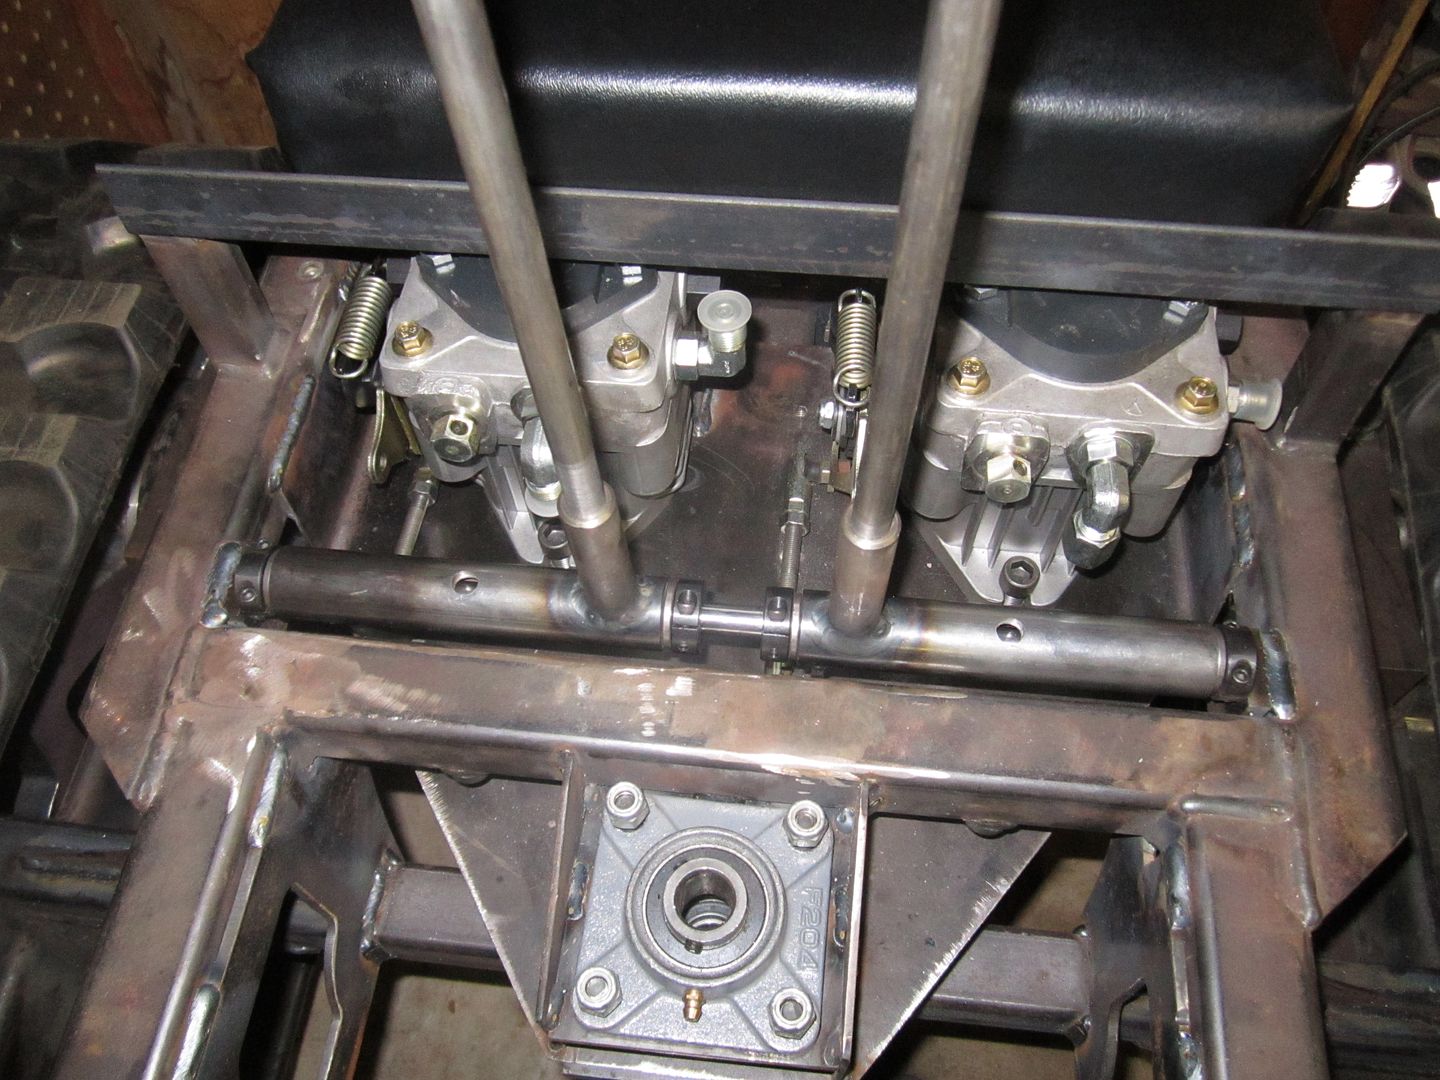
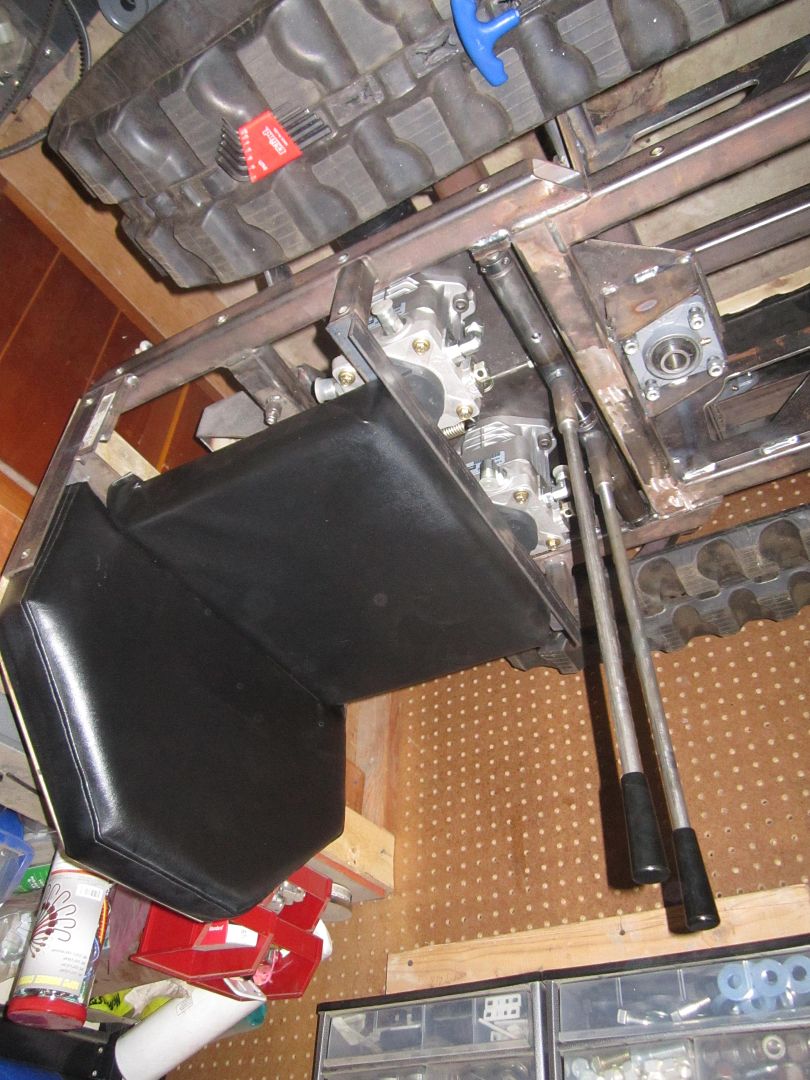
Have you considered building more to sell ?

I know. I'm cheap. Maybe next time. Having that sound would be cool though.

I thought about it. But it would cost way too much. I have made this one more complicated than it needs to be because I like the challenge. I could probably simplify a few things. But who knows.

That is just the coolest thing ever. Can I come over and play? :D

Sure, why not.

So I've been working hard to get this thing running. I'm very anxious. I don't have a ton of pictures because it isn't really exciting work.

So first random thing is, the return to center assembly for the pumps was a little strange on mine. I'll show step by step of how it goes together.

IMG_0494_zpsd63761d5.jpg


IMG_0495_zps97036888.jpg


This is the part that is strange. One direction is returned to center by this tiny little spring. It wasn't even enough to return the lever to center.

IMG_0496_zps5f6943d9.jpg


Then the other direction has a large spring tied to a stationary arm.

IMG_0497_zpsa1a46419.jpg


Normally, on other assemblies I've seen, these two levers oppose each other and are connected by the same spring. I want that. So several months ago, I tried to order the correct arm but after waiting on backorder for a long time, I was told it was discontinued. So, I made my own.

I had my friend cut out some blanks that I drew in cad.

BD0430_zps7db49f81.jpg


Then finished the bore.

BD0432_zps0f7613c4.jpg


I made a very crude stamp to bend them. I didn't feel like spending a lot of time on it so it looks like **** but it works. I didn't take any pictures of it working though.

IMG_0500_zpsd6b843c2.jpg


I also flipped the assembly to work with my linkage design.

IMG_0501_zps96c7e498.jpg


Now, the way I wanted it.

IMG_0502_zpsab53beaa.jpg


I didn't take many pictures of the linkage build but I'm pretty happy with the way it turned out.

IMG_0507_zps4e438830.jpg


IMG_0508_zps7650b6e6.jpg


IMG_0509_zps07910ff8.jpg


I still need to mount the return dampers but I'm waiting for the hydraulic control valve for the blade to show up so I can design a crossmember. Should be here tomorrow.

In this time since the last update, I also made sure everything fit, designed the belt tensioner for the engine to jackshaft belt and ordered some more fittings.

Need to shorten the pump to motor hoses and route the charge pump hoses once I get the crossmember figured out. Should hopefully be running in about a month. Then it might be time for a break.
 

Omphaloskeptic

Well-known member
Joined
Oct 11, 2008
Messages
2,346
Location
Ultima Ratio, Wa.
Just needs a 'machined' cup holder and she'll be ready to send out for the 'Cat Yellow' powder coat job! lol

Really an amazing project to see come together; KUDOS to you.
 

machine_punk

Well-known member
Joined
May 14, 2011
Messages
2,540
Location
Napa Valley, California
WOW...every update has been cool so far, but being able to see 'what it will look like' is that much cooler. You've been an inspiration in my garage to stop being so concerned about buying what I need and just start making what I need. I can't always do that, but I've stopped waiting for the 'perfect' tool to do a job, and just started moving forward with what I've got.

Cool project. Getting very close. Cannot wait to see it completed.

Kev
 

rockchucker

Well-known member
Joined
Mar 27, 2010
Messages
1,764
Location
Seattle WA
Wellllllll...I think you should change the Thread Title to... "I just decided to build a Bulldozer from scratch for my Son"

This thread is full of so much win I have no words for it.

Kudos to you Good Sir and your Son is VERY lucky to have a Pops like you. WoW!
 

Jbullfrog

ALLIANCE MEMBER
Joined
Jan 9, 2007
Messages
2,347
Location
Avoca, Iowa
You could add a small turbo to the exhaust for sound. I've seen it done on scaled projects. They used the exhaust ports and just looped the intake side to itself.
 

larry_g

Well-known member
Joined
Apr 28, 2007
Messages
16,858
Location
oregon
The OP said early in the project that he was modeling the Cat 22 which was either a gas or distillate engine, Engine, so the suggestion of diesel and turbo sounds is a bit far reaching. That said, I have a Kawasaki mule with the diesel engine in it that would probably fit right in there.

lg
no neat sig line
 
To avoid these ads, REGISTER NOW!
Top Bottom