To avoid these ads, REGISTER NOW!

Plasma cutter cut quality questions- Thermal Dynamics Cutmaster 42

sharkytm

ALLIANCE MEMBER
Joined
May 17, 2008
Messages
596
Location
Pocasset, MA
I was one of the lucky folks who got in on the Zoro Tools Cutmaster 42 deal on Cyber Monday. My first unit was DOA (not too happy about that, but Zoro did right by me and covered shipping both ways for free, plus shipped the replacement as soon as I had shipped the defective unit back, rather than waiting for it to arrive). A+ to Zoro... but anyhow.

In any case, I finally got the chance to start using it last night. I picked up a piece of used 3/8" steel plate from the local scrap yard. I'm working on building receiver mounts for all my vises (6 functional) and grinders (2). The steel is weathered, and has a good amount of surface rust. I needed to rip the 30"x30" piece of plate into an 8" width piece for the mounts for my gear.

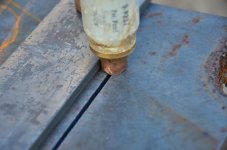
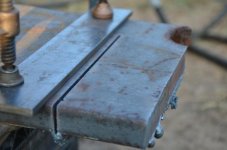
I used a flapdisc to remove the rust and any loose material where I was cutting, but I didn't grind off the mill scale, or really grind the rust out of the pockmarks. I measured out 8", and marked it on the plate, then affixed a piece of 1/2" plywood so that the arc would be in the center of the mark and the tip would be 1/8" above the plate, and made my cut. I was running ~32 amps, the 40Amp drag tip, and a relatively slow travel speed (probably took me 60 seconds to cut across the 30 inch piece). Air pressure was 90 psi from an attached regulator and 5 micron filter into the machine, which has its own internal regulator and filter as well.

I ended up with a lot of bottom dross, some of it came off easily with a scraper, but the rest had to be ground off. The kerf was kind of uneven (thanks to me not being smooth with my speed), and needed grinding to true it up.

I sectioned up the 8" wide piece into 5 pieces for my gear, and I tried varying my travel speed, dropping the amps to 27, and whatnot. I couldn't find the sweet spot easily, and I couldn't tell until I was done how it had turned out. There were spots where there was very little dross, and the cut was pretty flush on the edges, but it was inconsistent.

So, any tips to decrease the dross, and anything I should have done differently? I can't find a cut speed chart for the CM42, so if anyone has something for me to look at, I'd appreciate it. I know that slow speed dross is caused by a number of things (travel speed too slow, too high an amperage setting, dirty metal, etc)...

In any case, it was way way easier than O/A, and caused less noise and dust than using an abrasive saw. I could have probably used a jigsaw, but 3/8" is awful thick, and it would have taken forever. Plasma seems like a great technology, I just need to learn how to make it a little cleaner. I ordered a roller guide from eBay last night, hoping that would help me keep my angles better, and keep my speed more smooth. I'm a little confused regarding the drag/standoff tips for this machine. Drag tips that I've seen in the past have little teeth that maintain a distance off the piece, but the drag and standoff stips for the SL40 torch look identical.

If I get a chance to cut some more tonight, I'll take pictures (everything I cut yesterday has been ground down, and had the rust removed from the surface).
 
Last edited:
To avoid these ads, REGISTER NOW!

HMCFab9

Well-known member
Joined
Jan 22, 2013
Messages
1,317
Location
Fox valley area, Wisconsin
Only thing I can think of is your tip is too far from the material.
I have a Thermal Dynamics 39 plasma cutter & I just vary my speed & technique to get the best cut.
 

FunkyfullWidth

Well-known member
Joined
Oct 3, 2011
Messages
1,238
Location
Three Rivers, ma
Being 3/8 steel it sounds like you weren't moving fast enough, or possibly too much heat? The right consumable make a world of difference, as do a solid ground connection. I find it hard to beleive that the machine doesn't have a cut chart on it? Have you called zoro tools.

And ya know, it's times like these where it pays to have spent a little extra from a local shop. The place I deal with will come to your shop and walk you through the machine, plus if there's ever any problems with it, will most likely come and help you trouble shoot for nothing.
 

lilscorpion

Well-known member
Joined
Mar 15, 2010
Messages
3,600
Location
Colorado
The dross, kerf, and cut quality are a function of these components: (1) speed (2) perpendicularity to the material (3) distance from the material (4) consumable age (5) material quality and thickness. --- Speed/cut rate is difficult by hand. Speed is a practice thing and the sweet spot for little dross is very tight. Even a few IPM can have an impact depending on the material. Most can't stay consistent enough to get repeatable cuts with no dross using a hand torch. Sometimes it's tough with a machine torch. --- Perpendicularity - gotta get that torch head straight up and down however it can be tipped back or forward, not side to side. --- distance from material / standoff - some torches have optional drag tips (as mine does) which removes the height from equation. Drag tips actually allow you to set the torch on the material and pull. Some torches, like I believe yours does, can use optional attachments that help with the standoff when using non-drag tips. --- Consumable age has a huge impact on cut quality. Damaged or heavily worn tips can cause excessive dross and decreased cut quality. Consumables can be damaged instantly if the are non-shielded and come in contact with the material during the cut. any consumable can be damaged by blowback in a re-start or pierce. Excessive pierces decreases the life of consumables. --- Material quality also has an impact. I have thousands of hours of CNC time cutting a variety of thicknesses of steel plate. I found that even new sheets from different suppliers have different cut settings. The cut quality depends on the content of the material so it's likely that rusted material wouldn't cut as well. --- Thickness vs machine capability is also key. I've found that every machine has a sweet spot for capability. My Hypotherm 1000 cuts 1/8 to 1/4-inch with the hand torch easily and repeatably leaves quality cuts. Most plasma owners purchased a machine that's undersized for their actual needs because the cut ratings aren't clear and/or the salesman doesn't have the use experience needed to really be of help. The important rating to note at the time of purchase is the max pierce capacity. That capacity is the thickest you CAN cut (as you and i define cutting) with a hand torch. The sweet spot for that machine will be a thickness less than the pierce thickness by a sheet size or two. Best bet is to require you demo the machine before you buy it and cut the materials you plan to cut. Plasma cutting is far more complex than I knew when I dove in. I was lucky at the time. The salesman I dealt with gave me some really good advise.
 

MoonRise

Well-known member
Joined
Nov 5, 2010
Messages
4,031
Location
NJ
Thermal Dymanics at

http://victortechnologies.com/thermaldynamics/

TD Cutmaster42 page

http://victortechnologies.com/thermaldynamics/products/detailProduct.html?prodID=1-4200

TD Cutmaster42 manual

http://thermadyne.com/IM_Uploads/Do...ter 42 Operating Manual_(0-5161)_July2012.pdf

Which (surprisingly to me) doesn't list any recommended 'parameters' (amperage and cut speed based on material thickness). Hmmm ...

TD Cutmaster product line brochure

http://thermadyne.com/IM_Uploads/Do... Systems Range Brochure_(63-2727)_Jul2012.pdf

does list some specs and such. But I don't see a specific cut-speed/amperage chart for the TD CM42, even in the main Literature/manuals section on the website. Grrr.

But the operator's manual does list "Dross" on Page 30 (Page 4-8).

When dross is present on carbon steel, it is commonly
referred to as either “high speed, slow speed,
or top dross”. Dross present on top of the plate is
normally caused by too great a torch to plate distance.
"Top dross" is normally very easy to remove and can
often be wiped off with a welding glove. "Slow speed
dross" is normally present on the bottom edge of the
plate. It can vary from a light to heavy bead, but does
not adhere tightly to the cut edge, and can be easily
scraped off. "High speed dross" usually forms a narrow
bead along the bottom of the cut edge and is very
difficult to remove. When cutting a troublesome steel,
it is sometimes useful to reduce the cutting speed to
produce "slow speed dross". Any resultant cleanup
can be accomplished by scraping, not grinding.

I think you were moving too fast on that 3/8 inch plate. Slow down your travel speed to about 10 inch/minute and try that (you are pushing the machine close to its thickness limits, although TD does claim a max cut of 5/8 inch with the CM42, but that usually means a "sever" cut).

Oh, and set the output amperage to max (40 amps in this case). At the 'usual' 10 ipm cut speed when using a plasma cutter near its 'max' thickness capability, your 30 inch long cut through that 3/8 inch thick plate should take you ~ 3 minutes.

Also, make sure you ground a spot clean for the work clamp (aka 'ground' clamp) to connect to the workpiece. A poor connection there can really interfere with the ability of the power to get from the machine to the workpiece.

Need help? Try calling TD's Tech help line at 800-PLASMA2 (800-752-7622) (US).
 
OP
S

sharkytm

ALLIANCE MEMBER
Joined
May 17, 2008
Messages
596
Location
Pocasset, MA
Wow, three weeks and suddenly a flurry of replies. Thanks for the insights, as had been mentioned, there's on cut chart anywhere for this machine. I cut some 3/16 plate today using a roller guide. What a difference. Nice even cuts, little dross, and good quality. I am sure my tip to work distance was the problem, combined with the rusty metal. I did have a clean ground, I've learned that lesson.

I then made some hand cuts, and was having the same problems... I guess its time for the old mantra 'practice practice practice'.
 
OP
S

sharkytm

ALLIANCE MEMBER
Joined
May 17, 2008
Messages
596
Location
Pocasset, MA
Just an aside, I just cut out my house number from a piece of 1/2" steel plate with the Cutmaster. I cranked the power to 40A, and cut it free-hand.
I had huge amounts of dross on the bottom, but it all came off with a hammer. The cut quality varied tremendously, probably because I couldn't maintain the standoff distance.

Pics:


The mailbox:


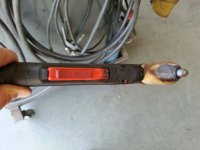
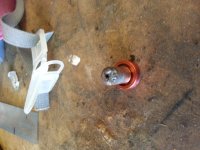
Now, here's the problem. I burned the **** out of a new tip making that cut. The air is 100% clean, as it runs through a coalescing filter and a disposable paintgun filter attached to the plasma cutter. This is using the --94 standoff tip.


Electrode:
 
Last edited:

sberry

Banned
Joined
Jun 18, 2005
Messages
35,747
Location
Brethren, Michigan
You can use the drag tips with lighter metal, I really don't. On thick material I stand off or use a guide that provides standoff.

I almost forgot,,, check your manual for air pressure, more is not better. Esab has an on line guide I believe.

I will agree with the sentiment in difference between pierce/severe and clean cut except think its greater than a gage or 2. I think most machines cut well at 1/2 of the sever rating.
 

Attachments

  • tube 2.jpg
    tube 2.jpg
    143.7 KB · Views: 118
Last edited:
OP
S

sharkytm

ALLIANCE MEMBER
Joined
May 17, 2008
Messages
596
Location
Pocasset, MA
I was using the standoff tip, and the air pressure is regulated internally by the Cutmaster. I regulate it down to 90psi before it gets there, and their regulator is set from the factory.

The air is 100% dry, between a coalescing filter and a desiccant filter. Plus, I was running off the tank, the compressor never kicked on (and hadn't in several days). And yes, I has drained the 80 gallon tank of water first too.

The 42 is rated to cut 3/8" all day, every day (according to the MFR), and sever 5/8". I know 1/2" is pushing it, but I didn't expect to blow through 10$ in consumables with a 5-minute cut.
 

justgurn

Active member
Joined
Jan 1, 2010
Messages
43
Location
Topeka, Kansas
Sharkytm, I have a CM52 and when I first got it a year ago I blew through the consumables and wasn't happy either. I went to the drag tip and found I can cut quite a bit before the nozzle starts to flare. I also will try to stand off just a bit too. Your electrode looks fine to me. I started running them till thay start messing with the start cartridge from moving. This weekend I cut some 1" and it turned out okay. I changed the nozzle half way because it started blowing out.
 

Attachments

  • 20130406_140843 (Small).jpg
    20130406_140843 (Small).jpg
    85.3 KB · Views: 203
  • 20130406_142237 (Small).jpg
    20130406_142237 (Small).jpg
    61.7 KB · Views: 165
  • 20130406_143415 (Small).jpg
    20130406_143415 (Small).jpg
    86.8 KB · Views: 167
To avoid these ads, REGISTER NOW!

killerjeep

Member
Joined
Feb 15, 2013
Messages
20
Water and dirt can be a big factor. You need to run top notch filters for that. I have a huge desiccant dryer and its amazing what a difference it made on cut quality. These little small ones from northern and harbor freight just dont cut it. You have to invest in a good quality., There was a thread hear a while ago where some one made one. I did the same thing. Huge difference.
 
OP
S

sharkytm

ALLIANCE MEMBER
Joined
May 17, 2008
Messages
596
Location
Pocasset, MA
Sharkytm, I have a CM52 and when I first got it a year ago I blew through the consumables and wasn't happy either. I went to the drag tip and found I can cut quite a bit before the nozzle starts to flare. I also will try to stand off just a bit too. Your electrode looks fine to me. I started running them till thay start messing with the start cartridge from moving. This weekend I cut some 1" and it turned out okay. I changed the nozzle half way because it started blowing out.

I was told that the drag tip on my 42 was only good for 1/4 or maybe 3/8, no way it'd do 1/2". Maybe I'll give it a shot.

Water and dirt can be a big factor. You need to run top notch filters for that. I have a huge desiccant dryer and its amazing what a difference it made on cut quality. These little small ones from northern and harbor freight just dont cut it. You have to invest in a good quality., There was a thread hear a while ago where some one made one. I did the same thing. Huge difference.
I've got a Norgren coalescing filter with a 5 micron element, and a desiccant cartridge after it. These arent' **** filters, and the desiccant is NEW. I can't imagine that the air isn't 100% dry and clean.
 

bcradio

Well-known member
Joined
Jan 30, 2012
Messages
6,017
Location
New Mexico
I was using the standoff tip, and the air pressure is regulated internally by the Cutmaster. I regulate it down to 90psi before it gets there, and their regulator is set from the factory.

The air is 100% dry, between a coalescing filter and a desiccant filter. Plus, I was running off the tank, the compressor never kicked on (and hadn't in several days). And yes, I has drained the 80 gallon tank of water first too.

The 42 is rated to cut 3/8" all day, every day (according to the MFR), and sever 5/8". I know 1/2" is pushing it, but I didn't expect to blow through 10$ in consumables with a 5-minute cut.

No it's not, it is rated to cut 1/4" all day.
 

Perrorojo

Well-known member
Joined
Jun 8, 2012
Messages
1,766
Location
Northern IN
I have the 42 and had the same issues with consumables until I learned stop dragging the regular tip and buy a drag cup. Make sure the ground is very clean. I usually take off the mill scale where I'm attaching the ground.
 

laser3kw

Well-known member
Joined
Nov 17, 2012
Messages
7,276
Location
northen IL
Water and dirt can be a big factor. You need to run top notch filters for that. I have a huge desiccant dryer and its amazing what a difference it made on cut quality
biggest surprise to most users. "shop air" is not good enough. good moisture &oil filters are an absolute must. don't go small, if nothing else, use a couple small units in parallel to get the cfm you need.
 

AndyA

Well-known member
Joined
May 23, 2011
Messages
514
Location
Texas Near Dallas
Some things I've learned:

Clean dry air is probably the first thing to fix to extend consumable life. Sound like you may already have this solved. I use an aftercooler, auto tank drain, a water separator, and a motor guard 'toilet roll' filter. I could probably do better, but it seems to be a fairly effective setup.

Avoid starting the arc without it being in contact with the workpiece. I used to have the bad habit of striking the arc in air (so I could see with my hood down), then moving to the workpiece to start cutting. This seems to really burn up the consumables. I bought a #5 shade full face shield. It looks like a tinted grinding shield. This works great. It gives enough protection, but it light enough you can see everything with it down. Previously I used a #10 shade welding helmet. The auto darken helmet works ok. It's #3 when not triggered, but only adjusts down to a #8. Sometimes #8 is too dark.

Run the minimum current possible to make the cut.

Use the shielded tips. These are electrically isolated. You can touch them against the workpiece without damaging the consumables. They work great for running against a guide. I've found this is the best way to get smooth lines by hand. You'll have to offset the guide to compensate for the kerf and thickness of the tip. I scribe a line, then unscrew the shielded tip piece, lay it on the workpiece, line it up so the scribed line is viewed thought the hole (lined up off to one side of the hole), then align the guide and clamp it down.

Watch the arc on the backside of the workpiece. If it blows out straight, you can travel faster. If it blows out at an angle (maybe 30 degrees) your travel speed is about right. If it blows out at a sharp angle or doesn't cut all the way through, your travel speed is too fast. Also look at the 'swirls' in the edge of the piece after you make the cut. Straight swirls = move faster. Slightly hooked swirls = good, Really hooked swirls = slow down.

Sometimes I still have the problems with dross. I have yet to fiddle with air pressure to find the optimum (my CM81 has an external regulator/filter on the back of the unit).

A 'pull' cut is usually smoother than a 'push' cut. This means you are always moving the torch so that your hand is moving away from the cutting tip. When you get snagged on a little burr or piece of slag on the workpiece, your hand is sort of pulling sideways and 'up'. This way the torch climbs over the obstruction and you get a smoother cut. When you're pushing the torch, your hand is pushing sideways and down. When you hit an obstruction, you just push the torch down into a tighter bind.

The pictures are 1" plate. I'm using a piece of 1/4" flat stock for the guide. I also use a 72" aluminum ruler as a cutting guide. I think I paid $10 or $15 for it. Cheap and very effective.
 

Attachments

  • plasmaGuide.jpg
    plasmaGuide.jpg
    39.4 KB · Views: 105
  • firstCut.jpg
    firstCut.jpg
    33.5 KB · Views: 108
  • secondPiece.jpg
    secondPiece.jpg
    50.3 KB · Views: 103
Last edited:

kazlx

Well-known member
Joined
Oct 30, 2012
Messages
2,851
Location
Tustin, CA
Just some other notes, are you piercing straight down? Ideally, with a hand torch, you should pierce at an angle. A little bit of molten blow back can ruin the nozzle. Once the nozzle and deflector are out of round, you will never get a good cut.

For the 42, there is no doubt you should be at full juice and have it set on kill. From there, it's adjusting your cut speed to get a good quality cut. The only other real variable is the cut height, which they should tell you in the manual. Plasmas cut very clean at the correct height and speed. Water in your air will greatly affect your quality of cut, especially bevel and dross.

Granted, CNC..but this is 3/8 HRS right off the table. 60A 41 ipm.

 
Last edited:

FriendOfYours

Well-known member
Joined
Feb 26, 2012
Messages
303
You gotta go SLOW and have the correct stand off height for the thicker stuff or you will ruin your nozzles. That electrode is fine
 

brucer

Well-known member
Joined
Dec 22, 2010
Messages
261
you should be around 70-75psi, dry air...

to me it looks like you were too close to the material....

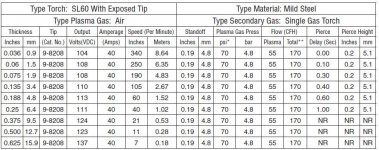
look at the cutmaster 52 manual, they have a chart in that manual for 40 amps, also I believe the A40 manual will also, the consumables for the cutmaster 42 are different but the 40amp parameters should get you pretty close as far as cut speeds.

Someone up the thread said you should be at max 40amps, and around 10ipm, I agree, but maybe a tad faster at 15ipm.

When your cutting I'm going to guess you should probably be roughly at an 1/8" standoff while cutting since your using less power then the cutmaster52.. My cm52 calls out for .190 standoff..

I attached the 40amp cut chart for mild steel from the cm52 manual..
 

Attachments

  • 40amp cut chart.JPG
    40amp cut chart.JPG
    108.5 KB · Views: 66
To avoid these ads, REGISTER NOW!
Top Bottom