To avoid these ads, REGISTER NOW!

fabricated tools that make your life better!

E.rodz

Well-known member
Joined
Nov 11, 2009
Messages
2,434
Location
st.paul MN.
searched up and could not find an exsisting thread I thought this would be a good place for people to post up tools,jigs,and clever designs that other people would like to make. please post up your projects weather they are wood,steel,aluminum or even unubtainium.

I just finished up this rear end jig that I made with a bunch of scrap material just laying around the shop.


PLEASE POST UP PROJECTS THAT MADE YOUR LIFE BETTER!
 
To avoid these ads, REGISTER NOW!

kazlx

Well-known member
Joined
Oct 30, 2012
Messages
2,851
Location
Tustin, CA
The 80/20 stuff is trick..I always feel like I should figure out stuff to build with it. Nice job.
 

kazlx

Well-known member
Joined
Oct 30, 2012
Messages
2,851
Location
Tustin, CA
Yup. Can be used for all sorts of stuff. The CNC plasma table I'm building uses it. I've seen it used for frame jigs, shelving, all kinds of stuff. Comes in different profiles with all sorts of brackets, attachments, etc.

http://www.8020.net/
 

Kevin54

MEMBER EMERITUS
Joined
Jan 12, 2005
Messages
29,341
Location
Urbana, Ohio
Ive never seen that stuff before. You call it 80/20?

80/20 is the company name. Here is their website www.8020.net

They've been around for a while. You've probably have saw their structures all the time and not even realize it. A lot of factories use the items in making enclosures for test equipment. Check the site out and order a catalog if you deal with making things like Eric shows. The catalog is about 2 1/2" thick.
 
OP
E

E.rodz

Well-known member
Joined
Nov 11, 2009
Messages
2,434
Location
st.paul MN.
The 80/20 stuff is trick..I always feel like I should figure out stuff to build with it. Nice job.
This stuff is kinda odd stuff not 80/20 it is bosh and all dimensions are metric 80/20 is another brand that we use all the time for my day job it is expensive but very nice ! Ebay is a great source of parts and pieces for 80/20 as well.

Ive never seen that stuff before. You call it 80/20?
This stuff is kinda odd stuff not 80/20 it is bosh and all dimensions are metric 80/20 is another brand that we use all the time for my day job it is expensive but very nice ! Ebay is a great source of parts and pieces for 80/20 as well.
Yup. Can be used for all sorts of stuff. The CNC plasma table I'm building uses it. I've seen it used for frame jigs, shelving, all kinds of stuff. Comes in different profiles with all sorts of brackets, attachments, etc.

http://www.8020.net/

Way nice E.rodz.:thumbup: Almost too nice for what it's for.
oh it is for much more this is not the only job this will be used for.

80/20 is the company name. Here is their website www.8020.net

They've been around for a while. You've probably have saw their structures all the time and not even realize it. A lot of factories use the items in making enclosures for test equipment. Check the site out and order a catalog if you deal with making things like Eric shows. The catalog is about 2 1/2" thick.
Thanks for the links I think this should help people on to something cool!:thumbup:
 

MarkG

Well-known member
Joined
May 23, 2012
Messages
1,219
Location
Elgin, IL
Cool. I'm curious about the rest of that project------what is the rearend for? I hope we'll get to see pics!
 
OP
E

E.rodz

Well-known member
Joined
Nov 11, 2009
Messages
2,434
Location
st.paul MN.
Cool ! That the best rear end I saw in a long time. I don't get out much.
LOL.you can check out the rest of the build on my garage build thread.

Cool. I'm curious about the rest of that project------what is the rearend for? I hope we'll get to see pics!

you can check out the rest of the car on my garage build thread or youtube channel. stay tuned in lots more to come!
 

aggierailroad

Well-known member
Joined
Jan 8, 2012
Messages
581
Location
Houston, TX
Here's a repeat of a post I did in my kegerator build thread. It's a coiled tubing straightener. Used 3/4" hard maple for the frame and 1/4"-20 carriage bolts to connect the patio door sliders used as rollers. Total cost was about $10. Compares nicely to the $200 ones from Jegs or elsewhere.

I don't have any taps and I'm suffering for it. Instead I needed the cross brace to be tapped and the sliding bar to be held captive but still allow the screw to rotate. The second problem with doing that is that I wanted to be able to take it all apart. I could have just welded a nut above the slider and problem solved. Instead I double nutted it and lost some clearance in the process. Moral of the store - drill and tap it next time..

The final product. I double nutted the top with a washer inbetween so my wrench could sit on it and not slip off to allow for quick adjustments. I think I may make a handle from maple once I can think of a simple way to attach it. If anyone has ideas, I'm all ears!


The first pass was pretty easy. I just chucked it up and then tightened the rollers another half turn. Then I pull the coil back until the end was at the last roller and began to push it through. Didn't take much effort at all.


After about 4 passes this is the result!


Next thing to do is cut the bolts down and give it some paint.

A couple of tips for anyone wanting to make one of these:

Get nylon rollers if you can find them. I got a few scratches on the tubing from these steal rollers. I'm not sure how because they are quite smooth.

After straightening the tubing in the "hard" direction, roll it to take out any curve from the natural helix shape that the coil is in.

I plan on making a 180 degree bender tonight - I'll post up if it works!
 

DoghouseForge

Well-known member
Joined
May 11, 2013
Messages
374
Location
Lakeland, Fl
This is a post copied from the blacksmith shops tool listing. Definatly a useful handmade shop saver!

The Pedal Vice

This is one of the most usefull tools you can have in a shop. Especially if your working with objects that are to hot to hold, you need both hands to weld, or you want to have 360deg mobility when filing or working an object.

Here are some pictures of the Pedal vice, and I will try to be a simple as possible in the description. Its not a a hard project if you can weld and have access to some basic metal working tools/supplies. I apologize for the lower picture quality. My wife took the good camera on her trip and I had to use my phone...


Pedal Vice:


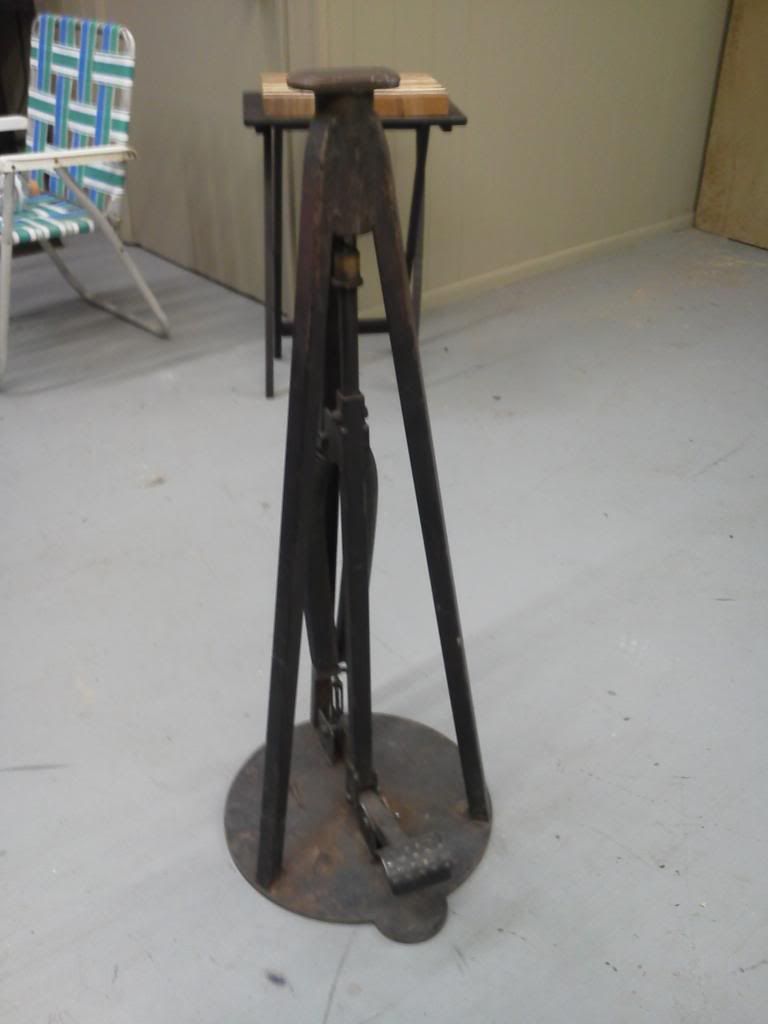
So lets start at the bottom and work our way up... The pedal is pretty straight forward. It bolts in as a lever hinge and attaches to the bottom of the shaft. By depressing the pedal you push the shaft upwards...


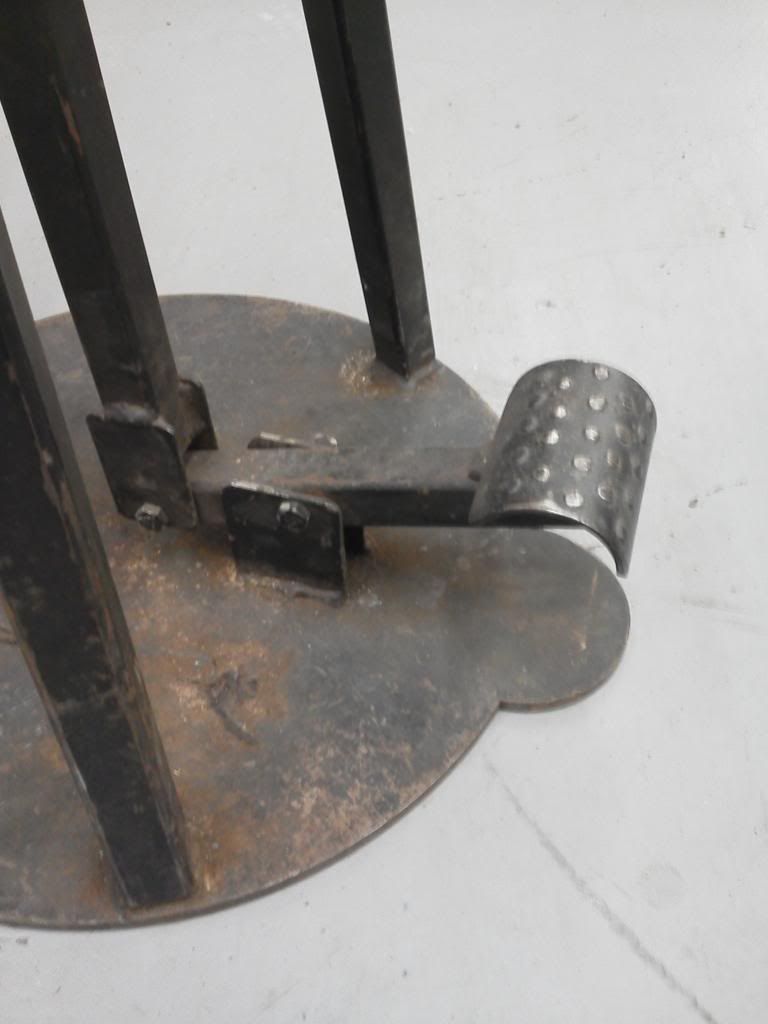
On the other side of the base plate an attachment point and turnbuckle hold the bottom of the spring mechanism... the turnbuckle allows you to adjust the tension of the springs to your preferd strength.


About half way up the shaft another attachment point connects the top of the springs. These are garage door springs. This particular one is one spring bent in half to make it extra strong...With the attachment at this point when the pedal is free the shaft is pulled to its lower base ...closing the jaws at the top.


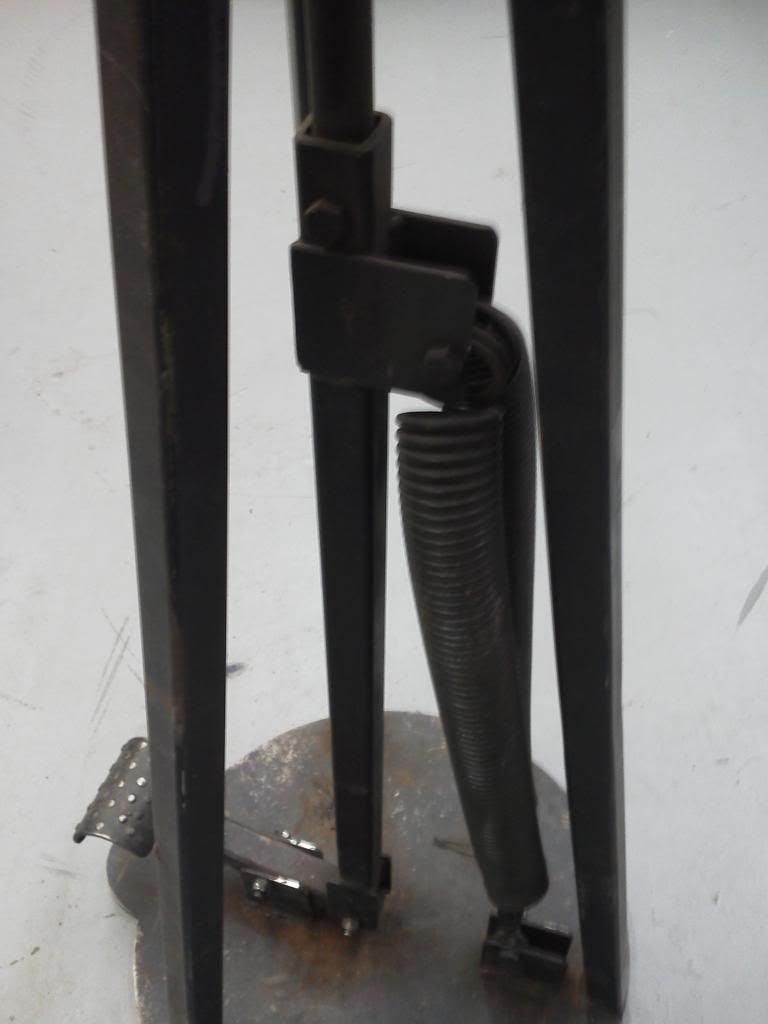
This is the catch assist mounted to the upper portion of the shaft. In this picture the pedal is free and the springs have pulled it to its lowest position...


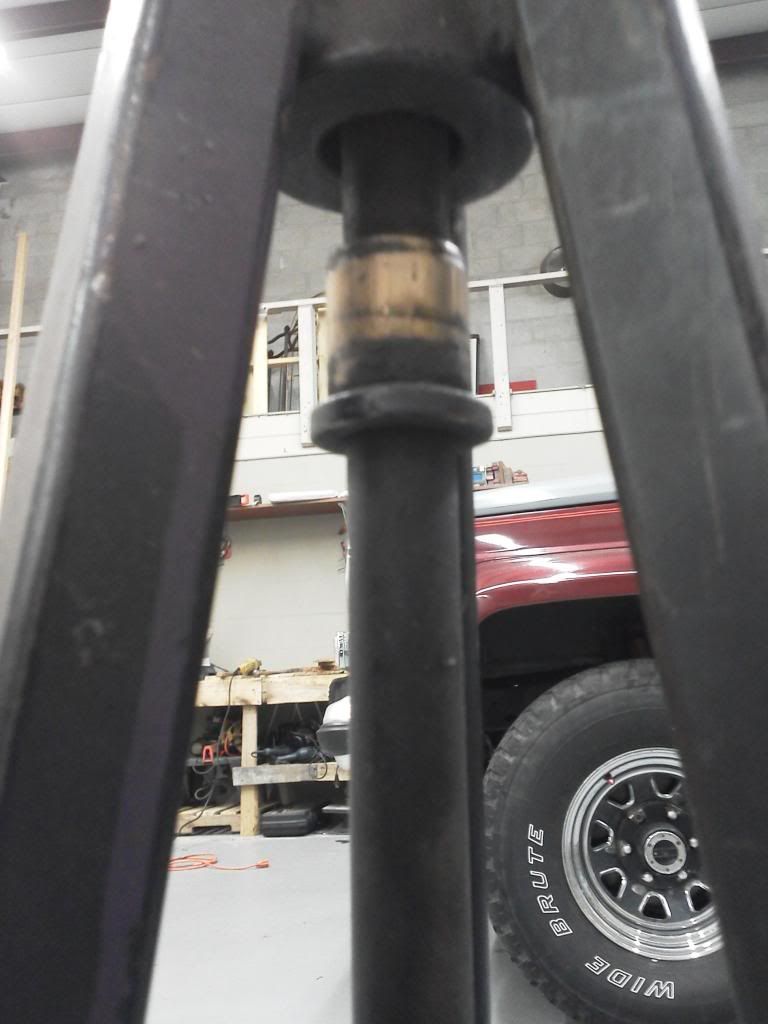
When the pedal is depressed the lever acts to push up the shaft and your foot overpowers the springs. The catch assit hits the opening of the upper shaft and stops the shaft from opening any further than your preset amount. Its not totaly necessary but its nice to not bottom out the pedal every time you depress it, and it also keeps some tension on the springs which in turn keep it from popping loose if slacked...


The pedal is depressed, the shaft is pushed up overpowering the springs, and the catch has limited the jaws to opening to this amount...


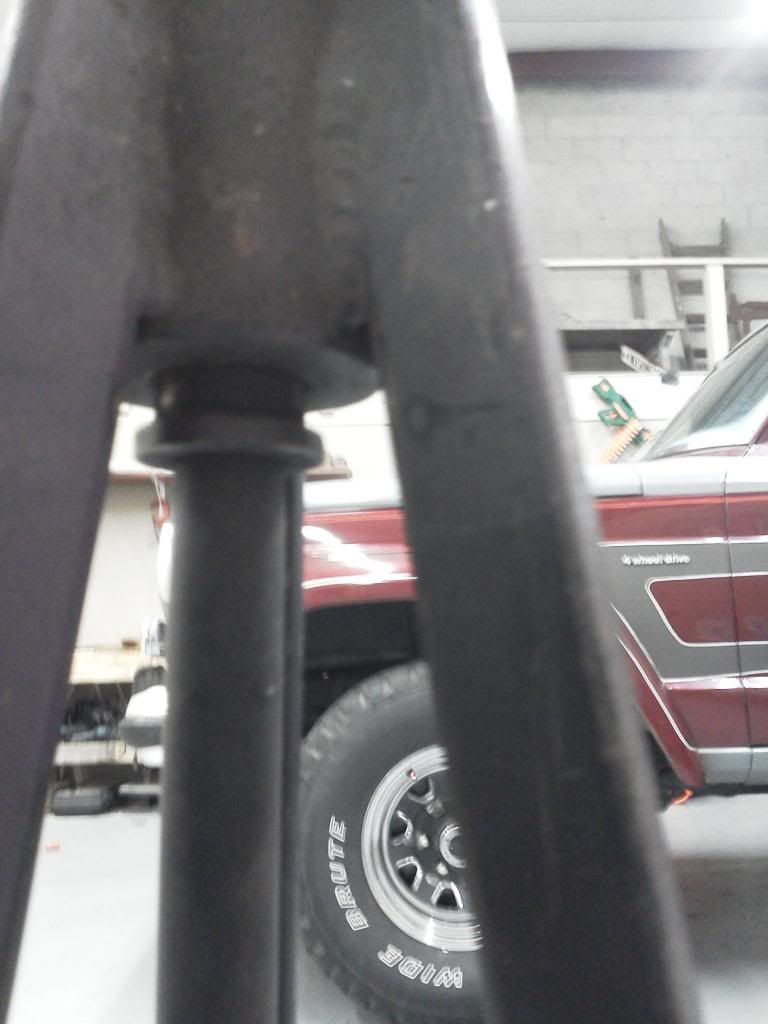
By letting loose the pedal the springs draw the shaft back down to the lower attachment point and the force of the springs tension keeps your object squeezed between the jaws...


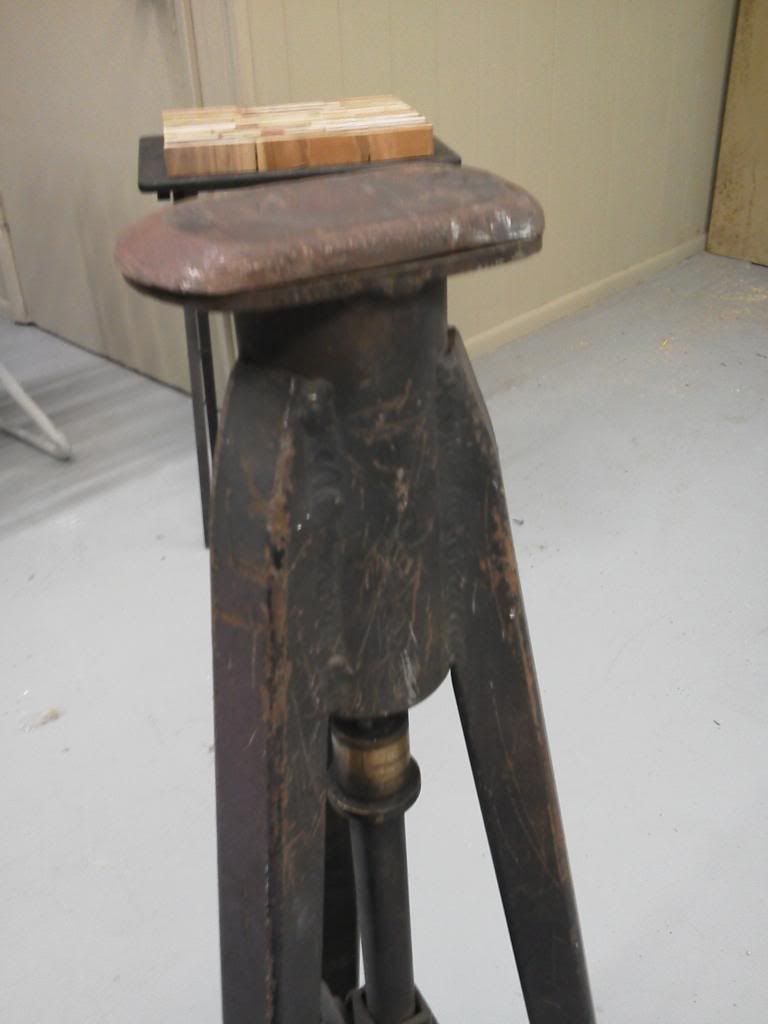
This vices jaws were made with the curved shape of a horseshoe in mind, but the size and shape of the jaws could be modified to meet whatever needs you would like.

So thats the pedal vice! Build one for yourself and free up those hands!


Thanks, if there are any questions please ask and I will try to answer them..

JP
 

zuk123

Well-known member
Joined
Mar 25, 2012
Messages
957
Location
Houston TX via Chicago, Phoenix, LA, and San Diego
I don't have any taps and I'm suffering for it.

If you have a grade 8 bolt in the same size they make great one off taps. Really any bolt will work in softer metal or wood.

On the grinder, round over the end a little (make it sort of cone shaped) grinding just thru the threads. The idea is it gets started in the hole easier.

With a file or dremel or grinding disk on an angle grinder, put a sharp channel in the bolt long ways. You want to cut thru the threads, going deeper at the end of the bolt. Keep the leading edge sharp, and even a little undercut if you can. This edge is what will actually cut the threads. Grind off the other edge of the groove to allow clearance into the groove.

When you drill the hole for the tap, go slightly bigger than a normal tap set and the threads will be easier to cut.

It takes longer to describe than to do, and can really save your bacon if you are on a jobsite/etc and don't have the tap you need.

Sorry no pics, but it really is a use it and forget it tool....

zuk
 

ilovevocs

Well-known member
Joined
Jun 26, 2009
Messages
1,966
Location
Toledo, Ohio
If you have a grade 8 bolt in the same size they make great one off taps. Really any bolt will work in softer metal or wood.

On the grinder, round over the end a little (make it sort of cone shaped) grinding just thru the threads. The idea is it gets started in the hole easier.

With a file or dremel or grinding disk on an angle grinder, put a sharp channel in the bolt long ways. You want to cut thru the threads, going deeper at the end of the bolt. Keep the leading edge sharp, and even a little undercut if you can. This edge is what will actually cut the threads. Grind off the other edge of the groove to allow clearance into the groove.

When you drill the hole for the tap, go slightly bigger than a normal tap set and the threads will be easier to cut.

It takes longer to describe than to do, and can really save your bacon if you are on a jobsite/etc and don't have the tap you need.

Sorry no pics, but it really is a use it and forget it tool....

zuk

I use this technique quite frequently when reassembling painted parts that need threads chased. I cut just a small grove in the bolt. If it is not a critical connection ill often leave that bolt in place. It is a nice technique to have in your bag of tricks.
 

NAPPY

Well-known member
Joined
Jun 30, 2011
Messages
54
Location
san tan valley,az
i work on rv's for a living. not much out there for rv specific tools. we are always making or modifying tools to fit our needs. i started labeling mine. i have a few things i made and i have no idea what they are or what i used them for. it made since to keep them at the time. i just stare at them from time to time.
 

rick01

New member
Joined
Jun 9, 2013
Messages
1
That is a top idea I will have a go at making one myself thanks for sharing.
Cheers Rick
 
OP
E

E.rodz

Well-known member
Joined
Nov 11, 2009
Messages
2,434
Location
st.paul MN.
Here is some work in progress. it sofar is a English wheel,nibbler table and holding device for 10 gauge steel,dimple punch and anvil holding device. still not done with this one yet. Still working on the bead roller for it yet. Hoping to get this thing painted this fall and be done with it.


To avoid these ads, REGISTER NOW!

NAPPY

Well-known member
Joined
Jun 30, 2011
Messages
54
Location
san tan valley,az
i just made this today. i needed a wide mouth wrench with a short handle. bought a three pack of wrenches at Walmart for $8.88. i wasn't going to cut up a nice Crescent wrench.
 

Attachments

  • wrench.jpg
    wrench.jpg
    68.7 KB · Views: 511
OP
E

E.rodz

Well-known member
Joined
Nov 11, 2009
Messages
2,434
Location
st.paul MN.
Here is a miter saw table that I made a few years ago.I use it for more aluminum than wood.made a vacuum table for it as well it is hooked into a central vacuum outside.


R.Anderson

Well-known member
Joined
May 26, 2012
Messages
906
Location
Wisconsin
E.rodz you have two saws for angles or you have two different blades?

And whats up with the vault door?

Just have to say this :lol: The door for the bathroom with a gold toilet.
 

bobadame

Well-known member
Joined
Dec 26, 2007
Messages
1,124
A crane. The third picture shows a Harbor Freight pick up bed crane which is mounted to the forks of a Big Joe electric lift which is in the bed of my old Ford camper special. I don't think that any of these pieces were originally intended to be used this way but it worked great. The home made tool in the last picture is the adapter between the HF crane and the fork lift.
 

Attachments

  • PA190064_01.jpg
    PA190064_01.jpg
    142.1 KB · Views: 1,601
  • PA170061_01.jpg
    PA170061_01.jpg
    142.3 KB · Views: 1,440
  • SETTING STEEL BEAMS.jpg
    SETTING STEEL BEAMS.jpg
    87.6 KB · Views: 1,484
Last edited:

sberry

Banned
Joined
Jun 18, 2005
Messages
35,747
Location
Brethren, Michigan
I do a lot of that, not so sophisticated or finished but very general, fast and retrofitting to existing equipment. I love the pallet jack. That old steel frame on the pallet stacked on my engine stand has held its fair share of projects clamped or bolted, maybe even welded to it. I(ts got a hole in the plate to drain fluid into a container below. In fact about all I do is try to figure out if I can make my life easier by improving the utilities.
 

Attachments

  • Snow skid.jpg
    Snow skid.jpg
    139.1 KB · Views: 903
  • eng stor stand.JPG
    eng stor stand.JPG
    68.8 KB · Views: 962
  • whl beg stand.jpg
    whl beg stand.jpg
    141.1 KB · Views: 926
Last edited:

Vertigo Cycles

Well-known member
Joined
Jan 14, 2010
Messages
193
Location
Portland, OR
I made this tube mitering fixture to make it easy for me to setup and miter titanium tubes for the bike frames I build.

The centerlines of the tube blocks, rotary table and horizontal spindle all intersect at a point, allowing me to use the "phase carriage" to set the center to center length of the tube to make a perfect cut length regardless of the angle of the miter.

The "phase carriage" is set to length using a pinned block and a digital caliper. The pinned block can be set in 100mm increments from the ctr of the rotab and I figure the ctr to ctr length of the cut tube is accurate to within about 0.002" and thanks to the rotab it's accurate to 1 minute. It enables me to make the six cuts needed to miter a front end in less than half an hour knowing that the fitup will be perfect.


Untitled by VertigoCycles, on Flickr


the whole thing by VertigoCycles, on Flickr
 
Last edited:

bobadame

Well-known member
Joined
Dec 26, 2007
Messages
1,124
That is a very nice set up you have there Vertigo, What kind of hole saw is that?
 

Vertigo Cycles

Well-known member
Joined
Jan 14, 2010
Messages
193
Location
Portland, OR
That is a very nice set up you have there Vertigo, What kind of hole saw is that?

Thanks. The hole saw is an Ultra. They're sold by Missouri tool under the name "rock hard". They have about twice the tooth count than the commonly available tools so they're great for thin wall tubing. When used on pipe or anything much thicker than 0.045" they don't clear chips very well and get worn out pretty quickly.
 
OP
E

E.rodz

Well-known member
Joined
Nov 11, 2009
Messages
2,434
Location
st.paul MN.
E.rodz you have two saws for angles or you have two different blades?

And whats up with the vault door?

Just have to say this :lol: The door for the bathroom with a gold toilet.
two different saws because I bought a 12" and was just going to sell my old 10" one and then just decided to keep both and use one for rough cutting and the other for finer cuts. and the vault doors well you just need to check out my garage build thread to get that answer .
A crane. The third picture shows a Harbor Freight pick up bed crane which is mounted to the forks of a Big Joe electric lift which is in the bed of my old Ford camper special. I don't think that any of these pieces were originally intended to be used this way but it worked great. The home made tool in the last picture is the adapter between the HF crane and the fork lift.
nice work! you gotta love ways to pick up heavy things you normally would not be able to do with one person.by the way nice equipment ! I love the pullmax. someday want one for myself.
Thanks. The hole saw is an Ultra. They're sold by Missouri tool under the name "rock hard". They have about twice the tooth count than the commonly available tools so they're great for thin wall tubing. When used on pipe or anything much thicker than 0.045" they don't clear chips very well and get worn out pretty quickly.
Wow talk about being inspiring! this is the kind of tool I COULD REALLY USE!
 

bad_idea

Well-known member
Joined
Jun 11, 2011
Messages
4,332
Location
Pasquotank, NC
I don't have any pictures but I end up building all kinds of misc tools working as a Defense Contractor on Navy ships.
 
Last edited:

R.Anderson

Well-known member
Joined
May 26, 2012
Messages
906
Location
Wisconsin
Vise on a pole stand, this comes handy alot. Propane preheat torch and a roller for cutting stock on the bandsaw, are a few I have pictures of.

I can't count/recall all the custom tools I have made to get things done, boring bar holders, lead hammers, wrenches, specialty pliers, knives, PCB drill press, the list goes on.
 

Attachments

  • DSCN3335.jpg
    DSCN3335.jpg
    144.5 KB · Views: 1,087

VC455

Well-known member
Joined
Dec 26, 2009
Messages
222
Location
NH
Vise on a pole stand, this comes handy alot. Propane preheat torch and a roller for cutting stock on the bandsaw, are a few I have pictures of.

I can't count/recall all the custom tools I have made to get things done, boring bar holders, lead hammers, wrenches, specialty pliers, knives, PCB drill press, the list goes on.

Quick question, what the thing on the floor between the roller and pole vise? Red and black thing with what looks like and the air ******.
 

Kevin54

MEMBER EMERITUS
Joined
Jan 12, 2005
Messages
29,341
Location
Urbana, Ohio
attachment.php


A crane. The third picture shows a Harbor Freight pick up bed crane which is mounted to the forks of a Big Joe electric lift which is in the bed of my old Ford camper special. I don't think that any of these pieces were originally intended to be used this way but it worked great. The home made tool in the last picture is the adapter between the HF crane and the fork lift.

So you carried a fullsize Bridgeport in the bed of your truck? How did it drive? I've thought about it but was sort of scared to do it.
 

ckpitt55

Well-known member
Joined
Jan 15, 2011
Messages
108
Location
PA
that 80/20 stuff is pretty sweet. completely configurable to length, extrusion type, channel width, mounting features, etc. not to mention there's about 10 million accessories for anything you could think of. we use it a lot for machine enclosures at work.

really nothing special, but it's a start on a HF bead roller build. using it for a car resto project. used 2" x .125" steel tubing for the frame and angle reinforcements to keep the forks from spreading apart laterally. Needs a bit more reinforcement to the frame and a motor.

IMG_1143_zps9728b6f4.jpg


IMG_1149_zps986a605d.jpg


Drilled pilot holes in the base and used these weld nuts to fit leveling feet. Welding them out was probably overkill but was using them for practice more than anything.

IMG_1146_zps0af82b02.jpg
 
Last edited:
OP
E

E.rodz

Well-known member
Joined
Nov 11, 2009
Messages
2,434
Location
st.paul MN.
So you carried a fullsize Bridgeport in the bed of your truck? How did it drive? I've thought about it but was sort of scared to do it.[/QUOTE] lol. I did that as well in a half ton pick up just flipped the head upside down and lowered the table down as low as it would go.still kind of scary in a 1/2 ton! luckily I only had to go about ten miles!

that 80/20 stuff is pretty sweet. completely configurable to length, extrusion type, channel width, mounting features, etc. not to mention there's about 10 million accessories for anything you could think of. we use it a lot for machine enclosures at work.

really nothing special, but it's a start on a HF bead roller build. using it for a car resto project. used 2" x .125" steel tubing for the frame and angle reinforcements to keep the forks from spreading apart laterally. Needs a bit more reinforcement to the frame and a motor.


Drilled pilot holes in the base and used these weld nuts to fit leveling feet. Welding them out was probably overkill but was using them for practice more than anything.

good idea for the bead roller please post up what you end up using for a motor and a drive system.using some jam nuts on the adjuster feet will help the feet from adjusting them selves every time you have to move it. and some studs welded on the frame to carry your dies would be handy to! keep up the good work and keep us posted!
 
OP
E

E.rodz

Well-known member
Joined
Nov 11, 2009
Messages
2,434
Location
st.paul MN.
here is another one that I built years ago with some scrap from and old conveyor it is a buffer/deburing wheel with a dc motor


alwaysFlOoReD

Well-known member
Joined
Sep 24, 2013
Messages
2,398
Location
Airdrie, Alberta, Canada
^^^ That's cool.
I found this treadmill belt-sander already built with one belt for $30.00. I added a second belt and enclosed the motor board and flipped the board upside down to prevent metal dust build up. I flipped the board after having a little magic smoke action. Luckily not all the magic got away lol, those boards are ~$200.00;


VC455

Well-known member
Joined
Dec 26, 2009
Messages
222
Location
NH
Yep that's a keeper! Brilliant!
Where does one belts that long?
How difficult is it to change belts?
 
To avoid these ads, REGISTER NOW!
Top Bottom