Since I have a wood burner, I have to be home to get it going, but a Wifi t-stat, I can these become very popular.

You are using an out of date browser. It may not display this or other websites correctly.
You should upgrade or use an alternative browser.
You should upgrade or use an alternative browser.
My Garage Refurb
- Thread starter IONH
- Start date
Many times I've been on the road saying to myself, "I should work in the garage when I get home" but that gets delayed by 30-45 minutes waiting for it to heat up after I turn it on. That 30-45 minutes can kill my motivation.
I'm optimistic this will help me be more productive.
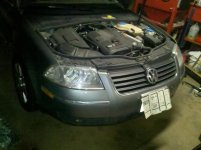
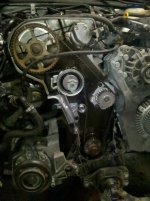
Side note, I am going to do my VW's timing belt and water pump starting tomorrow and hopefully that won't go more than the weekend. Then I might get to actually work on cleaning things up some more and maybe even buy a few lights to toss up. I got rid of one of the engine blocks in the blue car so that freed up a bit of floor space too.
I'm optimistic this will help me be more productive.
Side note, I am going to do my VW's timing belt and water pump starting tomorrow and hopefully that won't go more than the weekend. Then I might get to actually work on cleaning things up some more and maybe even buy a few lights to toss up. I got rid of one of the engine blocks in the blue car so that freed up a bit of floor space too.
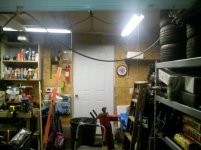
Let there be light !
Let there be light !
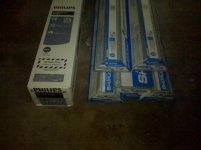
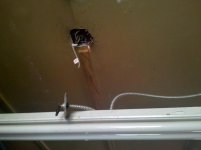
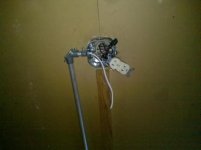
Thanks, I'm excited to get them up. My plan is to remove the two currently switched T12's at the back with 4 of these. The T12's have a flexible conduit coming through a 4" box in the ceiling. I want to replace both of them with outlets and then I can plug the 4 lights into the two outlets.
The lights have a 5 foot cord.
When I redo the ceiling, I'll run conduit and hard wire the lights. That's a ways out though.
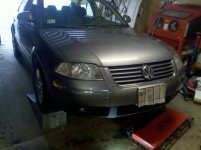
Side note, last weekend I spent doing the timing belt, water pump and other items which were due for my interference VW 1.8T engine.
I had also gone to install a remote start in my mother's 2011 Milan but they sent me the wrong one. I have the right one now and plan to install it Monday.
Few pictures of the VW attached.
I had also gone to install a remote start in my mother's 2011 Milan but they sent me the wrong one. I have the right one now and plan to install it Monday.
Few pictures of the VW attached.
Attachments

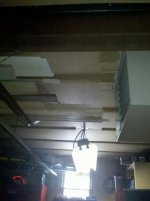
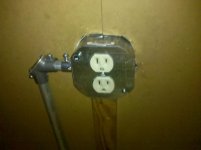
Attached pictures are of the two existing T12 lights I am looking to replace, for now. Seems the simplest place to start because there is already switched power available.
I plan on replacing the 4" box with a single outlet and running the 5 foot cords to it. I believe it is 14 gauge 15 Amp, which should be fine for just 4 lights on the switch/circuit for now.
Each side of the garage is about 12 feet total, not including space taken up by items on the wall.
On the tire side, the light at the outer wall will probably be parallel to the outer wall. The light toward the center of that side will probably be parallel to the back wall / bench.
Same I think for the other side. Outer light parallel to the window with the inner light parallel to the back wall / bench.
Attachments

franksgiants
Active member
- Joined
- Nov 25, 2012
- Messages
- 32
How is that WIFI tsat working for you?I installed one but evry week it seems to go off line and i have to program it?Mine is a little different then yours?
How is that WIFI tsat working for you?I installed one but evry week it seems to go off line and i have to program it?Mine is a little different then yours?
I assume you're talking about the thermostat.
I was a bit concerned about that before the install because my router is at the far opposite end of my house and the Garage PC wouldn't get a reliable signal and I had to put an external antenna on it.
Anyway, the thermostat has 2 of its 4 bars on its display and I've never had a problem with it losing signal as far as I can tell.
By the way, I ran out of propane during the week this week and had to get it filled. I had to shut off the heater which powered off the thermostat. When I had gas again, I turned the heater back on and the thermostat turned on again. The time was reset. I just clicked through the setup and it must have hooked up to my WIFI as it got the time and the prior set temp of 56 on a permanent hold.
That saved me from having to key anything in or use my laptop to set up its WIFI agian. Was probably turned off for 2 full days while my propane was out.
Last edited:
Tonight I picked up 4 lengths of 1/2" conduit and some boxes to put up on the ceiling for the lighting effort. Will be mounted externally to the ceiling.
Hoping to make some progress on this tomorrow night as I'm gone Friday through Sunday but the incoming snow may disrupt that plan. I'm excited to get this going though!
Hoping to make some progress on this tomorrow night as I'm gone Friday through Sunday but the incoming snow may disrupt that plan. I'm excited to get this going though!
dubber
Well-known member
Side note, last weekend I spent doing the timing belt, water pump and other items which were due for my interference VW 1.8T engine.
I had also gone to install a remote start in my mother's 2011 Milan but they sent me the wrong one. I have the right one now and plan to install it Monday.
Few pictures of the VW attached.
Nice garage progress. And well done tackling the timing belt change. Based on year of your passat was that its first or second timing belt change.
Fellow VW fan here.
Nice garage progress. And well done tackling the timing belt change. Based on year of your passat was that its first or second timing belt change.
Fellow VW fan here.
It's a 2005, so the last year of the 1.8T. Has 153k on it now. Having maintenance records from the beginning as the car is a 1 owner, the timing belt was done at 77k, so I was cutting it close as I believe they are due every 80k and I hear lots of stories of non-factory belts failing before even 80k. Just didn't have the garage space to get it done until then.
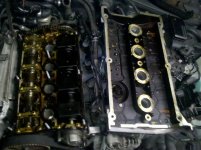
As some "while I'm in there..." I changed the water pump (put in one with a metal impeller), TB tensioner/idler, valve cover gasket, spark plugs (2 were at .060) and thermostat. The thermostat was probably the cause of my P2080 code as the car is now up to temp quickly and rock solid and the heat is amazing.
Unfortunately, found that my oil cooler is probably pushing oil into my coolant so that is on tap to be done within the next couple of weeks as well. Just ordered one from Rock Auto which should be here in a few days. Ticking timebomb even more now that the engine is hitting its 190 instead of hovering around 160-170.
This is my first VW and my first RWD facing engine timing belt job. The bumper removal was a hassle, but hindsight, it was not that difficult to remove and I didn't have an inner fender well right there to fight with so I am not really complaining.


It's amazing how something as simple as a fewmore lights makes a garage so much nicer to work in.
It's amazing how something as simple as a fewmore lights makes a garage so much nicer to work in.
While I do agree completely with your statement, this was not much of a change as the back corner did have its own light already.
I used drywall screws to put the chains up as I don't trust screw hooks. Unfortunately, this means the lights are not removable without a drill or spreading the S hooks at the light.
Do you think I should use screw in hooks? I don't expect to ever remove or "re-height" them.
Also, the lights say not to flush mount, which I was surprised at. It did not list a minimum clearance though. I'm at just 3 loops on the supplied chain for now to get it up nice and close.
My current plan is just 12 lights, but I wanted 16 originally. TBD based on cord length if I'll get to 16 lights or not.
Side note, my VW needs an oil cooler which should get in the garage this week.
I also had an early MGB rolling shell dropped off for me to test fit a turbo 4 cylinder transplant soon, but I think I may get to finish the lighting project first (at least the 12 lights) before that rolls inside.
The oil cooler went much smoother than I expected and I finished it up tonight.
Also I put up the next box down the line on the more cluttered side of the garage. I'm out of ground screws so I could not install any actual outlets tonight unfortunately.
I've also decided to put two outlets in each of the 4" boxes as I think the layout may need 3 in at least one of the boxes.
It's sad that the only fixed lights in the entire front half of the garage are the ones on the garage door openers.
I've got pictures, but the GJ upload isn't working for me right now.
Tonight's itinerary consisted of...
1. Buying another 8 lights.
2. Finishing the twin outlet box wiring on the ceiling.
3. Take down the 4 bulb T12 fixture as it was in the way.
4. Put up another 3 of the new T8 fixtures.
I'd love to post pictures, but I can't upload attachments still.
1. Buying another 8 lights.
2. Finishing the twin outlet box wiring on the ceiling.
3. Take down the 4 bulb T12 fixture as it was in the way.
4. Put up another 3 of the new T8 fixtures.
I'd love to post pictures, but I can't upload attachments still.
Alright, here's a handful of pictures since my last attachment worked.


My wonderful wife wiring up a pair of outlets.

Other side of the garage begins here...


All outlets tested. Should be a breeze to put the lights up at this point. Need to clear off some of the overhead storage though to not block a couple of them.


My wonderful wife wiring up a pair of outlets.

Other side of the garage begins here...


All outlets tested. Should be a breeze to put the lights up at this point. Need to clear off some of the overhead storage though to not block a couple of them.
Put 3 lights on the other side of the garage tonight.
I had to do two of them twice because my estimation on cord length was off by a couple inches so that hurt my interest in doing more tonight.
Also, because of the shelving I do not think it would make sense to put the lighting on the first furing strap. Instead, I'll have to put it halfway between two straps and into the floor joists above the sheetrock.

Please let me know if you can or can't see the pictures since I'm hosting them off the site now.


Bought and put up the last 3 lights tonight!
I needed 2 more bulbs and the cost of 2 bulbs is about $10! I couldn't believe that. The cost of 10 is $26 while the cost of 30 is $55. Wow, talk about motivation to buy a larger pack. That said, I bought a 10 pack to have spares and maybe I'll put a couple up in the attic space of either the garage or the house.


I needed 2 more bulbs and the cost of 2 bulbs is about $10! I couldn't believe that. The cost of 10 is $26 while the cost of 30 is $55. Wow, talk about motivation to buy a larger pack. That said, I bought a 10 pack to have spares and maybe I'll put a couple up in the attic space of either the garage or the house.


Almost 3 months since my last update.
In that time, I sold my Hayabusa and bought a C109 cruiser to replace it, in reverse order. Guess I'm finally getting old (or at least my back is). Successfully rebuilt my wife's Ninja 250 carbs, which I am very proud of myself for. Oh, and I'd also spread 30 yards of loam in a low area of my back yard and planted grass, which is coming up pretty well across most of it. If anyone's interested in pictures of this as well, I'd be happy to post a couple.
When I was buttoning up my wife's 250 last weekend, she was picking up the random bits strewn about the garage from working on her bike and doing a bit of maintenance (plugs/TB sync) to the Busa before its sale. It is amazing how much better it looked by just throwing everything in a tote and getting it off the floor.
I spent tonight going through that tote and picking up more tools that were laying around. Here's a couple pictures of two drawers which were near empty before I started distributing the tools.


And ran across these two sets which I'll put up on CL tonight as I got these for a gift one year and already had them.


I've come to the conclusion that old (prior) vehicles I'd had a lot of parts for but not had the actual vehicles anymore, I should just throw away / scrap the metal and free up that space.
I'd like to say I will get to work on the garage and make it awesome sooner rather than later, but outside projects are taking priority of course. I need to put up another 8x10 shed to put the stuff from under my deck into and then I want to remove the deck and side the back of my house.
In that time, I sold my Hayabusa and bought a C109 cruiser to replace it, in reverse order. Guess I'm finally getting old (or at least my back is). Successfully rebuilt my wife's Ninja 250 carbs, which I am very proud of myself for.
Oh, and I'd also spread 30 yards of loam in a low area of my back yard and planted grass, which is coming up pretty well across most of it. If anyone's interested in pictures of this as well, I'd be happy to post a couple.When I was buttoning up my wife's 250 last weekend, she was picking up the random bits strewn about the garage from working on her bike and doing a bit of maintenance (plugs/TB sync) to the Busa before its sale. It is amazing how much better it looked by just throwing everything in a tote and getting it off the floor.
I spent tonight going through that tote and picking up more tools that were laying around. Here's a couple pictures of two drawers which were near empty before I started distributing the tools.


And ran across these two sets which I'll put up on CL tonight as I got these for a gift one year and already had them.


I've come to the conclusion that old (prior) vehicles I'd had a lot of parts for but not had the actual vehicles anymore, I should just throw away / scrap the metal and free up that space.
I'd like to say I will get to work on the garage and make it awesome sooner rather than later, but outside projects are taking priority of course. I need to put up another 8x10 shed to put the stuff from under my deck into and then I want to remove the deck and side the back of my house.
e-tek
Well-known member
I had long thought there MUST be an iphone -controlled TS - but until now hadn't seen one. THANKS!
I had long thought there MUST be an iphone -controlled TS - but until now hadn't seen one. THANKS!
That thermostat was pretty great. I never saw it go below 40 which suggested to me that it might be maintaining that as a minimum even though I had it set to OFF. However, I put a KILL-A-WATT meter on the heater (wired it to an extension cord instead of hard wire) and it never turned on.
So either it doesn't read below 40 or it never got below 40. I won't know for sure until next winter when I put a second thermometer in there to verify.
I've finally decided to order a couple front garage doors with torsion springs and going to pair them with Liftmaster 8500 wall mount door openers.
That said, if you've been reading this thread, the front wall suffered a significant amount of water and termite damage. I need to rebuild it first.
I started by pulling the electrical away from the center of the front wall. None of it went through the top plate but instead went through the ceiling next to it. Once I pulled the staples, it was easy to get out of the way.

Doors will be installed in 2-3 weeks, so the new wall will be built with the 9x7 doors framed out, but I will have to put up a couple studs in the door opening to close it up until the doors get here.
A good amount of progress on the front wall yesterday.
This is the top rail of one door when attached to the vertical bracket away from the doors. Probably why the door did not go up very smooth. The other side of that door was about just as loose. Lucky it never shook apart.

Look at that termite damage! And my wife using my IR W7150 (can you say overkill) to pull out the bolts holding the last of the garage door rails which were "attached" to the front walls.

Wall gone!

New wall framed. I added a stud to the middle of each side and the center after this picture as the cavities were about 18 inches.
When I first finished up this framing, I measured both door openings and found out the right door (from the outside) opening is actually 1.5" narrower than the left door opening. I had replaced the vertical studs with the same thickness as was originally there as I am replacing the doors with the same 9x7 size. Silly me for not measuring to verify the previous structure. That said, I had 3 vertical studs to each side of the center foundation pier and removed one from the right side so it would be the same width as the left side.
I looked at the old doors and the weather stripping was, in fact, 3/4" further inward on one of the sets of door panels.

Closed up for the night.

Put the corner blocks in. Trying out a design we see on some garages while driving around.


Right door cut out.

Put the sheeting back up to close the door opening. Last time, it was getting late and I'd had a long day so it wasn't up against the floor. This time I put it up better and had to use the tires to keep the bottom pushed in as now the long sheets are flex outward a bit at the bottom.

I'll be reusing those OSB sheets on the walls inside when I'm done.
Closed up for the night.
I've been thinking about what to do to break up the space above the doors. I think I've decided on a 24" octagon window a bit below the security lights. I like the lights being right at the peak so I don't think I will change that.
Here's an example of the window I'm talking about. http://www.homedepot.com/p/Century-...-Grid-and-Screen-21112/100669090#BVRRWidgetID Being openable is a bonus but not required as I do have proper (sofit/ridge) venting up there.
Yikes ! I know your doors are framed in a gable end, but how about tossing in a beam across each door above those doors? This will prevent the area above the doors from sagging and strengthen that end wall.
I think you are talking about studding in above the doors. That will be done, just haven't gotten to it yet. Working on getting the sheeting done so I can close up the outside. The small studs will definitely get in there soon though.
I studded up above the doors today after work. Forgot to take any pictures of that as I was fighting against the sun as it was setting fast.
After that, I cut out the sheathing on the left door.

The foundation, especially in the middle (as pictured) has a very large gap between it and the floor. I'm considering cleaning it out as best as I can and filling it with something. Does anyone think this is where some of my bugs (specifically spiders) are coming from?


Tyvek is up.

Put up the bent trim, came out pretty well for being my first time. Angles all overlap going downward to keep water out.

Closed up for the day. Looks SO MUCH better with the sheets on the inside instead of the outside.

Scored the last in stock octagon window from a local Lowes for $30. I plan on putting this up on the gable of the front of the garage to break up the space. It's about as cheap as a window can get. Missing the interior trim, which is fine as the house doesn't have the dividers. I do plan on changing the house windows when I side it though so, if I end up with dividers, I can put some cheap trim in the garage octagon and no one will be the wiser that they are not real.

Now have two 2 outlet new construction boxes on the outer sections of the front wall. Also ran a line to the back and put it in a junction for the back wall so I can use the same circuit.
For now, I only have a 6 circuit 30A panel in this garage so I need to plan wisely. There are already two 220V breakers (60 gallon compressor and 180 amp MIG welder) in it so, unfortunately, that only leaves me two 110V breakers. In theory, one for lighting and one for everything else. I found out all the lighting and outlets were on one 15A 110V circuit. I am trying to resolve that as I go through all the walls, changing them over to new 12-2 wire tapping into the 20A breaker.
For now, I only have a 6 circuit 30A panel in this garage so I need to plan wisely. There are already two 220V breakers (60 gallon compressor and 180 amp MIG welder) in it so, unfortunately, that only leaves me two 110V breakers. In theory, one for lighting and one for everything else. I found out all the lighting and outlets were on one 15A 110V circuit. I am trying to resolve that as I go through all the walls, changing them over to new 12-2 wire tapping into the 20A breaker.
don long
Well-known member
Man I like the looks of the new garage front.
My first thought when I saw the whole front of the garage gone
was OH what a project.
It is coming along nicely.
My first thought when I saw the whole front of the garage gone
was OH what a project.
It is coming along nicely.