To avoid these ads, REGISTER NOW!

The Outlaw Shed

Outlawmws

Well-known member
Joined
Aug 9, 2011
Messages
39,258
Location
The Badlands
OK, I’ve mentioned the “New Shed” project a number of times, and between procrastination of the restart/completion and now, I finally got (made)time to post the pics and story.

The original plan was to do an “Eco friendly” build (Recycled materials as much as possible) but still have a nice looking shed when done.

Also I wanted to see how much of the materials could be had free/cheap from a number of sources. I’m involved with the local chapter of Freecycle, and of course there are pretty good offerings for free materials on Craig’s List as well sometimes. I would have to buy some things, but wanted to see if most of it could be done without real cost, just labor.

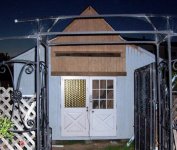
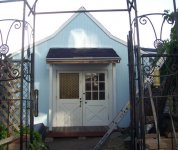
Concrete work gets into $$ fast, and I wanted it able to be at least partly “modular” in the event it was ever needed to be moved. So a wood floor on Pier blocks was the decision. Pier blocks were easy to get for free, as people regularly remove decks around here. I needed 15 for the “foundation” plus three more for the “porch deck” I wanted in front of the double doors. The double doors were planed from the beginning concept to be a pair of 36” reused house doors so there would be no real access issues, and minimal security issues as long as the “fixed” door was anchored well.

Square footage was difficult. My town allows me 120 SF without a permit as long as there is no electrical, no plumbing, and the midpoint on the roof slope is under 12’ (that and the usual setbacks to prop lines and adjacent buildings..)

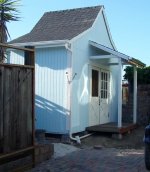
10 X 12 is the obvious answer, but I didn’t like those proportions and it didn’t fit in the “Back 40” well (what we have always called one fenced corner of my 10K sq ft lot). After a lot of playing “What If” I settled on 16 X 7-1/2.

I was planning on using a lot of replaced slab type Garage doors, (ties into the 16’ dimension well…) but was unsuccessful getting a local Garage door company to actually come through for me. The Gen. Manager acted very interested, especially when I offered to provide my plans based on Garage door reuse to his company for free (so they can get more people to come haul off the old doors, which is an ongoing problem to them), but it never happened.

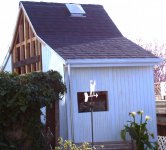
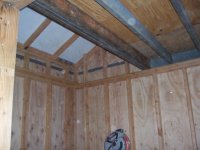
I was more successful getting sheets of plywood from various sources, enough for the floor (3/4”thick as well as enough 4X4 to do most of the floor framing)and all the roof sheathing in ½” ply. There is even enough ¾” left for the porch roof! (Yes it will have a covered porch)
About ½ of all the roofing shingles were free also (someone’s leftovers, all new) and maybe 1/4of the 2X4 framing; the remaining 2X4’s needed were not expensive and I also had some 2X6 redwood deck salvage for joists for a central loft.

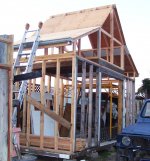
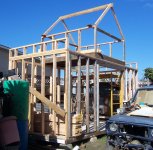
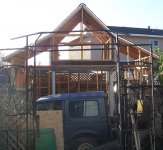
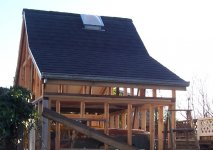
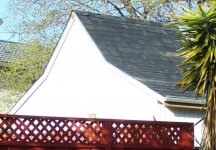
The overall profile is a “barn shape” but NOT Gambrel as I don’t like that look for sheds. This plan would have a steep 12 on 12 central pitch and what wound up to be nearly 6 on 12 for the “wings”. The 7-1/2 ft width allowed me to use full 8ft width on the roofing sheathing.

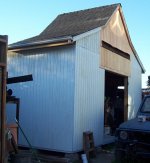
I had salvaged a stack of LONG pallets, for their 1X6 planks (over 8 ft long) and planned to rip those lengthwise for vertical batting on the plain garage door ply, so it would have some architectural flavor instead of just vanilla plain plywood.

About 10 weeks ago I finally got tired of waiting, and we started finishing the framing using new wood. I figured and additional 6-700 in new T1-11 was still cheap compared to even an inexpensive kit. (We had actually built and painted the floor framing and “subfloor” over a year previously in anticipation of the garage door materials)

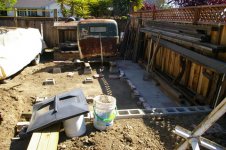
Here is that grading leveling and framing of the flooring, we had to do the final grading and setting pier blocks ½ at a time:

Looking South from the yard to the street:

attachment.php


And west from he Gate to the "Back 40":

attachment.php


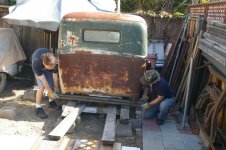
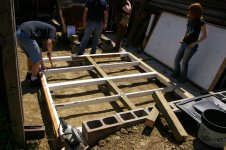
Doing 1/2 the framing/Flooring (Due to space constraints; I had 2 vehicles back there PLUS the 47 cab and frame) at a time:

attachment.php


attachment.php


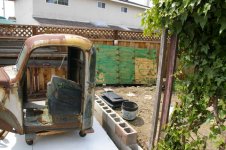
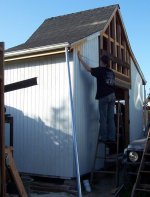
Once one side was done we inched the cab on ramp/rails to the cart it will live on "inside" the shed during the build... (No other practical place for it...)


attachment.php


Moving up the "ramp":

attachment.php


Almost there!

attachment.php
 

Attachments

  • 2+Looking+south+from+the+main+yard (1).jpg
    2+Looking+south+from+the+main+yard (1).jpg
    142.8 KB · Views: 7,141
  • 9c-+Almost+there! (1).jpg
    9c-+Almost+there! (1).jpg
    129.7 KB · Views: 7,016
  • 9a-+1-2-3-INCH! (1).jpg
    9a-+1-2-3-INCH! (1).jpg
    127.8 KB · Views: 7,017
  • 9+Getting+the+47+cab+out+of+the+way (1).jpg
    9+Getting+the+47+cab+out+of+the+way (1).jpg
    122.8 KB · Views: 7,066
  • 7+First+flooring+section+ (1).jpg
    7+First+flooring+section+ (1).jpg
    26.4 KB · Views: 7,068
  • 6+Nailing+in+joist+hangers (1).jpg
    6+Nailing+in+joist+hangers (1).jpg
    130.8 KB · Views: 7,111
  • 1+Looking+West+from+the+gate (2).jpg
    1+Looking+West+from+the+gate (2).jpg
    129.3 KB · Views: 7,092
To avoid these ads, REGISTER NOW!
OP
O

Outlawmws

Well-known member
Joined
Aug 9, 2011
Messages
39,258
Location
The Badlands
We got the Cab on it's new home and started on the second half:

attachment.php


I made Sarah (My youngest) Paint ALL the bottom side Ply with Copper Green despite her "Artistic" attempts...
attachment.php


Floor/Framing is complete.
attachment.php


It's Bigger than it looks:


See!:
attachment.php


And started on framing with salvaged lumber, and doors that later got scraped...
attachment.php
 

Attachments

  • 17+these+go+up+after+the+back+wall+is+brought+in+-+a+complete+Garage+door (1).jpg
    17+these+go+up+after+the+back+wall+is+brought+in+-+a+complete+Garage+door (1).jpg
    131.7 KB · Views: 6,858
  • 15+see- (1).jpg
    15+see- (1).jpg
    106.5 KB · Views: 84
  • 14+It's+bigger+than+it+looks (1).jpg
    14+It's+bigger+than+it+looks (1).jpg
    108.6 KB · Views: 6,849
  • 13+floor+&+frsme+is+complete (1).jpg
    13+floor+&+frsme+is+complete (1).jpg
    123.7 KB · Views: 6,859
  • 11+No+Sarah+-+you+have+to+paint+all+of+it+with+copper+green (1).jpg
    11+No+Sarah+-+you+have+to+paint+all+of+it+with+copper+green (1).jpg
    140 KB · Views: 6,861
  • 10+getting+on+with+the+second+half (2).jpg
    10+getting+on+with+the+second+half (2).jpg
    124.4 KB · Views: 6,886
OP
O

Outlawmws

Well-known member
Joined
Aug 9, 2011
Messages
39,258
Location
The Badlands
About a year and a half go by...

Before we picked it up again about 10 weeks ago. Progress is still slow as I can only really work it on weekends, but most of those have been sunny or good enough to work at least.

Last weekend in Jan: New studs and walls going up in sections:

attachment.php


attachment.php


attachment.php


First weekend in Feb and the roof line starts to appear:

attachment.php


attachment.php
 

Attachments

  • 2-2 Rafters and sheathing.jpg
    2-2 Rafters and sheathing.jpg
    131.4 KB · Views: 6,756
  • 2-2 Rafters.jpg
    2-2 Rafters.jpg
    140.2 KB · Views: 6,772
  • 1-26 framing 3.jpg
    1-26 framing 3.jpg
    130.6 KB · Views: 6,765
  • 1-26 framing 2.jpg
    1-26 framing 2.jpg
    101.9 KB · Views: 6,775
  • 1-26 framing 1.jpg
    1-26 framing 1.jpg
    144.4 KB · Views: 6,776
OP
O

Outlawmws

Well-known member
Joined
Aug 9, 2011
Messages
39,258
Location
The Badlands
Third weekend in Feb gets me a roof:
attachment.php


attachment.php


attachment.php


attachment.php


Fourth weekend and siding starts going up:

attachment.php


attachment.php
 

Attachments

  • 2-24 progress 2.jpg
    2-24 progress 2.jpg
    66.4 KB · Views: 6,652
  • 2-24 progress 1.jpg
    2-24 progress 1.jpg
    92.9 KB · Views: 6,675
  • 2-17 Roofing 3.jpg
    2-17 Roofing 3.jpg
    117.1 KB · Views: 6,695
  • 2-17 Roofing 2.jpg
    2-17 Roofing 2.jpg
    111.5 KB · Views: 6,688
  • 2-17 Roofing 1.jpg
    2-17 Roofing 1.jpg
    103.6 KB · Views: 6,709
  • 2-16 Roofing start1.jpg
    2-16 Roofing start1.jpg
    84.8 KB · Views: 6,719
OP
O

Outlawmws

Well-known member
Joined
Aug 9, 2011
Messages
39,258
Location
The Badlands
First weekend in March more siding:
attachment.php


attachment.php


attachment.php


Second weekend in March gets the siding basically completed:

attachment.php


I hung the doors in mid week, I ran a light to do the work.

attachment.php
 

Attachments

  • 3-12 Progress - Doors.jpg
    3-12 Progress - Doors.jpg
    141.7 KB · Views: 6,634
  • 3-9 progress.jpg
    3-9 progress.jpg
    91.6 KB · Views: 6,628
  • 3-2 progress 3.jpg
    3-2 progress 3.jpg
    127.9 KB · Views: 6,618
  • 3-2 progress 2.jpg
    3-2 progress 2.jpg
    71.8 KB · Views: 6,618
  • 3-2 progress 1.jpg
    3-2 progress 1.jpg
    89.9 KB · Views: 6,637
OP
O

Outlawmws

Well-known member
Joined
Aug 9, 2011
Messages
39,258
Location
The Badlands
Now that it is actually closeable, some interior pics:

attachment.php


attachment.php


attachment.php


attachment.php


attachment.php


attachment.php


attachment.php
 

Attachments

  • 100_3139.jpg
    100_3139.jpg
    136.7 KB · Views: 6,667
  • 100_3141.jpg
    100_3141.jpg
    138.5 KB · Views: 6,678
  • 100_3140.jpg
    100_3140.jpg
    138.6 KB · Views: 6,686
  • 100_3138.jpg
    100_3138.jpg
    135.8 KB · Views: 6,670
  • 100_3137.jpg
    100_3137.jpg
    126.9 KB · Views: 6,669
  • 100_3136.jpg
    100_3136.jpg
    138 KB · Views: 6,678
  • 100_3135.jpg
    100_3135.jpg
    141.5 KB · Views: 6,707
OP
O

Outlawmws

Well-known member
Joined
Aug 9, 2011
Messages
39,258
Location
The Badlands
Detail painting seems to go slow, and the kids aren’t motivated unless I’m there (and not REAL motivated even then…) But here it is now, this past weekend. Outside pics show the back almost (but not quite) done with paint. Mostly it's touch up where its thin in spots in the grooves that didn't quite get paint on the first pass. I think we need one more coat on the top trim as well.


attachment.php


The sides are mostly done, some touch up and the final white on the street side gutter and under the eaves is about it.

attachment.php


The front is 1/2 painted, 1/2 primed and of course the last major construction is the front deck and "porch" roof. You can see the flashing where the roof rafters will tie in. I did get the downspouts made up, and anchored and the girls and I painted those. They are plumbed to a drain that outlets at the foot of the "driveway". I will need to tee in one more down spout to that long cross pipe, from the future gutter on the porch. I even got a start on the Solar corner lights! I will hand a total of 4 more off the porch roof posts as well. I have a larger solar panel that will charge an old car battery, which will run LED lights inside when needed, as well as an Alarm system.


The inside front left corner, with a couple of shelves mostly loaded (probably some re-org before it's all done, but a start), is near done. I have my Oxy Acetylene tanks and hose, my big Prop tank, and an empty Argon tank set in place (I need to get it filled, but that is low priority), and there are tank holding brackets behind there for the straps to anchor to. I need two more straps for the last two tanks.

attachment.php


attachment.php


I’ll post more pics as the thing gets gradually filled. Most of the work lately has been painting which is painfully slow, as I have "let" the kids do most of it. (they are NOT motivated...) but we do make progress, I keep hacking at the mechanics, and am starting to seriously load it up, but ONLY when I have a spot ready for the stuff it's getting; NOTHING is moving in until it's basically right and has a spot...

The last of the major structural is the front deck/porch which also gets a roof, which is waiting for the deck and it’s supporting pier blocks and posts…
 

Attachments

  • 3-31 inside 2.jpg
    3-31 inside 2.jpg
    104.9 KB · Views: 6,647
  • 3-31 inside 1.jpg
    3-31 inside 1.jpg
    93 KB · Views: 6,665
  • 3-31 progress  Front .jpg
    3-31 progress Front .jpg
    67.5 KB · Views: 6,655
  • 3-31 progress  Back .jpg
    3-31 progress Back .jpg
    86.5 KB · Views: 6,687

Jen......

Member
Joined
Jan 24, 2007
Messages
13
thank you for posting pictures , am considering building one of these for my storage area


Jen
 

Amitygravel

Well-known member
Joined
Mar 26, 2010
Messages
1,188
Location
Claremont Illinois
Outlaw !
That shed is just way cool!
Love the fact you are using salvage to do the build.
Nothing like "making" family help too.
Keep the pictures coming man !
 
OP
O

Outlawmws

Well-known member
Joined
Aug 9, 2011
Messages
39,258
Location
The Badlands
Thanks Guys!

Yeah, I really wanted this to showcase what could be done with recycled materials but I needed it complete... I got over 1/4 of it recycled I figure. There is nearly as much recycled ply in it as new T1-11, maybe 1/4of the studs and other 2X materials, about 1/2 the shingles, and the Skylight was supposed to be a $5 yard sale fund but it came without any flashing and it was cheaper to buy that aluminum job than a flashing kit...

Doors and all the 1X material was recycled. The drip edge had to be new, but the gutter was salvaged. Just the end caps and down spouts were new. The big 4" drain pipe was all free leftovers and all the pavers and paving brick, and even the sand has been "come and get it" materials. I have enough of the brick to pave the ENTIRE dirt space once I get about one more yard of sand. That is enough area to park two vehicles, if closely.

I have almost all the materials for the porch deck, and the roof over it, we just need to set the pier blocks... I have the entire south wall insulated with leftover insulation, and a start on another wall, but If I can get the south facing roof insulated, I'd be happy as that and the south wall is probably 80-90% of the heat input. The front will be partially shaded by the porch, from the morning sun, and the back only gets afternoon sun, and we almost always get a nice breeze from that direction in the mid afternoon.

I still want to find a smaller turbine for the top peak of the roof to vent it.
 
Last edited:
OP
O

Outlawmws

Well-known member
Joined
Aug 9, 2011
Messages
39,258
Location
The Badlands
I tried a photographic experiment tonight. a night shot with no flash. point being I was trying to show how the Solar/LED yard lamps did as outside lighting for the shed. You can get a flavor, but the reality is at least 2X better than this pic shows. even with only three on the building, I'd be OK getting to and from without a flashlight. (I might have a bit more issues with using a key in the lock...)

I know this works as I've been taking 4-5 of these up camping for the past few years to mark a path from camp to the privy (Particularly marking obstacles like rocks and logs...), as well as one on my extendable painters pole "flag pole" as a mini beacon for when we drive into camp after dark. (Works great)

After the porch posts are in there will be at least three more on the posts, as with these, facing west and south. There will also be a few at the edges of the small bare dirt sections I will leave on either side of the porch for planting something to green it up a little, and there are two more on the fence on the right side facing the shed and another planter area is planned for that spot, and will also get a few. So with 15-16 of the little suckers, it should be adequate.

attachment.php
 

Attachments

  • night shot.jpg
    night shot.jpg
    60 KB · Views: 5,905
OP
O

Outlawmws

Well-known member
Joined
Aug 9, 2011
Messages
39,258
Location
The Badlands
Thanks guys,

Finished? I'm still working on it! :evil: After the porch deck and roof are on I'm thinking I'm in the market for a rocking char for the closed door side to relax in! :lol:
 
To avoid these ads, REGISTER NOW!
OP
O

Outlawmws

Well-known member
Joined
Aug 9, 2011
Messages
39,258
Location
The Badlands
Thanks again guys.

We got the porch/deck sorted out late Sunday (Leveling and getting it to clear the doors was entertaining...), then decided it needed one more brace under it to reduce the flex of the recycled 2X3 redwood (former pergola). at about 40" I should have known. We did that (well my son did most of it while I was at work, I finished up when I got home one night, and the other nights were taken as I had to rehash my taxes because the damn feds keep kicking it back for errors that don't exist...) and today they got most of the front painted, They need to finish the front roof rafter bits, and paint into the grooves of the t1-11, and Sat. we start on the porch roof. Heck, maybe we can actually finish the ****** thing this weekend...
 
OP
O

Outlawmws

Well-known member
Joined
Aug 9, 2011
Messages
39,258
Location
The Badlands
OK we are almost there! A bit more painting (The white on the porch roof structure is just primer) Staining the deck, som other painting touch up here and there, painting the frame of the old sash window half I installed on the yard side, door locks, and mounting then connecting the front downspout to the drain, and that is it!

attachment.php


I almost Forgot! this is a pic of the old 6 X 6 Arrow shed this one "replaces". (It was near this rusty when we moved in here 25 years ago...)

attachment.php


Back to the shed and a front view:


attachment.php


I also have a weather vane I'm going to put on, and the Solar panel for some 12 V LED Lighting, and we need to get back to the brick pavers. And of course filling it up! (Which is already in progress)

I have some post construction cleanup to get done, I'll Freecycle a bunch of the leftover 1X6's and other lumber leftovers I don't think I can use anytime soon.

I'll continue to post the progress of filling the place up, and then later the re-organization of the Garage.
 

Attachments

  • 4-14 Progress.jpg
    4-14 Progress.jpg
    146.4 KB · Views: 2,495
  • 4-14 Progress Front.jpg
    4-14 Progress Front.jpg
    142.4 KB · Views: 2,473
  • Old.jpg
    Old.jpg
    111.1 KB · Views: 2,470
OP
O

Outlawmws

Well-known member
Joined
Aug 9, 2011
Messages
39,258
Location
The Badlands
OK Quick update; We emptied the metal shed a couple of weekends ago adn stashed almost everything that was in it either inside or under the 47 truck cab, with the exception of a bunch of old Model A/truck banjo style axle housings, which got lined up on either side of the cab.

Last weekend We cleaned up and painted the 10" turbine I got at a yard sale for a fiver, and painted it, then cut a hole and mounted it. Gooped the flange well where it contacts the shingles and nailed it down.

Before painting, as recieved:
attachment.php


After painting and mounting:
attachment.php


What a difference! reasonable hot day today, but its nice inside with a slight breeze making the turbine do it's thing. And it runs dead silent. we cleaned and re-greased the bearings top and bottom so it should be good for many years. we also covered the hole up top with scrap window screen to help keep bugs out, and will add a wood "door" inside to cover the hole in the winter to help hold any heat and minimize the cold... (I do the same with the turbine on my garage every season)
 

Attachments

  • 1a turbine.jpg
    1a turbine.jpg
    138.7 KB · Views: 2,310
  • Turbine.jpg
    Turbine.jpg
    33.3 KB · Views: 2,312
OP
O

Outlawmws

Well-known member
Joined
Aug 9, 2011
Messages
39,258
Location
The Badlands
I forgot to ad, we also pulled the old shed down. (literally threw a rope around it and my three kids and I pulled it over and knocked it apart... ready for the scrapper...)

I was surprised we expected a big hole/burrow under it as a couple of years ago we had a family of skunks denning under it. it was near dead level! I don't know HOW the adults managed it...

The yard look SO much bigger with it gone! and it was only 6X6!
 
OP
O

Outlawmws

Well-known member
Joined
Aug 9, 2011
Messages
39,258
Location
The Badlands
I wish! Maybe "Phase 1, Mission accomplished" - Building the shed. Filling it without wasting space may take as long as it took to build the ****** thing, not to mention the reorg of the garage as we go...
 

timbitca

Well-known member
Joined
Aug 7, 2012
Messages
966
Location
Moncton, NB, Canada
Just found this thread. I always wondered where all the great stuff you get at Garage Sales goes, I guess part of it will go in here ;)

Great looking shed!
 

mooseye

Member
Joined
Jun 21, 2012
Messages
13
Just my safety side coming out, but I don't think it wise to store that propane bottle inside a closed building. I think it is illegal here in the USA.
 
OP
O

Outlawmws

Well-known member
Joined
Aug 9, 2011
Messages
39,258
Location
The Badlands
Just my safety side coming out, but I don't think it wise to store that propane bottle inside a closed building. I think it is illegal here in the USA.

And you would be wrong...

8.3 Storage Within Buildings

8.3.2 Storage within Buildings Frequented by the Public and in Residential Occupancies.

8.3.2.1 The quantity of LP-Gas in cylinders stored or displayed shall not exceed 200 lb (91 kg) in one location, with additional storage separated by 50 ft (15 m). The maximum quantity to be stored in one building shall not exceed 1000 lb (454 kg).
 

Sheriff Roscoe

Well-known member
Joined
Feb 6, 2014
Messages
189
Location
Great Lakes State
I wish! Maybe "Phase 1, Mission accomplished" - Building the shed. Filling it without wasting space may take as long as it took to build the ****** thing, not to mention the reorg of the garage as we go...

Just found this thread and WOW....great job Outlaw! :)

Any pics of Phase II? Looking forward to any updates...
 
OP
O

Outlawmws

Well-known member
Joined
Aug 9, 2011
Messages
39,258
Location
The Badlands
Thanks Sheriff, Naw, Life/work intervened, and I'm at that horrible state of both ate sort of wrecked. as the weather gets nicer (and my garage gets less painful to work in temp wise...) I'll start progressing again. About all that has been added was we got some more free sand, and pushed the brick pavers to the corner of the deck/porch, and west beside the shed where you see some of the sand in that last pic. I probably need about a half yard or more sand to complete the pavers.

But it is definitely weather tight and all that. I still have to deal with my Dad's estate and selling his Mobile home in Idaho, and what not as well, so more "life" to deal with... Heck even something that should be simple to do like getting his ring (The one potentially valuable thing he left) appraised turns out to be a hassle, as there doesn't seem to be a lot of reputable jeweler's around, and the one that seems to be is reputable a PITA to deal with... :dunno: Why can't people meet commitments these days, and run a reasonable operation?
 

-Brent-

Well-known member
Joined
Dec 23, 2009
Messages
4,709
Location
Utah
Sharp little outbuilding! I love that yellow door glass. Too bad you didn't have two of those doors.

I love builds like this, especially because it looks to be a quality built shed.
 

Sheriff Roscoe

Well-known member
Joined
Feb 6, 2014
Messages
189
Location
Great Lakes State
Thanks Sheriff, Naw, Life/work intervened, and I'm at that horrible state of both ate sort of wrecked. as the weather gets nicer (and my garage gets less painful to work in temp wise...) I'll start progressing again. About all that has been added was we got some more free sand, and pushed the brick pavers to the corner of the deck/porch, and west beside the shed where you see some of the sand in that last pic. I probably need about a half yard or more sand to complete the pavers.

But it is definitely weather tight and all that. I still have to deal with my Dad's estate and selling his Mobile home in Idaho, and what not as well, so more "life" to deal with... Heck even something that should be simple to do like getting his ring (The one potentially valuable thing he left) appraised turns out to be a hassle, as there doesn't seem to be a lot of reputable jeweler's around, and the one that seems to be is reputable a PITA to deal with... :dunno: Why can't people meet commitments these days, and run a reasonable operation?

I hear ya Outlaw. Sometimes too many irons in the fire...whether by choice or not by choice (like you're Dad's estate)...it's usually a combination of both. And yes, frustrating when the things that should be simple are not...like the ring ordeal you're dealing with.

Just remember this too shall pass. Hang in there my friend :)
 
To avoid these ads, REGISTER NOW!
Top Bottom