To avoid these ads, REGISTER NOW!

5mall5nail5's Modest 2-car Clean-up and Setup

OP
5

5mall5nail5

Well-known member
Joined
May 23, 2010
Messages
1,174
Location
Bucks County, PA
Thanks guys

For photos I take a mixture of cell phone (galaxy s3) and digital SLR. I like to consider myself more of a photographer but sometimes the cell phone is just too easy so I do it.

I made more of a mess tonight. It feels like I have to make a mess to make it neat - so annoying. I got the remaining two 4' T5HO fixtures up you can see them running parallel to the garage side walls beyond the beam. They light up my work area at my tool box and my sheet metal brake area. I may through one more in the back right corner relative to the photo because that's where my welding table will be, but for now I am good.


Garage lights done by Jon Kensy, on Flickr

Just need to finish up re-running the AC wiring (need an extension ladder... someone help! lol) using 10/2, tucking the wiring through the studs (why the previous owner put it above the studs I'll never know...) and then hanging dry wall. Easy, right? Ugh.
 
To avoid these ads, REGISTER NOW!
OP
5

5mall5nail5

Well-known member
Joined
May 23, 2010
Messages
1,174
Location
Bucks County, PA
Felt like doing something this evening so I first sorted my detailing stuff and put it in one of the cabinets in our laundry room. The benefit here is that the waxes aren't in the heat during summer months or cold during the winter - they should last longer or be more stable.


Detailing Stuffs by Jon Kensy, on Flickr

Then I couldn't sleep, so around 12:30A I went out and applied the privacy film (frosted) I've been meaning to do.


Untitled by Jon Kensy, on Flickr


Untitled by Jon Kensy, on Flickr

It's very simple and elegant once applied properly. The secret is to cut the pieces about 1/4 - 3/8" too large, SATURATE the window (after cleaning!) with distilled water and slide the piece around on the window until its where you need it to be. Then press the water/air out from under it and use a razor to trim the edges. Looks very professional from inside. I need to finish removing the yucky scotch tape that the previous owner used on the inside frames of the windows once the film is dry. They probably taped some sort of paper or plastic in place to do the same thing. Lame.
 

Hugo L.

Well-known member
Joined
Nov 1, 2012
Messages
271
Location
Québec City
Love the frost film. Great job, and keeps your valuable stuff away from prying eyes.

Hugo - that sounds promising. I think though that it's most common to run the lights on a separate circuit so that if you do trip a breaker your lights don't shut off. Traditionally 14/2 on lighting and 12/2 on 20A receptacle wiring, though I think most newer homes they run 12/2 for every outlet and 14/2 for every light fixture, but I can't be sure. How old is your home?

My house was built in 1970. Nothing fancy, but man these were freakin' bunkers. I now know why it was wired with 12/2 : aluminum. They would use one gauge bigger than copper, for everything, to have the equivalent in conductivity and all. So now I bought 12/2 copper wiring to replace 12/2 aluminum. Oh well... It'll be overkill, that's all.
 
OP
5

5mall5nail5

Well-known member
Joined
May 23, 2010
Messages
1,174
Location
Bucks County, PA
Made good progess today - my priority has been to reroute all of the wiring that was on the surface of the wall through the studs. That's when I discovered one of the 12/2 cables was warm to the touch when I went to move it. That queued the last week or two that it took me to repair. I had to run 10/2 romex from the garage panel up through the garage attic into the main attic, across the main attic, to farthest wall on the house, down a conduit, and finally landing on the disconnect nearest the condenser where I also had to repair the wiring from the disconnect to the condenser. All in all it wasn't bad but it took me some time to find an extension ladder long enough to get me up to the attic of my house from the outside. Once I managed that I just needed some help fishing the 10/2 through the various nooks in the house and the rest is history.

Here's my disconnect on the side of the house with two 1/2" conduits using LiquidTight, holding #10 THHN/THWN.


Untitled by Jon Kensy, on Flickr

Below you'll see the attic view of the junction box also with LiquidTight conduit meeting at it. This is where I transitioned from the THHN/THWN to Romex.


Junction box by Jon Kensy, on Flickr

So, with that completed it meant that I already ran the 10/2 to the panel in the garage, so that eliminated the one 12/2 circuit that was hanging down on the studs. I had 3 more to do - one is a circuit that runs into the garage attic for the lighting there, another is a GFCI to a bathroom (on 12/2), and the final one is a 15A 240v circuit on 12/2 to the air handler in the attic. So, had to pop some holes in the studs and had the wiring through there in little time.

What stunk was that the circuit for the bathroom GFCI was about 12" short once I got done rerouting the wiring through the studs. So, since I had a couple hundred feet of 12/2 on hand I put a junction box up in the garage attic out of the way - this afforded me to run the panel to the junction without wasting any material or doing anything ghetto with the (too) short cable.


Junction box in garage attic by Jon Kensy, on Flickr

Here's a pic of the resulting wiring:


Garage Attic Switch wire relocated by Jon Kensy, on Flickr


All wires through studs! by Jon Kensy, on Flickr

Forgive the lack of staples yet - I am going to be fastening to studs and putting up nail plates tomorrow. I also have yet to land the bathroom GFCI circuit down on the circuit panel. That'll happen tomorrow.

Here's what it looked like before cleaning up this wiring:


10/2 Condenser Romex by Jon Kensy, on Flickr


10/2 Romex run by Jon Kensy, on Flickr

Soooo there are only a couple more things to do. I have about 75' of 10/2 laying up in the garage attic that I want to bring across the attic and drop down on the opposite wall for a couple or few quad boxes on my 20A 120v circuit. There's also two circuits running across the front of the garage on the drywall surface so I need to determine what those circuits are doing and then move them. I know one circuit is for a ghetto light inside a coat closet - it doesn't even work, so that'll be removed not moved. The other I think is for the refrigerator in the garage that I am actually having removed on Sept 21, so that circuit should be able to go away as well. Oh, I want to run a 120v surface mount box on the 20A circuit I installed inside the closet in the garage because I have an audio receiver to plug in and my compressor is in there (120v compressor). Then, I have a couple network drops to run and speaker wiring to run. Other than that, we're getting ready for insulation and drywall!
 

Hugo L.

Well-known member
Joined
Nov 1, 2012
Messages
271
Location
Québec City
Ah yes, Monoprice. Once you find out about that site, the price you used to pay for cables at normal retailers makes you sick.

I once got an HDMI cable, a fiber optics one, a coaxial one, a set of component cables, an HDMI hub and a few other tidbits (like a retractable cable to connect my iPod in my car) for less than the cost of a 6 ft HMDI cable at Best Buy.

Loving this thread, great work man.
 
OP
5

5mall5nail5

Well-known member
Joined
May 23, 2010
Messages
1,174
Location
Bucks County, PA
Ah yes, Monoprice. Once you find out about that site, the price you used to pay for cables at normal retailers makes you sick.

I once got an HDMI cable, a fiber optics one, a coaxial one, a set of component cables, an HDMI hub and a few other tidbits (like a retractable cable to connect my iPod in my car) for less than the cost of a 6 ft HMDI cable at Best Buy.

Loving this thread, great work man.

Yep - love Monoprice. Used them to outfight all the CAT6 in my building at work. They were like 1/4 the price of other places on like 2000 cables.

Anyway, been doing stuff over here on the house haven't had much time to work on the garage. One nice thing is that I was able to schedule PECO to come pick up the nasty old refrigerator in the garage! So, I gained a like 36x30" area over by the entrance to the garage! Awesome! And, no more gunky refrigerator. So, that makes room for me to drop my 12/2 cable and run my low voltage stuff. I am going to put RCA/CAT6 on that wall along with at least 2 maybe 3 two-gang boxes on my 20A circuit. Also going to try and drop a 20A and provision a 50A drop into the closet for my current air compressor and future-proof for the 240v compressor I want to get. It should look slick. Then I can insulate and then I can sheet rock the place.


CAT6 Cable by Jon Kensy, on Flickr

Thats my cat getting pumped to fish cable. I told him fishing cable doesn't involve fish... he was less interested.
 

SiGmA_X

Well-known member
Joined
Aug 13, 2005
Messages
1,111
Location
Portland, OR
I have to bug you about what to do for AV wiring on my folks remodel Jon... I'll do that this week :D I look forward to more garage and house project pics, kthx!

Def support the 50amp service in the closet. And a 120v is also ideal, as you may want to run a 120v auto drain or perhaps a contactor relay to switch the compressor + drain on/off...it goes on! IMO its a damn good idea even if you only are going to run a 240v compressor.
 
OP
5

5mall5nail5

Well-known member
Joined
May 23, 2010
Messages
1,174
Location
Bucks County, PA
Thanks Roman - unfortunately didn't get too much done on the garage today. Had to paint more in the master closet project and fix the one BMW. Hopefully this week I'll get a little work done.
 
OP
5

5mall5nail5

Well-known member
Joined
May 23, 2010
Messages
1,174
Location
Bucks County, PA
Thanks Nicobkn

Latest addition to the garage:


My truck! by Jon Kensy, on Flickr

Well, not really a garage addition but I think you guys can see how this works :)

With the new house we need way too many things that are way too large to fit in any of my BMWs or wife's Volvo. So, a co-worker had this 1998 Dodge Ram 1500. Told him if he sells it let me know I'll take it. He called me Saturday saying he was at Dodge looking at a new truck and that he got offered a trade - with a trade theres a $1k rebate from Chrysler. So, we worked it out that he'd trade it in and I'd buy it off the dealer right after. So easy!

Pretty pumped - 4WD, 5.2L, short bed normal cab but so useful for the stuff I need to do. And, she's not in bad shape at all! I got a deal for sure.
 
OP
5

5mall5nail5

Well-known member
Joined
May 23, 2010
Messages
1,174
Location
Bucks County, PA
Hey guys - so I uncovered an issue yesterday while doing work on the garage.


IMG_0352.jpg by Jon Kensy, on Flickr

Here you see the front corner of the garage (nearest the face of the house). It has an external brick wall. Unfortunately it looks like the gutter nearest this corner wasn't functioning properly and water looks to have gone behind the brick and rotted the plywood out along with the wood along the bottom. It's about 12-18" wide of damage from what I can tell. Debating on removing the drywall to the right (its a corner after all) and seeing what's there. Fortunately it has not damaged the studs, but obviously I need to repair this before I can do any further work (of insulating and drywalling).

Can anyone recommend my next course of action? I will get exterior photos in a minute.
 

HSpencer

ALLIANCE MEMBER
Joined
Nov 28, 2010
Messages
2,854
Location
South Central US
I would wear a respirator, overalls, and gloves and scrape or cut all that mold out of there. Seeing how far it goes, I would insure to remove all of it and bleach it out well and let it dry. Then I would install what ever for replacement of the sheathing, and cut out the framing that is damaged. Using treated 2X I would then make new framing of the plate and stud framing lumber I had cut out. I can't see in the photo how high up the bad part goes, but you could sister in new 2X already attached to the new plate. I would go ahead and cut out anything that is wet and nasty. It's not that bad to do and I had to do it quite a bit in apartments that were sided with cedar shingles. Especially those that had poor drainage and usually always under the windows. You might do some kind of termite treatment while you are in there just to make sure the critters won't want to pass through that space.

Best Regards
Herb Spencer
 
Last edited:
OP
5

5mall5nail5

Well-known member
Joined
May 23, 2010
Messages
1,174
Location
Bucks County, PA
Hey guys so to follow up I got pics of the gutter outside/above the exterior wall that has the issue:


Gutter near damaged wall by Jon Kensy, on Flickr


Gutter near damaged wall by Jon Kensy, on Flickr


Gutter near damaged wall by Jon Kensy, on Flickr

So nothing horribly sticks out honestly. The flashing isn't the best, but it's there and covering the area I think water would drop down, though maybe that far left area is suspect. Not sure.

Also, the wall inside is not moldy. Its just rotted/deteriorated plywood. In fact, if you poke the ply wood, it flakes and crumbles - it's not wet in the least. The blackish is the plywood thats rotted and crumbling. The whitish stuff is the mortar from the backside of the brick wall.

That said, I finished the wiring for the most part. I extended my 20A circuit over to the opposite wall of the breaker box (tool box wall). And, what kind of IT guy would have a garage without network drops? That said, I installed two CAT6 drops one w/ RCA connectors that I'll be dropping in the closet to allow me to plug in buddies iphones or androids/pc etc, in order to place music over my sound system. I do have a bluetooth receiver paired up to the tuner but ... just in case.


Punch down tools by Jon Kensy, on Flickr


Network drop 2 w/ RCA by Jon Kensy, on Flickr


Tool box wall receptacles by Jon Kensy, on Flickr


Network drop 1 by Jon Kensy, on Flickr

Those detail oriented people would notice that the tool box wall has 3 drops on the 20A circuit. The was a single gang outlet that feeds a few other locations, so I'd either have to lose it or add a junction box. So, rather than lose the outlet and have an ugly junction box I made it a two gang box and moved it to match my 49" high 20A circuit drops. So, for that wall, we have 16 outlets to plug into - that should work well!

With all of that out of the way the only two annoyances were a 12/2 NM-B hanging down that ran through a hole in a wall into a closet, down, and into the basement to power a finished basements receptacles. Given the basement is not finished totally, and we don't use it, and they need to be on a GFCI, I pulled that circuit off the panel and cut the cable. I am going to pull it back down into the basement and ID it in case we ever finish the basement later or need more power down there and I'll run the wire more professionally. The other annoying circuit there was another 20A circuit that had a refrigerator on it (and the Verizon 48vdc power transformer). I relocated the Verizon hardware nearest the main box and circuit panel and got rid of the fridge so that left a useless and unnecessary single gang 20A circuit over there... chopped that down too (after pulling off of the panel)


Tool box wall by Jon Kensy, on Flickr


Tool box wall after wiring by Jon Kensy, on Flickr

Annnnnd here is the overall effect so far. Still a bunch to do but mostly cost free or very low cost... except for the repair of the plywood corner (sigh).


Garage after wiring by Jon Kensy, on Flickr

That's all I got for now. My knees are KILLING me from crawling across joists in the attic, ugh. Of course I bought knee pads AFTER I crawled around for 2 hours. Oh, the network drops run up to the garage attic, into the main attic, and drop into the closet of my office where I am going to wall mount a 24 port punch panel and Dell managed switch that I have. That's all for now.
 
OP
5

5mall5nail5

Well-known member
Joined
May 23, 2010
Messages
1,174
Location
Bucks County, PA
Thanks Def I agree. I didn't get to make a video of the hose tonight I will soon though.

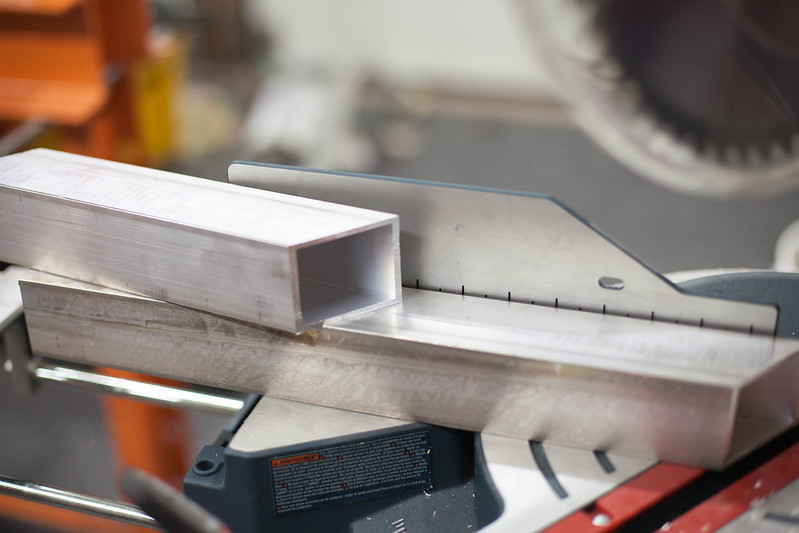
I got home and really had an urge to make something. I planned these speaker mounts in my head and just went at it. Tried something new - cutting aluminum on a wood miter saw. I have heard it works super well and... it does!


Cutting aluminum on miter saw by Jon Kensy, on Flickr


Cutting aluminum on miter saw by Jon Kensy, on Flickr

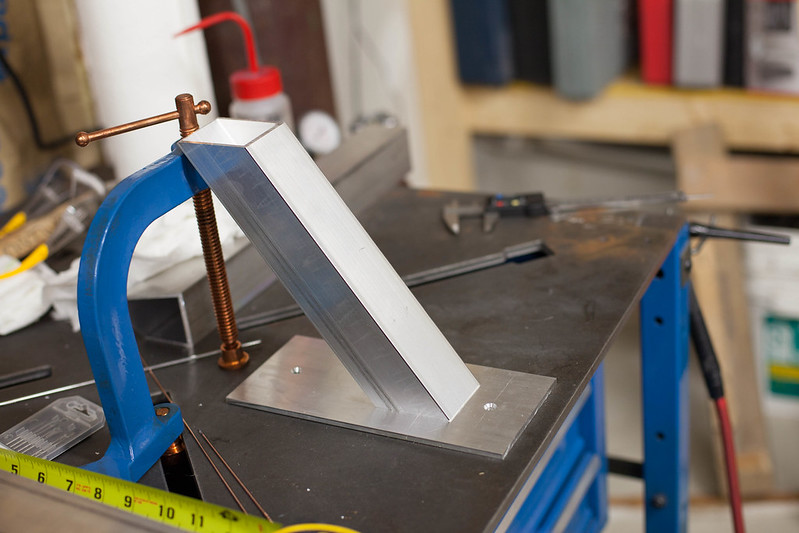
Check out the fit up - can't beat it


Speaker mount fit up by Jon Kensy, on Flickr

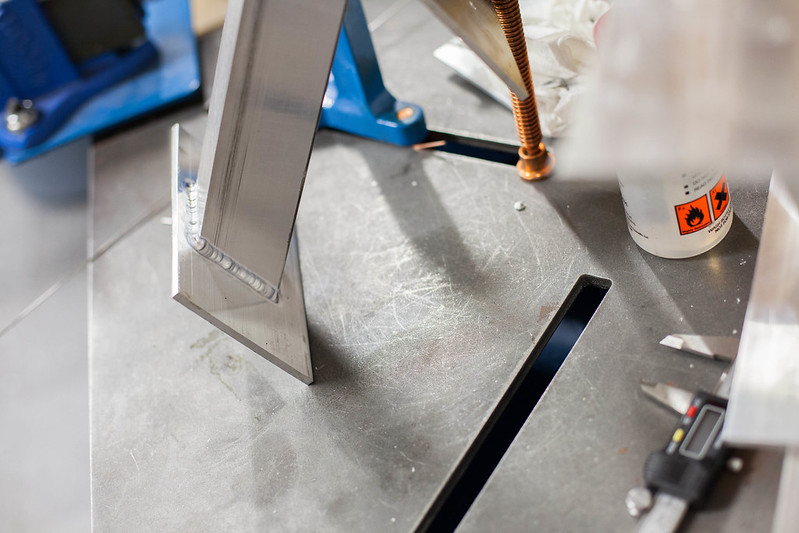
Throwing down the welds!


Speaker mount welds by Jon Kensy, on Flickr

This is 3/16" aluminum both the base plates and the tubing. Pretty taxing on the welder, I just ran it wide open at 180A with a 3/32" tungsten and #10 cup on a WP17 torch.

More welds down


Speaker mount welds by Jon Kensy, on Flickr


Speaker mount welds by Jon Kensy, on Flickr

Both plates welded on


Speaker mount both plates welded by Jon Kensy, on Flickr

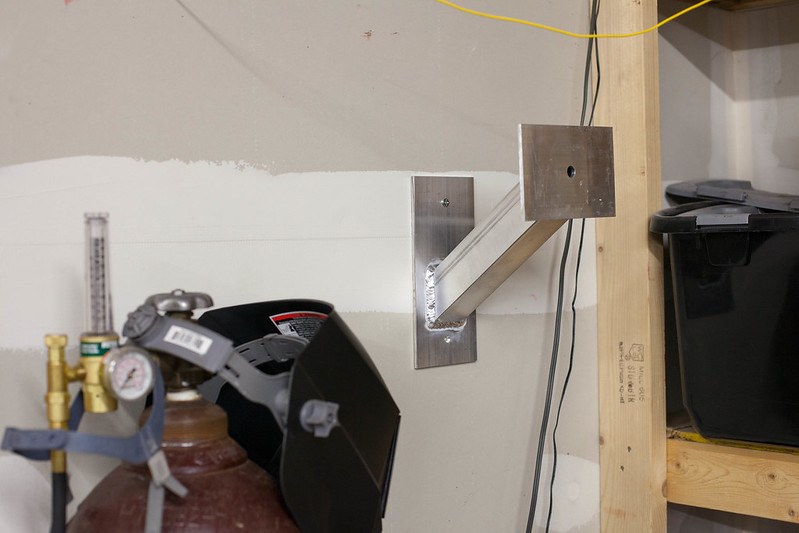
Test mounted on the wall


Speaker mount on wall by Jon Kensy, on Flickr

You'll notice that the two mounting holes are counter sunk for my wood screws. Also, there's a 1/2" or so hole drilled in the center of where the square tube meets each plate. This is because I am going to run the speaker wire through the mount up into the speaker terminals. This will be super sleek because there will be no visible wires.

So now, all I have to do is put up insulation and drywall, prime, paint, and hang these puppies up!
 
OP
5

5mall5nail5

Well-known member
Joined
May 23, 2010
Messages
1,174
Location
Bucks County, PA
Thanks guys - nope, stock wood blade cuts aluminum like butter. I've heard this before but never tried. It was so easy. I have a bandsaw, plasma cutter, and a chop saw, but the miter saw was super easy especially with the angles
 
To avoid these ads, REGISTER NOW!

thetastelingers

Well-known member
Joined
Mar 12, 2007
Messages
718
Location
Soddy Daisy
Great build man. I wasn't aware of the aluminum cutting abilities. Nice to know.
Thanks.

I like your networking and audio wiring. I am going to check out monoprice right meow!
 

SWAGON

Member
Joined
Oct 3, 2013
Messages
14
Looking good, Jon! You will never have a reason to go in the house when you are done :)
 
OP
5

5mall5nail5

Well-known member
Joined
May 23, 2010
Messages
1,174
Location
Bucks County, PA
Great build man. I wasn't aware of the aluminum cutting abilities. Nice to know.
Thanks.

I like your networking and audio wiring. I am going to check out monoprice right meow!

Thanks! The only suggestion I have is ear protection. The metal blade rings pretty loud when cutting its very annoying. Also safety glasses (duh) because you're throwing aluminum chips all over the place. Its messy, but its dry and easy to vacuum up.

Looking good, Jon! You will never have a reason to go in the house when you are done :)

Thanks Brandon - I know, except for food... and drinks... and some place soft to sit lol. Going to install a mini split eventually and get heat/ac in there.
 
OP
5

5mall5nail5

Well-known member
Joined
May 23, 2010
Messages
1,174
Location
Bucks County, PA
So I am learning how to do drywall. Oh boy. Put up the insulation today which went pretty quickly all things considered. I hung the drywall (5/8" x 4' x 8') alone - I do not recommend this in the least! It was hell. But, I got the hardest parts done on this wall. The opposite wall is much easier - its square and the beam isn't in the way, etc.


Insulating by Jon Kensy, on Flickr


Drywall going up by Jon Kensy, on Flickr


Drywall going up by Jon Kensy, on Flickr
 
OP
5

5mall5nail5

Well-known member
Joined
May 23, 2010
Messages
1,174
Location
Bucks County, PA

SiGmA_X

Well-known member
Joined
Aug 13, 2005
Messages
1,111
Location
Portland, OR
Nice work Jon! I have only hung drywall with friends, and it wasn't fun... I can't imagine hanging it by yourself! Good work.
 
OP
5

5mall5nail5

Well-known member
Joined
May 23, 2010
Messages
1,174
Location
Bucks County, PA
Nice work Jon! I have only hung drywall with friends, and it wasn't fun... I can't imagine hanging it by yourself! Good work.

Thanks Roman yeah it was one of the worst things I've had to done. Couple bruises on the drywall too from doing it (the first piece was the worst got better as I went).

So I hung up the last of the large sheets now I need to cut some pieces for the bottom ~1 - 2' footer piece then I can start mudding.


Drywall and additional light by Jon Kensy, on Flickr

I also hung up an additional 48" fixture. The corner near my tig welding table was not quite so nuclear bright as the rest of the garage, so I took care of that :lol_hitti
 
OP
5

5mall5nail5

Well-known member
Joined
May 23, 2010
Messages
1,174
Location
Bucks County, PA
blah i got noooothing done on the garage this weekend because we had to do other house stuff (pick up forniture)

I finally got around to making a ramp for my shed. I put mulching blade/block off plate on the tractor today and it made a huge huge difference. No more raking leaves! Mulch those puppies. I called it quits for the day and then decided that rather than relax for the rest of the day I'd make my shed ramp and get the wood out of my garage.


Shed ramp by Jon Kensy, on Flickr


Shed ramp by Jon Kensy, on Flickr

So nice because, as you can see, I had been doing what the previous owner had been doing (?!??) and stacking wood up each time I wanted to take the tractor out.

The nice part is that all of that wood is now out of the garage
 

nsogiba

Well-known member
Joined
Jan 16, 2013
Messages
232
looks nice. what's to stop the ramp from sinking with time (especially as it gets wet out)? I ask because I'll eventually need to do something similar with mine. I have a nearly identical setup, except it's plywood rather than stacking wood.
 
OP
5

5mall5nail5

Well-known member
Joined
May 23, 2010
Messages
1,174
Location
Bucks County, PA
looks nice. what's to stop the ramp from sinking with time (especially as it gets wet out)? I ask because I'll eventually need to do something similar with mine. I have a nearly identical setup, except it's plywood rather than stacking wood.

The soil under the ramp is extremely packed down - the previous owner had 2x6's laying on the ground for probably 5 years. I actually worried I'd have too hard a time digging down some. In theory it could sink down, but because I built it RIGHT up to the lip of the door bottom that wouldn't necessarily be a bad thing. I don't see if moving very much though I have 5 triangular 2x8's so the load is distributed across a pretty wide area. I could always put gravel down later if it becomes an issue but I really don't expect it to.

I haven't had a chance to work on the garage much as I've been busy doing a ton of other house projects. I want to mud the walls and remedy the opposite wall and hang the dry wall up just have not had a chance. It's getting colder out rapidly here in SE PA. Last night I was using my circular saw in the driveway to cut the shelving for my wifes walk in closet and when I came in I was freezing. Afterward, we agreed a heater for the garage is not a bad idea :)

I ended up picking an electric one out -

17303_400x400.jpg


Fahrenheat Ceiling-Mount 5000 Watt Electric Heater, Model# FUH5-4

Gets great reviews and is only $270 on NorthernTool

I would have preferred a natural gas but I don't have gas at my home. Just oil and electric. I could have done propane but I find the tanks unsightly and the units cost significantly more + plumbing costs. So, this will work for me - I can throw it on for a bit to take the edge off in my newly insulated garage and get work done in some more comfort!
 
OP
5

5mall5nail5

Well-known member
Joined
May 23, 2010
Messages
1,174
Location
Bucks County, PA
I came home and did some work in the garage after making dinner. Wrapped up around 11PM zzz - it's getting down into the 20's at night and prob around 40's during the day this week. That's not very conducive to doing anything in the shop. So, naturally, we need heat:


Making cord by Jon Kensy, on Flickr


Heater installed by Jon Kensy, on Flickr


Heater installed by Jon Kensy, on Flickr

I've got it all wired up using a twist-lock plug and receptacle and hung where I want I just need to land the romex down on the panel. Pretty pumped to churn out some BTU's. This will make it more enjoyable working on stuff this winter.
 
OP
5

5mall5nail5

Well-known member
Joined
May 23, 2010
Messages
1,174
Location
Bucks County, PA
This thing just showed up - I ordered a thermometer for my garage so I can have a clock but also an idea on garage temp and outside temp to better see how well my heater is working and set up my thermostat (the integral thermostat doesn't have degree marks or anything, just positions in general).


La Crosse Station by Jon Kensy, on Flickr

The "Indoor" temp is at my desk (I might have a heater on...)

the "Outdoor" temp is the remote wireless sensor in my lab which is obviously much colder.

I have two "outdoor sensors" so I can do the garage (built into base), attic over garage (just to see how the insulation/heater changes that) and outdoor temp.
 

rixtrix1

Well-known member
Joined
Aug 25, 2013
Messages
3,010
Location
Chandler, AZ (from west NE)
Thanks guys - nope, stock wood blade cuts aluminum like butter. I've heard this before but never tried. It was so easy. I have a bandsaw, plasma cutter, and a chop saw, but the miter saw was super easy especially with the angles

Really neat, Jon. Might mention that your miter saw has 80-100 teeth. A blade with less teeth might hangup and kick back a little. Need to run a bunch of CAT6 throughout our home. Do you need a special tool to put the plugs on? Thanks.
 
OP
5

5mall5nail5

Well-known member
Joined
May 23, 2010
Messages
1,174
Location
Bucks County, PA
Really neat, Jon. Might mention that your miter saw has 80-100 teeth. A blade with less teeth might hangup and kick back a little. Need to run a bunch of CAT6 throughout our home. Do you need a special tool to put the plugs on? Thanks.

Thanks! For CAT6 you just need a conventional crimp tool. For the jacks you need a punchdown tool - neither are super expensive.

I finally got around to (starting) the fix on the "bad wall".


Studs and sheathing removed by Jon Kensy, on Flickr

I pulled the drywall off the right side there (need to square it up for replacement) and managed to cut the sheathing and pull that and all the studs. I twinned up a 2x4 to share the load - I would ordinarily be more concerned except that the sill plates had rotted away and there were essentially 2-3 studs "missing" because the sill plates were gone - yuck!

So, I picked up sill plate foam, 2x4 pressure treated for sill plates, and some Eco Red Shield 2x4's for studs - figured I'd use them since they get good fire resistance review and its a garage so I figure it can't hurt.

So, I picked up a Ramset from my wifes cousin and ran to lowes to grab the blanks and nails - should be good to nail the sill plates tomorrow. I have pressure treated sill plates and pressure treated sheathing to prevent rot in the future.

One cool thing is that its been about 38 - 41 degrees lately (I like winter!). But, with my new handy dandy heater... it's been quite pleasant in the garage. I had the heater set and cycling for about 65 - 66 degrees. It would run for about 10 mins and then be off for about 15 minutes - not bad! That will surely conserve energy vs running full time!


Temp with heater on by Jon Kensy, on Flickr

You can see that it got as high as 69 degrees with a 41.5 exterior temp. I have a wireless temp sensor mounted on the outside of the garage door frame for reference. I have a second wireless sensor to put in the garage attic to see how that temp changes with the heater on or off.

I left to get the tool and hit lowe's, and came into the garage (heater had been off since I left) to see how the temps were - 62.9! The outside had dropped to 39.5 and the heater had been off for an hour and some change and the temp only dropped 7 degrees internally despite a 3 degree exterior temp drop - not bad. I think this whole insulation process might be worth it!


Temp an hour later by Jon Kensy, on Flickr
 
To avoid these ads, REGISTER NOW!
Top Bottom