planecrazy
Well-known member
Friends,
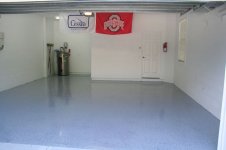
This morning, I walked on my new Legacy Industrial floor for the first time. I'm beyond happy! I still have to put down the Urethane top coat in a few hours but I thought I'd document the process.
My garage is a 450 square foot place to park our cars for the most part. There is no heavy duty work that goes on there, I have another location for that. We've owned this house for two years and when we purchased it, it had a nice looking garage floor with some sort of matt finish coating on it. It was perfect in that it had no flaws or bare spots.
Living in Florida, we like to go barefoot quite a bit. In short order, large flakes of the floor coating was coming off. It would stick to our feet, get in the cars, get in the house, etc. No good!
The original floor.

I debated for a long time what to do about it. I was pretty set on putting down porcelain tile. I've got a construction background and have layed plenty of tile over the years. In my previous house I'd put down a U-Coat It epoxy floor and was never happy with it and that what was causing me to lean towards tile. For some reason I can't explain, I had a change of heart and decided to go with epoxy. To be brutally honest, I chose Legacy Industrial due to the fact that Scotty is on here almost daily giving out advice. I'm sure all the floor coating folks that are here offer great products but I just kept coming back to Legacy Industrial.
I pulled the trigger on the purchase near the end of September. I had vacation coming up in the middle of October and wanted to do it then. I ordered the entire system from Scotty. Gel crack filler, primer, epoxy, flakes, urethane top coat and soft grit. I wanted a non slip floor.
So, The first order of business was to get the old coating off the floor. I checked with all the rental places in town and no one had even heard of a Dimabrush. Home Depot had one and as much as I dislike dealing with big box stores, I rented the Dimabrush and floor machine from Home Depot. It cost me $110 and took about 5 hours. The Floor machine would get to within 1/2" of a wall. To get the last 1/2" and the corners, we used a Bosch multi tool with and abrasive head on it. That worked well as the head is triangular and gets right into the corners.
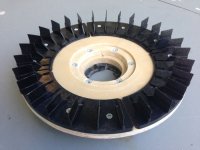
This is the brand new Dimabrush head that Home Depot had.

Halfway through grinding.

All done grinding.

There is no doubt about it, grinding is a dusty project. I didn't want to use any water on the floor because I didn't want to create a mud/slurry that would be even more difficult to get rid of and I didn't want to take the chance of having a failure due to high moisture content in my concrete. I swept the floor, vacuumed it, swept it again, vacuumed it again. Then I used my leaf blower to blow any dust I couldn't see. Then I swept and vacuumed it two more times. It's amazing how much dust you can find. A word of advice. Tape up the door to the house and cover anything you don't want dust on. More on this later but I ended up damp mopping the floor and that got the last of the dust off it. I could then rub my hand on it and not get a dusty hand. At that point, I was ready for primer.
I like to keep my garage clean and have always found that the control joints in the floor do a very good job of collecting debris. For that reason, I wanted to fill the control joints. I used the epoxy gel that Legacy sells. I decided to tackle that by myself the evening after we ground the floor. The directions clearly say, do not mix up any more than you can put down in 5 or 10 minutes. I had 50' of control joint to fill. I mixed up the entire gallon. BIG MISTAKE!! I was working out of a plastic drywall pan and got about 25' done when I went back to the gallon can for more. It was all set up and it had only bee 5 minutes. When I went to pick up the gallon can, I slightly burned my hand due to it being very hot (175 degrees) from the exothermic reaction. To tell you I was dejected that evening would be an understatement. I was highly upset at my dumb mistake. In order to keep my project moving along, I was trying to think of an alternate product to use. The next morning, I got a hold of Scotty and ordered another gallon of Gel. It was an expensive lesson and caused me some delay but in the end, I had enough invested in this floor that I wasn't going to cheap out at this point.
Two days ago, I got my replacement gel and proceeded to finish the job correctly. I mixed up about 1 pint at a time, weighed on a scale, in 1 qt plastic mixing cups. That worked much better! It was time to get this job back on track.
The floor with the cracks filled.

Yesterday morning, I started by removing the water heater. I know it's a bit **** to put a floor under the water heater but I couldn't stand the thought of replacing the water heater some day in the future with one that could be smaller in diameter and having a bare floor ring around it. It is only a 5 minute job to remove the water heater but it does mean cold showers for a couple days. I learned that Florida cold water is not the same as Ohio cold water. It actually isn't too bad.
After the lesson I lesson I learned with the gel, I only mixed up 1 gallon of primer at a time. I was working by myself for this phase and it didn't go too bad. It took me exactly 1 hour to cut in and roll the entire floor.
The primer is down. You can still see the gel crack filler. Don't worry, it disappears with the next step.

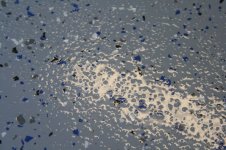
Close up of the primer.

More in the next installment.........
This morning, I walked on my new Legacy Industrial floor for the first time. I'm beyond happy! I still have to put down the Urethane top coat in a few hours but I thought I'd document the process.
My garage is a 450 square foot place to park our cars for the most part. There is no heavy duty work that goes on there, I have another location for that. We've owned this house for two years and when we purchased it, it had a nice looking garage floor with some sort of matt finish coating on it. It was perfect in that it had no flaws or bare spots.
Living in Florida, we like to go barefoot quite a bit. In short order, large flakes of the floor coating was coming off. It would stick to our feet, get in the cars, get in the house, etc. No good!
The original floor.
I debated for a long time what to do about it. I was pretty set on putting down porcelain tile. I've got a construction background and have layed plenty of tile over the years. In my previous house I'd put down a U-Coat It epoxy floor and was never happy with it and that what was causing me to lean towards tile. For some reason I can't explain, I had a change of heart and decided to go with epoxy. To be brutally honest, I chose Legacy Industrial due to the fact that Scotty is on here almost daily giving out advice. I'm sure all the floor coating folks that are here offer great products but I just kept coming back to Legacy Industrial.
I pulled the trigger on the purchase near the end of September. I had vacation coming up in the middle of October and wanted to do it then. I ordered the entire system from Scotty. Gel crack filler, primer, epoxy, flakes, urethane top coat and soft grit. I wanted a non slip floor.
So, The first order of business was to get the old coating off the floor. I checked with all the rental places in town and no one had even heard of a Dimabrush. Home Depot had one and as much as I dislike dealing with big box stores, I rented the Dimabrush and floor machine from Home Depot. It cost me $110 and took about 5 hours. The Floor machine would get to within 1/2" of a wall. To get the last 1/2" and the corners, we used a Bosch multi tool with and abrasive head on it. That worked well as the head is triangular and gets right into the corners.
This is the brand new Dimabrush head that Home Depot had.
Halfway through grinding.
All done grinding.
There is no doubt about it, grinding is a dusty project. I didn't want to use any water on the floor because I didn't want to create a mud/slurry that would be even more difficult to get rid of and I didn't want to take the chance of having a failure due to high moisture content in my concrete. I swept the floor, vacuumed it, swept it again, vacuumed it again. Then I used my leaf blower to blow any dust I couldn't see. Then I swept and vacuumed it two more times. It's amazing how much dust you can find. A word of advice. Tape up the door to the house and cover anything you don't want dust on. More on this later but I ended up damp mopping the floor and that got the last of the dust off it. I could then rub my hand on it and not get a dusty hand. At that point, I was ready for primer.
I like to keep my garage clean and have always found that the control joints in the floor do a very good job of collecting debris. For that reason, I wanted to fill the control joints. I used the epoxy gel that Legacy sells. I decided to tackle that by myself the evening after we ground the floor. The directions clearly say, do not mix up any more than you can put down in 5 or 10 minutes. I had 50' of control joint to fill. I mixed up the entire gallon. BIG MISTAKE!! I was working out of a plastic drywall pan and got about 25' done when I went back to the gallon can for more. It was all set up and it had only bee 5 minutes. When I went to pick up the gallon can, I slightly burned my hand due to it being very hot (175 degrees) from the exothermic reaction. To tell you I was dejected that evening would be an understatement. I was highly upset at my dumb mistake. In order to keep my project moving along, I was trying to think of an alternate product to use. The next morning, I got a hold of Scotty and ordered another gallon of Gel. It was an expensive lesson and caused me some delay but in the end, I had enough invested in this floor that I wasn't going to cheap out at this point.
Two days ago, I got my replacement gel and proceeded to finish the job correctly. I mixed up about 1 pint at a time, weighed on a scale, in 1 qt plastic mixing cups. That worked much better! It was time to get this job back on track.
The floor with the cracks filled.
Yesterday morning, I started by removing the water heater. I know it's a bit **** to put a floor under the water heater but I couldn't stand the thought of replacing the water heater some day in the future with one that could be smaller in diameter and having a bare floor ring around it. It is only a 5 minute job to remove the water heater but it does mean cold showers for a couple days. I learned that Florida cold water is not the same as Ohio cold water. It actually isn't too bad.
After the lesson I lesson I learned with the gel, I only mixed up 1 gallon of primer at a time. I was working by myself for this phase and it didn't go too bad. It took me exactly 1 hour to cut in and roll the entire floor.
The primer is down. You can still see the gel crack filler. Don't worry, it disappears with the next step.
Close up of the primer.
More in the next installment.........
Attachments


Last edited: