To avoid these ads, REGISTER NOW!

Between 485 & 705 SQ/FT Mid-Century Moto Mecca Makeover

Workspaces between 485 and 705 squarefeet.

msgross

Well-known member
Joined
Feb 22, 2013
Messages
331
Location
Central PA
amazing work and documentation, thanks... of course I just wasted a day at work looking through this!
 
To avoid these ads, REGISTER NOW!
OP
S

sakurama

Well-known member
Joined
Oct 10, 2010
Messages
1,458
Location
Portland - the cool one.
Most likely you could have had most of the house done by the amount you've spend on tools, but it would not have been up to your standard. Great work!

Umm, Judiaann subscribes to this thread. I don't think she reads it but just in case can we edit that?

Yeah, I've bought a lot of tools for the whole remodel but if you consider what it would have cost to hire a contractor to do the work (most likely not up to my standards) the tools would pale in comparison to the cost of hiring the work out. Plus, I have them now for future projects so they're an investment. That's how I look at tools - as an investment in myself and my work. I've never regretted buying tools as they always pay back dividends.

Alright, today is trim day.

G
 

mdbeck1

Well-known member
Joined
Mar 7, 2010
Messages
2,297
Location
Norman, OK
So far I'm enjoing your thread and I've joined in kind of late so seeing that you are moving toward trim work I'll try to add a technique to your trim work. You may already know it. It works well on inside corners.

As a kid I helped my cousin work on houses. I say help but I was about 10-12 years old so I mostly stayed out of the way and hauled stuff for him. Anyway, one day he was putting trim on the wall. He was telling me that the walls NEVER make a 90 degree corner so using a miter saw was a problem. He told me that we needed to "cope" them. So I have done this on most of the remodels that I have worked on since and he's right. The walls are never at 90 degrees. Wikipedia has a good example: http://en.wikipedia.org/wiki/Coping_(joinery). Essentially you put a piece of trim flat against one wall from side to side. Then you can cut a 45 on another piece. You can use a coping saw or a box knife but then cut the wood out until it gets rid of the wood in the 45. Then cut a little bit more from the back creating a 85 degree angle in the wood. When you slide your carved piece in next to the piece against the wall it looks like someone cut a 45 with a miter saw. Only you will know until the next guy removes it.

If this explanation doesn't work let me know and I'll set up a model with some pictures.
 

Calvin52

Member
Joined
Feb 20, 2014
Messages
5
^Agreed.

One of the reasons I got hooked on this thread (and the KTM thread) is Gregor's continued focus on the spirit of the project and his persistence in doing the job right.
 

Modern Jess

Well-known member
Joined
Jan 2, 2011
Messages
1,362
Location
Bay Area, California
Please some more info. It sounds interesting, but I don't really get it.:headscrat

A picture is worth a thousand words:

attachment.php


Here's an article that explains it step-by-step:

http://www.hammerzone.com/archives/finishcarp/baseboard/traditional/coped_cut.htm
 

Attachments

  • fcbbtx23b_cope_cut.jpg
    fcbbtx23b_cope_cut.jpg
    45.9 KB · Views: 131
  • fcbbtx31a_cope_cut.jpg
    fcbbtx31a_cope_cut.jpg
    40.7 KB · Views: 5,735

Modern Jess

Well-known member
Joined
Jan 2, 2011
Messages
1,362
Location
Bay Area, California
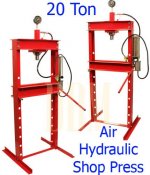
I also went to Harbor Fright with the intention of buying a shop press but I just couldn't do it. It was super cheap but then it was also super cheap. There's just something about a lot of (everything?) there that doesn't seem worth the time to remake in order to make it useable. I'll make a press down the road and do a nicer job but for now I just couldn't accept the sloppy build of it. Anyone have experience with hydraulics? I'm hoping to build a 20T press but with a hand pump instead of the ubiquitous bottle jack.

If you end up deciding to buy a press instead of build one, there does exist a step-up from the HF model with a real ram and a gauge (which I think is an absolute necessity). I have the earlier version of this, which has a different pump. This one looks a bit better.

I press final drive gears on and off of shafts with this.

http://www.amazon.com/dp/B000FVAUCM/?tag=atomicindus08-20
 

Attachments

  • 515crljADoL-1.jpg
    515crljADoL-1.jpg
    43.1 KB · Views: 135
OP
S

sakurama

Well-known member
Joined
Oct 10, 2010
Messages
1,458
Location
Portland - the cool one.
Man, you guys are a wealth of knowledge!

You're right, I have struggled with my miters and I really thought it was me and I'd checked and calibrated the saw the other day too. I suppose I just assumed that the corners were square I and was off but I should know better by now. I'll also admit that I've known of that method of coping molding and it seemed very tedious and so I've never tried it but I watched Tommy do it in that video and tomorrow I'll give it a try. I'm using about the simplest molding there it so there's no excuse.

Anyway, today I wanted to tackle the back of the cabinets under the counter - that place my kids seem to drop food and ants seem to feel is paradise. Since I have the beam detail I decided I wanted to angle a corner in to just sort of accentuate the angle of the under side.

i-msQ2Nxv-XL.jpg


So I started with cardboard to rough the shape. I'm sure there's a way to do this with math but I'm visual so this is my approach.

i-jBLPwsK-XL.jpg


Then a couple of plywood versions to help refine the angles and to give me a template.

i-j6qxqCS-XL.jpg


Which I then very carefully use the wrong way. Note the backwards miter? Damn.

i-cS8JMsT-XL.jpg


Finally I get the shape right but I was down to my last scrap of walnut ply and could only cut it with the grain going the wrong direction. Ain't that a *****? I still have some more walnut so I may decide to try one more time but then I moved on to the main panel which you can sort of see the end of there.

i-D67CDsh-XL.jpg


I was beginning to use the screws that came with the hinges until I came across the ones there in the photo and promptly pulled them out and went to my own screws which required me counter sinking the entire piano hinge.

And that's as far as I got before I had to pick up the kids and go grocery shopping. I'm hoping I can wrap that up tomorrow and then give coping a try.

Gregor

Jess that press looks about perfect and just what I've been hunting for. I might just add that to my cart for a purchase down the road (when a pressing need requires it, so to speak).
 

aggierailroad

Well-known member
Joined
Jan 8, 2012
Messages
581
Location
Houston, TX
Check out thejoyofmoldings.com for some great tips on molding installation. I don't think the built ups will have a place in your home, but the techniques are the same.

Also, Starrett makes a miter "square" at three different price points. Put it into your corner, it will tell you what angle to set your miter saw at for perfect, tight joints. Well worth the $60 or so investment.
 
Joined
Sep 27, 2013
Messages
17
Location
Amherst, NH
Wow just went through all 39 pages....granted it took a couple days but worth it. Your attention to detail is something to be applauded. Great work on the house, its gone through quite a transformation for the better. I love the MCM style and would love to live in one someday. Good call on making it out to the One Show! I followed the coverage online and it looks like an event not to be missed. I'm on the east coast but would love to get out there sometime. Great job with everything and congrats on finally getting moved in!
 

Andrew S

Well-known member
Joined
Nov 16, 2011
Messages
67
Location
Central Washington
Gregor-
I see your ant hotels in a photo above. If you are having trouble with ants, try Sevin dust instead of the traps. It looks like powdered sugar, so make sure it's inaccessible to kids.
If you sprinkle some in the problem areas behind your trim, your kids and pets can't get to it, but the ants will still carry it home and kill off the queen ant.
Only bad thing is all the dead ants you'll have to vacuum up, but the colony will be history.
Andrew
 

gasgas17

Well-known member
Joined
Nov 7, 2009
Messages
443
Location
Nova Scotia, Canada
We generally cut all our outside corners at 46 degrees if the walls are drywall with corner bead. All the inside corners get coped of course.
 

RKA

Well-known member
Joined
Jun 9, 2010
Messages
1,744
Location
NJ
Gregor, you have that angle transfer device on your kapex (left side of the base). Coping is still better for inside corners, but you can use the angle transfer tool on outside corners.
 
OP
S

sakurama

Well-known member
Joined
Oct 10, 2010
Messages
1,458
Location
Portland - the cool one.
Gregor, you have that angle transfer device on your kapex (left side of the base). Coping is still better for inside corners, but you can use the angle transfer tool on outside corners.

I've used it when doing ceiling trim in the strange angles there but hadn't thought to use it for standard 90° corners. I guess I'll try that.

Gregor
 
To avoid these ads, REGISTER NOW!

Pinz73

Member
Joined
Dec 3, 2013
Messages
8
i-QVcVDpF-XL.jpg


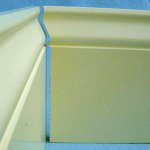
That Woodpecker square has been a great help in keeping things square. Anyway, once the doors were cut allowing for the 3mm edge that I'd planned I couldn't stain or drill the holes for the cup hinges until that showed up.

After seeing this photo I searched for one of those squares only to learn of Woodpecker's one time tool program. I purchased their 1281 square and 24" T and they're beautiful.

Is that square your method for squaring your MFT or are you squaring to the holes via dogs?

Thanks
 
OP
S

sakurama

Well-known member
Joined
Oct 10, 2010
Messages
1,458
Location
Portland - the cool one.
After seeing this photo I searched for one of those squares only to learn of Woodpecker's one time tool program. I purchased their 1281 square and 24" T and they're beautiful.

Is that square your method for squaring your MFT or are you squaring to the holes via dogs?

Thanks

They're stuff is nice and I have a thing for red anodizing from my bmx days.

I made dogs in the lathe and bump the rails to them but double check it with the triangle and also use the triangle for larger crosscuts. One thing I've learned about the one time tool program is to do searches and check eBay. I found the triangle long after the run via a Festool dealer who'd bought a bunch. I make the internet my ***** if I'm looking for something.

Gregor
 

Pinz73

Member
Joined
Dec 3, 2013
Messages
8
Thanks. I've been searching for that square. Apparently there is an online campaign through various forums to bring it back. I'll find it eventually.

In the mean time I'm going to square to my Parf dogs and offset the track with some parallels from my mill so I'm not running through a set of holes.
 

madoc1

Well-known member
Joined
Dec 11, 2012
Messages
1,242
Location
spicewood, tx
sakurama, I read an article this morn on nbc news about a new exhibit at the contemporary jewish museum in s.f. it will feature mcm architecture and design and the jewish influence. thought you might be interested. jim
 
OP
S

sakurama

Well-known member
Joined
Oct 10, 2010
Messages
1,458
Location
Portland - the cool one.
I've been in a down mood recently and it's been hard to work. I finally figured out I was suffering from "nobikeitis" which can strike suddenly when the first luscious warm days of spring arrive and you have no working motorcycle. It is typically sparked by seeing other people riding motorcycles. Lots of them. The bastards.

This week I took a mental health day and just worked in the shop yesterday trying to get the Guzzi into riding shape so that the next warm stretch we have I will have a set of wheels. Since there was only so much I could do on the Guzzi I ended up deciding to just take a little time and fix a watch I picked up on ebay and just get some shop stuff done. I rewired the cold saw coolant pump, made a new arbor for the buffing wheel and then decided to make a hammer. Yeah, I know, wtf right? I've needed a small one for watch stuff and I just wanted to make something that wasn't house related and since I couldn't fix the Guzzi...

i-LRrRjBk-X2.jpg


Anyway, it turned out very well and I think I'll make another one for my boys birthday.

Along the way I remembered another trick for those of you with lathes. As you probably know your tool needs to be centered on your work. The typical way of doing this is to eye the tool at the center of a turned rod or something. It sorta works but it's tedious and not very accurate. "There's a better way" as they say on Fine Homebuilding.

i-PTVDMRR-X2.jpg


Take a small ruler or really any small straight edge type thing and place it between your work and the tools point and then close your crossfeed to trap it. If it's tilted your tool is off center - away from you it's high and pointing to you is low. Back off the crossfeed and adjust your tool post height and when you can pin the ruler vertically you've nailed the height. It's very fast and easy and works with any tool; parting blade, facing, thread turning, etc.

i-p4HRsBJ-X2.jpg


Trim continues to go up slowly.

i-TFc8bLX-X2.jpg


I'm discovering that the true purpose of trim it so make it appear that everything was thought out by covering all the mistakes. Mostly I'm covering historical ones, not so many of my own.

i-9kmKh5x-X2.jpg


The end of the counter has been a ***** but it's almost done.

i-zChjQXb-X2.jpg


i-zKTsZ22-X2.jpg


My wise idea was to embed the outlets in the end of the counter and then cover them with the formica so as to avoid having box covers. Of course it would be a more or less permanent solution and that would most likely be unwise but I really wanted to make that end clean. As if to foreshadow my doubt the two plugs I chose are very difficult to get plugs into... I'm in a holding pattern on glueing that for the moment.

Okay, I need to stop, my nobikeitis is acting up.

Gregor
 

OJ Bartley

Well-known member
Joined
May 18, 2009
Messages
605
Location
Toronto, ON
Gregor, watches too? It's like you intentionally choose hobbies that want to eat all of your time (bikes, tools, photography - OK, that one's work, but same problem). Looks like you're pretty handy with a case opener, do you do much internal work? Those Seikos can have a lot of fun options to customize if you have the steady fingers for it. I learned the hard way that I do not.

I love how those outlets are giving the perfect :eek: face after you isolate them like that.
 

Tyberius

Well-known member
Joined
Nov 26, 2013
Messages
312
Location
Wilmette, IL

I don't understand the use of pocket screws here.

Will the screw holes continue to be exposed?

If they will be filled, it seems like it would be easier to fill them straight on, though maybe you can't put a cleat behind. Though for my money, I'd make the entire back a series of removable panels held in place by cam bolts or some kind of fancy pin. May require a bit of extra framing though.
 
OP
S

sakurama

Well-known member
Joined
Oct 10, 2010
Messages
1,458
Location
Portland - the cool one.
Gregor, watches too? It's like you intentionally choose hobbies that want to eat all of your time (bikes, tools, photography - OK, that one's work, but same problem). Looks like you're pretty handy with a case opener, do you do much internal work? Those Seikos can have a lot of fun options to customize if you have the steady fingers for it. I learned the hard way that I do not.

Watches are sort of recent. Judiaann got sick of me asking her what time it was (she wears a gorgeous old Rolex which I admire but can't/won't afford) and so in my typical fashion I researched the topic to death and chose Seiko because they're plentiful, indestructible, cheap and best of all easy to fool with and modify, which, if you've been following along, is sort of an obsession of mine.

I'm only doing some simple things like dial, hand, crystal swaps but I'm very curious about the actual movement. Of course Ben, my identical twin from different parents, did watch repair in a previous life so he was an inspiration. It's something I mess with at night that's quiet and it's something new to learn.

Here's my first full rebuild from a $40 wreck off ebay:

i-fp8Fbkn-X2.jpg


I don't understand the use of pocket screws here.
Will the screw holes continue to be exposed?

Ah, yes, that does look horrible doesn't it? Well, that's only the base of the cover. It's 1/2" plywood suspended by a full length piano hinge at the top. I'm going to sheathe that with 1/2" walnut ply stained to match the cabinets. I haven't done it yet as I want to incorporate a strip of LED lights behind it and haven't pulled the trigger on the lights yet as I haven't decided on which I want. That and I've had trouble getting a perfectly invisible seam in my plywood panels so I'm considering dividing the panel with a couple of black seams to disguise the joints. Often when I hit a stumble I move to something else and let it soak. In this case I needed to get the basic cover in to keep the food my kids drop from falling into the open backed cabinets. Until we get a dog there's a lot of food hitting the floor...
:dunno:

Gregor
 

akapero

Well-known member
Joined
Mar 3, 2009
Messages
96
Location
EPWV
I've been following this one from the beginning, and it has always been one of my favorites. I may have said it before, but I just wanted to reiterate that I thoroughly enjoy following along on with your endeavors.

Also, I can't think of a single use I have for that little hammer, but it seems I have an almost uncontrollable desire to own one. It makes me want to get into watches just to have reason to buy a hammer like that.

Is that weird? :dunno:
 

dhubbard422

Well-known member
Joined
Jan 16, 2011
Messages
472
Location
Texas Hill Country
Must resist... This garagejournal habit is becoming costly... I still haven't started my workshop build and I am already looking for an old vise and drill press to restore. ;) Now I feel this urge to learn what it takes to customize Seiko watches... BTW, That is a beautiful little hammer too.

Gregor, you are doing amazing things with and in your house/shop! I truly enjoy checking in on your progress regularly.
 

E12-535iTurbo

Well-known member
Joined
Feb 27, 2014
Messages
492
Location
The Netherlands
I'm just continiously wondering where you get the time to work on these things. Two kids, restoring a house, make money to pay for it all and still have little side projects. You must have no friends, no sports and Judiaann has to be doing all the household. Or you sleep less then I do, or just have more hours in a day, or you make very good money and don't need to work as much as normal people do.
 
Last edited:
OP
S

sakurama

Well-known member
Joined
Oct 10, 2010
Messages
1,458
Location
Portland - the cool one.
Now I feel this urge to learn what it takes to customize Seiko watches... BTW, That is a beautiful little hammer too.

Not much really. Check out this link to see a good tutorial.

I'm just continiously wondering where you get the time to work on these things. Two kids, restoring a house, make money to pay for it all and still have little side projects. You must have no friends, no sports and Judiaann has to be doing all the household. Or you sleep less then I do, or just have more hours in a day, or you make very good money and don't need to work as much as normal people do.

Well, I don't have a normal job first of all. I'm freelance so I work far fewer days and get paid far more when I do work. Despite that I've sold three motorcycles and a fair bit of photo gear to fund the remodel and I've not ridden a bike in over a year and that was my main passion in life - so I've sacrificed a fair bit for this. I have a limited social life but I'm hoping to change that this year with more riding. I do side projects at night, only sleep about 5 hours and I've spent most of this past year being broke. That shed any light on it?

Gregor
 

nguyenctx

Member
Joined
Nov 8, 2011
Messages
6
I thought I was a really handyman until I read your thread. is there anything that you don't know how to fix?
 

YoungMedic

Well-known member
Joined
Jul 10, 2012
Messages
170
Location
Florida
Love the watch Gregor!

Quick question about the track saw, does it come with its own systainer? If so what size is it? Ive looked but haven't been able to find a good answer
 
To avoid these ads, REGISTER NOW!
Top Bottom